
Popular categories
Looking for a yarn?


Comments / Questions (60)
![]() Nuria wrote:
Nuria wrote:
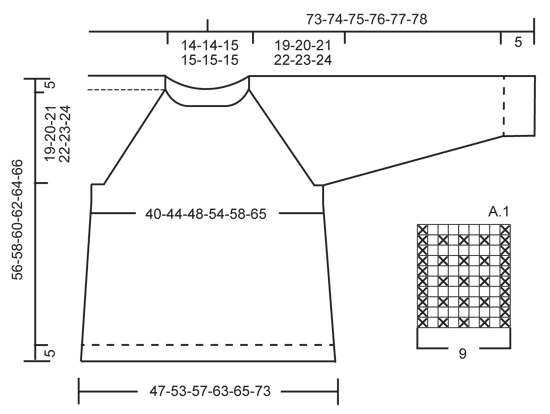
No explica cunado hay que poner los marcadores. ¿Hasta que no se acaban los aumentos del raglan antes y después del A.1, no hay que empezar los aumentos del cuerpo y de las mangas?
13.09.2015 - 10:27DROPS Design answered:
Hola Nuria. Lee atentamente el patrón antes de comenzar. "Tejer los primeros 18-20-22-25-28-32 pts, deslizar los 39-41-43-45-49-51 pts siguientes a un gancho o seguro aux para la manga, montar 8 pts nuevos bajo la manga, insertar un marcapuntos en el centro de estos pts, tejer los 36-40-45-51-56-64 pts siguientes, deslizar los 39-41-43-45-49-51 pts sig a un gancho o seguro aux para la manga, montar 8 pts nuevos bajo la manga, insertar un marcapuntos en el centro de estos pts, tejer los 18-20-23-26-28-32 pts restantes. Y en cuanto a lo segundo si, hasta que no acabes los aum del raglán no hay que empezar los del cuerpo.
15.09.2015 - 09:21
![]() Lisa wrote:
Lisa wrote:
Bonjour, je démarre l'empiècement et je ne comprend pas quelle type d'augmentation je dois faire pour les manches? De même pour les augmentations du dos et devant comment faire 2 mailles ensembles si on s'est arrêté à une maille du marqueur? merci de votre aide
26.02.2015 - 12:24DROPS Design answered:
Bonjour Lisa, on tricote A.1 à chaque raglan (4 fois tout le tour), mais on va augmenter différemment sur les manches et sur le dos/devant. On va ainsi augmenter soit avant A.1 soit après A.1 soit avant et après A.1, en fonction de la taille et des augmentations à faire. Les augmentations du raglan se font avec 1 jeté, tricoté torse à l'end au tour suivant. Bon tricot!
26.02.2015 - 14:51
![]() Stephanie Harrison wrote:
Stephanie Harrison wrote:
I am confused about the increases on the body. The pattern says to knit until one st before marker and then to yo k2 yo... how can you knit 2 if you only have one stitch before the marker? How many sts are supposed to increased every round on the body sections 2 or 4? thanks for your help!
05.02.2015 - 02:50DROPS Design answered:
Dear Mrs Harrison, you start inc when 1 st remain before marker: make 1 yo, then work 1 st, slip marker, work next st and make 1 yo = you have increased 2 sts, 1 st each side of marker, repeat on the 2nd marker of round = you have inc 4 sts on this round, 1 st each side of both markers. Happy knitting!
05.02.2015 - 09:34
![]() Nele wrote:
Nele wrote:
Hi, I understand that you need to increase on each side of every A1 by making 1YO, but I don't understand how it works with the repetitions on the next rounds. When it says for the sleeve "repeat inc every round 6 times", does it mean that you have to make 6 inc on each sleeve? And how do you do that? Should the increases be distributed evenly, like this: inc K inc K inc K inc K inc K inc? And the repeated increases on the body, where do you make those?
12.01.2015 - 22:44DROPS Design answered:
Dear Nele, you inc for raglan with 1 yo before or after A.1, on sleeve when you inc every round 6 times, you will work at the beg of sleeve (= after A.1) with a YO and at the end of sleeve (= before A.1) with a YO (= 2 inc on each sleeve every inc round) - on next round, K YO into back of loop to avoid holes and inc the same way (when inc every round). All inc should be done either side of A.1, but the inc are different on body and sleeves. Happy knitting!
13.01.2015 - 09:43
![]() Sini wrote:
Sini wrote:
Jäin ensikertalaisena jumiin raglanlisäyksiin. Miten niitä siis lisätään? Onko yksi lisäys yhtä kuin yksi silmukka A1:n molemmin puolin eli 2s? Ja mitä tarkoittaa, että niitä lisätään X kertaa jokaisella krs:lla, Y kertaa joka toisella jne?
03.01.2015 - 21:00DROPS Design answered:
Hei! Jokaisella lisäyskerroksella lisätään yht. 8 s. Eli piirroksen A.1 molemmin puolin lisätään aina 1 s. Toistat nämä 8 s:n lisäykset niin monta kertaa, kuin ohjeessa mainitaan oman kokosi kohdalla.
09.01.2015 - 16:29
![]() Øyvor Johanne Angell wrote:
Øyvor Johanne Angell wrote:
Hei! Jeg lurte på om denne oppskriften og bildet samsvarer? Jeg klarer ikke å se at det gjør det...
20.11.2014 - 17:17DROPS Design answered:
Hei Øyvor. Jo, det er det rigtige mönster paa denne genser. Hvor har du problemer?
21.11.2014 - 12:45
![]() Åse wrote:
Åse wrote:
Jeg forstår ikke øketipset som gjelder bolen. Ved beskrivelse av raglan står det at det skal økes på hver side ved å lage 1 kast. Men i øketipset for bol vil det vel bli en økning på 2 masker før og etter? Er det riktig? Og hvis en skal strikke 2 m mellom kastene, vil en jo komme inn i rapport A1? Har prøvd å få svar hos butikken der jeg kjøpte garnet, men de forstod det heller ikke.
01.11.2014 - 10:53DROPS Design answered:
Hej Åse, Når du er færdig med raglan, har sat ærmemaskerne på tråde og skal strikke bolen, så er det du tager 2 m ud i hver side som der står under øketips. God fornøjelse!
03.11.2014 - 10:28
![]() Thora Rytter wrote:
Thora Rytter wrote:
Hvor skal mærkerne til for- og bagstykke være?
04.09.2014 - 15:54DROPS Design answered:
Hej Thora. Du placere maerkerne som der staar i opskriften: Midt mellem de 8 m som du har slaaet op under hvert aerme.
05.09.2014 - 10:26
![]() Thora Rytter wrote:
Thora Rytter wrote:
Hvor skal mærkerne til for- og bagstykke være?
04.09.2014 - 15:53
![]() Sidsel Marie Endresen wrote:
Sidsel Marie Endresen wrote:
Nydelig, denne kan jeg godt tenke meg å lage og å gå med
15.07.2014 - 12:21
|
|||||||
Virginia#virginiasweater |
|||||||
|
|
|||||||
Knitted DROPS jumper with rib and raglan, worked top down in ”Snow”. Size: S - XXXL.
DROPS 157-29 |
|||||||
|
PATTERN: See diagram A.1. The diagram shows all rows in pattern seen from RS. RAGLAN: Inc on each side of every A.1 by making 1 YO. On next round K YOs twisted (i.e. work in back loop of st instead of front) to avoid holes. INCREASE TIP (applies to body): Work until 1 st remains before marker, 1 YO, K 2, 1 YO = 2 sts inc. Repeat in the other side. On next round K YOs twisted (i.e. work in back loop of st instead of front) to avoid holes. DECREASE TIP (applies to sleeves): Dec before marker and 1 st as follows: K 2 tog. Dec after marker and 1 st as follows: Slip 1 st as if to K, K 1, psso. ---------------------------------------------------------- JUMPER: Worked in the round, top down. YOKE: Cast on 52-52-56-56-56-56 sts on circular needle size 8 mm with Snow. Then work rib as follows from mid back: K 1, * P 2, K 2 *, repeat from *-* until 1 st remains, K 1. When rib has been worked for 3 cm, work 1 round in stocking st while AT THE SAME TIME inc 10-10-8-8-10-10 sts evenly = 62-62-64-64-66-66 sts. Now work pattern as follows: 5-5-5-5-6-6 sts in stocking st (= back piece), A.1, 3 sts in stocking st (= sleeve), A.1, 10-10-11-11-12-12 sts in stocking st (= front piece), A.1, 3 sts in stocking st (= sleeve ), A.1, 5-5-6-6-6-6 sts in stocking st (= back piece). There is now 1 repetition A.1 in each raglan. REMEMBER THE KNITTING TENSION! Continue with pattern like this AT THE SAME TIME on next round beg inc for RAGLAN – see explanation above! Inc differently on body and sleeves: BODY: Repeat inc every round 0-2-5-8-10-12 times, every other round 4-4-3-4-4-8 times and every 4th round 5-5-5-4-4-2 times. SLEEVE: Repeat inc every round 6-6-7-7-10-11 times, every other round 3-4-4-5-4-4 times and every 4th round 4 times in all sizes. When all inc are done and piece measures 24-25-26-27-28-29 cm, there are 150-162-176-192-210-230 sts in total on needle. Then continue in stocking st as follows: Work the first 18-20-22-25-28-32 sts, slip the next 39-41-43-45-49-51 sts on a stitch holder for sleeve, cast on 8 new sts under sleeve, insert a marker in the middle of these sts, work the next 36-40-45-51-56-64 sts, slip the next 39-41-43-45-49-51 sts on a stitch holder for sleeve, cast on 8 new sts under sleeve, insert a marker in the middle of these sts, work the remaining 18-20-23-26-28-32 sts. Work the new sts under each sleeve in stocking st. BODY: There are now 88-96-106-118-128-144 sts for body. Continue in stocking st. When piece measures 4 cm from the new sts under sleeve, beg inc on each side of markers - READ INCREASE TIP! Repeat inc every 5½-4½-5-5-6½-7 cm 3-4-4-4-3-3 more times = 104-116-126-138-144-160 sts. When piece measures 51-53-55-57-59-61 cm from shoulder, inc 0-0-2-2-0-0 sts = 104-116-128-140-144-160 sts. Now work rib from mid back as follows: K 1, * P 2, K 2 *, repeat from *-* until 1 st remains, K 1. Continue like this until rib has been worked for 5 cm, cast off with K over K and P over P. SLEEVE: Slip sts back on double pointed needles. Work in stocking st and cast on 8 new sts at the end of row = 47-49-51-53-57-59 sts. Insert a marker in the middle of the new sts under the sleeve. NOW MEASURE THE PIECE FROM HERE. Then work in stocking st in the round – AT THE SAME TIME dec 1 st on each side of marker – READ DECREASE TIP. Repeat dec every other round 2 more times in all sizes = 41-43-45-47-51-53 sts. Then dec every 4-3½-4-3½-3-3 cm 9-10-9-10-12-11 times = 23-23-27-27-27-31 sts. When sleeve measures 42-42-41-41-41-41 cm, inc 1 st in all sizes = 24-24-28-28-28-32 sts. Continue with rib as follows: K 1, * P 2, K 2 *, repeat from *-* until 1 st remains, K 1. Continue like this until rib has been worked for 5 cm. Cast off with K over K and P over P. ASSEMBLY: Sew the holes under the sleeves. |
|||||||
Diagram explanations |
|||||||
|
|||||||
 |
|||||||
Have you finished this pattern?Tag your pictures with #dropspattern #virginiasweater or submit them to the #dropsfan gallery. Do you need help with this pattern?You'll find 21 tutorial videos, a Comments/Questions area and more by visiting the pattern on garnstudio.com. © 1982-2026 DROPS Design A/S. We reserve all rights. This document, including all its sub-sections, has copyrights. Read more about what you can do with our patterns at the bottom of each pattern on our site. |
|||||||


With over 40 years in knitting and crochet design, DROPS Design offers one of the most extensive collections of free patterns on the internet - translated to 17 languages. As of today we count 324 catalogues and 12290 patterns translated into English (UK/cm). 12290
We work hard to bring you the best knitting and crochet have to offer, inspiration and advice as well as great quality yarns at incredible prices! Would you like to use our patterns for other than personal use? You can read what you are allowed to do in the Copyright text at the bottom of all our patterns. Happy crafting!
Post a comment to pattern DROPS 157-29
We would love to hear what you have to say about this pattern!
If you want to leave a question, please make sure you select the correct category in the form below, to speed up the answering process. Required fields are marked *.