
Popular categories
Looking for a yarn?


Comments / Questions (106)
![]() Michelle wrote:
Michelle wrote:
Bonjour, je viens de commencer le modèle, je pense que la première côte mousse est de trop, car elle casse l'harmonie du point,en se trouvant juste à la couture. Est-ce que ce n'est pas mieux de commencer par le premier rang du point ? Merci !
24.11.2023 - 10:04DROPS Design answered:
Bonjour Michelle, je ne suis pas bien sûre de quelle côte mousse vous parlez, mais vous pouvez naturellement adapter les explications à votre goût et/ou à vos envies. Bon tricot!
24.11.2023 - 11:12
![]() Sophie LACAILLE wrote:
Sophie LACAILLE wrote:
Bonjour, J'aimerais savoir où faire les jetés pour le raglan à partir du deuxième rang. Le jeté doit -il être fait avant le premier jeté ou après ?
12.10.2023 - 10:33DROPS Design answered:
Bonjour Mme Lacaille, vous devez augmenter différemment en fonction des marqueurs et sur l'endroit/sur l'envers, vous allez augmenter avant et/ou après les 4 mailles jersey des raglans, donc sur l'endroit et sur l'envers avant et / ou après ces 4 mailles - cf RAGLAN où il est expliqué comment augmenter en fonction du marqueur + sur l'endroit ou sur l'envers. Bon tricot!
12.10.2023 - 14:07
![]() Sophie LACAILLE wrote:
Sophie LACAILLE wrote:
Bonjour, Sur la fin de la capuche, le dernier rang doit être sur l'envers, cela veut-il dire que l'empiècement commence sur un rang envers ? ou au contraire sur un rang endroit ? Je ne comprend pas bien.
09.10.2023 - 09:45DROPS Design answered:
Bonjour Mme Lacaille, le dernier rang de la capuche doit être tricoté sur l'envers, ainsi, le 1er rang de l'empiècement se tricote sur l'endroit. Bon tricot!
09.10.2023 - 10:06
![]() Anja wrote:
Anja wrote:
Ich habe die Jacke aus meiner selbstgesponnenen Alpakawolle gestrickt und sie ist wunderschön geworden! Vielen Dank für die tolle und gut verständliche Anleitung!
25.09.2023 - 12:30
![]() Elizabeth Conlan wrote:
Elizabeth Conlan wrote:
Thank you.
26.11.2022 - 07:01
![]() Elizabeth Conlan wrote:
Elizabeth Conlan wrote:
Hi back again l am doing the increase stitches on the yolk for seperating the sides, arms and back inbetween the four stitches would it be alright if I pick up the strand inbetween the stitches and twisting instead of the yo for increase would it still sit properly do you think. Thanks
25.11.2022 - 06:49DROPS Design answered:
Dear Mrs Conlan, there are several techniques to increase for the raglan, please feel free to use the one you rather. Happy knitting!
25.11.2022 - 08:46
![]() Elżbieta wrote:
Elżbieta wrote:
Witam ponownie. Proszę o wyjaśnienie narzutów ( 4dodatkowych oczek). Robię ścieg francuski, dżersej do 1 oczka lewego, narzut, dalej dżersej A3/A4, dalej do ostatniego oczka lewego włącznie, narzut, tył dżersejem do 1oczka lewego, narzut, A3/A4, dalej przerabiać do ostatniego oczka lewego włącznie, narzut, dalej przerabiać dżersejem i ściegiem francuskim. Czy dobrze zrozumiałam? Dziękuję i pozdrawiam serdecznie 😀
15.11.2022 - 18:56DROPS Design answered:
Witaj Elu, dokładnie jest tak jak piszesz. Zobacz jeszcze korekty do tego wzoru, bo pamiętam, że ostatnio coś było. Miłej pracy :)
16.11.2022 - 14:17
![]() Elżbieta wrote:
Elżbieta wrote:
Dzień dobry, robię kardigan 157-3, rozmiar S. Przerobiłam schemat A1 i A2 aż pierwsze oczko lewe doszło do obszycia. W ostatnim schemacie przerobiłam 2 rzędy A1A2 . Jak przejść do A3 iA4? Czy w pierwszym schemacie przesuwamy oczko lewe tylko w A3? Będę wdzięczna za pomoc i odpowiedź Pozdrawiam serdecznie Ela Paś
07.11.2022 - 10:03DROPS Design answered:
Witaj Elu, dalej przerabiasz schemat A.3 ponad schematem A.1 i schemat A.4 ponad schematem A.2, tzn. że przesuwamy teraz oczka lewe do boków. Zaczynasz schematy od początku. Oczka lewe są przesuwane w obu schematach, czyli A.3 i A.4. Już to poprawiłam we wzorze. Pozdrawiamy!
08.11.2022 - 09:11
![]() Elizabeth Conlan wrote:
Elizabeth Conlan wrote:
Hi back again l am doing the increase stitches on the yolk for seperating the sides, arms and back would it be alright if I pick up the strand inbetween the stitches and twisting instead of the yo for increase would it still sit properly do you think. Thanks
07.11.2022 - 05:45
![]() Elizabeth Conlan wrote:
Elizabeth Conlan wrote:
Hi l am up to shaping raglan sleeves and the yoke the increasing part the first increased set increase in every row which l have in every row, just wondering the next set of increase, increase every row from RS is that still every row or just on the right side only just on the right side of garment, hope you understand this thank you.
26.10.2022 - 22:47DROPS Design answered:
Dear Mrs Conlan, you first increase on every row (= both from the right side and from the wrong side) and then decrease on every other row (only from the right side). Happy knitting!
27.10.2022 - 09:47
|
|||||||
Autumn Getaway#autumngetawayjacket |
|||||||
 |
 |
||||||
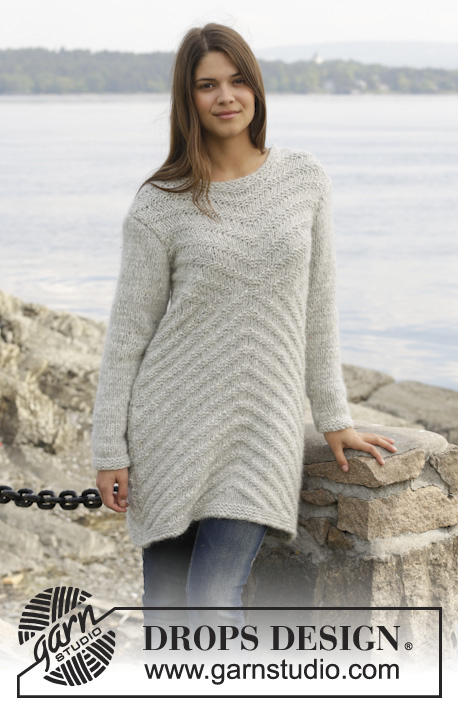
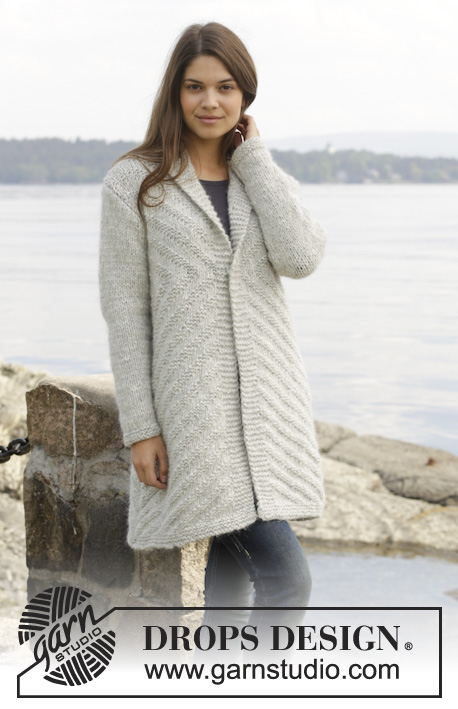
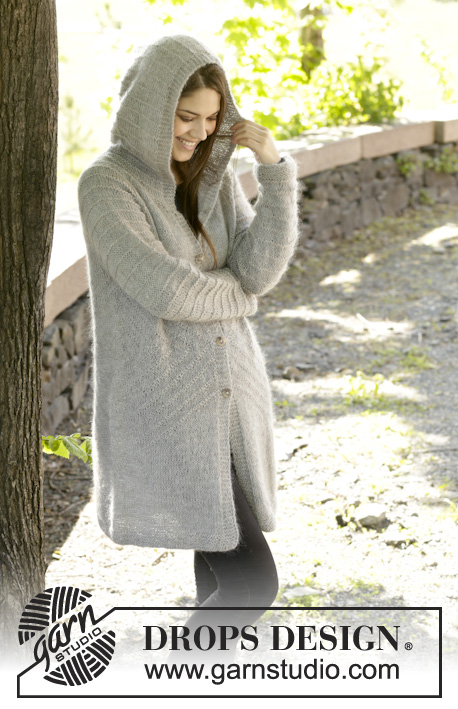
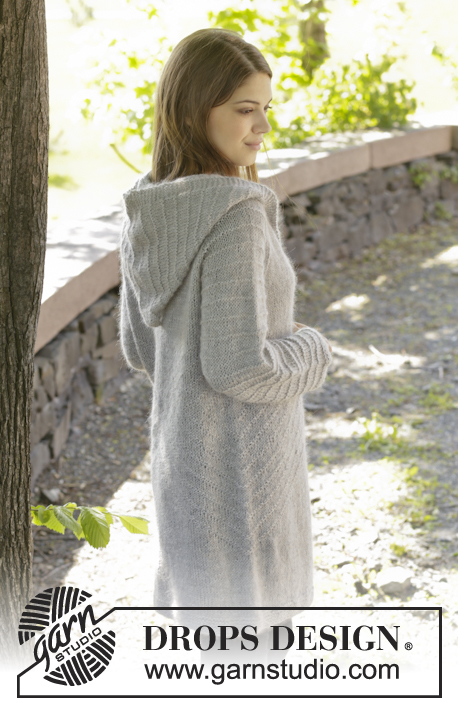
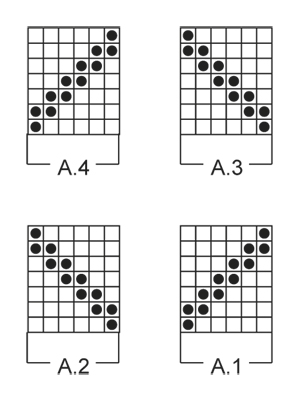
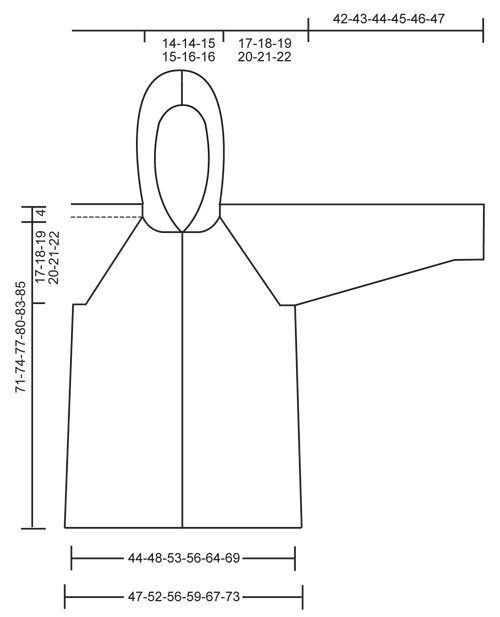
Knitted DROPS jacket with raglan, hood and textured pattern, worked top down in "Alpaca" and "Kid-Silk". Size: S - XXXL.
DROPS 157-3 |
|||||||
|
GARTER ST (back and forth on needle): K all rows. 1 ridge = 2 rows K. GARTER ST (in the round on double pointed needles): * K 1 round and P 1 round *, repeat from *-*. 1 ridge = 2 rounds. PATTERN 1: See diagrams A.1-A.4. The diagrams show all rows in pattern seen from RS. PATTERN 2: Row 1: K from RS. Row 2: P from WS. Row 3: K from RS. Row 4: K from WS. Row 5: K from RS. Row 6: P from WS. Repeat rows 1-6. MEASURING TIP: All measurements must be done when holding the piece up on needle. DECREASE TIP: All dec are done from RS! Dec 1 st before marker as follows: Work until 2 sts remain before marker, slip 1 st as if to K, K/P 1, psso. Dec 1 st after marker as follows: K/P 2 tog. NOTE: Adjust dec according to pattern 2 whether st is worked P or K. RAGLAN: Inc 1 st before 1st-3rd-5th-7th marker and 1 st after 2nd-4th-6th-8th marker. Inc as follows from RS: Work until marker, 1 YO. P YO twisted on next row. Inc as follows from WS: Work until marker, 1 YO. K YO twisted on next row. NOTE: Adjust YO on sleeve according to pattern 2 whether st is worked twisted P or K. BUTTONHOLES: Dec for buttonholes on right band. 1 buttonhole = K tog third and fourth st from edge and make 1 YO. Dec for buttonholes when piece measures: SIZE S: 4, 14, 24, 34 and 42 cm SIZE M: 2, 10, 19, 28, 37 and 46 cm. SIZE L: 2, 11, 20, 30, 40 and 50 cm. SIZE XL: 2, 10, 18, 26, 34, 42 and 50 cm SIZE XXL: 2, 10, 19, 28, 37, 46 and 55 cm SIZE XXXL: 2, 11, 20, 29, 39, 49 and 59 cm ---------------------------------------------------------- JACKET: Worked top down, back and forth on circular needle. HOOD: Cast on 98-98-106-106-114-114 sts on circular needle size 5 mm with 1 strand Alpaca and 1 strand Kid-Silk (= 2 strands). Work 1 ridge in GARTER ST - see explanation above. Work next row as follows: Work 6 sts in garter st, PATTERN 2 – see explanation above, until 6 sts remain, AT THE SAME TIME insert 1 marker after 49-49-53-53-57-57 sts, finish with 6 sts in garter st. When piece measures 26-26-27-27-28-28 cm, dec 1 st on each side of marker – see DECREASE TIP. Repeat dec every 8th row 3 more times = 90-90-98-98-106-106 sts. REMEMBER THE KNITTING TENSION! Work until piece measures 38-38-39-39-40-40 cm – READ MEASURING TIP, adjust so that last row is from WS. Insert 1 marker in the piece. NOW MEASURE PIECE FROM HERE! YOKE: Work 1 ridge while AT THE SAME TIME on 1st row dec 6-6-10-6-10-10 sts evenly = 84-84-88-92-96-96 sts. Work 1 ridge while AT THE SAME TIME on last row inc 8-16-20-36-44-56 sts evenly = 92-100-108-128-140-152 sts. Remember BUTTONHOLES - see explanation above. On next row insert 8 markers in the piece as follows: Work 6 band sts in garter st, 10-12-14-18-21-24 sts in stocking st (= left front piece), insert 1st marker, work 4 sts in stocking st, insert 2nd marker, 12-12-12-14-14-14 sts pattern 2 (= left sleeve), insert 3rd marker, work 4 sts in stocking st, insert 4th marker, 20-24-28-36-42-48 sts in stocking st (= back piece), insert 5th marker, 4 sts in stocking st, insert 6th marker, 12-12-12-14-14-14 sts pattern 2 (= right sleeve), insert 7th marker, 4 sts in stocking st, insert 8th marker, 10-12-14-18-21-24 sts in stocking st and finish with 6 band sts in garter st (= right front piece). Work band sts in garter st until finished measurements. Work sleeves in pattern 2 until finished measurements. Then inc for RAGLAN - see explanation above, as follows: Inc on every row 2-4-6-4-6-8 times, then inc on every row from RS 18-18-18-20-20-20 times = 252-276-300-320-348-376 sts. Piece now measures approx. 17-18-19-20-21-22 cm. Now work next row as follows: Work the first 40-44-48-52-57-62 sts, slip the next 52-56-60-62-66-70 sts on a stitch holder for sleeve, cast on 6 new sts under sleeve, work the next 68-76-84-92-102-112 sts, slip the next 52-56-60-62-66-70 sts on a stitch holder for sleeve, cast on 6 new sts under sleeve, work the remaining 40-44-48-52-57-62 sts. There are now 160-176-192-208-228-248 sts on body. Insert 1 marker in the piece. NOW MEASURE PIECE FROM HERE! BODY: Then work as follows: 6 band sts in garter st, 31-35-39-43-48-53 sts in stocking st, A.1 (= 6 sts), A.2, 62-70-78-86-96-106 sts in stocking st, A.1, A.2, 31-35-39-43-48-53 sts in stocking st, finish with 6 band sts in garter st. P sts in A.1/A.2 are displaced 1 st towards mid front/mid back on every row. When there are 10 sts in stocking st between P sts in each side of piece, beg 1 new repetition of A.1/A.2 vertically. When A.1/A.2 have been worked 1 time vertically, continue to displace P sts on every row until 1st P st meets band in each side of piece. Then work A.3 over A.1 and A.4 over A.2, i.e. now displace P sts towards the side, P sts in are displaced 1 st on every row. When A.3/A.4 have been worked 1 time vertically, continue to displace P sts on every row until they meet in the side. AT THE SAME TIME beg a new repetition of A.3/A.4 every 8th row towards mid front and mid back 3 times in total. When piece measures 28-30-32-34-36-38 cm, inc as follows from RS: Work in garter st and stocking st as before until first P st, 1 YO, work pattern A.3/A.4 as before to and with last P st, 1 YO, work in stocking st over back piece until first P st, 1 YO, work pattern A.3/A.4 as before to and with last P st, 1 YO, work in stocking st and finish with 6 sts in garter st (= 4 sts inc). P YO twisted. Repeat inc every 5 cm 2 more times = 172-188-204-220-240-260 sts. When last P sts meet in the side, continue piece in stocking st with 6 band sts in garter st in each side. When piece measures 50-52-54-56-58-59 cm, switch to circular needle size 4.5 mm and work 6 ridges. Cast off. SLEEVE: Worked in the round on double pointed needles. Slip sts from stitch holder back on double pointed needles size 5 mm. Continue with pattern 2 AT THE SAME TIME on 1st row cast on 6 new sts under sleeve (insert a marker in the middle of the new sts) = 58-62-66-68-72-76 sts. NOW MEASURE THE PIECE FROM HERE. When piece measures 4 cm, dec 1 st on each side of marker. Repeat dec every 3-3-2½-2½-2½-2½-2 cm 10-11-12-12-13-15 more times = 36-38-40-42-44-44 sts. When piece measures 38-39-40-41-42-43 cm, switch to double pointed needles size 4.5 mm and work 6 ridges in GARTER ST - see explanation above! Cast off. ASSEMBLY: Sew the openings under the sleeves tog. Place the hood double and sew it tog at the top. Sew the buttons on to left front piece. |
|||||||
Diagram explanations |
|||||||
|
|||||||
 |
|||||||
 |
|||||||
Have you finished this pattern?Tag your pictures with #dropspattern #autumngetawayjacket or submit them to the #dropsfan gallery. Do you need help with this pattern?You'll find 24 tutorial videos, a Comments/Questions area and more by visiting the pattern on garnstudio.com. © 1982-2026 DROPS Design A/S. We reserve all rights. This document, including all its sub-sections, has copyrights. Read more about what you can do with our patterns at the bottom of each pattern on our site. |
|||||||


With over 40 years in knitting and crochet design, DROPS Design offers one of the most extensive collections of free patterns on the internet - translated to 17 languages. As of today we count 324 catalogues and 12290 patterns translated into English (UK/cm). 12290
We work hard to bring you the best knitting and crochet have to offer, inspiration and advice as well as great quality yarns at incredible prices! Would you like to use our patterns for other than personal use? You can read what you are allowed to do in the Copyright text at the bottom of all our patterns. Happy crafting!
Post a comment to pattern DROPS 157-3
We would love to hear what you have to say about this pattern!
If you want to leave a question, please make sure you select the correct category in the form below, to speed up the answering process. Required fields are marked *.