
Popular categories
Looking for a yarn?


Comments / Questions (206)
![]() Tina wrote:
Tina wrote:
Buongiorno, vorrei sapere usando la lana DROPS Aplaca gruppo A, se devo usare sempre due fili nella lavorazione del maglione, per una taglia M , e i ferri da usare sono quelli del modello quindi n5 o devo usare quelli riportati sul gomitolo quindi n3 grazie
30.10.2022 - 07:16DROPS Design answered:
Buongiorno Tina, DROPS Alpaca appartiene al gruppo filati A, quindi deve comunque lavorare con 2 fili e con un nunero di ferri che le permette di ottenere il campione indicato. Buon lavoro!
30.10.2022 - 10:08
![]() Françoise wrote:
Françoise wrote:
Ah! oui j'ai compris, il s'agit de diminutions 😉
26.10.2022 - 16:43
![]() Françoise wrote:
Françoise wrote:
Bonjour,ma question concerne le diagramme du dessin:au sommet de chaque motif aucun jeté n'est indiqué.Comment compense-t-on les 2 mailles manquantes après la double diminution du centre?
26.10.2022 - 16:30DROPS Design answered:
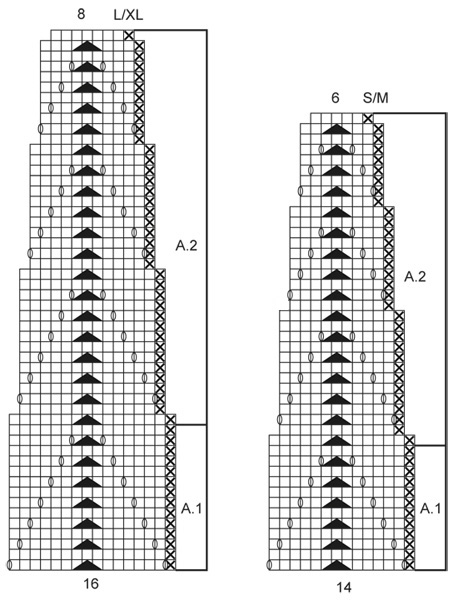
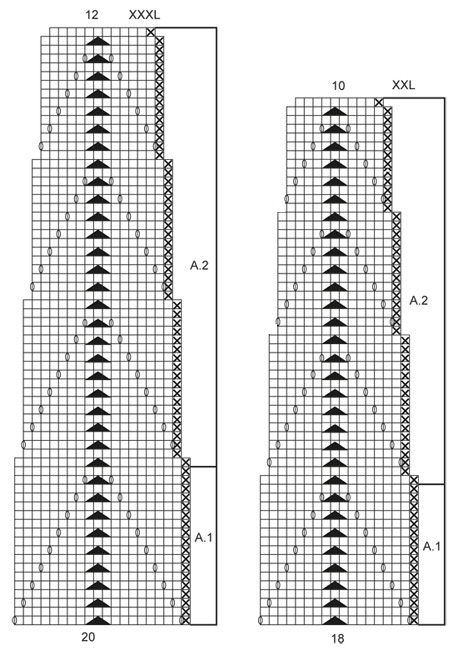
Bonjour Françoise, cette double diminution n'est pas compensée sur ce tour, autrement dit, vous terminez le diagramme avec 6 mailles (S/M), 10 mailles (L/XL et XXL) ou 12 mailles (XXXL). Bon tricot!
26.10.2022 - 17:04
![]() Rosy wrote:
Rosy wrote:
Dov’è il diagramma A1 e A2?
04.10.2022 - 12:24DROPS Design answered:
Buonasera Rosy, può trovare i diagrammi A.1 e A.2 scorrendo in fondo la pagina. Buon lavoro!
04.10.2022 - 19:39
![]() Stanislava wrote:
Stanislava wrote:
Hello, would you please explain in more details the: "slip 1 st as if to K, K 2 tog, psso" and "1 YO between 2 sts" in the knitting instructions? Do you have video available for that technique? Thank you for the great patterns!
31.08.2022 - 13:54DROPS Design answered:
Dear Stanislava, see our video showing how to slip 1 as if to K, K2 tog, psso and how to make a yarn over between 2 sts; ex. Row 1 in A.1: *P1, YO, K7, slip 1, K2 tog, passo, K7, YO*, repeat from *-*. Happy knitting!
31.08.2022 - 15:12
![]() Rosemarie Herrmann wrote:
Rosemarie Herrmann wrote:
Anleitung 150-7:Ab wann beginnt A. 2.?
25.02.2022 - 18:30DROPS Design answered:
Liebe Frau Herrmann, bei der Passe stricken Sie zuerst A.1 dann stricken Sie A.2 - siehe RAGLAN (was hier nicht genau stimmt, da es keinen Raglan ist, das wird korrigiert, danke für den Hinweis) . Viel spaß beim stricken!
28.02.2022 - 08:51
![]() Maya wrote:
Maya wrote:
Zu diesem Modell habe ich eine Frage, und zwar; wie sieht der Ausschnitt am Rücken aus? Ist er nicht sehr tief, wenn man gleich wie Vorne einfach in Runden strickt? Kann mir das jemand beantworten, der dieses Modell schon gestrickt hat? Danke scho im voraus.
29.10.2021 - 18:00DROPS Design answered:
Liebe Maya, ja, der Rückenausschnitt ist vergleichsweise tief, da er nicht höher gestrickt wird als der vordere Halsausschnitt. Viel Spaß beim Stricken!
30.10.2021 - 11:56
![]() Nicole wrote:
Nicole wrote:
Ich sehe gerade, dass das Erklärvideo für die Zunahmen neben dem Markierer sich nicht mit der Beschreibung bei diesem Modell deckt. Da ist ein Umschlag angegeben, den ich, direkt nebeneinander, verschränkt stricken soll. Dann hätte ich ja ein riesen Loch. Vielleicht einmal korrigieren?
03.05.2021 - 20:55DROPS Design answered:
Liebe Nicole, wenn Sie bei den Ärmel mit 1 Umschlag zunehmen, dann am besten stricken Sie die 2 Umschläge mit 2 Maschen dazwischen (= 1 Umschlag, 2 Maschen mit der Markierung zwischen diesen beiden Maschen), 1 Umschlag) und bei der nächsten Runde stricken Sie die Umschläge rechts verschränkt. Viel Spaß beim stricken!
04.05.2021 - 07:46
![]() Nicole wrote:
Nicole wrote:
Ich bin am Ärmelende und soll 14 M in der letzten A1 Runde abnehmen. Der Marker sitzt ja auf einer Masche, neben der ich vor A1 ja die Zunahmen gemacht habe. Zähle ich vor dieser Markermasche 7 M ab zum abnehmen und die markierte Masche ist dann die 8.?
02.05.2021 - 12:26DROPS Design answered:
Liebe Nicole, die Markierung (wo Sie zugenommen haben) soll in der Mitte von dem 1. A.1 der Runde sein, Sie ketten jetzt die 14 Maschen von diesem 1. A.1 der Runde ab = 7 Maschen vor der Markierung + 7 Maschen nach der Markierung = 1. A.1 der Runde. Viel Spaß beim stricken!
03.05.2021 - 08:44
![]() Cristina wrote:
Cristina wrote:
Buona sera, avrei un’altra domanda sull’alzata. ho dovuto rimpicciolire i diagrammi perché troppi grandi per me, quindi ho fatto un diagramma A.1 che parte con 12 maglie e finisce in un diagramma A.2 con 4 maglie. Quindi alla fine dell’ultimo ferro del diagramma A.2 mi rimangono 64 maglie. Di quante maglie devo diminuire nel corso del ferro a dritto subito dopo il diagramma A.2? E in seguito, quante maglie dovrò lavorare in totale nella mia alzata? Grazie mille
18.04.2021 - 01:29DROPS Design answered:
Buonasera Cristina, purtroppo in questa sede non possiamo adattare le spiegazioni alle modifiche personali, ma può rivolgersi al suo rivenditore DROPS di fiducia. Buon lavoro!
18.04.2021 - 18:12
|
|||||||||||||
Fox Sweater#foxsweater |
|||||||||||||
|
|
|||||||||||||
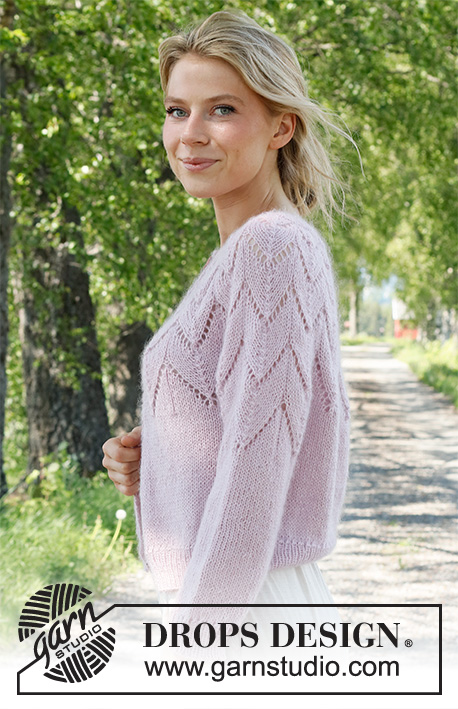
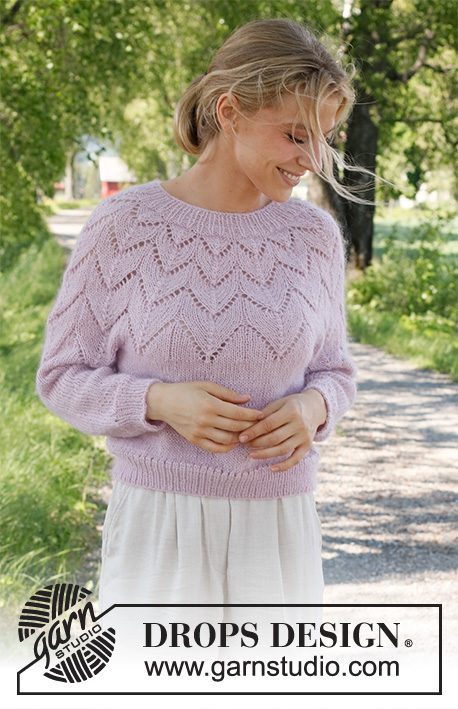
Knitted DROPS jumper with round yoke and lace pattern in ”BabyAlpaca Silk”, ”Kid-Silk” and ”Glitter”. Size: S - XXXL.
DROPS 150-7 |
|||||||||||||
|
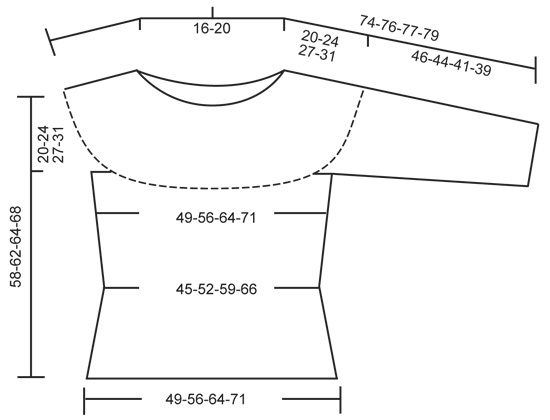
GARTER ST (in the round on circular needle): * K 1 round and P 1 round *, repeat from *-*. 1 ridge = 2 rounds. PATTERN: See diagrams A.1 and A.2. Diagrams show all rows in pattern from RS. See diagram for size! DECREASE TIP (applies to the body): Dec as follows before marker: K 2 tog. Dec as follows after marker: Slip 1 st as if to K, K 1, psso. INCREASE TIP: Inc 1 st by making 1 YO. On next row/round work YO twisted to avoid holes. -------------------------------------------------------- BODY: Worked in the round on circular needle. Cast on 168-192-216-240 sts on circular needle size 5 mm with 1 strand BabyAlpaca Silk + 1 strand Kid-Silk + 2 strands Glitter. Work 1 RIDGE in garter st - see explanation above. Then work as follows: A.1 over all sts (= 12 repetitions in the round). When A.1 has been worked 1 time vertically, insert 2 markers in piece; 1 after 7th-8th-9th-10th st and 1 after 91st-104th-117th-130th st (= 1 marker in each side, front/back piece = 84-96-108-120 sts). Then work in stocking st. REMEMBER THE KNITTING TENSION. When piece measures 7 cm, dec 1 st on each side of both markers - READ DECREASE TIP (= 4 sts dec). Repeat dec every 3½-4-4½-5 cm 3 more times (= 4 dec in total) = 152-176-200-224 sts. When piece measures 24-26-27-29 cm, inc 1 st on each side of both markers – READ INCREASE TIP (= 4 sts inc). Repeat inc every 3-3-2½-2 cm 3 more times (= 4 inc in total) = 168-192-216-240 sts. When piece measures 38-38-37-37 cm, cast off 14-16-18-20 sts in each side for armhole (i.e. cast off 7-8-9-10 sts on each side of both markers) = 70-80-90-100 sts remain on back/front piece. Put piece aside and knit the sleeves. SLEEVE: Worked in the round on double pointed needles. Cast on 42-48-54-60 sts on double pointed needles size 5 mm with 1 strand BabyAlpaca Silk + 1 strand Kid- Silk + 2 strands Glitter. Work 1 ridge in garter st. Work A.1 over all sts (= 3 repetitions in width). When A.1 has been worked 1 time vertically, continue in stocking st. Insert 1 marker at beg of round (= mid under sleeve). When piece measures 8 cm, inc 1 st on each side of marker. Repeat inc every 5-4-3-2 cm 6-7-8-9 more times (= 7-8-9-10 inc in total) = 56-64-72-80 sts. When piece measures 41-38-34-31 cm (shorter measurements in the larger sizes because of wider shoulders), work A.1 over all sts (= 4 repetitions) - NOTE! Start first repeat of A.1 7-8-9-10 sts before the marker! On last round with A.1 cast off 14-16-18-20 sts mid under sleeve (i.e. cast off 7-8-9-10 sts on each side of marker) = 42-48-54-60 sts remain on needle (= 3 whole repetitions of A.1). Sleeve measures 46-44-41-39 cm. Put piece aside and knit another sleeve. YOKE: Slip sleeves on to same circular needle as body = 224-256-288-320 sts. Work A.1 over all sts (= 16 repetitions in width). When A.1 has been worked one time vertically, continue with A.2 over A.1. Continue the pattern like this. Switch to a shorter circular needle when needed. When A.2 has been worked, 96-128-160-192 sts remain on needle. K 1 round AT THE SAME TIME on 1st row dec 22-50-68-92 sts evenly = 74-78-92-100 sts. Then work an elevation at the back of neck as follows in stocking st, insert 1 marker in middle st (= mid back), cut the yarn and beg here: K 7 sts past marker mid back, turn, tighten yarn and P 14 sts back, turn, tighten yarn and K 21 sts, turn, tighten yarn and P 28 sts back. Continue like this - work 7 sts more on every turn until a total of 56-56-70-70 sts have been worked, turn and K 1 round until mid back again. Work 2 ridges in garter st. Cast off with K from RS. Yoke measures approx. 20-24-27-31 cm (mid front) and entire jumper measures approx. 58-62-64-68 cm. ASSEMBLY: Sew the openings under the sleeves tog. |
|||||||||||||
Diagram explanations |
|||||||||||||
|
|||||||||||||
 |
|||||||||||||
 |
|||||||||||||
 |
|||||||||||||
Have you finished this pattern?Tag your pictures with #dropspattern #foxsweater or submit them to the #dropsfan gallery. Do you need help with this pattern?You'll find 22 tutorial videos, a Comments/Questions area and more by visiting the pattern on garnstudio.com. © 1982-2026 DROPS Design A/S. We reserve all rights. This document, including all its sub-sections, has copyrights. Read more about what you can do with our patterns at the bottom of each pattern on our site. |
|||||||||||||


With over 40 years in knitting and crochet design, DROPS Design offers one of the most extensive collections of free patterns on the internet - translated to 17 languages. As of today we count 324 catalogues and 12290 patterns translated into English (UK/cm). 12290
We work hard to bring you the best knitting and crochet have to offer, inspiration and advice as well as great quality yarns at incredible prices! Would you like to use our patterns for other than personal use? You can read what you are allowed to do in the Copyright text at the bottom of all our patterns. Happy crafting!
Post a comment to pattern DROPS 150-7
We would love to hear what you have to say about this pattern!
If you want to leave a question, please make sure you select the correct category in the form below, to speed up the answering process. Required fields are marked *.