
Popular categories
Looking for a yarn?


Comments / Questions (49)
![]() Justyna wrote:
Justyna wrote:
,Witam nie rozumiem jak * wykonać 1 luźny narzut na prawym drucie, zamknąć narzut, zamknąć 2 proszę o dokładną instrukcję o
05.05.2023 - 12:24DROPS Design answered:
Witaj Justyno, zamykamy szal z narzutami, aby brzeg nie był zbyt ścisły. Ta technika jest ładnie pokazana na filmie TUTAJ. Zwróć tylko uwagę, że na filmie częstotliwość narzutów jest inna niż we wzorze. Pozdrawiamy!
05.05.2023 - 12:50
![]() Deborah Ann Moorman wrote:
Deborah Ann Moorman wrote:
Very pretty.
16.05.2019 - 22:06
![]() Hélène wrote:
Hélène wrote:
Merci beaucoup pour ce patron! Je viens de terminer de le bloquer et le châle est dans toute sa splendeur. Hélène
16.04.2018 - 20:28
![]() Hélène wrote:
Hélène wrote:
J’ai une autre interrogation pour vous à savoir : répartir 8 augmentations est-ce 8 augmentations total sur le dernier rang ou 8 augmentations à répartir jusqu’à la maille centrale et 8 autres dans la deuxième section du châle? Merci à l’avance! Hélène
14.03.2018 - 19:04DROPS Design answered:
Bonjour Hélène, on augmente 8 m au total au dernier rang, soit 4 m avant la m centrale et 4 m après la m centrale. Bon tricot!
15.03.2018 - 08:21
![]() Hélène wrote:
Hélène wrote:
Oups! Je crois que vous m’avez oublié! Hélène
13.03.2018 - 12:55
![]() Hélène wrote:
Hélène wrote:
J’ai tricoté les 229 mailles. Pour la partie de A5-A6-A7, j’augmente de 4 mailles à chaque rang impair et rendue au 8ième rang (envers) je tricote 8 augmentations et ce à chaque fois que je tricote ces 8 rangs. Donc, dans le 1er. rapport les 8 augmentations se feraient à peu près aux 30 mailles. Est-ce que je suis dans l’erreur? Merci de me répondre, Hélène
12.03.2018 - 13:26DROPS Design answered:
Bonjour Hélène, vous augmentez 4 m dans chaque A.5/A.7 soit effectivement 8 m à chaque fois que les diagrammes sont faits 1 fois en hauteur mais 16 mailles au total sur le rang (on les tricote 2 fois, une fois avant et une fois après la m centrale). La 2ème fois que vous répétez ces diagrammes, tricotez-les comme la 1ère fois, mais entre chaque A.5 et A.7 vous répèterez A.6 2 fois de plus en largeur (= 8 m en plus entre A.5 et A.7 = 2 x A.6 en plus entre A.5 et A.7). Bon tricot!
12.03.2018 - 16:27
![]() Mariya Peneva-Chavdarova wrote:
Mariya Peneva-Chavdarova wrote:
Bitte um Hilfe! Wenn ich die 85 Maschen auf der Rundstricknadel habe, also einmal Diagram A1 und einmal A2+A3+A4 gestrickt habe, soll ich WO die noch 2Rapporte von A3 hinzustricken - in der Reihengfolge A2-A3-A3-A3- mittlere Masche - A3-A3-A3-A4? Stricke ich dann kein A4 vor der mittleren Masche? irgendwie habe ich einen DenkFehler und mir geht dann das Muster nicht auf? Danke für Ihre Hilfe im voraus?
28.02.2018 - 11:58DROPS Design answered:
Liebe Frau Peneva-Chavdarova, wenn Sie 1 x die Diagramme A.2/A.3/A.4 in der Höhe gestrickt haben, dann haben Sie jetzt genügend Maschen um 3 x A.3 in der Breite (zwischen A.2 und A.4) zu stricken, dh so werden Sie bei der 2. Rapport in der Höhe stricken: 3 M re, A.2, 3XA.3, A.4, 1 mittlere Masche, A.2, 3xA.3, A.4, 4 M re. Bei 3. Rapport in der Höhe wiederholen Sie 5 x A.3 zwischen A.2 und A.4, und bei dem 4. Rapport in der Höhen wiederholen Sie 6 x A.3 zwischen A.2 und A.4. Viel Spaß beim stricken!
28.02.2018 - 17:28
![]() Hélène wrote:
Hélène wrote:
Merci d’avoir répondu à ma question si rapidement. Les 8 augmentations se font-elles à chaque fois qu’on complète un rapport de 8 rangs ou les fait-on juste un fois? De plus, avez-vous une vidéo montrant comment faire une augmentation en tricotant 2fois la même maille? Au plaisir de vous lire.
23.02.2018 - 14:39DROPS Design answered:
Bonjour Hélène, les 8 augmentations se font au dernier rang (= sur l'envers) quand vous tricotez le dernier des 4 motifs en hauteur. Cette vidéo montre comment tricoter 2 fois la même maille à l'endroit, comme ce rang se tricote en mailles envers, procédez de la même façon mais en tricotant la maille à l'envers une fois dans le brin avant puis dans le brin arrière. Bon tricot!
23.02.2018 - 16:47
![]() Hélène wrote:
Hélène wrote:
J’ai tricoté les 229 mailles et je commence la section de A5. Cependant vous indiquez de tricoter sur les 108 mailles moi j’arrive à 111 mailles de chaque côté à savoir 229 mailles-6 mailles bordure-1 maille centrale=222 donc ce serait 111 mailles et non 108 tel qu’indiqué. Suis-je dans l’erreur? Merci.
22.02.2018 - 17:50DROPS Design answered:
Bonjour Hélène, c'est bien exact ainsi: vous tricotez les 111 m en suivant A.5 (= 1 m), vous répétez A.6 sur les 108 m suivantes (= 27 fois) et vous terminez par A.7 (= 2m) sot: 1+108+2 = 111 m. Les 3 m point mousse et la m jersey se tricotent comme avant. Bon tricot!
23.02.2018 - 08:56
![]() Hélène wrote:
Hélène wrote:
Bonjour, Est-ce qu’on doit les rangs impairs de gauche à droite même si on nous indique de tricoter A2A3et A4 3 fois ? Merci
04.02.2018 - 22:55DROPS Design answered:
Bonjour Hélène, les rangs sur l'endroit se lisent de droite à gauche et les rangs sur l'envers de gauche à droite (lisez chaque diagramme séparément de gauche à droite sur l'envers). Bon tricot!
05.02.2018 - 10:01
|
|||||||||||||||||||
Lisa#lisashawl |
|||||||||||||||||||
 |
 |
||||||||||||||||||
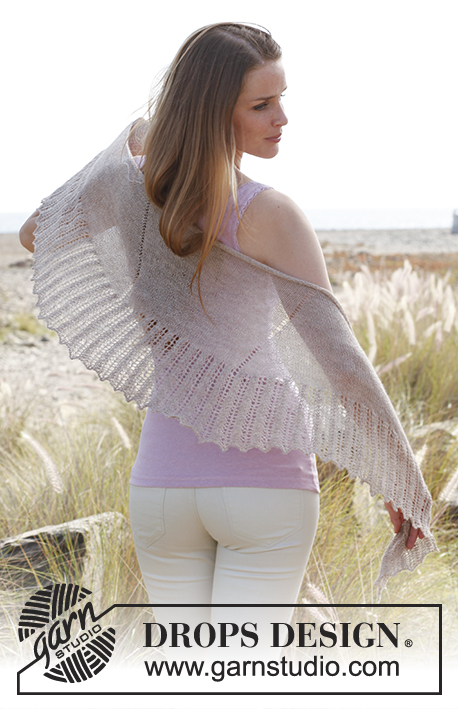
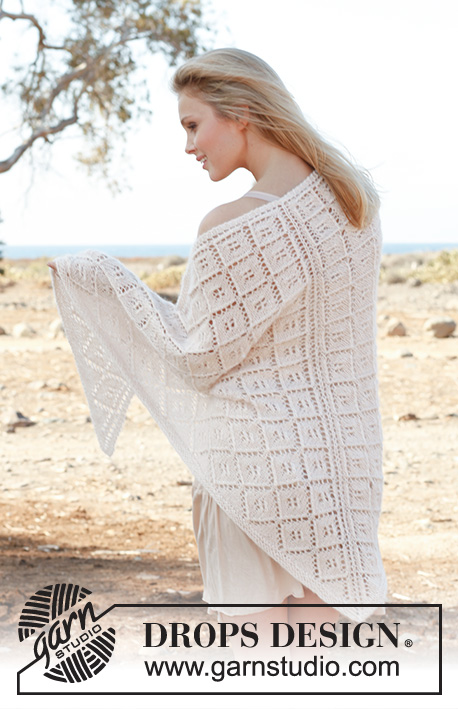
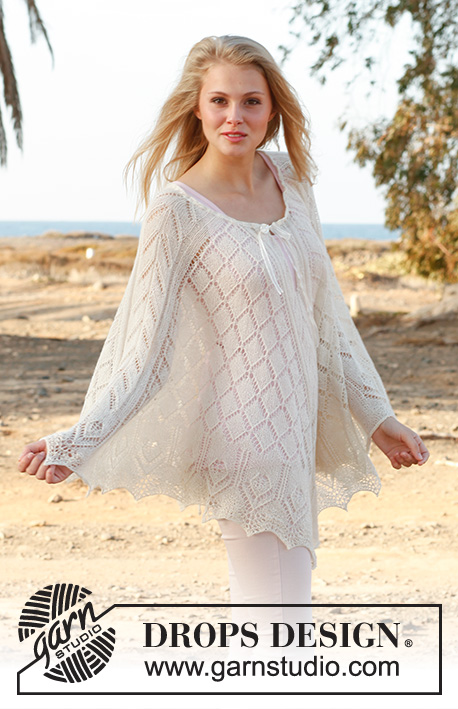
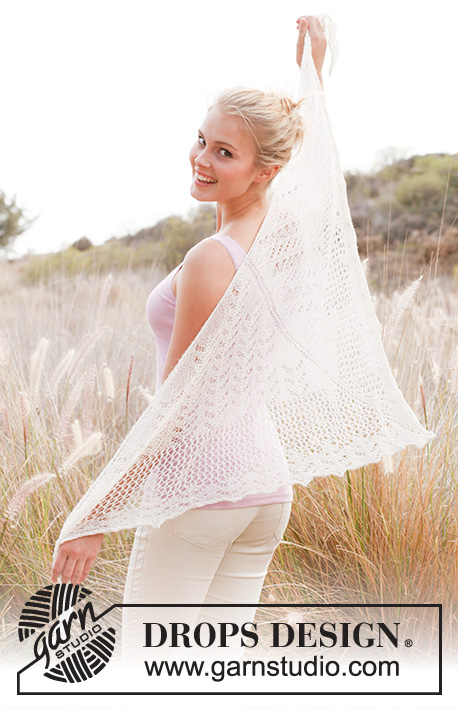
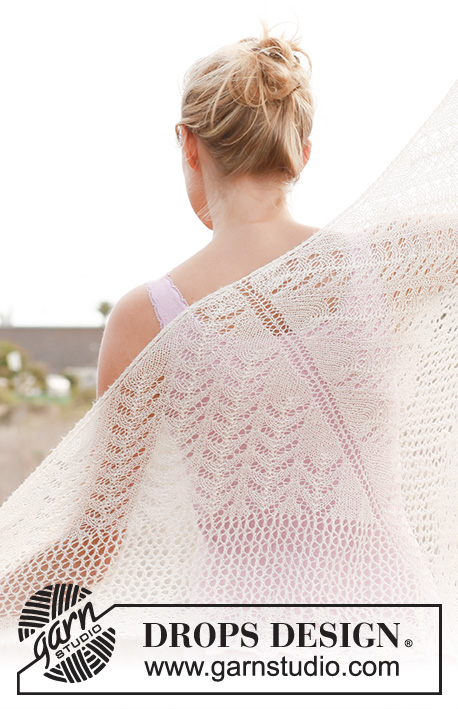
Knitted DROPS shawl with lace pattern in ”Lace”.
DROPS 146-15 |
|||||||||||||||||||
|
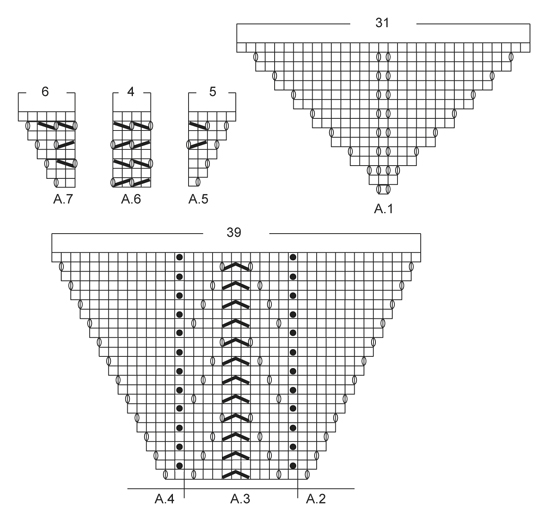
GARTER ST (back and forth on needle): K all rows. 1 ridge = 2 rows K. PATTERN: See diagrams A.1 to A.7. Diagrams show all rows in pattern seen from RS. ---------------------------------------------------------- SHAWL: Worked back and forth on circular needle to make room for all the sts. Cast on 7 sts on circular needle size 3.5 mm with Lace. Insert 1 marker in the 4th st and move it upwards when working (= mid st - marks mid back of shawl). Then work as follows: (1st row = RS) 3 sts in GARTER ST – see explanation above, diagram A.1 and 3 sts in garter st. On next row P YOs to make holes = 9 sts. Continue to work according to diagram A.1 with 3 sts in garter st in each side, when diagram A.1 has been worked 1 time vertically, there are 37 sts on row. Now continue as follows: 3 sts in garter st, diagrams A.2/A.3/A.4 and K 1 st (= mid st), diagrams A.2/A.3/A.4 and 3 sts in garter st. When diagrams have been worked 1 time vertically (= 85 sts), start over; 3 repetitions of A.3 will fit between A.2 and A.4. Work diagrams a total of 4 times vertically, every time you start over, there is room for 2 more repetitions of A.3 between A.2 and A.4. When diagrams have been worked 4 times vertically, there are 229 sts on row. Piece measures approx. 37 cm measured in knitting direction from cast on edge up to needle. Now continue as follows: 3 sts in garter st, A.5, A.6 over the next 108 sts, work until 2 sts remain before mid st, work A.7, K 1 st (= mid-st), A.5, A.6 over the next 108 sts until 5 sts remain, work A.7 and 3 sts in garter st. Continue to work according to diagrams A.5/A.6/A.7 until diagrams have been worked 4 times vertically. Every time A.5/A.6/A.7 have been worked 1 time vertically, there is room for 2 more repetitions of A.6 between A.5 and A.7 on each side of mid st - AT THE SAME TIME on last row of last repetition (= WS), inc 8 sts evenly by working 2 sts in 1 st = 301 sts. Piece measures approx. 48 cm measured in knitting direction. Now continue as follows: 3 sts in garter st, A.2, A.3 over the next 144 sts, work until 2 sts remain before mid st, work A.4, K 1 st (mid-st), A.2, A.3 over the next 144 sts, 5 sts remain, work A.4 and 3 sts in garter st. Continue to work according to diagrams A.2/A.3/A.4 until diagrams have been worked 1 time vertically = 349 sts. On next row from RS, loosely cast off as follows – NOTE: It is very important to cast off very LOOSELY otherwise the edge cannot be shaped into tips: Cast of the first 3 edge sts (lightly pull them when casting off so that they are loose), * make 1 loose YO on right needle, cast off YO, cast off 2 sts (lightly pull when casting off so that they are loose) *, repeat from *-* the entire row. BLOCKING: Place the shawl in lukewarm water until it is soaking wet. Carefully squeeze the water out of the shawl - do not twist the shawl - then roll the shawl in a towel and squeeze to remove more water - the shawl will now only be moist. Place the shawl on a carpet or mattress - carefully stretch it out to size and fasten it with pins. NOTE: 1 pin in the outermost st in each side of shawl, fasten 1 pin in the middle of every repetition along the 2 diagonal sides and 1 pin in mid st (= at the bottom of tip on shawl), lightly pull at every pin so that the edge is shaped into small tips. Leave to dry. Repeat the process when the shawl has been washed. |
|||||||||||||||||||
Diagram explanations |
|||||||||||||||||||
|
|||||||||||||||||||
 |
|||||||||||||||||||
Have you finished this pattern?Tag your pictures with #dropspattern #lisashawl or submit them to the #dropsfan gallery. Do you need help with this pattern?You'll find 14 tutorial videos, a Comments/Questions area and more by visiting the pattern on garnstudio.com. © 1982-2026 DROPS Design A/S. We reserve all rights. This document, including all its sub-sections, has copyrights. Read more about what you can do with our patterns at the bottom of each pattern on our site. |
|||||||||||||||||||


With over 40 years in knitting and crochet design, DROPS Design offers one of the most extensive collections of free patterns on the internet - translated to 17 languages. As of today we count 324 catalogues and 12290 patterns translated into English (UK/cm). 12290
We work hard to bring you the best knitting and crochet have to offer, inspiration and advice as well as great quality yarns at incredible prices! Would you like to use our patterns for other than personal use? You can read what you are allowed to do in the Copyright text at the bottom of all our patterns. Happy crafting!
Post a comment to pattern DROPS 146-15
We would love to hear what you have to say about this pattern!
If you want to leave a question, please make sure you select the correct category in the form below, to speed up the answering process. Required fields are marked *.