
Popular categories
Looking for a yarn?

























Comments / Questions (37)
 Le Chat Détricote wrote:
Bonjour, Merci pour votre réponse. Je bute maintenant sur le début du tour 3 du point de fantaisie A1.😞 Le tour 2 commence par 1 groupe de B, 2ml, 1 B dans l'arceau du groupe de B suivant... et finit par 1 groupe de B, 2ml, 1mc dans la 3e ml du début du tour. Le tour 3 commence par 5ml, 1 groupe de B dans la B suivante, 2ml,... Mais au rang en dessous, j'ai déjà un groupe de B? Je ne vois pas comment faire? Merci pour vos lumières. Belle journée
21.08.2020 - 12:44DROPS Design answered:
Bonjour Le Chat Détricote, le motif se croc hète sur 8 mailles, au 2ème tour vous devez terminez par 1 bride dans le groupe de Brides, 2 ml, 1 mc dans le groupe de brides du début du tour (= la 3ème ml qui remplace la1ère bride du 1er groupe de brides), le 3ème tour va ainsi commencer par 3 ml, (= 1ère bride), puis 2 ml, 1 groupe de bride dans la bride suivante, etc... Au début du 3ème rang, vous pouvez crocheter des mc dans le 1er arceau pour que les 3 ml partent au milieu du groupe de brides du début du 2ème tour. Bon crochet!
21.08.2020 - 13:12
 Le Chat Detricote wrote:
Bonjour, je ne comprends pas le descriptif de la fin du 2e rang du diagramme: on commence le rang par un groupe de brides et tout à la fin on parle de fermer le rang par une maille coulée dans la 3e maille en l'air... pouvez vous clarifier ce point? Mille mercis d'avance pour votre réponse
14.08.2020 - 23:59DROPS Design answered:
Bonjour le Chat Detricote, vous commencer chaque tour par 3 mailles en l'air pour remplacer la 1ère bride (cf INFO CROCHET au début des explications), à la fin du 2ème tour (comme à la fin du 1er) vous terminez le tour par 2 mailles en l'air et 1 maille coulée dans la 1ère maille du début du tour = la 3ème maille en l'air du début du tour qui remplace la 1ère bride. Bon crochet!
17.08.2020 - 08:07
 Ariadna wrote:
Hola! El bolso es precioso pero tengo una duda con el asa. Pone que ponga un marcapunto en el inicio de la vuelta y en el p.a 56. Pero cuando luego dice que haga 5 p.a. me encontraré con el primer marcapuntos. Eso no lo entiendo porque no le cuadra. Gracias
02.09.2019 - 13:44DROPS Design answered:
Hola Ariadna. Los marcapuntos están situados en el centro del asa a cada lado. Trabajamos puntos enanos desde el primer marcapuntos hasta el 5º punto de la vuelta para empezar el asa. El asa se trabaja con puntos bajos de ida y vuelta , con 5 puntos a cada lado de los marcapuntos (= un total de 10 puntos el ancho del asa).
05.09.2019 - 20:44
Cande wrote:
Bonjour sauf erreur de ma part vous ne dites pas comment crocheter le 12 eme rang c'est comme le 10 eme? merci pour ce modèle
04.07.2019 - 22:32DROPS Design answered:
Bonjour Mme Cande, les tours 11 à 13 se crochètent de la même façon, c'est-à-dire avec 1 bride dans chaque bride tout le tour. Bon crochet!
05.07.2019 - 08:35
 StefanieSenger wrote:
Im Folgenden ein Vorschlag, wie man die Enden der Netzrunden unsichtbar machen kann. 1. Man beginnt die Reihe mit 5 Lm, dann direkt 2 Stb ins gleiche Loch. 2. Wenn man die Runde durch hat und am Ende ist, häkelt man 2 Lm, wie gewohnt. dann macht man ein Stb in das erste Loch der Reihe und vervollständigt damit die Stb-Gruppe. 3. 1 Km in die 3. Lm vom Rundenanfang 4. 1Km in den anliegenden Lm-Bogen, jetzt ist man in der Mitte der Gruppe nächste Runde beginnen
09.10.2018 - 08:56
Anikjl56 wrote:
Oh merciiii bcp pour votre réponse rapide!!!! Tbon vendredi à vs !!😘!
10.11.2017 - 09:35
Anikjl56 wrote:
Bonjour Je suis étr in de faire se sac Et jen suis au tout début pour faire les point fantaisies A1! Je suis au tour 1 quand sa dit 1 ) faire 5 ml (remplacent 1B et 2ml) Est se que je ne doit faire que les 5ml? se qui remplacent bien les 1Bet les 2ML?c bien sa??? En vous remerciant pr votre aide bon vendredi à bientot!!
10.11.2017 - 07:33DROPS Design answered:
Bonjour Anikjl56, tout à fait, au début du tour 1, on crochète 5 mailles en l'air pour remplacer la 1ère bride et les 2 premières mailles en l'air, répétez ensuite la partie de *-*. Bon crochet!
10.11.2017 - 08:09
Andrea Schwarz wrote:
Hallo, ich habe Probleme beim Übergang von der 3. Runde im Muster A.1. Die Übergänge der einzelnen Runden 2 und 3 sehen bei mir komisch aus, wenn ich nach der Anleitung stricke. Es kommen immer Maschen dazu. Ich häkel nach der Kettmasche für die nächste Reihe immer erst 3 Luftmaschen. Ist das richtig? Vielen Dank für eine Antwort und liebe Grüße, Andrea
18.06.2016 - 17:18DROPS Design answered:
Liebe Andrea, haben Sie beachtet, dass das erste Stb jeweils durch 3 Lm ersetzt wird?
20.06.2016 - 20:30
 Jocelyn wrote:
I am having trouble at the start of row 3 on A1. After joining to the third chain from the beginning, it says chain 5 then a treble group in the next trable - but what about the treble in the first treble loop? Thanks
01.07.2015 - 16:44DROPS Design answered:
Dear Jocelyn, on row 3 in A.1 the 5 ch are made for: 3ch replacing 1st tr + 2 ch. Happy crocheting!
02.07.2015 - 09:43
 Lory wrote:
Grazie per lo schema, chiaro e ben spiegato! La borsa finita è molto, molto carina! A presto, Lory
07.06.2015 - 16:11
|
||||||||||||||||
Jean#jeanbag |
||||||||||||||||
 |
 |
|||||||||||||||
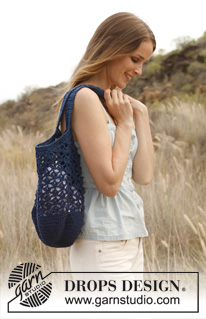
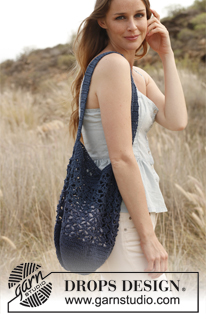
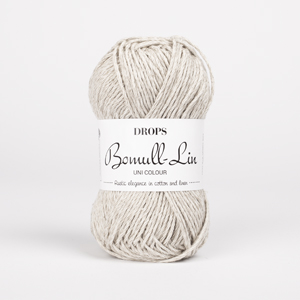
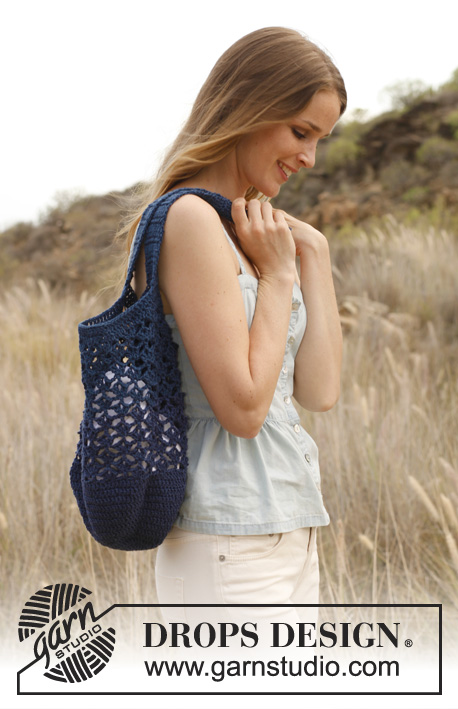
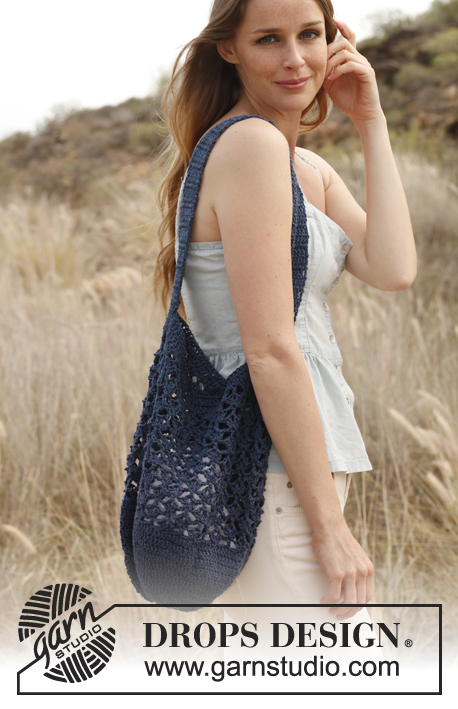
Crochet bag/tote bag in DROPS Bomull-Lin or DROPS Paris
DROPS 147-22 |
||||||||||||||||
|
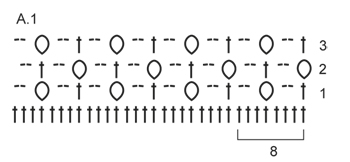
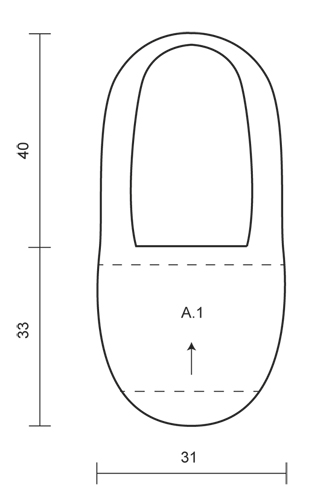
MAGIC CIRCLE: When piece is worked in the round, start with this technique to avoid holes in the middle (instead of ch-ring): Hold the yarn end and wind the yarn one time around the index finger to make a loop. Hold the loop with left thumb and middle finger, place the thread over left index finger. Insert hook through the loop, make a YO and pull thread through loop, work 3 ch (counted as 1st tr), then work tr around the loop. When the desired no of tr have been reached, pull the yarn end to tighten the loop. Fasten the yarn end at the back. CROCHET INFO: Beg every round with tr with 3 ch (counted as 1st tr), work tr in every tr, finish with 1 sl st in 3rd ch from beg of round. TR-GROUP: 1 tr-group = in same tr work 2 tr, 2 ch and 2 tr. ---------------------------------------------------------- BAG: Worked in the round. Start by making a MAGIC CIRCLE - read explanation above - at the bottom of bag with Bomull-Lin on hook size 4 mm. ROUND 1: Work 16 tr in the magic circle. ROUND 2: READ CROCHET INFO! Work 2 tr in every tr = 32 tr. ROUND 3: * 1 tr in next tr, work 2 tr in next tr *, repeat from *-* the entire round = 48 tr. ROUND 4: * 1 tr in each of the next 2 tr, work 2 tr in next tr *, repeat from *-* the entire round = 64 tr. ROUND 5: Work 1 tr in every tr. ROUND 6: * 1 tr in each of the next 3 tr, work 2 tr in next tr *, repeat from *-* the entire round = 80 tr. ROUND 7: Work 1 tr in every tr. ROUND 8: * 1 tr in each of the next 4 tr, work 2 tr in next tr *, repeat from *-* the entire round = 96 tr. ROUND 9: Work 1 tr in every tr. ROUND 10: * 1 tr in each of the next 5 tr, work 2 tr in next tr *, repeat from *-* the entire round = 112 tr. ROUND 11-13: Work 1 tr in every tr. Then work pattern A.1 - see diagram - as follows: ROUND 1: Work 5 ch (replaces 1 tr and 2 ch), skip the first 3 tr, * work 1 TR-GROUP - read explanation above - in next tr, 2 ch, skip the next 3 tr, 1 tr in next tr, 2 ch, skip 3 tr *, repeat from *-* the entire round, finish with 1 tr-group, 2 ch, skip the last 3 tr and 1 sl st in 3rd ch from beg of round = 14 tr-groups. ROUND 2: In same ch work 1 tr-group, * 2 ch, 1 tr in ch-loop on next tr-group, 2 ch, 1 tr-group in next tr *, repeat from *-* the entire round, finish with 2 ch, 1 tr in ch-loop on last tr-group, 2 ch and 1 sl st in 3rd ch from beg of round = 14 tr-groups. ROUND 3: Work sl st to the middle of the first ch-space (in the middle of the tr-group), 5 ch, * 1 tr-group in next tr, 2 ch, 1 tr in ch-loop on next tr-group, 2 ch *, repeat from *-* the entire round, finish with 1 tr-group in last tr, 2 ch and 1 sl st in 3rd ch from beg of round = 14 tr-groups. Repeat ROUND 2 and 3 upwards. Work diagram A.1 for approx. 18 cm (piece measures approx. 30 cm vertically). Then work as follows: In every ch-loop (also in ch-loop on tr-groups) on round work 2 tr, in every single tr (not in tr on tr-groups) work 2 tr (i.e. 8 tr over every repetition of diagram A.1) = 112 tr in total. Work 1 round with 1 tr in every tr, do not cut the thread, now piece measures approx. 33 cm vertically. Insert a marker at beg of round and a marker after 56 tr (= middle of the side). SHOULDER STRAP: Worked back and forth as follows: Turn piece and work sl sts until 5th tr after 1st marker, turn piece and work 1 tr in each of the next 10 sts (marker is in the middle of these sts), turn. Work 1 tr in every tr on row until strap measures approx. 80 cm from marker (or until desired length). Cut and fasten the thread. Fasten the end directly above the marker on the other side of bag as follows: Sew with neat little stitches in front loop on last row. |
||||||||||||||||
Diagram explanations |
||||||||||||||||
|
||||||||||||||||
 |
||||||||||||||||
 |
||||||||||||||||
Have you finished this pattern?Tag your pictures with #dropspattern #jeanbag or submit them to the #dropsfan gallery. Do you need help with this pattern?You'll find 5 tutorial videos, a Comments/Questions area and more by visiting the pattern on garnstudio.com. © 1982-2026 DROPS Design A/S. We reserve all rights. This document, including all its sub-sections, has copyrights. Read more about what you can do with our patterns at the bottom of each pattern on our site. |
||||||||||||||||






With over 40 years in knitting and crochet design, DROPS Design offers one of the most extensive collections of free patterns on the internet - translated to 17 languages. As of today we count 333 catalogues and 12525 patterns translated into English (UK/cm). 12525
We work hard to bring you the best knitting and crochet have to offer, inspiration and advice as well as great quality yarns at incredible prices! Would you like to use our patterns for other than personal use? You can read what you are allowed to do in the Copyright text at the bottom of all our patterns. Happy crafting!
Post a comment to pattern DROPS 147-22
We would love to hear what you have to say about this pattern!
If you want to leave a question, please make sure you select the correct category in the form below, to speed up the answering process. Required fields are marked *.