
Popular categories
Looking for a yarn?


Comments / Questions (86)
![]() Gloria wrote:
Gloria wrote:
¿Es necesario usar aguja circular o se puede emplear agujas rectas?
02.07.2013 - 09:55DROPS Design answered:
Hola, Gloria. La parte del cuerpo se trabaja en redondo sin costuras laterales, para eso se usan las ag circulares. Si quieres trabajar con agujas rectas debes hacer los cambios en el patrón para dividir la labor en 2 y hacer luego costuras laterales.
02.07.2013 - 12:29
![]() Lone Møller wrote:
Lone Møller wrote:
Forstår simpelt hen ikke at der i Emilia ikke skal strikkes ærmemasker op over aflukningsmaskerne...
08.05.2013 - 22:58DROPS Design answered:
Hej Lone. Jeg er ikke helt sikker paa hvad du mener, men mönstret skulle stemme som det staar her. God fornöjese.
10.05.2013 - 16:32
![]() Angélique Wenell wrote:
Angélique Wenell wrote:
Jag förstår inte hur ärmen ska sys ihop enl. ert mönster. Jag la upp 3 extra maskor på var sida av ärmen, för tidigare avmaskning för ärmen, så fick jag ordning på det.
15.04.2013 - 10:37
![]() Isabel Lopes wrote:
Isabel Lopes wrote:
Foi com grande sorte que descobri este maravilhoso site, só tenho pena que não exista uma loja em Lisboa. Os modelos são lindissimos e de muito bom gosto as lãs são lindas.Adorei este em especial só falta encomendar as lâs Obrigada Isabel
12.04.2013 - 15:34
![]() Lena wrote:
Lena wrote:
Ist der Pullover leicht zu stricken? Für Strickanfänger?
31.03.2013 - 19:54DROPS Design answered:
Liebe Lena, das ist ein recht einfaches Modell ohne stricktechnische Raffinessen. Probieren Sie am Probestück aus, ob Ihnen das Stricken mit den beiden Farben in einer Reihe (beim Musterstreifen) gelingt, ansonsten könnten Sie z.B. einfach 2 Reihen in der anderen Farbe stricken. Dann gibt es zwar nicht den Pippi-Langstrumpf Pullover, aber es ist nochmals einfacher zu stricken.
03.04.2013 - 09:15
![]() Carina P wrote:
Carina P wrote:
Är nöjd med resultatet fast mönstret var lite luddigt här och där.
04.12.2012 - 02:38
![]() Carina Pettersson wrote:
Carina Pettersson wrote:
Min fråga är då, vilken storlek ska jag göra? måtten är 110cm(byst), 99cm(midja), 108cm(stuss) vill ju inte börja sticka om storleken inte stämmer med det som står i mönstret.
11.11.2012 - 15:59DROPS Design answered:
Hej, du tittar i måttskissen. Här ser du måttet på en XL är 112 cm (byst) vilket stämmer med dina mått. Du kan också alltid mäta en tröja du gillar ha på och gillar storleken på. Lycka till!
12.11.2012 - 15:28
![]() Sigrid wrote:
Sigrid wrote:
Verkligen liten i storleken! Men ärmarna är oerhört smala och tajta även om man går upp ett par storlekar. Trots att jag var mycket noga med masktätheten ser inte tröjan ut som på bilend. De är även ganska korta om man följer mönstret.
09.09.2012 - 20:53
![]() Margith Henriksson wrote:
Margith Henriksson wrote:
Sy ärm och sidsömmar!? Tröjan är ju stickad på rundstickor. Likaså är det vanskligt att sticka ärmen uppifrån då det inte finns någon öppen sida. Hur är det tänkt?
03.09.2012 - 22:32DROPS Design answered:
Ärmen stickas fram och tillbaka enligt beskrvningen, men väljer du att sticka runt så behøver du ju inte sy ärmsömmen :) Arb delas till ärmhål och sista delen stickas fram och tillbaka. Här får du då en kant att plocka upp m i. Lycka till!
13.12.2012 - 11:23
![]() Signe Sporring wrote:
Signe Sporring wrote:
Hello everybody I just love this jumper and I am in the process of making it. To my disappointment its the sizes misleading. The girl in the photo must be wearing an oversize. I can see it on the number of times the pattern is repeated on the sleeves. I am normally a size M, which is the size I have knittet, but the jumper is far too tight. I will need to knit a size XL to fit it like the girl on the photo. Regards Signe
09.08.2012 - 18:19
|
||||||||||
Emilia#emiliasweater |
||||||||||
 |
 |
|||||||||
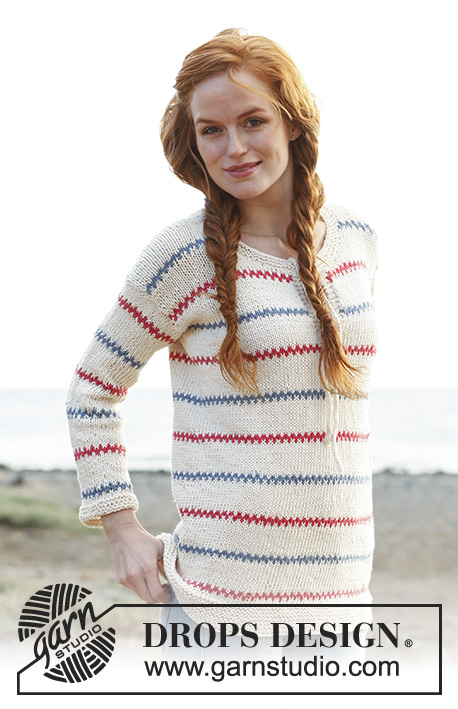
Knitted DROPS Pippi jumper in "Paris". Size: S - XXXL.
DROPS 137-17 |
||||||||||
|
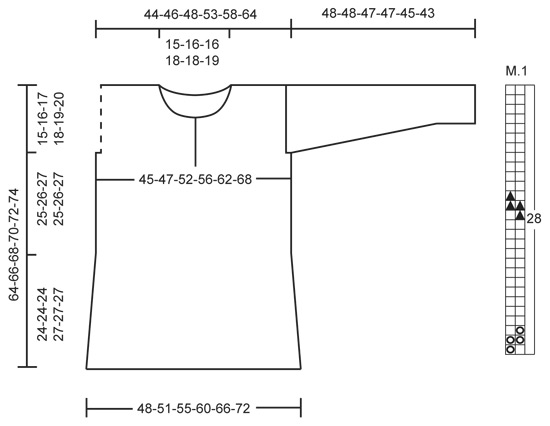
GARTER ST (in the round on circular needle): * K 1 round and P 1 round *, repeat from *-*. GARTER ST (back and forth on needle): K all rows. PATTERN: See diagram M.1 - diagram is worked in stocking st. DECREASE TIP: Dec 1 st in each side as follows: 1 edge st in garter st, slip 1 st as if to K, K 1, psso, work until 3 sts remain, K the next 2 sts tog, 1 edge st in garter st. TUBE KNITTING: * K 1, place yarn in front of piece (towards you), slip 1 st as if to P, place yarn behind piece (from you) *, repeat from *-* on all rows. -------------------------------------------------------- BODY: Worked in the round on circular needle. Cast on 164-172-188-204-224-244 sts on circular needle size 5 mm with off white. Work in garter st - Read explanation above - for 5 cm, then work in stocking st for 1 cm. Then work diagram M.1. Insert a marker at beg of round (= left side) and a marker after 82-86-94-102-112-122 sts (= right side), move the markers upwards when working. REMEMBER THE KNITTING TENSION! When diagram M.1 has been worked for 40-40-40-46-46-46 rows (piece measures approx. 24-24-24-27-27-27 cm), dec 1 st on each side of every marker = 4 sts dec on round. Repeat dec when diagram M.1 has been worked for 60-60-60-66-66-66 rows (piece measures approx. 33-33-33-36-36-36 cm), and when diagram M.1 has been worked for 76-76-76-82-82-82 rows (piece measures approx. 41-41-41-43-43-43 cm) = 152-160-176-192-212-232 sts. Continue with diagram M.1 until piece measures 43-44-46-47-49-50 cm. Work next round as follows: Work 34-36-40-44-49-54 sts, P the next 8 sts (= beg of neck vent mid front), work the rest of round in stocking st. On next row divide the piece for neck vent mid front and work back and forth as follows: K 38-40-44-48-53-58 sts (= left front piece), turn piece. Work 1 row from WS over all sts on needle - but work the first 4 and the last 4 sts in garter st - Read explanation above (= neck vent mid front). Continue back and forth with diagram M.1 and 4 sts in garter st in each side. When piece measures 49-50-51-52-53-54 cm, cast off for armholes on next row from RS as follows: Work 37-39-42-45-49-54 sts (= right front piece), cast off the next 2-2-4-6-8-8 sts (= 1-1-2-3-4-4 sts on each side of marker), work 74-78-84-90-98-108 sts (= back piece), cast off the next 2-2-4-6-8-8 sts (= 1-1-2-3-4-4 sts on each side of marker), work the remaining 37-39-42-45-49-54 sts (= left front piece). Now divide the piece and finish each part separately. BACK PIECE: = 74-78-84-90-98-108 sts. Insert a marker at beg and end of row (where to knit up sleeves later). Continue back and forth with diagram M.1 until piece measures 62-64-66-68-70-72 cm. On next row from RS, cast off the middle 24-26-26-28-28-30 sts for neck and finish each shoulder separately. Cast off 1 st on next row from neck = 24-25-28-30-34-38 sts remain on shoulder. Loosely cast off all sts when piece measures 64-66-68-70-72-74 cm. RIGHT FRONT PIECE: = 37-39-42-45-49-54 sts. Insert a marker at beg and end of row (where to knit up sleeve later). Continue back and forth with diagram M.1 and 4 sts in garter st towards mid front until piece measures 54-56-57-59-60-62 cm. Then cast off for neck at beg of every row from RS as follows: Cast off 6-6-7-7-8-8 sts 1 time, 2 sts 2 times, and 1 st 1 time. Then cast off at beg of every other row from RS as follows: Cast off 1 st 2-3-2-3-2-3 times = 24-25-28-30-34-38 sts remain on shoulder. Loosely cast off all sts when piece measures 64-66-68-70-72-74 cm. LEFT FRONT PIECE: Work as right front piece but reversed. ASSEMBLY: Sew shoulder seams from RS with neat stitches. SLEEVE: Worked back and forth on needle. Knit up with off white from RS approx. 50 to 70 sts between markers along one armhole (NOTE: Do not knit up over the cast off sts for armhole). P next round - while at the same time adjusting no of sts to 52-54-58-62-66-68. Work in stocking st for 2-2-2-3-3-3 cm, then work rounds 1 to 4 in diagram M.1. On 5th round in diagram M.1 dec 1 st in each side - Read DECREASE TIP above. Repeat dec every 7-7-6-5-4-3½ cm a total of 6-6-7-8-9-10 times = 40-42-44-46-48-48 sts. Continue with diagram M.1 until piece measures approx. 46-46-45-45-43-41 cm (shorter measurements in the larger sizes because of broader shoulder width), then work in garter st for 2 cm. Loosely cast off all sts, piece now measures 48-48-47-47-45-43 cm. Knit another sleeve. ASSEMBLY: Sew sleeve and side seams in one inside 1 edge st. NECK EDGE: Worked back and forth on circular needle. Beg on right front piece mid front, knit up from RS approx. 80 to 90 sts along the entire neck edge. K next row from WS - while at the same time adjusting no of sts to 74-76-80-82-84-86. Work in garter st until edge measures 2 cm, loosely cast off all sts. TIES: Cast on 2 sts on double pointed needles size 5 mm. Work TUBE KNITTING - Read explanation above. Cast off when tie measures approx. 36 cm. Knit a similar tie. Sew one tie to each tip of vent in each side. |
||||||||||
Diagram explanations |
||||||||||
|
||||||||||
 |
||||||||||
Have you finished this pattern?Tag your pictures with #dropspattern #emiliasweater or submit them to the #dropsfan gallery. Do you need help with this pattern?You'll find 16 tutorial videos, a Comments/Questions area and more by visiting the pattern on garnstudio.com. © 1982-2026 DROPS Design A/S. We reserve all rights. This document, including all its sub-sections, has copyrights. Read more about what you can do with our patterns at the bottom of each pattern on our site. |
||||||||||


With over 40 years in knitting and crochet design, DROPS Design offers one of the most extensive collections of free patterns on the internet - translated to 17 languages. As of today we count 324 catalogues and 12290 patterns translated into English (UK/cm). 12290
We work hard to bring you the best knitting and crochet have to offer, inspiration and advice as well as great quality yarns at incredible prices! Would you like to use our patterns for other than personal use? You can read what you are allowed to do in the Copyright text at the bottom of all our patterns. Happy crafting!
Post a comment to pattern DROPS 137-17
We would love to hear what you have to say about this pattern!
If you want to leave a question, please make sure you select the correct category in the form below, to speed up the answering process. Required fields are marked *.