
Popular categories
Looking for a yarn?


Comments / Questions (18)
![]() Claude wrote:
Claude wrote:
Merci beaucoup pour votre réponse. J’ai bien compris votre explication.
12.06.2024 - 16:51
![]() Claude wrote:
Claude wrote:
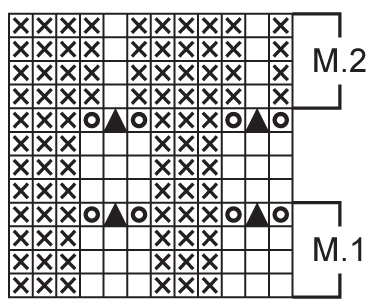
Dans le diagramme M1. On doit faire une jeté, de glisser une m, de tricoter 2 m ensemble et de passer la m glissée par dessus la m tricotée. Jusque là tout va bien. Après on demande de faire une jetée. On se trouve à augmenter les mailles. Je ne comprends pas. Pouvez-vous m’expliquer SVP
08.06.2024 - 22:15DROPS Design answered:
Bonjour Claude, les 2 jetés vont venir compenser la double diminution, quand vous glissez 1 m à l'end, tricotez 2 m ens à l'end et passez la m glissée par-dessus la m tricotée il reste 1 m sur 3, vous faites 1 jeté juste avant + 1 jeté juste après cette diminution, ainsi, il vous reste bien de nouveau 3 m. Bon tricot!
10.06.2024 - 08:00
![]() Barbara Christel Bühn wrote:
Barbara Christel Bühn wrote:
Guten Tag , komme mit den Abnahmen nicht zurecht ,bei 101 M 2x 5 M und dann 7x1M. In der Mitte muss ich zweimal 13 M abnehmen?
12.03.2023 - 18:45DROPS Design answered:
Liebe Frau Bühn, es fehlen die Armausschnitt: 1 M beidseitig 8 Mal = 16 M insgesamt = 101-16=85 M - die 13 mittleren Maschen stilllegen = 36 M für Jede Schulter, dann für den Hals: 3 M x 1 + 2 M x 2 + 1 M x 8 = 15 M = 21 Maschen übrig. Viel Spaß beim stricken!
13.03.2023 - 10:12
![]() Diane wrote:
Diane wrote:
Bonjour, j’ai besoin d’aide, Le diagr. M. 1 Rang 1: 3 m à l’end, 3 m. à l’env. Rang 2 : 3 m à l’end, 3 m. à l’end ? Rang 3 : 3 m. à l’end, 3 m. à l’env? Rang 4 : 1 jeté, gliss une m à l’end, 2 m.ens. à l’end, passer le m. gliss par-dessus la m. tricotée, 1 jeté, 3 m. env? Je ne sais pas quand ou si les carrés avec un « X » je dois faire des mailles à l’envers ou à l’endroit. Suis-je claire? J’ai défait et refait plusieurs fois! Merci
15.08.2022 - 20:37DROPS Design answered:
Bonjour Diane, lorsque vous tricotez en rond (avant les emmanchures), vous allez répéter les rangs 1,2 et 3 en côtes (3 m end, 3 m env), mais lorsque vous tricoterez ensuite en rangs (M.2 uniquement), vous devrez adapter sur l'envers, autrement dit, M.2 en rond = *1 m env, 1 m end, 5 m env, 1 m end, 4 m env*, se tricotera sur l'envers (en commençant par la dernière m du diagramme): *4 m end, 1 m env, 5 m end, 1 m env, 1 m end*. Bon tricot!
16.08.2022 - 08:35
![]() Manuela wrote:
Manuela wrote:
Gracias por un patrón tan bonito. Me costó entender una cosa y mirando otros idiomas creo que el problema está que en español hay un pequeñito error al explicar el símbolo del triángulo negro. Entiendo que se hace por el lado del derecho, se desliza un punto como derecho, se hacen dos juntos del derecho y el deslizado se pasa por encima, ¿es así? Muchas gracias
16.07.2021 - 08:03DROPS Design answered:
Hola Manuela, efectivamente, se trabaja como has dicho, ahora mismo corregimos la errata. Muchas gracias.
19.07.2021 - 20:26
![]() Manuela wrote:
Manuela wrote:
Muchas gracias por el patrón, es un jersecito precioso. Tengo una duda: entre el patrón M1 y el M2 hay un espacio que no tiene indicación con letras. ¿Cuándo se teje ese espacio? Es que es la primera vez que voy a tejer siguiendo un patrón escrito y no lo entiendo muy bien. Muchas gracias.
10.07.2021 - 18:38DROPS Design answered:
Hola Manuela, el espacio que no tiene indicación con letras es tambien M.1. Buen trabajo!
12.07.2021 - 14:07
![]() Ane-Marie Maes wrote:
Ane-Marie Maes wrote:
Hoe ga ik te werk als ik de top wil breien op gewone breinaalden. Ik kom er niet uit. Dank voor uw reactie
25.05.2020 - 15:43DROPS Design answered:
Dag Anne-Marie,
Om een patroon aan te passen zodat je hem op rechte naalden kunt breien, hebben we een instructie gemaakt. Deze vind je hier.
01.06.2020 - 10:28
![]() Heidmann AM wrote:
Heidmann AM wrote:
Bonjour en ce qui concerne le gilet les aiguilles mentionnées sont : Aiguilles circulaires et doubles pointes DROPS n° 2,5 et 3. Cependant l'échantillon est donné pour du 3,5 et et 2,5 Je suppose que c'est du 3,5 et non du 3? Pour le gilet seul, est-ce que je peux utiliser des aiguilles simples et doubles pointes au lieu de circulaires et doubles pointes ?
08.06.2018 - 17:49DROPS Design answered:
Bonjour Mme Heidmann, l'échantillon se tricote bien avec les aiguilles 3 et non 3,5 (correction faite, merci). Vous trouverez ici quelques informations à propos de l'adaptation d'un modèle sur aiguilles droites. Bon tricot!
11.06.2018 - 08:15
![]() Nancy Reichenbach wrote:
Nancy Reichenbach wrote:
I’m having trouble figuring out what is pattern 1 and pattern2. Are they on the top is page 5? And is pattern 1 labeled M.1 and pattern 2 labeled M.2? Thanks for your help.
19.05.2018 - 04:18DROPS Design answered:
Dear Mrs Reichenbach, pattern 1 and 2 are diagrams M.1 and M.2 you will find at the bottom of the written pattern. Happy knitting!
22.05.2018 - 08:25
![]() Marie Foulon wrote:
Marie Foulon wrote:
Merci pour votre rapidité à répondre, je voulais ajouter que j'ai fait le débardeur, tellement joli que ma fille l'a adopté et a demandé le gilet :-)
04.05.2018 - 09:38
|
|||||||||||||
DROPS 77-24 |
|||||||||||||
|
|
|||||||||||||
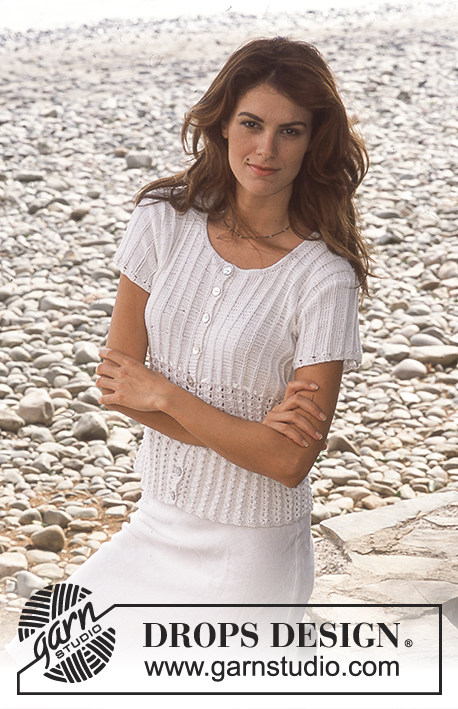
DROPS Sleeveless Top in Safran
DROPS 77-24 |
|||||||||||||
|
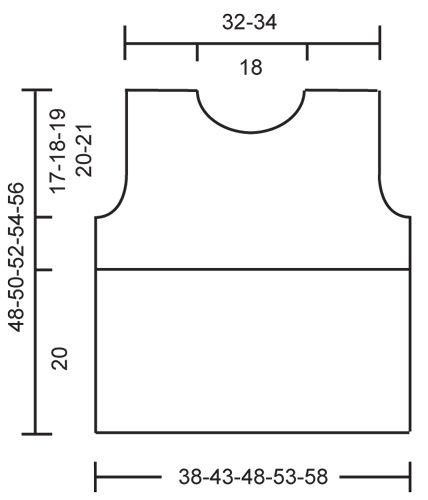
Gauge: Stockinette st: 24 sts x 32 rows on larger needles = 10 x 10 cm. Pattern 1: 24 sts on smaller needles = approx. 10 cm wide. Pattern: See chart. The pattern is seen from the right side. Rib: * P 1, K 1 *, repeat from * - *. Garter st, when knitting flat: Knit all sts, all rows. Knitting tips (for armhole): All decs are made from right side. Dec inside 5 edge sts knit as follows from edge (seen from the right side): K 1 (edge st knit in garter st), K 1, P 1, K 1, P 1. Dec 1 st as follows:After 5 edge sts: Slip 1 st as if to knit, K 1, psso. Before 5 edge sts: K 2 tog. Note: on wrong side rows P the 6th st from edge. Body: Cast on 180-204-228-252-276 sts on smaller circular needles; join and place a marker at the join. Knit Pattern 1 for 20 cm, change to larger circular needles and knit Pattern 2 to finished measurements. Put a marker in one of the knit sts at each side (there will be P 5 on each side of each marker and 89-101-113-125-137 sts between markers). When the piece measures 30-31-32-33-34 cm knit 3 rows rib - see instructions above - over 15-15-23-23-31 sts at each side (7-7-11-11-15 sts at each side of marked sts) - start and end rib with P 1 (knit the remaining sts in Pattern 2 as before). Then bind off 5-5-13-13-21 sts at each side for armhole and knit each piece separately. Front: = 85-97-101-113-117 sts. Read the entire section before knitting: Armhole: Dec 1 st at each side every other row 2-7-8-13-14 times - see knitting tips. Then continue with the 6 outermost sts knit as follows from edge: K 1 (edge st knit in garter st), K 1, P 1, K 1, P 1, K 1) to finished measurements. Neckband: At the same time when the piece measures 35-37-38-40-41 cm bind off the center 13 sts for the neck. Then bind off at each neck edge every other row: 3 sts 1 time, 2 sts 2 times and 1 st 8 times. After all armhole and neck shaping is complete 19-20-21-22-23 sts remain on each shoulder. Bind off when the piece measures 48-50-52-54-56 cm. Back: = 85-97-101-113-117 sts. Bind off for armhole as on front = 81-83-85-87-89 sts. When the piece measures 46-48-50-52-54 cm bind off the center 39 sts for the neck. Then dec 1 st at each neck edge every other row 2 times = 19-20-21-22-23 sts remain on each shoulder. Bind off when the piece measures 48-50-52-54-56 cm. Assembly: Sew shoulder seams. Neckband: Pick up approx. 120-130 sts around the neck on smaller circular needles. P 1 row, K 1 row, P 1 row, and then bind off with a knit row. Thread ribbon through the top row of holes in Pattern 1. ------------------------ CARDIGAN WITH SHORT OR LONG SLEEVES IN SAFRAN: Sizes: S - M - L - XL - XXL Finished measurements: 82-92-102-112-122 cm Materials: Garnstudio SAFRAN, 100% cotton, 50 g/160 m Short sleeve: 250-250-300-300-350 gr nr 17, white. Long sleeve: 350-350-400-400-450 gr nr 17, white. Alternate yarns: See listing for the top. Narrow white ribbon: approx. 90-100-110-120-130 cm long 9 DROPS Pearl shell buttons nr 521 DROPS 2.5 mm and 3 mm circular and double-pointed needles, or sizes needed to obtain correct gauge. Gauge: Stockinette st: 24 sts x 32 rows on larger needles = 10 x 10 cm. Pattern 1: 24 sts on smaller needles = 10 cm wide Pattern: See chart. The pattern is seen from the right side. = knit (as seen from the right side) = purl (as seen from the right side) = yo = from right side: Slip 1 st as if to knit, K 2 tog, psso. Garter st, when knitting flat: Knit all sts, all rows. Buttonhole: Make buttonholes on right buttonband as follows (from wrong side): knit until 4 sts remain, K 1, yo, K 3. Knit the next row as follows (from right side): K 1, K 2 tog, K the yo from previous row, K 1. Make buttonholes when the piece measures: Make the last buttonhole when there are 2 rows garter st remaining in neck shaping. Size S: 2, 7, 12, 17, 21, 26, 31, 36 and 41 cm Size M: 2, 7, 12, 17, 22, 27, 32, 37 and 42 cm Size L: 2, 7, 12, 17, 22, 27, 33, 38 and 43 cm Size XL: 2, 7, 13, 18, 23, 28, 34, 39 and 44 cm Size XXL: 2, 7, 13, 18, 24, 29, 34, 40 and 45cm Body: Cast on 203-227-251-275-299 sts on smaller circular needles. Knit Pattern 1 (row 1 = wrong side, begin pattern with P 3), keeping 4 sts in garter st at each side for buttonbands - make buttonholes on right buttonband - see instructions above. When the piece measures 22 cm change to larger circular needles and knit Pattern 2 to finished measurements. When the piece measures 34-35-36-37-38 cm knit the next row as follows (right side row): 50-56-62-68-74 sts (= right front), bind off 7 sts for armhole, 89-101-113-125-137 sts (= back), bind off 7 sts for armhole), 50-56-62-68-74 sts (= left front). Knit each piece separately. Left front: = 50-56-62-68-74 sts. Bind off for armhole at the side every other row: 3 sts 0-0-1-2-3 times, 2 sts 0-1-2-3-4 times and 1 st 1-4-4-4-4 times = 49-50-51-52-53 sts. When the piece measures 42-43-44-45-46 cm put the 10 sts at the center front edge on a st holder for the neck. Then bind off at neck edge every other row: 3 sts 1 time, 2 sts 1 time and 1 st 10 times = 24-25-26-27-28 sts remain on shoulder. Bind off the remaining sts when the piece measures 52-54-56-58-60 cm. Right front: = 50-56-62-68-74 sts. Knit the same as the left, reversing shaping - continue to make buttonholes. Back: = 89-101-113-125-137 sts. Bind off for armholes at each side as on front = 87-89-91-93-95 sts remain. When the piece measures 50-52-54-56-58 cm bind off the center 35 sts for the neck. Then dec 1 st at each neck edge every other row 2 times = 24-25-26-27-28 sts remain on each shoulder. Bind off when the piece measures 52-54-56-58-60 cm. Short sleeve: Cast on 72-78-78-84-90 sts on smaller double-pointed needles; join and place a marker at the join. Knit Pattern 1 one time, change to larger double pointed needles and knit Pattern 2 to finished measurements. After Pattern 1 inc 1 st each side of marker (make incs 1 st in from marker) every 6-8-3-3-4 rows a total of 3-2-4-4-3 times = 78-82-86-92-96 sts - purl the increased sts. When the piece measures 7-6-5-5-5 cm bind off 7 sts at marker (3 before and 4 after). Then bind off for sleeve cap at each side every other row: 3 sts 1 time, 2 sts 2-1-0-0-0 times, 1 st 5-10-15-18-21 times, then bind off 3 sts at each side until the piece measures 14-15-16-18-20 cm. Bind off the remaining sts. Long sleeve: Cast on 54-54-60-60-60 sts on smaller double-pointed needles; join and place a marker at the join. Knit Pattern 1 one time, change to larger double pointed needles and knit Pattern 2 to finished measurements. At the same time when the piece measures 8-8-8-7-7 cm inc 1 st each side of marker (make incs 1 st in from marker) every 11-9-9-7-6 rows a total of 12-14-13-16-18 times = 78-82-86-92-96 sts - purl the increased sts. When the piece measures 49-47-45-43-41 cm bind off 7 sts at marker (3 sts before and 4 sts after). Then bind off for sleeve cap at each side every other row: 3 sts 1 time, 2 sts 2-1-0-0-0 times, 1 st 5-10-15-18-21 times, then bind off 3 sts at each side until the piece measures 56 cm. Bind off the remaining sts. Assembly: Sew shoulder seams. Neckband: Pick up approx. 110-120 sts (incl. sts on st holders) around the neck on smaller circular needles. Knit 3 rows garter st, then bind off. Sew in sleeves and buttons. Thread ribbon through the top row of holes in Pattern 1. |
|||||||||||||
Diagram explanations |
|||||||||||||
|
|||||||||||||
 |
|||||||||||||
 |
|||||||||||||
Have you finished this pattern?Tag your pictures with #dropspattern or submit them to the #dropsfan gallery. Do you need help with this pattern?You'll find 22 tutorial videos, a Comments/Questions area and more by visiting the pattern on garnstudio.com. © 1982-2026 DROPS Design A/S. We reserve all rights. This document, including all its sub-sections, has copyrights. Read more about what you can do with our patterns at the bottom of each pattern on our site. |
|||||||||||||


With over 40 years in knitting and crochet design, DROPS Design offers one of the most extensive collections of free patterns on the internet - translated to 17 languages. As of today we count 324 catalogues and 12290 patterns translated into English (UK/cm). 12290
We work hard to bring you the best knitting and crochet have to offer, inspiration and advice as well as great quality yarns at incredible prices! Would you like to use our patterns for other than personal use? You can read what you are allowed to do in the Copyright text at the bottom of all our patterns. Happy crafting!
Post a comment to pattern DROPS 77-24
We would love to hear what you have to say about this pattern!
If you want to leave a question, please make sure you select the correct category in the form below, to speed up the answering process. Required fields are marked *.