
Popular categories
Looking for a yarn?


Comments / Questions (77)
![]() Ingrid wrote:
Ingrid wrote:
Beste,ben het patroon 77-19 aan het maken,zit aan de 12 cm boord ,moet nu meerderen 4 ker 1 steek,dat komt toch niet uit met het patroon,weet eigenlijk hoe ik verder moet,gr
25.04.2026 - 11:21DROPS Design answered:
Dag Ingrid,
Je breit de gemeerderde steken gaandeweg mee in het patroon. Na de eerste keer meerderen lukt dat nog niet, dus dan brei je de gemeerderde steken in tricotsteek. Zodra je in patroon kunt breien, brei je deze steken in patroon.
25.04.2026 - 19:25
![]() Ingrid wrote:
Ingrid wrote:
Vraagje,wordt dit patroon van onder naar boven gebreid,ben nog een beginneling,moet veel vragen en veel uittrekken,maar we komen er wel
07.04.2026 - 19:59DROPS Design answered:
Dag Ingrid,
Dit patroon wordt van onder naar boven gebreid. Je kunt ook de veel gestelde vragen lezen en de video's bekijken voor tips en hulp.
08.04.2026 - 21:22
![]() Julianna wrote:
Julianna wrote:
L es mérethez 224 szemmel kezdtem. A magyar leírás alapján, 12 cm után 1 szemet kell szaporítani 5 cm ként 4 alkalommal. Ha mind két oldalon szaporítok 1 szemet 4 alkalommal az 2*4= 8 szem, vagyis 232 szem lesz szaporítás után. Ezt az értéket nem látom. A magyar fordításban lehet, hogy hiba van. El tudnák küldeni az eredetit?
02.03.2026 - 09:18
![]() Anita wrote:
Anita wrote:
Heb een beetje moeite met het telpatroon te begrijpen waar de steken worden samen gebreid zonder ze af te halen 3 rechts samen en dann de volgende averechts samen dan zitten de steken toch over elkaar heen? Bedankt voor antwoord
24.08.2025 - 05:45DROPS Design answered:
Dag Anita,
Je breit 3 steken averecht samen, maar je laat de 3 steken niet van de linker naald af glijden. Dan brei je dezelfde 3 steken recht samen en tot slot nog een keer averecht samen. Daarna laat je de steken pas van de naald af glijden. In de eerste video die bij het patroon staat wordt dit ook getoond.
27.08.2025 - 21:07
![]() Irena wrote:
Irena wrote:
Dzień dobry. Utknęłam . Jestem w momencie TYŁ&PRZÓD: "Na wys. 12 cm od dołu robótki dodać 1 m z każdej strony oczek z markerami 4 razy co 5 cm - przer. dodawane o. ściegiem fantazyjnym w miarę postępu robótki = 192-208-224-240-272 o.". Co to 1m? Jezeli to oczko, to jeslidodam 4x4oczka to ze 111 nie bedzie 240. (rozmiar xl). Nie wiem co w tym miejscu mam zrobic. Proszę o pomoc.
21.07.2025 - 09:32DROPS Design answered:
Witaj Ireno, masz na początku 224 oczka. Wkładasz markery w oczka na bokach, tzn, masz 111 oczek na przód, 1 oczko z markerem, 111 oczek na tył i 1 oczko z markerem, razem 224 oczka. Dodajesz 4 x 4 oczka w okrążeniu > 224+16=240 oczek. Pozdrawiamy!
21.07.2025 - 10:22
![]() Stefania Hagen wrote:
Stefania Hagen wrote:
Buongiorno, desideravo comunicare la mia osservazione sulla spiegazione dei primi due punti del DIAGRAMMA. E' sicuro che non c''è qualche errore?: --------------- Diagramma - 1 m dir. sul rovescio (???) del lavoro, rov sul diritto (???) del lavoro - 1 m rov sul diritto del lavoro, dir sul rovescio del lavoro --------------- Se fosse come descritto, sul diritto del lavoro ci sarebbero SOLO punti rovescio... Grazie
15.07.2025 - 09:42DROPS Design answered:
Buonasera Stefania, grazie per la segnalazione, abbiamo corretto la legenda. Buon lavoro!
15.07.2025 - 22:47
![]() Kirsten Sørensen wrote:
Kirsten Sørensen wrote:
Skal der ikke strikkes en halskant?
09.07.2025 - 22:57DROPS Design answered:
Hej Kirsten. Du stickar 5 p rib på forstk og rygstk. Mvh DROPS Design
10.07.2025 - 10:07
![]() Patricia wrote:
Patricia wrote:
Bonjour Je tricote le modèle en S. Pour le dos, vous écrivez de tricoter 5 rangs de côtes au milieu à partir de 49 cm. Nous arrivons alors à 52 cm. Il n’est donc pas possible de tricoter les épaules comme le devant sans dépasser ces 52 cm, alors que sur votre schéma, nous voyons que le décolleté semble pareil que le devant. Est-ce que le début des côtes à 49 cm n’est pas une erreur ? Ne faut-il pas les faire à 40 cm, comme devant ? Merci de m’éclairer
14.05.2025 - 18:22DROPS Design answered:
Bonjour Patricia, les 5 rangs de côtes + le rang pour rabattre les mailles centrales pour l'encolure doivent mesurer environ 2 cm (sur la base de 30 rangs = 10 cm), vous continuerez donc 1 cm sur chaque épaule séparément, soit environ 3 rangs. Bon tricot!
15.05.2025 - 09:24
![]() Jytte Eriksen wrote:
Jytte Eriksen wrote:
I opskriften Blue Summer står der i diagram forklaring: strik 3 m sammen således fra retsiden uden at lade dem falde af venstre p: 3vr sm, 3r sm, 3 vr sm, slip m af venstre pind, Kan ikke få det til at fungere, kan i hjælpe mig. Venlig hilsen Jytte
06.05.2025 - 18:28DROPS Design answered:
Hej Jytte, se videoen her: Hvordan strikkes knude over 3 masker
08.05.2025 - 08:35
![]() Chris Van Der Sijpt wrote:
Chris Van Der Sijpt wrote:
Hoe brei ik dit van onder naar boven??dank u
04.05.2025 - 09:06DROPS Design answered:
Dag Chris,
Je kunt gewoon de beschrijving volgen en dan brei je het patroon al van onder naar boven.
04.05.2025 - 10:09
|
|||||||||||||||||||
Blue Summer |
|||||||||||||||||||
|
|
|||||||||||||||||||
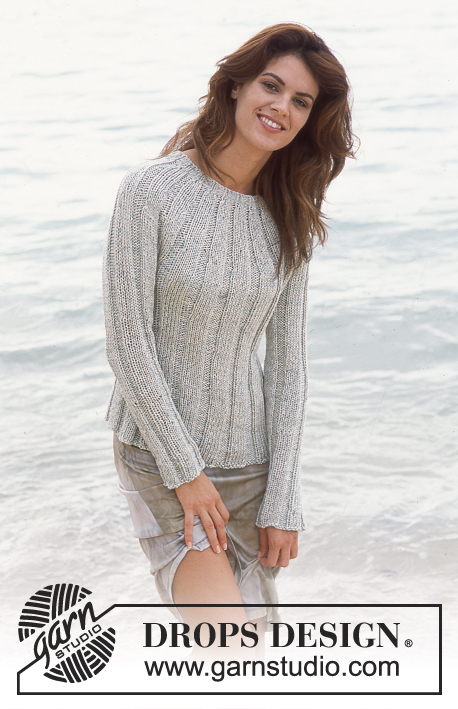
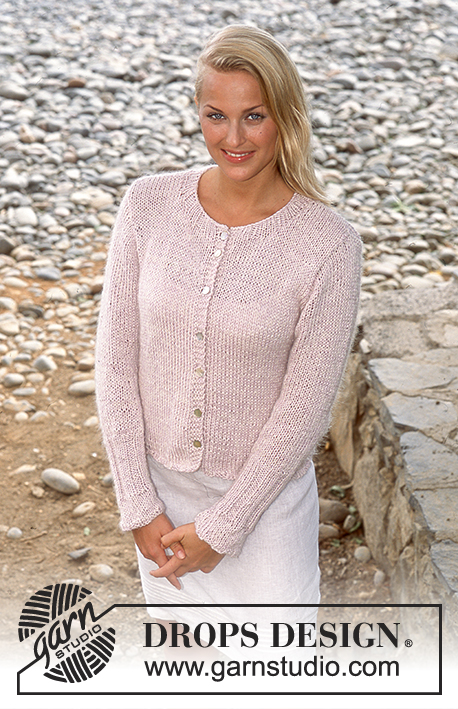
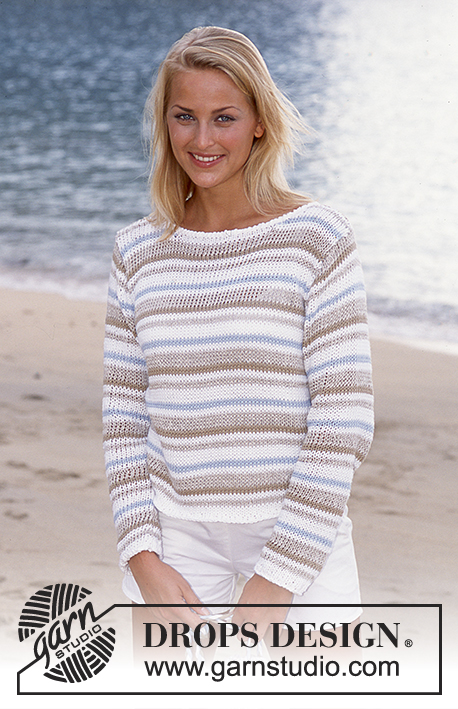
DROPS Pullover in Safran with short or long sleeves
DROPS 77-19 |
|||||||||||||||||||
|
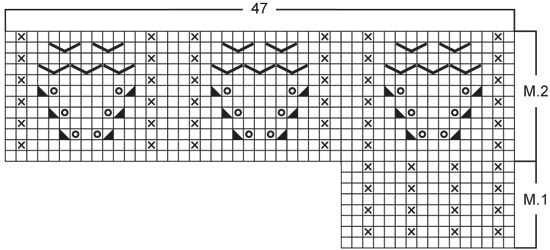
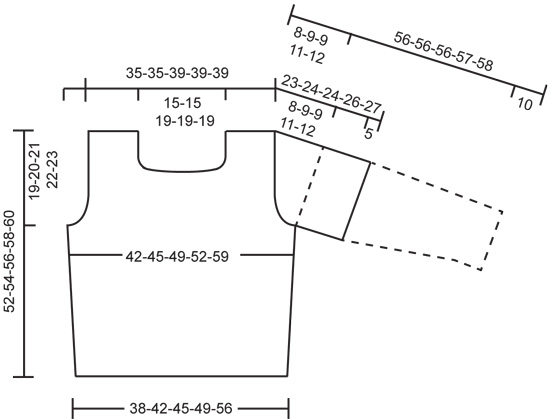
Tension: 23 sts x 30 rows = 10 x 10 cm on larger needles in stockinette st. Rib: * K 1, P 1 *, repeat from * - *. Pattern: See chart. The pattern is seen from the right side. Garter st, when knitting flat: Knit all sts, all rows. Knitting tips (for neckband): All decs are made from right side. Dec inside 5 edge sts knit as follows from edge (seen from the right side): K 1 (edge st knit in garter st), K 1, P 1, K 1, P 1. Dec 1 st as follows: After 5 edge sts: Slip 1 st as if to knit, K 1, psso. Before 5 edge sts: K 2 tog. Body: Cast on 176-192-208-224-256 sts on smaller circular needles; join and place a marker at the join. Knit 5 rows rib. Change to larger circular needles and Pattern 1 - see that the seed st columns in the pattern are directly over the purl sts in the rib. Put a marker at each side (in the center st of a K 3 rib) – there will be 87-95-103-111-127 sts between markers. When the piece measures 12 cm inc 1 st at each side of sts with markers every 5 cm a total of 4 times - knit the increased sts into the pattern as you go along = 192-208-224-240-272 sts. Read the entire next section before continuing: Pattern: When the piece measures 31-32-34-36-37 cm knit Pattern 2 over the center 47 sts on the front (knit the remaining sts as before). After Pattern 2 knit Pattern 1 over all sts again. Armhole: When the piece measures 33-34-35-36-37 cm cast off 7-9-9-11-11 sts at each side for armhole (that is, the st with the marker and 3-4-4-5-5 sts at each side st with marker). Knit each piece separately. Front: = 89-95-103-109-125 sts. Continue the pattern and cast off for armhole at each side every other row: 3 sts 0-0-0-1-2 times, 2 sts 1-2-2-2-4 times and 1 st 2-3-3-3-4 times = 81-81-89-89-89 sts. When the piece measures 40-41-42-44-45 cm knit 5 rows rib over the center 29-29-37-37-37 sts - start with P 1 (knit the remaining sts in pattern as before). Then cast off the center 19-19-27-27-27 sts for the neck - cast off in pattern. Keep the 5 sts at each neck edge in rib, with the outermost st in garter st, to finished dimensions. Dec 1 st at each neck edge: every other row 4 times and then every 4 rows 4 times - see knitting tips = 23 sts remain on each shoulder. Cast off when the piece measures 52-54-56-58-60 cm. Back: = 89-95-103-109-125 sts. Cast off for armhole as on front = 81-81-89-89-89 sts. When the piece measures 49-51-53-55-57 cm knit 5 rows rib over the center 45-45-53-53-53 sts - start with P 1 (knit the remaining sts in pattern as before). Then cast off the center 35-35-43-43-43 sts for the neck - cast off in rib = 23 sts remain on shoulder. Knit the 5 sts at neck edge as on front and cast off when the piece measures 52-54-56-58-60 cm. Short sleeve: Cast on 60-64-68-72-80 sts on smaller double-pointed needles; join and place a marker at the join. Knit 5 rows rib. Change to larger double-pointed needles and knit Pattern 1 to finished measurements. When the piece measures 5 cm inc 1 st each side of marker a total of 8-8-10-10-8 times: Sizes S, M and XXL: alternately every 3rd and 4th row. Sizes L and XL: alternately every other and every 3rd row = 76-80-88-92-96 sts - knit the increased sts in the pattern as you go along. When the piece measures 15 cm cast off 3 sts each side of marker. Then cast off for sleeve cap every other row: 3 sts 1 time, 2 sts 3-3-4-4-4 times and 1 st 3-3-2-5-7 times, then cast off 2 sts at each side until the piece measures 22-23-23-25-26 cm, then cast off 3 sts at each side 1 time. Cast off the remaining sts, the piece measures approx. 23-24-24-26-27 cm. Long sleeve: Cast on 48-52-52-56-56 sts on smaller double-pointed needles; join and place a marker at the join. Knit 5 rows rib. Change to larger double-pointed needles and knit Pattern 1 to finished measurements. When the piece measures 10 cm inc 1 st each side of marker every 8-8-6-6-5 rows a total of 14-14-18-18-20 times = 76-80-88-92-96 sts - knit the increased sts in the pattern as you go along. When the piece measures 48-47-47-46-46 cm cast off 3 sts each side of marker. Then cast off for sleeve cap every other row: 3 sts 1 time, 2 sts 3-3-4-4-4 times and 1 st 3-3-2-5-7 times, then cast off 2 sts at each side until the piece measures 55-55-55-56-57 cm, then cast off 3 sts at each side 1 time. Cast off the remaining sts, the piece measures approx. 56-56-56-57-58 cm. Assembly: Sew shoulder seams. Sew in sleeves. |
|||||||||||||||||||
Diagram explanations |
|||||||||||||||||||
|
|||||||||||||||||||
 |
|||||||||||||||||||
 |
|||||||||||||||||||
Have you finished this pattern?Tag your pictures with #dropspattern or submit them to the #dropsfan gallery. Do you need help with this pattern?You'll find 23 tutorial videos, a Comments/Questions area and more by visiting the pattern on garnstudio.com. © 1982-2026 DROPS Design A/S. We reserve all rights. This document, including all its sub-sections, has copyrights. Read more about what you can do with our patterns at the bottom of each pattern on our site. |
|||||||||||||||||||


With over 40 years in knitting and crochet design, DROPS Design offers one of the most extensive collections of free patterns on the internet - translated to 17 languages. As of today we count 324 catalogues and 12290 patterns translated into English (UK/cm). 12290
We work hard to bring you the best knitting and crochet have to offer, inspiration and advice as well as great quality yarns at incredible prices! Would you like to use our patterns for other than personal use? You can read what you are allowed to do in the Copyright text at the bottom of all our patterns. Happy crafting!
Post a comment to pattern DROPS 77-19
We would love to hear what you have to say about this pattern!
If you want to leave a question, please make sure you select the correct category in the form below, to speed up the answering process. Required fields are marked *.