
Popular categories
Looking for a yarn?


Comments / Questions (169)
![]() Annie wrote:
Annie wrote:
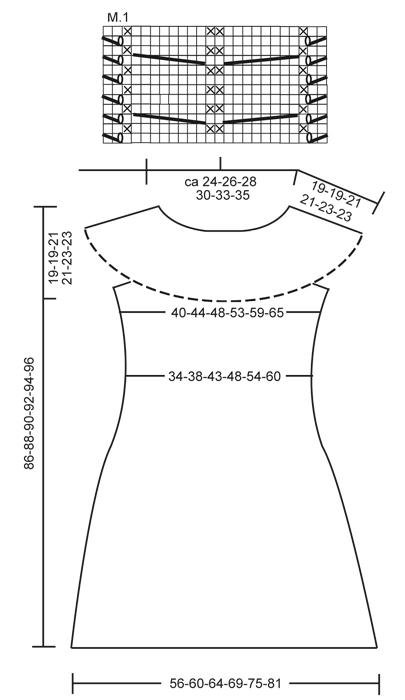
When it says to work to the marker, is that using the diagram? are the 2nd marker rows included in the diagram rows, and are the 1st marker rows?
24.01.2026 - 23:58DROPS Design answered:
Dear Annie, yes just work the number of sts stated as before, ie with P over P, K over K and garter stitch over garter stitch with M.1 as before. Happy knitting!
27.02.2026 - 15:30
![]() Annie wrote:
Annie wrote:
Is the "working back" according to the M.1 diagram as well, or should it ignore the diagram?
24.01.2026 - 23:51DROPS Design answered:
Dear Annie, when working the short rows, just work the stitches as before, ie including Diagram. Happy knitting!
27.02.2026 - 15:29
![]() Geneviève wrote:
Geneviève wrote:
Bonjour Le dessin du diagramme se fait sur 12 rangs et les rangs raccourcis sur 14 rangs. A un moment je dois aller jusqu'au 1er marqueur et tourner alors que je devrais faire la tresse. Il y a toujours une fois où la torsade devrait se faire alors que je dois tourner au 1er marqueur. Est ce alors normal que la torsade ne doit pas régulière ? Merci pour votre aide.
17.10.2025 - 19:41DROPS Design answered:
Bonjour Geneviève, lorsque vous tricotez les rangs raccourcis, continuez à tricoter le diagramme comme indiqué, autrement dit, les deux torsades ne vont pas se tricoter au même rythme mais vous aurez toujours le même nombre de rangs entre chaque torsade. Bon tricot!
28.10.2025 - 18:22
![]() Geneviève wrote:
Geneviève wrote:
Bonjour Je ne trouve pas la quantité de laine qu'il faut pour ce modèle. Merci.
02.10.2025 - 07:53DROPS Design answered:
Bonjour Geneviève, fournitures : DROPS DELIGHT de Garnstudio 200-250-250-300-300-350 g coloris n° 01, gris mix et DROPS KID-SILK de Garnstudio 100-100-125-125-150-150 g coloris n° 02, noir. DROPS Delight n'est plus en vente, vous pouvez la remplacer par une autre laine du group A. Vous pouvez calculer combien de laine acheter en utlisant notre convertisseur ICI. Bon tricot!
02.10.2025 - 08:49
![]() Karine wrote:
Karine wrote:
Autre question pour le rang raccourci il est noté tricoter 2 rangs sur toutes les mailles mais on les tricoté en point mousse ou en jersey 🤷 Merci de votre aide
01.12.2022 - 08:48DROPS Design answered:
Bonjour Karine, pendant les rangs raccourcis, tricotez les mailles comme elles ont été établies auparavant, autrement dit, soit au point mousse, soit en jersey, soit en point fantaisie. Le diagramme doit continuer sur les mailles tricotées. Bon tricot!
01.12.2022 - 11:36
![]() Karine wrote:
Karine wrote:
Bonjour Il est noté que le diagramme représente les rangs endroits mais dans la légende la "croix" représente 1 maille endroit sur l'envers ? Merci
01.12.2022 - 08:31DROPS Design answered:
Bonjour Karine, tous les rangs sont représentés dans le diagramme, les rangs sur l'endroit (à lire de droite à gauche) et ceux sur l'envers (à lire de gauche à droite), autrement dit, la 3ème m de M.1 par ex est une maille point mousse (on va la tricoter à l'endroit sur l'endroit et à l'endroit sur l'envers), alors que les mailles des torsades se tricotent à l''envers sur l'envers (= jersey endroit). Bon tricot!
01.12.2022 - 11:35
![]() Karine wrote:
Karine wrote:
Désolée mais je n'y arrive pas , je comprends le rangs raccourci, je comprends le diagramme mais je n'arrive pas à associer les deux 😥 moi qui avais hâte de recevoir la laine pour la faire 🤷
14.11.2022 - 17:51DROPS Design answered:
Bonjour Karine, placez vos marqueurs comme indiqué (sur l'endroit de l'ouvrage) et tricotez les rangs raccourcis ( 2 rangs sur toutes les mailles, 2 rangs jusqu'au 2ème marqueur, 2 rangs sur les mailles jusqu'au 1er marqueur, 2 rangs sur toutes les mailles, 2 rangs jusqu'au 2ème marqueur, 2 rangs sur toutes ls mailles, 2 rangs jusqu'au 1er marqueur (= 14 rangs à droite, vu sur l'endroit et 6 à gauche) en même temps, tricotez 10-16 m point mousse, .1 (24 m), 6-8 m point mousse (vu sur l'endroit). Bon tricot!
15.11.2022 - 09:26
![]() Karine wrote:
Karine wrote:
Bonjour Il faut faire d'abord les rangs raccourci et après commencer le diagramme 1 ? Merci
14.11.2022 - 16:24DROPS Design answered:
Bonjour Karine, vous tricotez M.1 et les rangs raccourcis en même temps. Bon tricot!
14.11.2022 - 16:31
![]() Hanne wrote:
Hanne wrote:
Hey there. It is my very first time I wrote to this. Ehat do you mean by i´m spammer or I´ve wrote too many times, when its my first time🙄😱
12.10.2022 - 21:33
![]() Hanne wrote:
Hanne wrote:
Hej. Hjælp mig til at forstå denne opskrift. Forvirrer mig med forkortede pinde og mønster, hvornår skal der strikkes forkortede og hvornår strikkes mønsteret, starten forstår jeg godt, men derfra heller ikke mere 🙄 Tak p.f.h M.v.h Hanne
11.10.2022 - 20:51
|
|||||||||||||||||||
Forest Nymph#forestnymphdress |
|||||||||||||||||||
|
|
|||||||||||||||||||
Knitted DROPS dress with yoke worked across with cables, short rows and crochet border in ”Delight” and ”Kid-Silk”. Size: S to XXXL
DROPS 132-1 |
|||||||||||||||||||
|
GARTER ST (back and forth on needle): K all rows. GARTER ST (in the round on circular needle): 1 ridge = 2 rounds: * K 1 round and P 1 round *, repeat from *-*. SHORT ROWS: To make the yoke wider at the bottom, work more rows over the bottom sts than the upper sts. This is done as follows: * Work 2 rows over all sts, work until 2nd marker, turn, tighten thread and work back, work until 1st marker, turn, tighten thread and work back, work 2 rows over all sts, work until 2nd marker, turn, tighten thread and work back, work 2 rows over all sts, work until 1st marker, turn, tighten thread and work back *, repeat from *-*, i.e. 1 repetition = 6 rows at the top and 14 rows at the bottom. PATTERN: See diagram M.1. Diagram shows 1 repetition of pattern in breadth (= 24 sts), the diagram shows pattern from RS. MEASURING TIP: Measure when piece is flat, it is important not to stretch the piece when measuring. DECREASE TIP: Work until 2 sts remain before marker, K 2 tog, slip 1 st as if to K, K 1, psso. INCREASE TIP: Work until 1 st remains before marker, make 1 YO, work 2 sts (marker is between these 2 sts), make 1 more YO. On next round K YOs twisted (i.e. work in back loop of st instead of front) to avoid holes . -------------------------------------------------------- -------------------------------------------------------- YOKE: Worked back and forth on circular needle, worked sideways from mid back. LOOSELY cast on 32-32-36-36-40-40 sts on circular needle size 5 mm with 1 thread Delight and 1 thread Kid-Silk. K 2 rows over all sts (1st row beg from bottom edge from RS). Work next row as follows (from RS): K 10-10-13-13-16-16, K 2 tog, 1 YO, K 1, K 2 sts in each of the next 4 sts (= K 8), K 2, K 2 in each of the next 4 sts (= K 8), K 1, 1 YO, slip 1 st as if to K, K 1, psso, K 6-6-7-7-8-8 = 40-40-44-44-48-48 sts. Work next row as follows (from WS): K 6-6-7-7-8-8, P 2, K 1, P 8, K 2, P 8, K 1, P 2 and K 10-10-13-13-16-16. Insert 2 markers in the piece as follows (from RS): 1st marker after 13-13-16-16-19-19 sts and 2nd marker after a total of 31-31-34-34-37-37 sts = 9-9-10-10-11-11 sts remain at the top after 2nd marker. Then work SHORT ROWS – see explanation above and PATTERN as follows: 10-10-13-13-16-16 sts in GARTER ST – see explanation above, diagram M.1 over the next 24 sts and 6-6-7-7-8-8 sts in garter st. Work until piece measures approx. 112-120-128-140-152-164 cm at bottom edge – SEE MEASURING TIP – finish after 2 rows have been worked on all sts. Work next row as follows (from RS): K 13-13-16-16-19-19, K the next 8 sts tog 2 by 2, K 2, K the next 8 sts tog 2 by 2, K 9-9-10-10-11-11 = 32-32-36-36-40-40 sts. K 1 row over all sts, then cast off all sts with K from RS. Piece measures approx. 114-122-130-142-154-166 cm at bottom edge. INSERTING MARKERS: Remove the markers in the piece and insert 4 new markers as follows: Place piece flat on a table and measure along the longest side. First find centre of piece – measure 18-20-21½-24-26½-29½ cm from centre out to each side – insert a marker in each side (i.e. there are 36-40-43-48-53-59 cm between markers on front piece), then measure 18-20-21½-24-26½-29½ cm in from cast off edge and cast on edge (= back piece) – insert markers here. There are now approx. 21-21-22-23-24-24 cm in each side between markers on front and back piece (= armholes). Sew yoke tog, sew edge to edge mid back to avoid a chunky seam. BODY: Worked in the round on circular needle. Knit up sts along bottom edge of yoke with 1 thread Delight and 1 thread Kid-Silk on circular needle size 5 mm – start round at marker in transition between left sleeve and back piece. Knit up 1 st in front loop of st in every ridge (1 ridge = 2 rows in garter st) between markers on back piece (approx. 60 to 98 sts), cast on 6-6-8-8-10-10 new sts (= under sleeve), skip to first marker on front piece and knit up 1 st in front loop of sts in every ridge on front piece (= approx. 60 to 98 sts), cast on 6-6-8-8-10-10 new sts (= under the other sleeve). NOW MEASURE PIECE FROM HERE! P 1 round while at the same time adjusting the no of sts to 136-148-162-180-200-220. Remove markers and insert 4 new markers as follows: K 14-15-16-18-20-22 sts, insert a marker, K 34-38-41-46-50-56 sts, insert a marker (these 2 markers marks where waistline should be worked on back piece), K 34-36-40-44-50-54 sts, insert a marker, K 34-38-41-46-50-56 sts, insert a marker (these 2 markers marks where waistline should be worked on front piece), K rest of round (= 20-21-24-26-30-32 sts). On next round, P 10-10-12-12-14-14 sts under each sleeve, K the remaining sts. Continue in stocking st over all sts. REMEMBER THE KNITTING TENSION! When piece measures 10 cm, dec 1 st on each side of the 4 markers - READ DECREASE TIP! Repeat dec when piece measures 15 cm = 120-132-146-164-184-204 sts. When piece measures 20-21-21-22-22-23 cm, inc 1 st on each side of the 4 markers – see INCREASE TIP. Repeat inc every 8 rounds a total of 9 times = 192-204-218-236-256-276 sts. When piece measures 63-65-65-67-67-69 cm, K 1 round while at the same time dec 12 sts evenly. Then work 4 cm in garter st. LOOSELY cast off. CROCHET LACE EDGE: Crochet an edge in bottom st in garter st along yoke (i.e. in same st that was knit up on body). Hold piece with neck opening towards you, work with 1 thread Kid-Silk on hook size 3.5 mm as follows – start mid back as follows: ROUND 1: 1 dc in first ridge (1 ridge = 2 rounds in garter st), * 3 ch, 1 dc in next ridge *, repeat from *-* the entire round, finish with 3 ch and 1 sl st in first dc on round (adjust so that there is an even number of ch-loops). ROUND 2: 2 ch, 1 dc in first ch-loop, * 5 ch, 1 dc in next ch-loop, 1 ch, 1 dc in next ch-loop *, repeat from *-*, finish with 1 sl st (instead of 1 dc) in first dc on round. ROUND 3: Work as follows in each of the large ch-loops (= 5 ch): 1 dc, 5 tr, 1 dc and work 1 dc in each of the small ch-loops (= 1 ch), finish with 1 sl st at beg of round, cut and fasten the thread. Steam the lace edge well to make it fold nicely downwards. |
|||||||||||||||||||
Diagram explanations |
|||||||||||||||||||
|
|||||||||||||||||||
 |
|||||||||||||||||||
Have you finished this pattern?Tag your pictures with #dropspattern #forestnymphdress or submit them to the #dropsfan gallery. Do you need help with this pattern?You'll find 17 tutorial videos, a Comments/Questions area and more by visiting the pattern on garnstudio.com. © 1982-2026 DROPS Design A/S. We reserve all rights. This document, including all its sub-sections, has copyrights. Read more about what you can do with our patterns at the bottom of each pattern on our site. |
|||||||||||||||||||


With over 40 years in knitting and crochet design, DROPS Design offers one of the most extensive collections of free patterns on the internet - translated to 17 languages. As of today we count 324 catalogues and 12290 patterns translated into English (UK/cm). 12290
We work hard to bring you the best knitting and crochet have to offer, inspiration and advice as well as great quality yarns at incredible prices! Would you like to use our patterns for other than personal use? You can read what you are allowed to do in the Copyright text at the bottom of all our patterns. Happy crafting!
Post a comment to pattern DROPS 132-1
We would love to hear what you have to say about this pattern!
If you want to leave a question, please make sure you select the correct category in the form below, to speed up the answering process. Required fields are marked *.