
Popular categories
Looking for a yarn?


Comments / Questions (5)
![]() Liz wrote:
Liz wrote:
When shaping the armhole, the instructions ay bind off 5 stitches (M) on each side. Did you intend for binding off 5 on RS and WS or did you intend for 5 on left side and right side in same row
04.04.2026 - 07:42DROPS Design answered:
Dear Liz, bind off the first 5 sts at the beginning of a row from RS and work this row to the end, turn and bind off the first 5 sts at the beginning of this row from WS, work row to the end. Decrease now on each side from the right side only as explained under decrease tip at the beg of the pattern. Happy knitting!
08.04.2026 - 09:10
![]() Wendi wrote:
Wendi wrote:
Hello, I would like to make this top considerably longer. Would I just add rows after the bottom band? Will that screw up the shaping?
25.01.2026 - 18:27DROPS Design answered:
Dear Wendi, you can add rows before working the armholes, but after the initial ridges. You can either add more rows before starting to shape the piece or spread out the increases working more rows in between them; you can adjust it according to your body's shape. Remember that you may also need to increase the initial number of stitches depending on the size of the hips, if the longer piece will reach them. Happy knitting!
25.01.2026 - 20:01
![]() Eeckhoudt Emelda wrote:
Eeckhoudt Emelda wrote:
Hallo een vraagje kan ik de wol of katoen bestellen van dat wit topje hierbovenzou graag het zelfde bestellen wil je me antwoorden aub
16.03.2025 - 11:44DROPS Design answered:
Dag Emelda,
Het bestellen van garens gaat via een van de verkooppunten die onze artikelen verkopen; wij verkopen geen garens via de site. Via deze link vind je een lijst met verkooppunten.
16.03.2025 - 19:46
![]() Sigrid wrote:
Sigrid wrote:
Ik wil dit patroon gebruiken . Welk garen is compatible met de ribbon. De draad vervanging werkt niet want ribbon staat niet meer tussen het te vervangen garen. De eventuele looplengte de meter van de ribbon was ook al een oplossing
10.06.2024 - 14:18DROPS Design answered:
Dag Sigrid,
Voor een vervangend garen kun je onze garenvervanger gebruiken. Hiervan vindt je een link onderaan de materialenlijst bij ieder patroon.
12.06.2024 - 16:38
![]() Paulissen wrote:
Paulissen wrote:
Bonjour, Pour ce joli modèle il ne faut pas faire de boutonnière. Je ne comprends alors pas ? Faut-il tout simplement faire une fausse boutonnière ? Pouvez-vous m'éclairer afin que je puisse terminer correctement ce joli modèle ? Merci d'avance et bien à vous. Martine
03.05.2020 - 11:28DROPS Design answered:
Bonjour Mme Paulissen, on ne forme effectivement pas de boutonnière pour ce modèle, on va "forcer" le passage entre 2 mailles pour boutonner les boutons.Le fil utlisé dans ce modèle le permettait facilement, mais vous pouvez faire des boutonnières si vous préférez. Pensez à bien les répartir au fur et à mesure. Tricotez le devant gauche en premier pour pouvoir les prévoir plus facilement sur le devant droit. Bon tricot!
04.05.2020 - 12:39
|
|
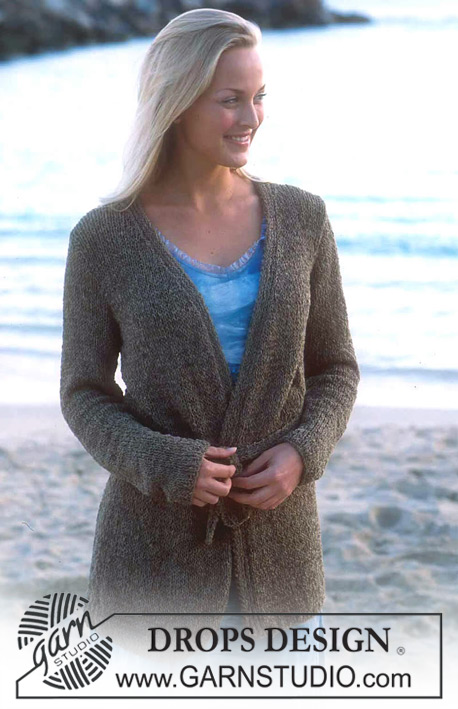
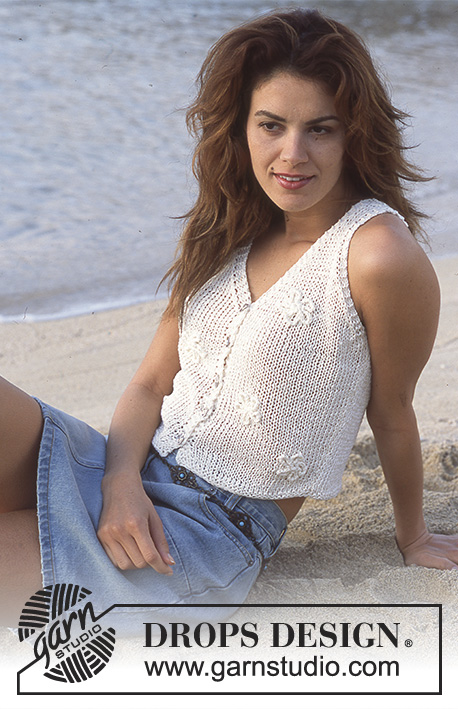
Wild Daisy Vest#wilddaisyvest |
|
 |
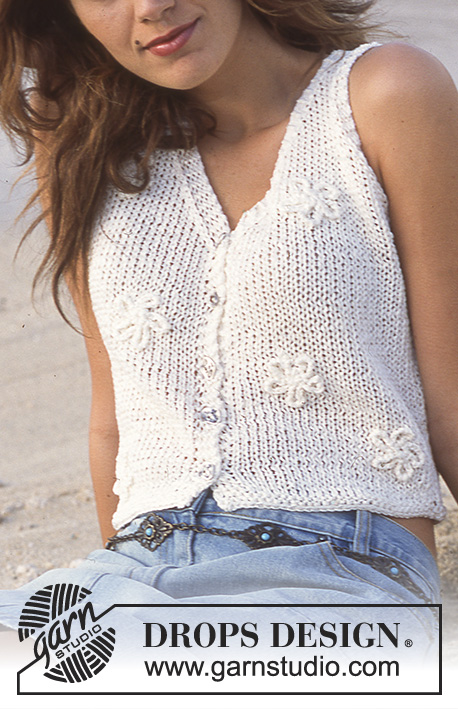 |
Small DROPS vest and top in "Ribbon" with buttons on front and crochet flowers.
DROPS 78-15 |
|
|
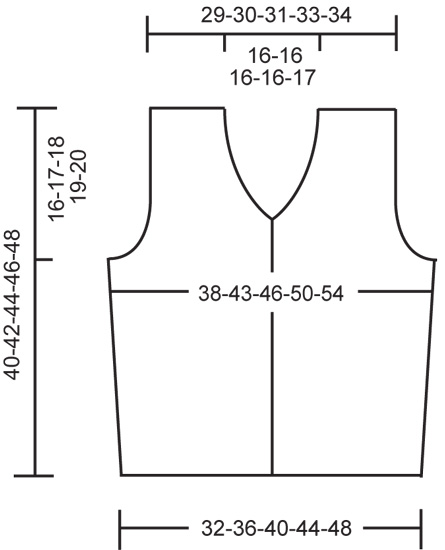
Tension: 16 sts x 20 rows = 10 x 10 cm with needle size 5.5 mm and stocking st. Remember needle size is only a guide! Ridge (back and forth on needle): 1 ridge = 2 rows: 1st row: K, 2nd row: K. Decrease tip: (for the armholes and neck): All decreases are done on RS! At the neckline dec inside 4 ridge sts and at the armholes inside 3 ridge sts. Dec as follows after the ridge sts: Slip 1 st as if to K, K 1, lift the slip st over. Dec as follows before the ridge sts: K 2 tog. Band: The band is worked in ridges upwards - work them a bit tight to get a neat look. Knitting tip: Ribbon yarn has a tendency to twist when worked, so it should be untwisted as you go for the best result. Back piece: Read knitting tip! Cast on 53-60-66-72-79 sts (incl 1 edge st in each side) with needle size 4.5 mm and Ribbon and work 2 ridges. Change to needle size 5.5 mm and continue with stocking st. Remember knitting tension! When the piece measures 5 cm inc 1 st in each side every 4th row cm in total 5 times = 63-70-76-82-89 sts. When the piece measures 23-24-25-26-27 cm work 2 ridges over 6-7-8-9-10 sts in each side (the other sts are worked in stocking st). Then cast off 3-4-5-6-7 sts in each side for armholes. Continue to dec for armholes in each side every 2nd row - see Decrease tip: 1 st 5-7-8-9-10 times = 47-48-50-52-55 sts remaining on the needle. Continue with stocking st and 3 ridge sts in each side. When the piece measures 37-39-41-43-45 cm work 2 ridges over the middle 31-32-32-32-33 sts (the other sts are worked as before). Then cast off the middle 23-24-24-24-25 sts for the neck. Continue to dec 1 st on next row towards neck - see Decrease tip = 11-11-12-13-14 sts remain on each shoulder. Continue working with 3 ridge sts towards armhole and 4 ridge sts towards neck, cast off when the piece measures 40-42-44-46-48 cm. Left front piece: Cast on 30-34-37-40-43 sts (incl 1 edge st in the side and 4 band sts towards mid front) with needle size 4.5 mm and Ribbon. Work 2 ridges, change to needle size 5.5 mm and continue with stocking st and 4 band sts in ridges - see description for the bands above! When the piece measures 5 cm inc in the side as for the back piece = 35-39-42-45-48 sts. Read all of the next paragraph before continuing! Neckline: When the piece measures 22-24-25-27-28 cm dec for neck every 2nd row - see Decrease tip: 1 st 16-17-17-17-17 times. Armhole: At the same time when the piece measures 23-24-25-26-27 cm work ridges in the side and cast off/dec for armhole as for the back pieces. After all dec for armhole and neck there are 11-11-12-13-14 sts remaining on the shoulder. Continue with 3 ridge sts towards armhole and 4 ridge sts towards neck and cast off when the piece measures 40-42-44-46-48 cm. Right front piece: Cast on and work as for the left front piece but cast off/dec for armhole and neck on the opposite side. As this top is tight-fitting, there are no buttonholes (these would easily become too big and the buttons would slip out). The buttons are pulled through the sts and the top is pulled over head without unbuttoning at the front. Assembly: Sew shoulder seams and side seams inside the 1 edge st. Sew buttons onto the left band. Crochet flowers: Work with hook size 4 mm as follows: 4 ch, form them in a ring with 1 sl st, * 9 ch, 1 dc around the ring *, repeat from *-* until 5 petals have been worked, finish with 1 sl st in first ch at beg of round, cut the yarn. Crochet 6 flowers and fasten 3 to each front piece. |
|
 |
|
Have you finished this pattern?Tag your pictures with #dropspattern #wilddaisyvest or submit them to the #dropsfan gallery. Do you need help with this pattern?You'll find 19 tutorial videos, a Comments/Questions area and more by visiting the pattern on garnstudio.com. © 1982-2026 DROPS Design A/S. We reserve all rights. This document, including all its sub-sections, has copyrights. Read more about what you can do with our patterns at the bottom of each pattern on our site. |
|


With over 40 years in knitting and crochet design, DROPS Design offers one of the most extensive collections of free patterns on the internet - translated to 17 languages. As of today we count 324 catalogues and 12290 patterns translated into English (UK/cm). 12290
We work hard to bring you the best knitting and crochet have to offer, inspiration and advice as well as great quality yarns at incredible prices! Would you like to use our patterns for other than personal use? You can read what you are allowed to do in the Copyright text at the bottom of all our patterns. Happy crafting!
Post a comment to pattern DROPS 78-15
We would love to hear what you have to say about this pattern!
If you want to leave a question, please make sure you select the correct category in the form below, to speed up the answering process. Required fields are marked *.