
Popular categories
Looking for a yarn?


Comments / Questions (135)
![]() Camilla wrote:
Camilla wrote:
I give up! I am quite experienced knitter, this is the first time i give up
24.04.2026 - 22:30
![]() Camilla wrote:
Camilla wrote:
Jag har läst mönstret så här: varv 1 från höger till vänster, varv två från vänster till höger. Har för mig att det stod så i en kommentar, men varven kanske alltid ska läsas från hö - vä? Lite lurigt då mitten ändå blir ✅
24.04.2026 - 17:18DROPS Design answered:
Hei Camilla. Ja, man leser et strikkediagram motsatt av slik man normalt leser: Fra høyre mot venstre, nedenfra og opp. Du begynner altså nederst i det høyre hjørnet, og jobber deg mot venstre og oppover. mvh DROPS Design
27.04.2026 - 10:51
![]() Camilla wrote:
Camilla wrote:
Är inte mönstret fel på aviga varven med att man ska FÖRST göra omslag sedan sticka ihop två rm i bakre maskbågen, borde man inte göra som på räta varv först sticka ihop, SEN omslag, resultatet ser konstigt ut på den sidan, blir inte lika snygga ”hål” på mönstrets vänstra sida jämfört med högra
24.04.2026 - 17:14DROPS Design answered:
Hei Camilla. Skjønner hva du mener, men på denne oppskriften er det skrevet/tegnet slik. Det er ikke feil, men om du ønsker å forandre det slik du mener blir penere, må du gjerne gjøre det. mvh DROPS Design
27.04.2026 - 10:15
![]() Gillian wrote:
Gillian wrote:
I have completed the first row of the chart (23 sts) and knitted remaining sts to the end of the row. Do i have to knit another row ? if not how do i get back to the 23st to do the second row?
14.04.2026 - 18:03
![]() Gillian wrote:
Gillian wrote:
I have completed the first row of the chart (23 sts) and knitted remaining sts to the end of the row. Do i have to knit another row ? if not how do i get back to the 23st to do the second row?
14.04.2026 - 15:51DROPS Design answered:
Dear Gillian, short rows start from the first row M.1, starting from the right side work 30 to 47 sts (see size) - with the first 23 sts as shown in M.1 and the remaining sts in garter stitch, turn and work garter stitch and 2nd row M.1 (read diagram from the left towards the right), turn work 46-70 sts with 3rd row M.1 and knit remaining sts, turn and knit + work 4th row M.1, turn and continue short rows as stated for the size continuing M.1 and knitting remaining sts. Happy knitting!
15.04.2026 - 07:36
![]() Gillian wrote:
Gillian wrote:
Can you tell me what 1 YO between 2 sts mean
14.04.2026 - 15:25DROPS Design answered:
Dear Gillian, work the previous stitch as shown in diagram, make 1 yarn over then work the next stitch as shown in diagram = you have worked 1 yarn over between 2 stitches. On first row M.1 eg, work: K3, YO, K2 tog, P2, YO, slip 1, K1, psso, K5, K2 tog, YO,l P2, K1, YO, K2 tog, K2. Happy knitting!
14.04.2026 - 15:43
![]() Inge Glarborg wrote:
Inge Glarborg wrote:
Jeg for ikke det samme hulmønster frem på hver side af trekanterne, altså de første og sidste 5 masker, når jeg strikker M1, som det ser ud på fotoet
12.04.2026 - 22:19DROPS Design answered:
Hei Inge. Om man følger diagrammet skal man få det hullmønstret man ser på bildet. Husk at bildet viser diagrammet loddrett, mens selve diagrammet ligger vannrett (jakken strikkes sidelengs). Men hvordan blir ditt mønster? mvh DROPS Design
13.04.2026 - 14:49
![]() Sibylle wrote:
Sibylle wrote:
Meine Frage ist leider noch nicht beantwortet. Das Muster wird doch nicht am unteren Rand begonnen. Die Blende besteht aus 4 Krausrippen. Dann beginnt das Muster. Doch nicht direkt am unteren Rand?
09.02.2026 - 19:57DROPS Design answered:
Liebe Sibylle, Sie stricken tatsächlich die ersten 23 Maschen gemäß Diagramm, dabei werden ja auch ein paar Maschen am Anfang des Diagramms kraus rechts gestrickt. Die Löcher (nach der 3. Masche im Diagramm) sind am unteren Rand nicht gut erkennbar, das liegt aber an der Fotoaufnahme bzw. daran, dass die Jacke genau an der Stelle etwas geknickt liegt. An der anderen Seite des mittleren Musters können Sie die Löcher gut erkennen.
18.02.2026 - 20:18
![]() Sibylle wrote:
Sibylle wrote:
Laut Beschreibung wird das Muster direkt am Rand begonnen. Laut Bild aber nicht.
08.02.2026 - 17:06DROPS Design answered:
Liebe Sibylle, auch laut Beschreibung stricken Sie zuerst 4 Krausrippen, dann kommt erst das Muster. Sie stricken die vordere Blende also zuerst und dann geht es mit dem Muster weiter. Viel Spaß beim Stricken!
09.02.2026 - 08:38
![]() Lucia Nardella wrote:
Lucia Nardella wrote:
Se il diagramma M1 mostra come lavorare le maglie sul diritto del lavoro dove indica cone lavorare il rovescio quando necessario?
21.10.2025 - 13:47DROPS Design answered:
Buonasera Lucia, i diagrammi mostrano tutti i ferri del lavoro, anche quelli lavorati sul rovescio. Buon lavoro!
21.10.2025 - 17:53
|
||||||||||||||||||||||
DROPS Baby 20-12 |
||||||||||||||||||||||
 |
 |
|||||||||||||||||||||
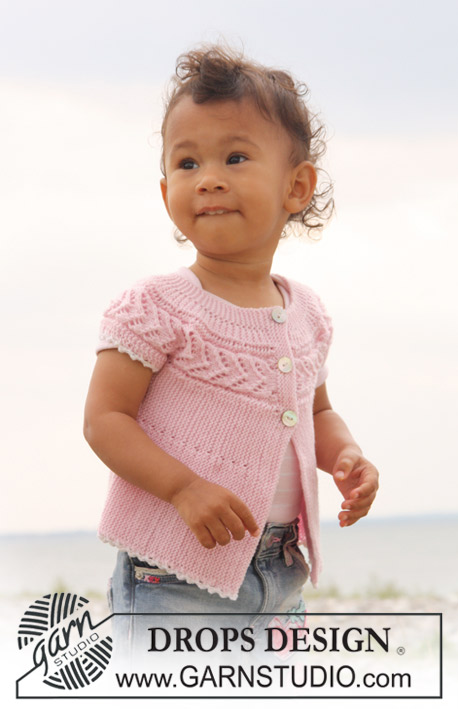
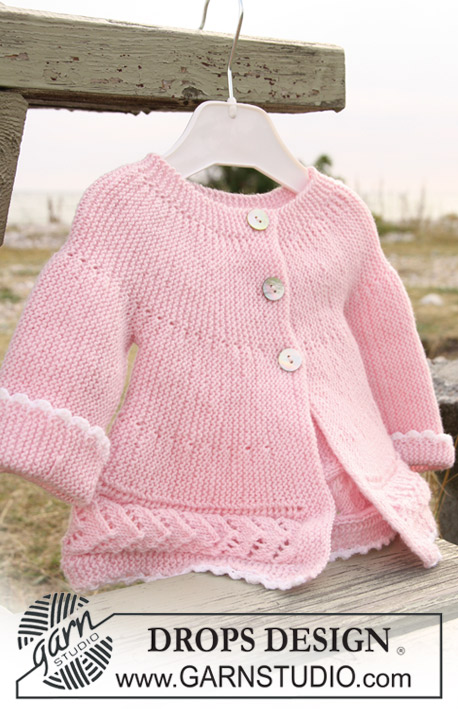
Jacket knitted from side to side in garter st and lace pattern for baby and children in DROPS BabyMerino
DROPS Baby 20-12 |
||||||||||||||||||||||
|
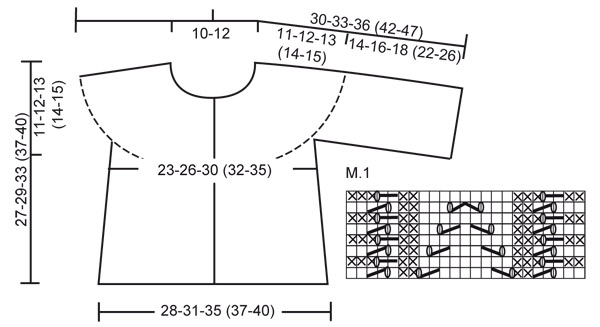
JACKET: PATTERN: See diagram M.1. Diagram shows the pattern from RS. KNITTING TIP: When turning mid piece, slip the first st as if to K, tighten thread and continue as before, do this to avoid a hole in transition. -------------------------------------------------------- -------------------------------------------------------- JACKET: Beg on left front piece, work towards the sleeve, back piece, the other sleeve and finish with right front piece. Loosely cast on 62-68-78 (88-96) sts on needle size 2.5 mm with Baby Merino and K 8 rows for front band (first row = RS). Work next row as follows from RS: K the first 15 sts, AT THE SAME TIME inc 8 sts evenly (inc1 st by making 1 YO), K remaining sts on needle = 70-76-86 (96-104) sts. K 1 row from WS on all sts, work YO into back of loop to avoid a hole. Continue as follows: work the first 23 sts on needle in M.1, and K remaining sts on every row. AT THE SAME TIME work shortened rows as follows – see KNITTING TIP: * work the first 30-32-38 (42-47) sts, turn piece and work return row, work the first 46-50-57 (65-70) sts, turn piece and work return row, work the first 64-70-80 (90-98) sts, turn piece and work return row, work all 70-76-86 (96-104) sts, turn and work return row *, repeat from *-* until piece measures approx 16-17.5-19.5 (20.5-22) cm from cast on row (measured just before the first turn, i.e. over M.1). Cut the thread. Now slip the first 41-45-52 (60-65) sts towards bottom edge on a stitch holder (= the side). Cast on 36-42-46 (60-70) new sts over sts on stitch holder (i.e. before the 29-31-34 (36-39) sts left on needle) for sleeve and now continue as follows (first row = from RS): * work the first 41-47-51 (65-75) sts, turn piece and work return row, work the first 59-67-74 (90-103) sts, turn piece and work return row, work all 65-73-80 (96-109) sts, turn and work return row *. Repeat from *-*. When piece measures 16-17-18 (18-20) cm from where sts for sleeve were cast on (measured where widest, i.e. along bottom edge) cast off 36-42-46 (60-70) sts from sleeve edge towards body piece. Cut the thread. Slip the 41-45-52 (60-65) sts from stitch holder at the side back on needle and insert a marker in piece. Continue from bottom of body piece as before from *-* as described for front piece (first row = from RS). When piece measures 28-31-35 (37-40) cm from marker (measured just before the first turn, i.e. over M.1) cut the thread. Slip the first 41-45-52 (60-65) sts towards bottom edge on a stitch holder (= the side). Cast on 36-42-46 (60-70) new sts over sts on stitch holder (i.e. before the 29-31-34 (36-39) sts left on needle) for sleeve and continue as before from *-* as described for the other sleeve. When sleeve measures the same as the left sleeve cast off 36-42-46 (60-70) sts from sleeve edge towards body piece. Cut the thread. Slip the 41-45-52 (60-65) sts from stitch holder at the side back on needle and continue from bottom of body piece as before from *-* as described for front piece (first row = RS). When right front piece measures the same as left front piece (less front band) work next row from RS as follows: K the first 23 sts, AT THE SAME TIME dec 8 sts evenly (dec 1 st by K2 tog) and K remaining 47-53-63 (73-81) sts on row = 62-68-78 (88-96) sts. Now work front band as follows (first row = from WS): K 3 rows on all sts, on next row from RS make 3 buttonholes as follows (i.e. from bottom edge towards neckline): K 41-45-53 (61-65) sts, 1 YO, K2 tog, K 7-8-9 (10-12) sts, 1 YO, K2 tog, K 7-8-9 (10-12) sts, 1 YO, K2 tog and finish with K1. Turn and K all sts on return row. Now K 5 rows on all sts and cast off loosely from RS. ASSEMBLY: Sew under arm seams, edge to edge. Sew on buttons. CROCHET BORDER: Crochet a border along bottom edge with crochet hook size 3 mm and white as follows: 1 dc, * 3 ch, 1 tr in the first of the 3 ch, skip approx 1 cm, 1 dc *, repeat from *-*. Crochet a similar border round both sleeves. |
||||||||||||||||||||||
Diagram explanations |
||||||||||||||||||||||
|
||||||||||||||||||||||
 |
||||||||||||||||||||||
Have you finished this pattern?Tag your pictures with #dropspattern or submit them to the #dropsfan gallery. Do you need help with this pattern?You'll find 16 tutorial videos, a Comments/Questions area and more by visiting the pattern on garnstudio.com. © 1982-2026 DROPS Design A/S. We reserve all rights. This document, including all its sub-sections, has copyrights. Read more about what you can do with our patterns at the bottom of each pattern on our site. |
||||||||||||||||||||||


With over 40 years in knitting and crochet design, DROPS Design offers one of the most extensive collections of free patterns on the internet - translated to 17 languages. As of today we count 324 catalogues and 12290 patterns translated into English (UK/cm). 12290
We work hard to bring you the best knitting and crochet have to offer, inspiration and advice as well as great quality yarns at incredible prices! Would you like to use our patterns for other than personal use? You can read what you are allowed to do in the Copyright text at the bottom of all our patterns. Happy crafting!
Post a comment to pattern DROPS Baby 20-12
We would love to hear what you have to say about this pattern!
If you want to leave a question, please make sure you select the correct category in the form below, to speed up the answering process. Required fields are marked *.