
Popular categories
Looking for a yarn?


Comments / Questions (21)
Velvet wrote:
Are only odd number rows diagrammed or all rows? It would be very helpful to have the rows on the diagram numbered.
22.09.2016 - 22:14DROPS Design answered:
Dear Mrs Velvet, all rows are shown in diagram, both from RS and from WS. Read more about diagram here. Happy knitting!
23.09.2016 - 08:36
![]() Julia wrote:
Julia wrote:
Hallo, wie muss ich denn das Muster lesen und stricken? Von oben nach unten? Von links nach rechts? oder jeweils umgekehrt? vielen Dank!
30.10.2015 - 12:05DROPS Design answered:
Generell lesen Sie Strickmuster immer ganz unten rechts beginnend nach links, das ist die 1. R (Hin-R), dann lesen Sie die nächste R von links nach rechts (= Rück-R) usw.
30.10.2015 - 12:23
![]() Naomi H wrote:
Naomi H wrote:
What does it mean when it says..."work next round as follows: P4, K2, P4, K2 in each of the next 2 sts (i.e. K2 becomes K4 – this is mid upper glove)? Also, when it says "Work next round as follows: P2, M.1, P2 and rib as before on remaining 20 sts - insert a marker in the second of these rib-sts (= thumb st).", do you do P2, M1, P2, K2, P4, K2, then insert it the marker? Thanks for any advice!
09.02.2015 - 14:53DROPS Design answered:
Dear Naomi H, K2 in each of the next 2 sts means to work the next 2 sts into front and back loop (you inc a total of 2 sts and there is now K4 over K2 from previous round). The marker for thumb is inserted there: work P2, M1, P2, K2, place a marker in the 2nd K st just worked, and continue in rib as before (P4, K2) to the end of round. Happy knitting!
09.02.2015 - 16:13
![]() Lucy wrote:
Lucy wrote:
How many needles are used in this pattern and is it knit in the round or knit flat?
17.01.2015 - 07:48DROPS Design answered:
Dear Lucy, gloves are worked in the round with double pointed needles (set of 5 needles). Happy knitting!
19.01.2015 - 11:16
![]() Inge Oudt wrote:
Inge Oudt wrote:
Voor het meerderen voor de duim moet je iedere 3e naald meerderen. Is dat dan naald meerderen, 2 pennen gewoon en dan weer pen meerderen. Of naald meerderen , 3 pennen gewoon en dan weer pen meerderen?
01.01.2015 - 17:53DROPS Design answered:
Hoi Inge. Ja, je meerdert in nld 1, brei 2 nld gewoon en meerder weer in de volgende en 3e nld na de vorige meerdering.
14.01.2015 - 14:51
![]() Elena Regis wrote:
Elena Regis wrote:
Finalmente ho realizzato il guanto destro!!!! Ho faticato molto a capire le istruzioni, M1 è corretto solo per una lavorazione su due ferri non per il circolare; in tal caso bisogna invertire tutti gli incroci
12.02.2013 - 15:24DROPS Design answered:
Buongiorno, abbiamo controllato, ma il diagramma è corretto per la lavorazione in tondo.
14.02.2013 - 12:49
![]() Elena Regis wrote:
Elena Regis wrote:
M1 è corretto ma NON per la lavorazione in circolare del guanto per la quale gli incroci DEVONO ESSERE TUTTI INVERTITI.
07.02.2013 - 08:16
![]() Elena Regis wrote:
Elena Regis wrote:
Potete dirmi come va interpretato il diagramma? La lavorazione in circolare è sempre sul diritto. Grazie.
03.02.2013 - 00:21DROPS Design answered:
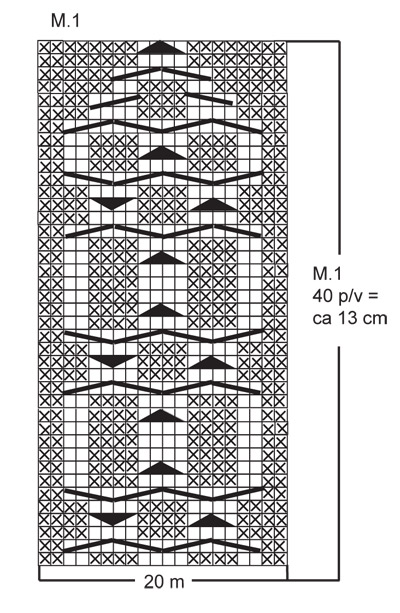
Buongiorno, il diagramma va letto dal basso verso l'alto, la lavorazione in circolare è sempre sul diritto del lavoro, quindi deve lavorare i vari punti come se fosse sempre sul diritto del lavoro.
14.02.2013 - 12:36
![]() Elena wrote:
Elena wrote:
Ho provato di nuovo eseguendo il diagramma tutto sul diritto, quindi quadretto vuoto a diritto e quadretto X a rovescio. la losanga non è venuta.
03.02.2013 - 00:20DROPS Design answered:
Buongiorno, il diagramma è corretto per la lavorazione circolare, il quadretto con la x va lavorato a rovescio e corrisponde alla parte esterna e interna della losanga, i quadretti vuoti sono lavorati a diritto e andranno a formare la lavorazione della losanga.
14.02.2013 - 12:38
![]() Elena Regis wrote:
Elena Regis wrote:
Grazie mille per la risposta. Il problemaè nella comprensione della legenda del diagramma. Cosa intendete con diritto sul rovescio e rovescio sul diritto? Un punto a diritto su uno sottostante a rovescio e un punto rovescio su uno sottostante a diritto oppure un punto a diritto sul rovescio del lavoro ed un punto rovescio sul diritto del lavoro?
27.01.2013 - 21:06DROPS Design answered:
Nella legenda del diagramma "dir. sul rovescio e rov. sul diritto" si intende lavorare a dir. sul rovescio del lavoro e a rov. sul diritto del lavoro.
14.02.2013 - 09:56
|
|||||||||||||||||||
Maritza Gloves#maritzagloves |
|||||||||||||||||||
|
|
|||||||||||||||||||
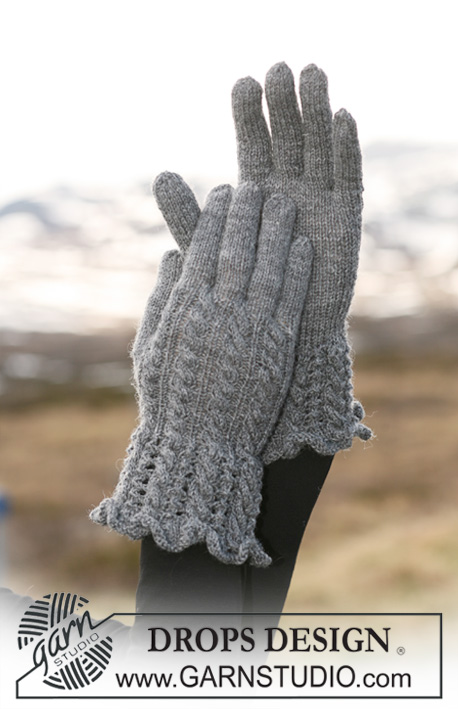
DROPS gloves in ”Alpaca” and ”Kid-Silk” with cable pattern .
DROPS 117-10 |
|||||||||||||||||||
|
PATTERN: See diagram M.1- diagram shows the whole pattern. ---------------------------------------------------------- RIGHT GLOVE: Cast on 42 sts on double pointed needles size 3 mm with Alpaca + Kid-Silk. K 2 rounds and continue in rib, P4/K2. When piece measures 7 cm work next round as follows: P4, K2, P4, K2 in each of the next 2 sts (i.e. K2 becomes K4 – this is mid upper glove), continue with P4/K2 as before = 44 sts. Work next round as follows: P2, M.1, P2 and rib as before on remaining 20 sts - insert a marker in the second of these rib-sts (= thumb st). REMEMBER THE KNITTING TENSION! When piece measures 11 cm inc for thumb gusset as follows: Inc 1 st on each side of st with marker - inc by making 1 YO, on next round work YO into back of loop to avoid a hole. Inc on every 3rd round a total of 6 times = 13 thumb sts in stocking st. When piece measures 17 cm slip the 13 thumb sts on a stitch holder. On next round cast on 1 new st behind the thumb = 44 sts on needle. Continue as before with pattern and rib until M.1 has been completed. Piece now measures approx 20 cm. Now keep the first 4 sts on needle, slip the next 36 sts on a stitch holder and keep the 4 last sts on needle. LITTLE FINGER = 8 sts, cast on 2 new sts towards the hand = 10 sts. P all sts in the round for 6 cm, then P2 tog all the way round. Cut the thread and pull it through remaining sts, tighten and fasten. HAND: Slip sts from stitch holder back on needle, pick up 3 sts towards little finger = 39 sts. Work 2 rounds with K over K and P over P - AT THE SAME TIME on round 2 K2 tog on the 4 sts on cable = 37 sts. Keep the 3 sts picked up towards little finger + 5 sts on each side of these on needle. Slip remaining 24 sts back on stitch holder. RING FINGER = 13 sts, cast on 1 new st towards sts on stitch holder = 14 sts. P all sts in the round for 7.5 cm, then P2 tog all the way round. Cut the thread and pull it through remaining sts, tighten and fasten. MIDDEL FINGER: Slip 5 sts from each end of stitch holder back on needle, pick up 3 sts towards ring finger and cast on 1 new st towards sts on stitch holder = 14 sts. P all sts in the round for 8.5 cm, then P2 tog all the way round. Cut the thread and pull it through remaining sts, tighten and fasten. INDEX FINGER: Slip the remaining 14 sts from stitch holder back on needle, pick up 2 sts towards middle finger = 16 sts. P all sts in the round for 7 cm, then P2 tog all the way round. Cut the thread and pull it through remaining sts, tighten and fasten. THUMB: Slip the 13 thumb sts back on needle and pick up 5 sts in edge behind the sts = 18 sts. K all sts in the round for 6 cm, then K2 tog all the way round. Cut the thread and pull it through remaining sts, tighten and fasten. LEFT GLOVE: Like right glove, but mirrored, i.e. inc for thumb gusset on each side of the last but one rib st on round. Work little finger as follows: Slip the first 19 sts on a stitch holder (= upper hand), keep the next 8 sts on needle and slip the last 17 sts on stitch holder (= palm of hand). |
|||||||||||||||||||
Diagram explanations |
|||||||||||||||||||
|
|||||||||||||||||||
 |
|||||||||||||||||||
Have you finished this pattern?Tag your pictures with #dropspattern #maritzagloves or submit them to the #dropsfan gallery. Do you need help with this pattern?You'll find 16 tutorial videos, a Comments/Questions area and more by visiting the pattern on garnstudio.com. © 1982-2026 DROPS Design A/S. We reserve all rights. This document, including all its sub-sections, has copyrights. Read more about what you can do with our patterns at the bottom of each pattern on our site. |
|||||||||||||||||||


With over 40 years in knitting and crochet design, DROPS Design offers one of the most extensive collections of free patterns on the internet - translated to 17 languages. As of today we count 324 catalogues and 12290 patterns translated into English (UK/cm). 12290
We work hard to bring you the best knitting and crochet have to offer, inspiration and advice as well as great quality yarns at incredible prices! Would you like to use our patterns for other than personal use? You can read what you are allowed to do in the Copyright text at the bottom of all our patterns. Happy crafting!
Post a comment to pattern DROPS 117-10
We would love to hear what you have to say about this pattern!
If you want to leave a question, please make sure you select the correct category in the form below, to speed up the answering process. Required fields are marked *.