
Popular categories
Looking for a yarn?


Comments / Questions (74)
![]() Helena Lilja wrote:
Helena Lilja wrote:
Hur maskar man av för ärmhål? Förstår inte instruktionen. Tacksam för hjälp och tydligare beskrivning.
13.11.2025 - 17:33DROPS Design answered:
Hej Helena, Se på vores videoer som er lagt ind til denne opskrift, her ser du hur man maskar av :)
19.11.2025 - 12:12
![]() Lise Strømsvik wrote:
Lise Strømsvik wrote:
Når man setter sammen bakstykkene og skal begynne å øke i sidene, da står det at det skal gjentas på hver 2. rad. Menes det hver andre rad med staver? Ellers blir det hver rad med staver og økningen i siden blir nokså skarp…?
25.05.2025 - 16:00DROPS Design answered:
Hei Lise. Ja, hver 2. rad med staver. Etter at du har satt sammen bakstykket måler arbeidet 12 cm, så skal du øke i sidene på hver 2.rad (med staver) totalt 9 ganger. Du har da heklet 18 rader med Mønster (mønster = 2 rader). mvh DROPS Design
02.06.2025 - 07:37
![]() Thomas Schmidt wrote:
Thomas Schmidt wrote:
Okay I will try again since you didn’t answer my question. Regarding the part of armholes that concerns the SIDES. Could you please try and explain how this should be done as the recipe is VERY confusing and near for someone that doesn’t know the pattern by heart. Please refrain from just explain with the same wording as the recipe since it makes very little sense. The dec tips also don’t make sense if it should apply to the sides since you then dec 2 st each row. And dec with a dc?
26.03.2025 - 08:47DROPS Design answered:
Dear Thomas, you work the decreases over the 0-3-5-7-8-11 sts at the beginning of the armhole on each side piece, before the armhole stitches (5-5-8-14-21-25 sts on each side, right before the back piece sts). So, you will only work over the 0-3-5-7-8-11 sts, while the armhole stitches are left unworked, and will leave the hole for the arm. For example, for size L, start the row on the outermost stitch, work 4 stitches and turn, then work back without decreases. On the next row, work 3 stitches and turn. Repeat like this until you decrease all stitches. Happy crochetting!
30.03.2025 - 21:28
![]() Thomas Schmidt wrote:
Thomas Schmidt wrote:
Hi. I’m having trouble with the armholes. 1. Do I start from the last st, then do 5 st and turn? 2. Or do I start 5 st in and crochet to the last st then turn? 3. Also do I dec both in the beginning with a sl ST and at the end with skipping the last st? 4. Is says crochet until you reach 46 cm. Does that also regard the 5 st in each side? Usually I don’t have troubles with the patterns but I find the part about the armholes very confusing.
25.03.2025 - 23:00DROPS Design answered:
Dear Mr Schmidt, see DECREASING TIP (armholes): at the beg of the pattern, and here to decrease 1 dc (US English) in each side and here to decrease 1 sc in each side. When all decreases are done work until piece measures 46 cm from very bottom edge and work each shoulder separately with 2 rows over the 16 sts leaving the middle 30 sts unworked for neckline = piece measures now 48 cm from top down. Happy crocheting!
26.03.2025 - 08:31
![]() Gabi wrote:
Gabi wrote:
Hallo und danke für die letzte Hilfe. Bin jetzt beim Armloch und verstehe die Anleitung wieder nicht. Äußerste 5 M häkeln, dann 8 auslassen und dann weiter? Was wird das für ein Armloch? Dann gegen die Seite abnehmen bis das ganze Seitenteil abgenommen ist? Linke Seite dann genauso. Wo ist denn dann das Rückenteil? Wenn ich alles abnehme, ist doch nichts mehr übrig in der Mitte! Bitte noch einmal um Hilfe. Danke.
14.02.2025 - 19:12DROPS Design answered:
Liebe Gabi, so wird die Arbeit "verteilt": 5 M für das Vorderteil, 8 M für das Armloch, 72 M für das Rückenteil, 8 M für das Armloch und 5 M für das Vorderteil = 98 M insgesamt. So häkeln Sie zuerst die Vorderteile (separat) über die 5 M beidseitig, dann häkeln die Mittelren 72 M so haben Sie 8 M für die beide Armlöcher. Und dazu nehmen Sie 1 Masche jede Reihe am Anfang /Ende der Reihe für das Armloch ab, bis keine Masche übrig sind, so dazu brauchen Sie 5 Reihen im L für die Vorderteile. Viel Spaß beim Häkeln!
17.02.2025 - 07:36
![]() Gabi wrote:
Gabi wrote:
Hallo, habe alle Squares gehäkelt u die ersten 12 cm 1. Teil. Und von da ab verstehe ich gar nichts mehr. Wieso soll ich Seitenteile häkeln, wenn die Seiten doch Squares sind? Was sind Blenden? Was heißt, dass die in der Mitte übereinander kommen? Was heißt, 1. Reihe häkelt man die Blenden mit den 6 M. zusammen? Welche 6 Maschen? Ich verstehe den ganzen Rest nicht mehr! Soll ich die ganzen Squares und die Wolle jetzt in den Müll werfen?
12.02.2025 - 19:12DROPS Design answered:
Liebe Gabi, die Quadraten sind nur für beide Vorderteile, an beiden Seiten + Rückenteil sind es Stäbchen - siehe auch Maßskizze. Mit "Blenden" sind hier die Maschen am Schlitz, so die ersten 6 Maschen bei der rechten Seite und die letze 6 M bei der linken Seiten, dann werden sich diese 6 Maschen in der Mitte vom Rückenteil überlappen und je 1 Stäbchen in beiden Teilen häkeln wenn man weiter häkelt. Dann häkelt man mit Zunahmen bis zum Armlöcher und die 3 Teilen: rechte Seite/Vorderteil, linke Seite/Vorderteil und Rückenteil werden dann separat gehäkelt. Viel Spaß beim Häkeln!
13.02.2025 - 09:46
![]() Helen wrote:
Helen wrote:
PART-1 (= left side includes buttonhole band) PART-2 (= right side includes buttonhole band) Could someone explain or show what the above should look like as confused? I have an odd shape at the mo??
04.12.2024 - 10:42DROPS Design answered:
Dear Helen, there seems to be a typo in the pattern. Part-1 is the left side, which includes the band where the back buttons will be later placed. Part-2 is the right side, which includes the band with back buttonholes. You can see this second set of buttons in the second photo. After working each part, you will place them together, with the Part-2 buttonhole band over the Part-1 button band. Only the bands overlap, the rest of Part-2 and Part-1 will cover the right side and left side of the back piece, respectively. Happy knitting!
08.12.2024 - 18:57
![]() Mary Johansson wrote:
Mary Johansson wrote:
Mönster 115-37 Fråga kring ärmhålet ska man virka en smygmaska i början sen 3 maskor sen 5 maskor , det står nåt om i slutet av varvet att man ska lämna en, vänd Har aldrig varit med om så krångligt mönster att läsa.
07.11.2024 - 11:20DROPS Design answered:
Hei Mary. Vi skal hjelpe deg så godt vi kan, men fint om du kan opplyse nøyaktig hvor i oppskriften du er / hvilket avsnitt (og hvilken str. du hekler etter). mvh DROPS Design
11.11.2024 - 09:22
![]() Sonja Nilsson wrote:
Sonja Nilsson wrote:
Var i mönstret gäller detta ? Uppdaterad online: 15.09.2009 VARV 3: 4 lm, 3 st om första lm från föregående v, 1 lm, 3 st i nästa lm, 1 lm, 3 st i nästa lm-båge, 3 lm, 3 st i samma lm-båge (= hörnet), 1 lm, 3 st i nästa lm, 1 lm, 3 st i sista lm. \" 1lm, 1 st till om samma lm.\" Vänd arb. Tack på förhand
04.11.2024 - 13:11DROPS Design answered:
Hei Sonja. Ser ut som om det er samme rettelse som fra 13.11.2009 bare med uten teksten HALV MORMORS-RUTA. Vi skal få slettet denne. Takk for at du gjorde oss oppmerksom på dette. mvh DROPS Design
04.11.2024 - 13:54
![]() Joan wrote:
Joan wrote:
I am an experienced crocher, but am having trouble understanding the increases for the back. I did it the way I thought, but they came out to sharp, i.e. not a gradual increase. If I do it the way I understand the instructions, I am only increasing on one side, as you are always working right to left (or left to right in my case as I'm left-handed). Please clarify
01.08.2024 - 18:02DROPS Design answered:
Dear Joan, make sure you are increasing on every other row but on each side crocheting both sides together (under back piece + sides). Make also sure to get the right tension in both width and height. Happy crocheting!
02.08.2024 - 08:54
|
|
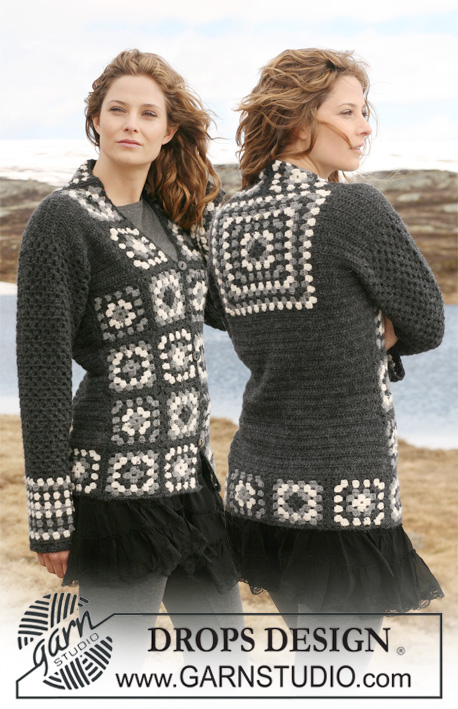
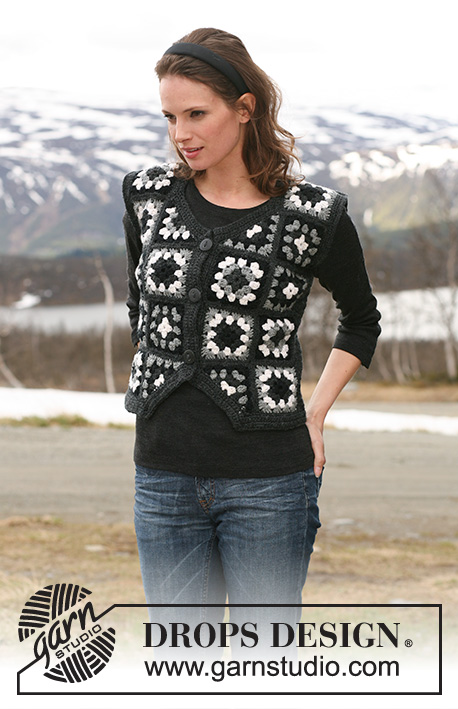
Licorice Squares Vest |
|
 |
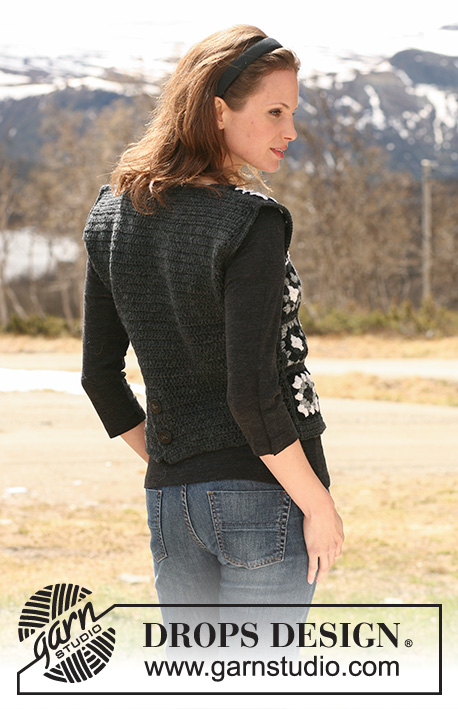 |
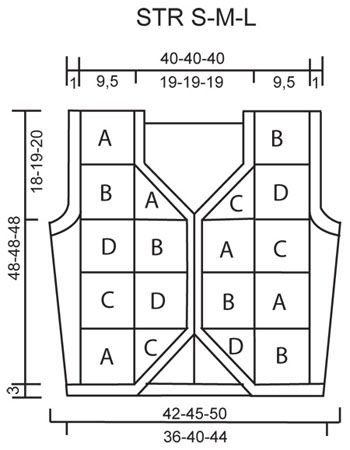
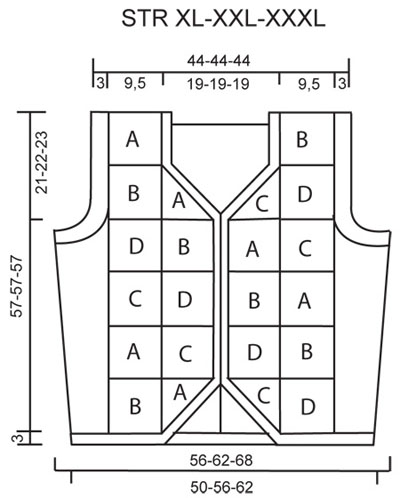
Crochet DROPS waistcoat in ”Karisma” with squares. Size S to XXXL.
DROPS 115-37 |
|
|
PATTERN: ROW 1: 1 tr in each dc, finish row with 1 ch to turn with. ROW 2: 1 dc in each tr, finish row with 3 ch to turn with. DECREASING TIP (armholes): Dec as follows at the end of row: work row until 1 st remain, turn piece and work return row. Dec as follows at beg of row: work 1 sl st in first st, continue as before. ---------------------------------------------------------- WAISTCOAT: Front piece crochet in squares. Back piece + side piece crochet in pattern rows. COLOURS OF SQUARES: SQUARE A: Beg + round 1 = charcoal grey, round 2 = grey, round 3 = white, round 4 = black, round 5 = charcoal grey. SQUARE B: Beg + round 1 = black, round 2 = charcoal grey, round 3 = white, round 4 = grey, round 5 = charcoal grey. SQUARE C: Beg + round 1 = white, round 2 = charcoal grey, round 3 = black, round 4 = grey, round 5 = charcoal grey. SQUARE D: Beg + round 1 = white, round 2 = charcoal grey, round 3 = grey, round 4 = black, round 5 = charcoal grey. WHOLE SQUARE: Crochet 6 ch with crochet hook size 4 mm and form a ring with 1 sl st in first ch. ROUND 1: 3 ch, 2 tr in ring, * 3 ch, 3 tr *, repeat from *-* a total of 3 times and finish with 3 ch and 1 sl st in 3rd ch from beg of round. Turn piece. ROUND 2: 3 ch, 2 tr in first ch-loop, 3 ch, 3 tr in the same ch-loop, * 1 ch, 3 tr in next ch-loop, 3 ch, 3 tr in the same ch-loop *, repeat from *-* a total of 3 times, finish with 1 ch and 1 sl st in 3rd ch from beg of round. Turn piece. ROUND 3: 3 ch, 2 tr in first ch-loop, 1 ch, * 3 tr in next ch-loop, 3 ch, 3 tr in the same ch-loop, 1 ch, 3 tr in next ch-loop, 1 ch *, repeat from *-* a total of 3 times, 3 tr in next ch-loop, 3 ch, 3 tr in the same ch-loop, 1 ch, finish with 1 sl st in 3rd ch from beg of round. Turn piece. ROUND 4: 3 ch, 2 tr in first ch-loop, 1 ch, * 3 tr in next ch-loop, 3 ch, 3 tr in the same ch-loop, 1 ch, 3 tr in next ch-loop, 1 ch, 3 tr in next ch-loop, 1 ch *, repeat from *-* a total of 3 times, 3 tr in next ch-loop, 3 ch, 3 tr in the same ch-loop, 1 ch, 3 tr in next ch-loop, 1 ch, finish with 1 sl st in 3rd ch from beg of round. Turn piece. ROUND 5: Crochet 1 dc in each tr and 1 dc in each ch, finish with 1 sl st in first dc. Square measures approx 9.5 x 9.5 cm. HALF SQUARE: Crochet 6 ch with crochet hook size 4 mm and form a ring with 1 sl st in first ch. ROW 1: 4 ch, 3 tr in ring, 3 ch, 3 tr in ring, 1 ch, 1 tr in ring. Turn piece. ROW 2: 4 ch, 3 tr in first ch from previous row, 1 ch, 3 tr in next ch-loop, 3 ch, 3 tr in the same ch-loop (= corner), 1 ch, 3 tr in last ch, 1 ch, 1 tr in the same ch. Turn piece. ROW 3: 4 ch, 3 tr in first ch from previous row, 1 ch, 3 tr in next ch, 1 ch, 3 tr in next ch-loop, 3 ch, 3 tr in the same ch-loop (= corner), 1 ch, 3 tr in next ch, 1 ch, 3 tr in last ch, 1 ch, 1 tr in the same ch. Turn piece. ROW 4: 4 ch, 3 tr in first ch from previous row, * 1 ch, 3 tr in next ch-loop *, repeat from *-* a total of 3 times, 3 ch, 3 tr in the same ch-loop, repeat from *-* a total of 3 times, 1 ch, 1 tr in the last ch. Turn piece. ROW 5: Crochet 1 dc in each tr and 1 dc in each ch. NUMBER OF SQUARES: SIZE S-M-L: Crochet 4 whole + 1 half square of A, 5 whole squares of B, 2 whole + 2 half squares of C and 3 whole + 1 half square of D = a total of 14 whole and 4 half squares. SIZE XL-XXL-XXXL: Crochet 4 whole + 2 half squares of A, 6 whole squares of B, 3 whole + 2 half squares of C and 5 whole squares of D = a total of 18 whole and 4 half squares. BACK PIECE + SIDE PIECE: Crochet the first 12 cm in 2 parts (for split mid back). PART-1 (= left side includes buttonhole band): Crochet 38-45-54-66-78-90 loose ch on crochet hook size 4.5 mm with charcoal grey. Crochet first row as follows: 1 dc in 2nd ch from hook, 1 dc in each of the next 1-3-2-4-1-3 ch, * skip 1 ch, 1 dc in each of the next 4 ch *, repeat from *-* = 30-36-43-53-62-72 dc. Continue in PATTERN – see above. REMEMBER THE CROCHET TENSION! When piece measures 12 cm put it aside. PART-2 (= right side includes buttonhole band): Crochet like part-1, but when piece measures approx 5 cm – adjust so that next row is a row with tr - make 1 buttonhole towards mid back by replacing the last but 2 tr towards mid back with 1 ch, on next row crochet 1 dc in ch. Repeat when piece measures 10 cm. Put piece aside when it measures 12 cm (adjust to no of rows on part-1. BACK PIECE + SIDE PIECE: Place part-1 and part-2 over each other (right side over left side) with 6 sts overlapping mid back – (i.e. 1 row crochet through 2 layers on these 6 sts) = 54-66-80-100-118-138 sts. Continue in pattern, AT THE SAME TIME on next row with tr inc 1 st each side by working 2 tr in the last but 1 tr each side. Repeat the inc on every other row a total of 9 times = 72-84-98-118-136-156 sts. When piece measures 30-29-28-36-35-34 cm cast off for armhole as follows: RIGHT SIDE PIECE: Continue in pattern as before on the 0-3-5-7-8-11 outermost sts at the side (the next 5-5-8-14-21-25 sts = armhole - in size S all sts on side piece = armhole). Now dec 1 st on every row towards armhole until all sts have been dec – SEE DECREASING TIP! LEFT SIDE PIECE: Like right side piece. BACK PIECE: Crochet back and forth on the middle 62-68-72-76-78-84 sts only, AT THE SAME TIME dec 1 st towards armhole each side on every row until 62 sts remain (for all sizes). When piece measures 46-46-46-55-55-55 cm crochet 2 rows on 16 sts each side only (the middle 30 sts = neckline). Cut the thread. ASSEMBLY: Sew squares tog to 2 front pieces as shown in chart – sew edge to edge with charcoal grey in outer loops of sts. Sew front pieces to back piece and sew shoulder seams in the same way. BORDER ARMHOLE: Crochet 2-2-2-5-5-5 rounds with dc round armholes with charcoal grey and crochet hook size 4.5 mm - approx 16 dc per 10 cm – make sure border is even, i.e. not too many dc. BORDER WAISTCOAT: Crochet a border round the whole waistcoat with charcoal grey on crochet hook size 4.5 mm. Beg at bottom of split on back piece, continue along bottom edge, up along right front piece, round neck, down along left front piece and along bottom edge to split mid back (i.e. do not crochet each side of split mid back) Crochet 5 rows back and forth with dc - approx 16 dc per 10 cm - NOTE: in all outward facing corners crochet 3 dc and in all inward facing corners skip 1 st. AT THE SAME TIME on row 2 (= WS) make 3-3-3-4-4-4 buttonholes on right front band. 1 BUTTONHOLE = 2 ch and skip 2 dc, on next row crochet 2 dc in each ch-loop. Make 1 buttonhole in each transition between the squares. Sew 2 buttons to split mid back and 3-3-3-4-4-4 buttons to left front band. |
|
 |
|
 |
|
Have you finished this pattern?Tag your pictures with #dropspattern or submit them to the #dropsfan gallery. Do you need help with this pattern?You'll find 11 tutorial videos, a Comments/Questions area and more by visiting the pattern on garnstudio.com. © 1982-2026 DROPS Design A/S. We reserve all rights. This document, including all its sub-sections, has copyrights. Read more about what you can do with our patterns at the bottom of each pattern on our site. |
|


With over 40 years in knitting and crochet design, DROPS Design offers one of the most extensive collections of free patterns on the internet - translated to 17 languages. As of today we count 324 catalogues and 12290 patterns translated into English (UK/cm). 12290
We work hard to bring you the best knitting and crochet have to offer, inspiration and advice as well as great quality yarns at incredible prices! Would you like to use our patterns for other than personal use? You can read what you are allowed to do in the Copyright text at the bottom of all our patterns. Happy crafting!
Post a comment to pattern DROPS 115-37
We would love to hear what you have to say about this pattern!
If you want to leave a question, please make sure you select the correct category in the form below, to speed up the answering process. Required fields are marked *.