
Popular categories
Looking for a yarn?


Comments / Questions (42)
![]() Senecal wrote:
Senecal wrote:
Bonsoir j aimerais savoir si le dos se tricote de la même façon que le devant
12.09.2018 - 19:15DROPS Design answered:
Bonjour Mme Senecal, le dos se tricote comme pour le devant jusqu'à ce que l'encolure mesure 12 cm, puis on va continuer à diminuer et on va rabattre en même temps 1 m au début de chaque rang (pas d'encolure V dans le dos). Bon tricot!
13.09.2018 - 08:27
![]() Senecal wrote:
Senecal wrote:
Bonsoir après avoir séparé en deux parti de quel côté je dois augmente s il vous plais et pour le dos je dois faire exactement pareil que le devant ou pas
11.09.2018 - 20:42DROPS Design answered:
Bonjour Mme Senecal, pour le devant droit, on augmente côté B (comme avant côté encolure) puis on diminue du même côté. En même temps, 2 cm après la fin des augmentations, vous diminuez de chaque côté du marqueur. Il reste 21-49 m (cf taille). Diminuez ensuite côté encolure (= B) et augmentez côté A (sur le côté). Suivez bien les indications pour votre taille pour bien faire les bonnes augmentations/diminutions au bon moment. Bon tricot!
12.09.2018 - 07:51
![]() Luz wrote:
Luz wrote:
Estoy intentando hacer este patrón pero me he liado a la hora de saber cuál es el lado B y el A para hacer las disminuciones. Por favor ruego me ayuden
13.02.2018 - 15:36DROPS Design answered:
Hola Luz. Mirando con el lado derecho hacia tí, el inicio de la fila = lado-A (hacia el centro de la espalda), final de la fila = lado-B (hacia el lado).
17.02.2018 - 17:16
![]() Sara wrote:
Sara wrote:
When measuring neckline to the 12cm mark do you measure from centre of v where the decreases are or from sides where the 25 stitches are cast on because they have different measurements.
30.05.2016 - 01:43DROPS Design answered:
Dear Sara, measure along the new sts cast on (the 12 cm = strap/shoulder - see measurement chart). Happy knitting!
30.05.2016 - 10:22
![]() Sally wrote:
Sally wrote:
I'm really keen on this top but surely the instructions could be written in a clearer way? So many complicated increases and decreases on different numbered rows all at once! I'm not surprised people are struggling here! It's a gorgeous pattern and very on-trend. Please consider a way to present the pattern in an easier form!
20.05.2016 - 16:32DROPS Design answered:
Dear Sally, you can write all dec/inc you are making to not miss any "at the same time" and be sure you will get correct number of sts. Happy knitting!
20.05.2016 - 16:41
![]() Sara wrote:
Sara wrote:
I understand the directions and when to place markers and when and where to increase/ decrease....what I am saying is there are not enough stitches in my size 21 stitches to do the increases before the b side decreases are past the marker! Thanks
17.05.2016 - 19:34DROPS Design answered:
Dear Sara, as previously answered on Cindy, you will pass marker when continuing the dec towards B side, the dec at marker are then already done. In first size, there are 58 sts - 33 dec towards B - 4 sts at marker = 21 sts remaining. Happy knitting!
18.05.2016 - 10:12
![]() Sara wrote:
Sara wrote:
I agree with question asked by Cindy ....there are 10 stitches on each side of marker at this point....I need at least 6 rows to get 2 cm all while decreasing on b side 10-3 4 stitches.... Increase 1 on b side 5 stitches on b side.... Decrease another 9 stitches before another increase on b side if increasing every 8 rows???????? Help please
16.05.2016 - 20:34DROPS Design answered:
Dear Sara, inc first towards B, then insert a marker. Then dec 1 st towards B and 2 cm after marker dec at the same time 1 st at the marker. You should have 21-49 sts (see size) when all dec have been done. Then insert a new marker in the middle and continue dec towards B, at the same time, inc 1 st towards A and inc 1 st at the marker (first before the marker, then after the marker). Happy knitting!
17.05.2016 - 11:20
![]() Lyn Johnson wrote:
Lyn Johnson wrote:
Love the look of this top. I started the front and everything was fine until I started the directions for the right front. I was unable to follow all the directions "at the same time" so put my project in time out. I would love to try again but even after studying the directions further, I can't understand how all the directions work together. Can you give me any suggestions?
07.06.2015 - 06:32DROPS Design answered:
Dear Mrs Johnson, on right front piece inc 1-11 times (see size) as before first towards B - then insert a marker after 29-43 sts and inc 33 times towards B and 2 cm after marker dec 4 times 1 st at marker. You should have 21-49 sts. Insert then a marker in the mid st and dec towards B + inc towards A + 2 cm after marker inc at the marker. Then bind off sts towards B while continuing inc towards A. Happy knitting!
08.06.2015 - 08:34
![]() Tone Gustavsen wrote:
Tone Gustavsen wrote:
Det var den tunikaen jeg lette etter! Ivrig etter å komme i gang, men oppdager at garnet er merket 'utgått'. Er det noe alternativ i flammegarn?
13.02.2015 - 17:55
![]() Cindy wrote:
Cindy wrote:
Pattern drops #112-13. I am having trouble understanding the directions for right front after completing decreases to 25 sts (medium size) I've inserted the marker on the thirteenth st. Decreasing 24 times will put me way past 2 cm from marker. Can someone clarify the remaining directions for the right front? Thanks so much
25.02.2013 - 04:15DROPS Design answered:
Yes, you will pass marker in some point, and continue dec on the side B. Middle inc's should be done already for that time.
25.02.2013 - 15:43
|
|
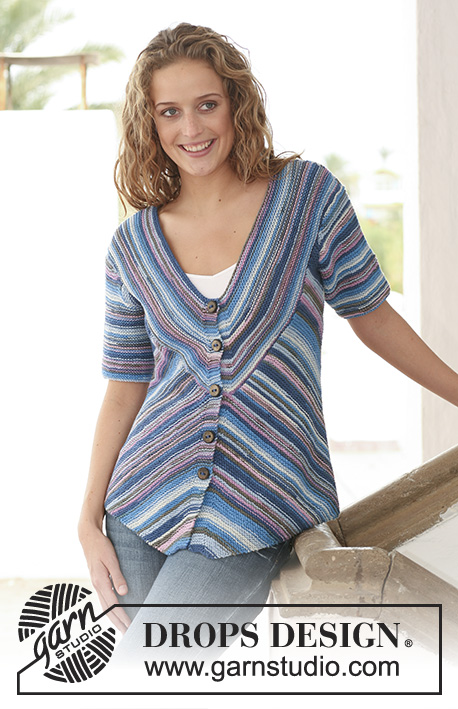
Grape Valley#grapevalleytunic |
|
|
|
|
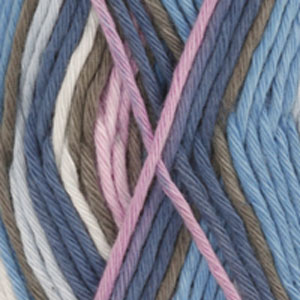
DROPS top in garter st in ”Muskat Soft”. Size S - XXXL.
DROPS 112-13 |
|
|
FRONT PIECE: Worked in garter st throughout, i.e. K all rows. Cast on 6 sts on needle size 4 mm with Muskat Soft. Insert a marker in the middle of row = 3 sts on each side af marker. The marker marks mid front. Continue as follows: Row 1(= RS): K1, 1 YO, work row to 1 st before marker, 1 YO, K2 (marker sits between these 2 sts) 1 YO, work row until 1 st remain, 1 YO and K1. Row 2 (= WS): K all sts, K all YO into back of loop to avoid a hole. Row 3: like row 1. Row 4: like row 2. Row 5: K all sts. Row 6: like row 5. Repeat row 1 to 6 until there is a total of 114-118-122-130-142-150 sts on row. Now divide the piece and slip the first 57-59-61-65-71-75 sts on a stitch holder. Complete each piece separately. RIGHT FRONT PIECE: = 57-59-61-65-71-75 sts. From the RS: beg of row = side-A (towards mid front), the end of row = side-B (towards the side). READ ALL OF THIS SECTION BEFORE CONTINUING! Continue in garter st on all sts, AT THE SAME TIME inc 1 st on side-B as before a total of 1-3-5-7-9-11 times = 58-62-66-72-80-86 sts. When all inc are complete insert a marker after 29-31-33-36-40-43 sts. Now dec 1 st on every other row on side-B a total of 33 times. AT THE SAME TIME when piece measures approx 2 cm from marker dec 1 st on every 10 row a total of 4 times by K tog 2 sts before/2 sts after marker alternately. When all dec are complete there are 21-25-29-35-43-49 sts left on row. Insert a marker in the middle st on row. Continue to dec 1 st on every other row on side-B a total of 21-24-24-27-28-28 times, AT THE SAME TIME inc 1 st on every 6-8-8-8-10-10 row on side-A a total of 6 times and AT THE SAME TIME when piece measures approx 2 cm from marker inc 1 st on every 8 row a total of 4 times by K 2 sts in 1 st before marker/after marker alternately. When all inc and dec are complete there are 10-11-15-18-25-31 sts left on row. Cast off 4-3-7-10-17-23 sts on side-B = 6-8-8-8-8-8 sts left. Now cast off to shape the armhole on side-B on every other row: 2 sts 3-4-4-4-4-4 times and 1 st 2 times, and AT THE SAME TIME continue to inc 1 st on every 6 row on side-A a total of 2 times. When all dec are complete there are no sts left on row. LEFT FRONT PIECE: Slip sts from stitch holder back on needle = 57-59-61-65-71-75 sts. Work like right front piece, but mirrored. NECKLINE: Cast on 25-24-23-22-21-20 sts, pick up 67-70-73-76-81-88 sts along neckline on left front piece, pick up 1 st mid front where piece was divided, then pick up 67-70-73-76-81-88 sts along neckline on right front piece and now cast on 25-24-23-22-21-20 sts at the end of this row = 185-189-193-197-205-217 sts in total. K 1 row from WS. Insert a marker in the middle st on row and continue as follows: Row 1 (=RS): work row to 1 st before marker, slip 1 st as if to K, K2 tog, psso, and work remaining sts on row. Row 2 (= WS): like row 1. Row 3: like row 1 Row 4: K all sts. Row 5, 6 and 7: like row 1. Row 8: like row 4. Row 9 and 10: like row 1. Repeat from row 1 to 10 until neckline measures approx 12 cm = approx 105-109-113-117-125-137 sts on row. Now continue dec as above, AT THE SAME TIME cast off 4 sts at the beg of every row until there are approx 5 sts left. Cast off these sts BACK PIECE: Cast on and work like front piece until neckline measures approx 12 cm = approx 105-109-113-117-125-137 sts on row. Continue dec, AT THE SAME TIME cast off 1 st at the beg of every row until approx 5 sts remain. Cast off these sts. ASSEMBLY: Sew shoulder seams. Sew side seams. CROCHET BORDER: Crochet a border round neckline, armholes and along bottom edge as follows: 1 dc in first st, * 2 ch, skip approx 1 -1.5 cm, 1 dc *, repeat from *-*, and finish with 1 sl st in dc from beg of round. Cut and fasten thread. |
|
 |
|
Have you finished this pattern?Tag your pictures with #dropspattern #grapevalleytunic or submit them to the #dropsfan gallery. Do you need help with this pattern?You'll find 22 tutorial videos, a Comments/Questions area and more by visiting the pattern on garnstudio.com. © 1982-2026 DROPS Design A/S. We reserve all rights. This document, including all its sub-sections, has copyrights. Read more about what you can do with our patterns at the bottom of each pattern on our site. |


With over 40 years in knitting and crochet design, DROPS Design offers one of the most extensive collections of free patterns on the internet - translated to 17 languages. As of today we count 324 catalogues and 12245 patterns translated into English (UK/cm). 12245
We work hard to bring you the best knitting and crochet have to offer, inspiration and advice as well as great quality yarns at incredible prices! Would you like to use our patterns for other than personal use? You can read what you are allowed to do in the Copyright text at the bottom of all our patterns. Happy crafting!
Post a comment to pattern DROPS 112-13
We would love to hear what you have to say about this pattern!
If you want to leave a question, please make sure you select the correct category in the form below, to speed up the answering process. Required fields are marked *.