
Popular categories
Looking for a yarn?


Comments / Questions (84)
![]() Meña wrote:
Meña wrote:
Bonjour Combien je dois prévoir de pelote pour une taille M Merci Meña
28.04.2026 - 23:56DROPS Design answered:
Bonjour Meña, vous trouverez les quantités requises pour chaque taille en haut de page sous l'onglet "Explications", en même temps que les aiguilles / crochet et l'échantillon; il faut ainsi en taille M 300 g DROPS Fabel / 50 g la pelote = 6 pelotes Fabel en M + 1 pelote Cotton Viscose (utilisez le convertisseur pour voir les alternatives possibles). Bon tricot!
29.04.2026 - 09:24
![]() Tina wrote:
Tina wrote:
Jeg forstår simpelthen ikke omgang 5 i den hæklede rude. Har opdatering fra 15.04.2009, men det hjælper mig ikke, desværre Hvad gør jeg?
18.10.2025 - 18:45DROPS Design answered:
Hei Tina. Håper du skjønner denne formuleringen bedre. 5. omg starter med å hekle 4 lm, i 1. lm-bue hekles det slik: (*1 boble-2 lm-1 boble - 4 lm – 1 boble – 2 lm – 1 boble* (= 1. hjørne). Deretter slik: # 3 lm, hopp over 3 lm og hekle 1 st i neste fm, hekle 3 lm, hopp over 3 lm #. I neste lm-bue hekles det som står mellom stjernene *-* = 2. hjørne. Så hekles det som står mellom # - #, så det som står mellom *-* igjen (=3. hjørne), så gjentas #-#, så gjentas *-* = 4. hjørne. Avslutt omgangen med # - #, og avslutt med 1 lm og 1 kjm i tredje lm fra beg av omg. mvh DROPS Design
27.10.2025 - 10:43
![]() Thuan Hao VU wrote:
Thuan Hao VU wrote:
Comment faire des rangs raccourcis sans qu'il y ait de trous merci pour votre aide
28.07.2024 - 13:30
![]() Gantzer Patricia wrote:
Gantzer Patricia wrote:
Merci de votre réponse , j'ai fait ce tour comme indiqué , mon carré est identique , bizarre d'avoir aucune différence en cm, 5,6 ,et 7 cm comme c'est préciser à l'explication. Dommage qu'il n'y est pas une grille , chaque point tricot à un schéma... Mais pas pour le crochet , pourtant bien plus facile à comprendre !
15.08.2023 - 07:27DROPS Design answered:
Bonjour Mme Gantzer, c'est peut-être juste une question de tension? Vérifiez avec le tour 6 que vous allez bien donner la bonne forme à votre motif, vous arriverez peut-être ainsi aux bonnes mesures plus facilement. Bon crochet!
15.08.2023 - 09:23
![]() Gantzer Patricia wrote:
Gantzer Patricia wrote:
Je bloque au tour n°5, o.k. pour les nopes ,les ml et faire de " a" mais combien de fois ? Je n'arrête pas de défaire , et n'obtiens pas la grandeur différente , PAREIL POUR LES CORRECTIONS ajoutés ,j'ai essayé , puis zoomer pour voir le carré , mais en chiner , on ne le devine même pas ! Le reste est fini et à cause de cette bordure… Pas ce boléro
14.08.2023 - 11:22DROPS Design answered:
Bonjour Mme Gantzer, vous devez avoir *1 nope, 2 ml, 1 nope, 4 ml, 1 nope, 2 ml, 1 nope* 4 fois au total = pour les 4 coins du carré, puis entre chaque, 2 arceaux non crochetés et 1 bride dans la ms entre ces 2 arceaux, autrement dit: 4 ml (= 1 ms + 3 ml) au début du tour, de *à* dans l'arceau suiv, sautez 1 arceau, 3 ml, 1 b dans la ms suiv, 3 ml, sautez l'arceau suiv, répétez de *-*, sautez l'arceau suiv, 4 ml, 1 bride dans la ms suiva 4 ml, sautez l'arceau suiv, répétez de *-* dans l'arceau suiv, sautez l'arceau suiv, 3 ml, 1 bride dans la ms suiv, 3 ml, sautez l'arceau suiv, 1 mc dans la 3ème ml du début du tour. Bon crochet!
14.08.2023 - 13:31
![]() Gantzer Patricia wrote:
Gantzer Patricia wrote:
Bonjour ,j'aimerais la grille du carré au crochet ,je ne comprends pas ces écrits même corrigés , ( c'est du charabia) merci d'avance .
14.08.2023 - 10:11DROPS Design answered:
Bonjour Mme Gantzer, je suis désolée, nous n'avons pas de diagramme pour ce carré au crochet, il vous faudra suivre les indications écrites pas à pas - notez les abréviations si besoin: ml = maille en l'air, B = bride, ms = maille serrée, nope = 3 brides écoulées ensemble, mc = maille coulée. Bon crochet!
14.08.2023 - 10:29
![]() Bernadette Perrier wrote:
Bernadette Perrier wrote:
Comment faire les carré au crochet pourrais avoir le modele. en Français de préférence .
27.02.2021 - 10:46DROPS Design answered:
Bonjour Mme Perrier, tous nos modèles sont disponibles en français; cliquez sur le menu déroulant sous la photo pour changer la langue. Bon crochet!
01.03.2021 - 08:03
![]() Paula wrote:
Paula wrote:
Oh, my apologies! I see that the pattern was displayed a few days ago in US, and now it is in British. So nothing has changed. You can ignore my earlier question.
19.11.2013 - 20:21
![]() Paula wrote:
Paula wrote:
Hi--yes, I know that American and UK terminology differs. I printed this pattern off just a few days ago and I see that the double crochets have definitely been changed since then to triple crochets.
19.11.2013 - 20:01
![]() Paula wrote:
Paula wrote:
I see that a few corrections were made yesterday to the crochet portion of this pattern (double crochets were changed to triple crochets). Are we sure? Now the circle is not laying flat. Should I be turning in between rounds? thanks
19.11.2013 - 17:31DROPS Design answered:
Dear Paula, note that US-English and UK-English is different in crochet terminology, ie a US- dc is a UK- tr. Did you check the measurement of the square after round 5? Do not hesitate to take a smaller/larger hook if necessary. Happy crocheting!
19.11.2013 - 18:14
|
|
Memory Lane#memorylanebolero |
|
 |
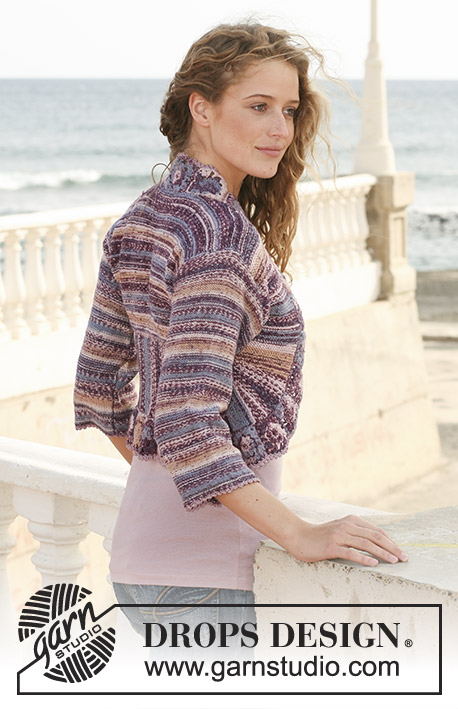 |
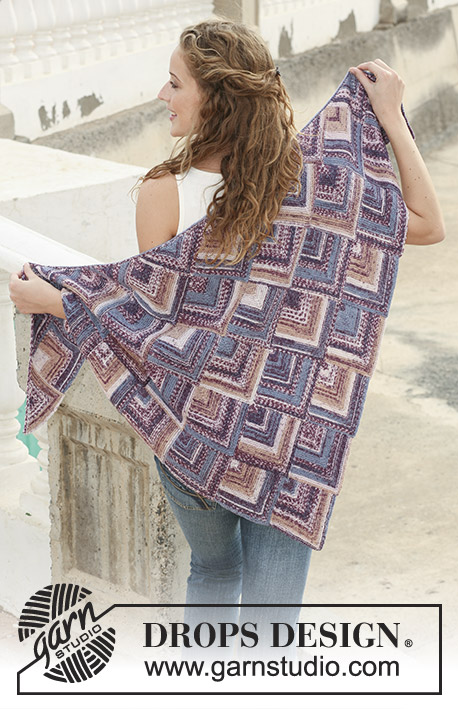
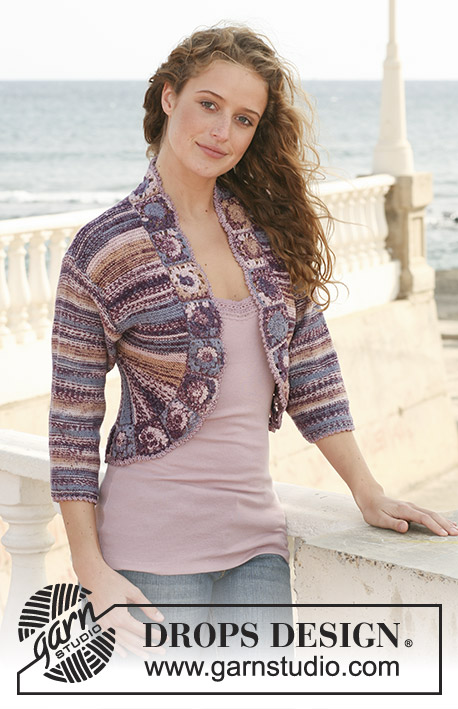
DROPS bolero in garter st with turns in ”Fabel” and border in crochet squares. Size S - XXXL.
DROPS 113-14 |
|
|
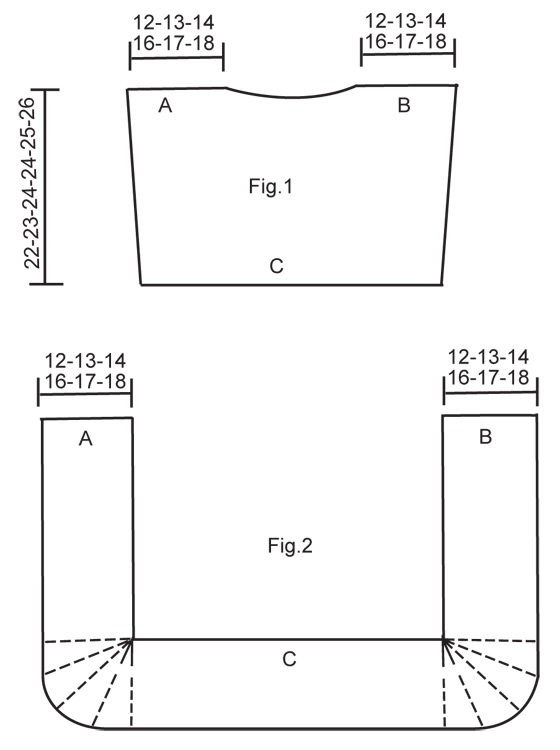
GARTER ST (back and forth on needle): K all rows. TURNS: Work shortened rows to shape the bolero at the front. Work turns as follows: Row 1: Work 24-27-30-33-36-39 sts, turn piece. Row 2: Work all sts. Row 3: Work 21-24-27-30-33-36 sts, turn piece. Row 4: Work all sts. Row 5: Work 18-21-24-27-30-33 sts, turn piece. Row 6: Work all sts. Row 7: Work 15-18-21-24-27-30 sts, turn piece. Row 8: Work all sts. Continue like this with 3 less sts before each turn until you have worked 2 rows on the 3 first sts only. Now work 2 rows on all sts. Repeat from row 1 a total of 5 times. There are now 18-20-22-24-26-28 rows garter st towards mid front and 2 rows garter st towards the side and front piece now measures approx 20-22-24-27-29-31 cm towards mid front and 2 cm towards the side. ---------------------------------------------------------- BACK PIECE: Worked back and forth on needle. See fig.1. Cast on 68-78-88-98-110-122 sts on needle size 3.5 mm with Fabel and work garter st – see above. REMEMBER THE KNITTING TENSION! When piece measures 4 cm continue as follows: SIZE S: Inc 1 st each side, repeat the inc on every 2.5 cm a total of 7 times = 82 sts. SIZE M: Inc 1 st each side, repeat the inc on every 3 cm a total of 6 times = 90 sts. SIZE L: Inc 1 st each side, repeat the inc on every 5 cm a total of 3 times = 94 sts. SIZE XL: Inc 1 st each side, repeat the inc on every 5 cm a total of 3 times = 104 sts. SIZE XXL: No inc. SIZE XXXL: No inc. ALL SIZES: When piece measures 20-21-22-22-23-24 cm cast off the middle 22-24-22-26-26-32 sts for neck and complete each shoulder separately. Cast off at the beg of every row from neckline: 1 st 3 times = 27-30-33-36-39-42 sts left on shoulder. Cast off when piece measures 22-23-24-24-25-26 cm. FRONT PIECE: Worked from one shoulder towards the bottom edge, then across and up towards the other shoulder – see fig.2. Cast on 27-30-33-36-39-42 sts on needle size 3.5 mm with Fabel. Work 21-22-23-23-24-25 cm garter st. Now continue with TURNS – see above. After TURNS work 28-32-36-41-46-51 cm garter st and now work TURNS again the other side. Work 21-22-23-23-24-25 cm garter st and cast off. ASSEMBLY: Place back piece between side pieces on front piece. Fold the 2 side pieces on front piece towards the middle. Sew shoulder seams A to A and B to B in outer loops of sts, and sew C to C at bottom of back piece in the same way – continue the seam up along the sides so that armhole measures approx 18-19-20-21-22-23 cm. CROCHET SQUARES: Explanation Bobble: 3 tr crochet tog: wait with the last pull-through until all 3 tr have been crochet, make a yarn over hook and pull yarn through all 4 sts on hook. Work 4 ch with crochet hook size 3.5 mm and Fabel and form a ring with 1 sl st in first ch. ROUND 1: 6 dc in ring. ROUND 2: 2 dc in each dc = 12 dc. ROUND 3: 2 tr in each dc (replace first tr with 3 ch), only crochet in the back loop of sts = 24 tr. ROUND 4: 4 ch, skip 1 tr, * 1 dc, 3 ch, skip 1 tr *, repeat from *-*, and finish with 1 sl st in first ch = 12 ch-loops ROUND 5: 4 ch, in first ch-loop crochet from *-* as follows: * 1 bobble - see above, 2 ch, 1 bobble, 4 ch, 1 bobble, 2 ch, 1 bobble *, 3 ch, 1 tr in dc between the next 2 ch-loops, 3 ch, in next ch-loop crochet from *-* as above, 4 ch, 1 tr in dc between the next 2 ch-loops, 4 ch, in next ch-loop crochet from *-* as above, 3 ch, 1 tr in dc between the next 2 ch-loops, 3 ch, in next ch-loop crochet from *-* as above, and finish with 1 ch and 1 sl st in third ch from beg of round. Two of the sides are now the same width, approx 6 cm, 1 is smaller, approx 5 cm and 1 is wider, approx 7 cm. ROUND 6: Crochet dc’s in all ch-loops as follows: 1 dc in first ch-loop, 2 dc in next, 5 dc in next (= corner), then 2 dc, 3 dc, 3 dc, 2 dc, 5 dc (= corner), 2 dc, 4 dc, 4 dc, 2 dc, 5 dc (= corner), 2 dc, 3 dc, 3 dc, 2 dc, 5 dc (= corner), 2 dc and 1 dc in the last ch-loop, finish with 1 sl st in first dc from beg of round. Cut the thread. Make approx 25-27-29-32-34-36 squares. Sew squares tog to a long row, edge to edge - place the squares so that all the shorter sides of squares are at the same side and all the longer sides at the opposite side in order the row becomes curved. Begin sewing the row to neckline mid back. Sew the shorter side to body piece, edge to edge. Continue down along one front piece, and along bottom edge to mid back. Beg mid back at neckline again and continue to mid back at bottom edge. If you need more/less squares, adjust this before sewing tog the squares mid back at bottom edge. SLEEVE: Worked back and forth on needle. Cast on 58-60-62-66-66-68 sts on needle size 3.5 mm Fabel. Work garter st. When piece measures 7 cm inc 1 st each side, and repeat the inc on every 3.5-3-2.5-2.5-2-2 cm a total of 9-10-12-12-14-15 times = 76-80-86-90-94-98 sts. When piece measures 37 cm cast off 3 sts each side at the beg of every row until piece measures 40 cm. Cast off remaining sts. Sew sleeve seams in outer loops of sts and set in sleeves. CROCHET BORDER: Crochet a border round the opening with crochet hook size 3.5 mm and Cotton Viscose as follows – beg in the first square mid back at neckline: 1 dc in second st on square, * 1 picot (= 3 ch, 1 dc in first ch), skip 1 dc, 1 dc in next dc *, repeat from *-* (= 7 picots along each square + 1 in seam between each square) and finish with 1 sl st in first dc from beg of round. Crochet a similar border round sleeve edges. |
|
 |
|
 |
|
Have you finished this pattern?Tag your pictures with #dropspattern #memorylanebolero or submit them to the #dropsfan gallery. Do you need help with this pattern?You'll find 18 tutorial videos, a Comments/Questions area and more by visiting the pattern on garnstudio.com. © 1982-2026 DROPS Design A/S. We reserve all rights. This document, including all its sub-sections, has copyrights. Read more about what you can do with our patterns at the bottom of each pattern on our site. |
|


With over 40 years in knitting and crochet design, DROPS Design offers one of the most extensive collections of free patterns on the internet - translated to 17 languages. As of today we count 324 catalogues and 12290 patterns translated into English (UK/cm). 12290
We work hard to bring you the best knitting and crochet have to offer, inspiration and advice as well as great quality yarns at incredible prices! Would you like to use our patterns for other than personal use? You can read what you are allowed to do in the Copyright text at the bottom of all our patterns. Happy crafting!
Post a comment to pattern DROPS 113-14
We would love to hear what you have to say about this pattern!
If you want to leave a question, please make sure you select the correct category in the form below, to speed up the answering process. Required fields are marked *.