
Popular categories
Looking for a yarn?


Comments / Questions (64)
![]() DROPS Design NL wrote:
DROPS Design NL wrote:
De beschrijving van de verkorte naalden staan aan het begin van het patroon onder "verkorte naalden" - als goed is heeft u deze ook gebreid op het voorpand? Ik hoop dat u hiermee verder kunt. Succes. Gr. Tine
17.08.2009 - 10:42
![]() DROPS Design NL wrote:
DROPS Design NL wrote:
Linker mouw: U heeft nu 50-52-54-56-59 st op de nld. Zet daarbij 11 nieuwe st op aan het eind van de nld tegen de st op de hulpnld (manchet in Alpaca). Brei nu door met Alpaca alleen over de nieuwe st en zet daarbij 2 x 15-14-14-13-13 st en 1 x 17-17-15-15-12 st op voor de mouw aan het eind van elke 2e nld. Brei na 2 cm door over alle steken met verkorte toeren. Brei de "nieuwe" st met Alpaca en de "oude" met Fabel. Brei door volgens de beschrijving.
17.08.2009 - 10:40
![]() DROPS Design NL wrote:
DROPS Design NL wrote:
Goedemorgen mevrouw. U moet het patroon breien als volgt. Aan het eind van het linker voorpand heeft u eerst de zijkant gemaakt. U plaatst deze 65-68-71-73-75 st vanaf de onderrand op 1 merkdraad De overige st op de nld zijn voor de mouw.
17.08.2009 - 10:36
![]() Van Der Zijde wrote:
Van Der Zijde wrote:
Ik snap de instructie voor het maken van de mouwen niet goed. Zou deze instructie nog iets meer uitgeschreven kunnen worden (op welke plek komen de nieuwe steken, wanneer wisselen van wol, wat betekent verkorte naalden). Graag uw advies!
16.08.2009 - 08:54
![]() Marit Rasmussen wrote:
Marit Rasmussen wrote:
Jeh skjønner ikke hvordan du har fått for få masker her. Du skal jo legge opp noen m. ad gangen, og til slutt hadde du jo over 100m. Jeg har strikket mye på denne måten, og det har stemt hver gang. Ikke gi opp, prøv en gang til, og les nøye igjennom oppskr. der opplegget står. Lykke til!
21.07.2009 - 19:50
![]() Hanne Bak wrote:
Hanne Bak wrote:
Desværre er der alt for få masker til ærmerne, så jeg har nu trævlet hele blusen op. Det er første gang i mere end 40 år, at jeg har prøvet dette.
21.07.2009 - 13:58
![]() Tale wrote:
Tale wrote:
Jeg tror oppgitt mengde Alpaca i oppskriften for størrelse S er litt for stor. Jeg sitter igjen med nesten to hele nøster, så 150 g bør være mer enn nok!
10.08.2008 - 16:21
![]() Tale wrote:
Tale wrote:
Jakka på bildet er lekker, men resultatet avhenger veldig av innfargingen på Fabel-garnet. Jeg har vært uheldig og fått en innfarging med lange (2-3 m) stykker med svart. Dette har resultert i at stripeeffekten nesten er ikke-eksisterende, og jakka er mørk med kun enkelte lyse striper og spragler. Kjempeskuffa! Vurder å rekke opp hele jakka og bruke annet garn til de lyse stripene.
10.08.2008 - 16:18
![]() Aud Buringrud wrote:
Aud Buringrud wrote:
Hei. jeg kan ikke helt skjønne hvordan vendingene blir på armen.jeg strikker størrelse large, og har på venstre side 125 masker. på armen blir d 108. hvordan deler jeg opp vendingene da? kan jo ikke bruke 112-97-76. håper på raskt svar, da jeg synes denne er utrolig spennende og strikke. jeg vil også berømme alle de flotte modellene dere har. har strikket temmelig mange av dem. på forhånd takk. med hilsen aud buringrud
11.07.2008 - 16:59
|
|
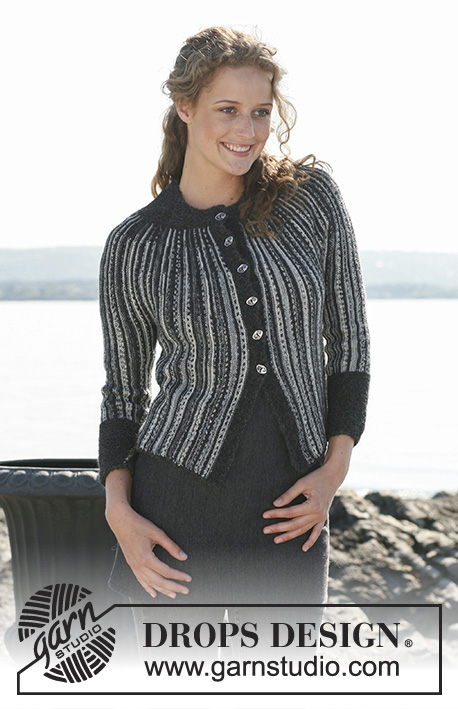
Cat Stripes |
|
 |
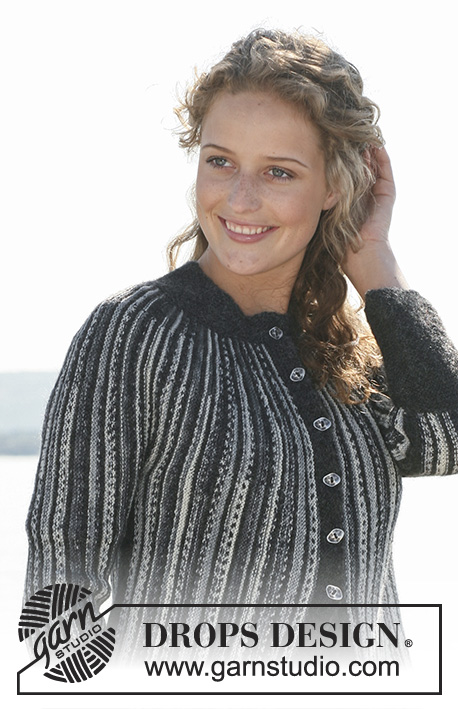 |
DROPS jacket in garter st in ”Fabel” and ”Alpaca”. Worked from side to side with shortened rows. Size S - XXL.
DROPS 110-2 |
|
|
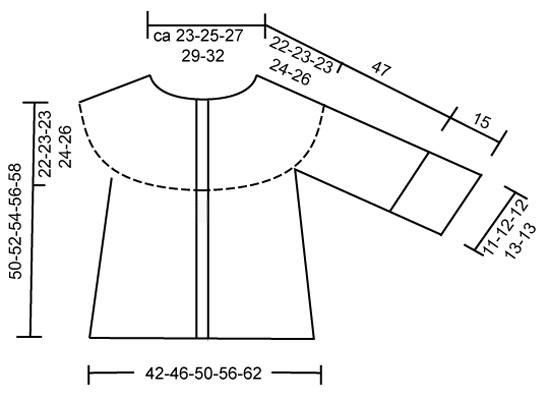
Knitting tip-1: When working turns, twist the Fabel and Alpaca threads at bottom edge after every 4th row, in order the Alpaca thread follows the piece. Knitting tip-2: Steam iron garment before use. Turns: Work shortened rows with turns in mid piece to slightly A-shape the jacket. Beg at bottom edge and work towards neckline. * Work all sts with Fabel, turn piece and work return row. Work 103-108-112-115-119 sts with Fabel, turn piece and work return row. See Knitting-tip-1! Work 89-94-97-99-103 sts with Fabel, turn piece and work return row. Work 70-73-76-78-80 sts with Fabel, turn piece and work return row. Work all sts with Alpaca, turn piece and work return row *. Repeat from *-*. Turns, neckline: Beg mid front (1st row = RS): * Work row to MT-4, turn piece, K2 tog and work return row to MT-1, turn piece, K2 tog and work return row to MT-3, turn piece , K2 tog and work return row to MT-2, turn piece, K2 tog and work return row on all sts *, repeat from *-*. Jacket is worked from side to side, beg mid front on left front piece, work towards sleeve, work sleeve, back piece, sleeve and then right front piece. Row is worked from bottom edge towards neckline and the entire jacket is worked in garter st, i.e. K all rows. Left front piece: Loosely cast on 115-120-125-129-134 sts on needle size 3.5 mm with Alpaca. First row = RS (from bottom edge towards neckline). Work approx 3 cm on all sts with Alpaca = front band (make sure next row is from RS). Remember the knitting tension! Now continue with shortened rows and Turns – see explanation above. See Knitting tip-1! Continue like this until piece measures approx 23-25-27-30-33 cm from casting on row (measured at bottom edge). At neckline piece measures approx 11-12-12½-14-15 cm from casting on row. Now continue over the side piece with Alpaca as follows: work 1 cm back and forth on 65-68-71-73-75 sts from bottom edge only. Insert a Marking Thread (MT) (= mid side). Work 1 cm back and forth on the 65-68-71-73-75 sts again and now slip these sts on a stitch holder (to be used later for back piece). Now work the sleeve. Left sleeve: = 50-52-54-56-59 sts on needle. Loosely cast on 11 new sts over sts on stitch holder. Continue with Alpaca on the new sts only (= edge under the sleeve), at the same time cast on 15-14-14-13-13 sts 2 times and 17-17-15-15-12 sts 1 time on every other row towards bottom edge. At the same time when piece measures 2 cm continue on all sts. Continue with Turns. After all new sts have been cast on there are 108 sts on needle. Continue until piece measures approx 22-24-24-25-26 cm (along bottom edge) measured from where the last new sts were cast on. Loosely cast off 17-17-15-15-12 sts from bottom edge and now cast off on every other row: 15-14-14-13-13 sts 2 times and 11 sts 1 time = 50-52-54-56-59 sts left on needle. Back piece: Slip the 65-68-71-73-75 sts from stitch holder back on needle = 115-120-125-129-134 sts. Continue with Turns. When piece measures approx 21-23-25-28-31 cm (measured along bottom edge) from MT at mid side, insert a new MT = mid back, (piece measures approx 28-31-33-35-37 cm at neckline, measured from casting on row mid front). Continue until piece measures approx 20-22-24-27-30 cm (measured along bottom edge) from MT mid back. Now work side piece in Alpaca as follows: Work 1 cm back and forth on 65-68-71-73-75 sts from bottom edge only. Insert a MT (= mid side). Work 1 cm back and forth on the 65-68-71-73-75 sts again and now slip these sts on a stitch. Right sleeve: Like left sleeve. Right front piece: Slip the 65-68-71-73-75 sts from stitch holder back on needle = 115-120-125-129-134 sts. Continue with Turns as on back piece. When you have worked the same amount of rows on right front piece as on left front piece work front band as follows: Work approx 1.5 cm on all sts with Alpaca. On next row from RS (from bottom edge) cast off for buttonholes as follows: Work 47-47-48-51-51 sts, cast off 1 st, * work 13-14-15-15-16 sts, cast off 1 st *, repeat from *-* a total of 4 times, work the remaining 11-12-12-13-14 sts. On next row cast on 1 new st over the cast off sts. Continue on all sts until front band measures approx 3 cm. Cast off loosely. Cuffs: Pick up 1 st in approx every other row along sleeve edge. Work garter st back and forth on all sts with Alpaca, at the same time adjust no of sts to 51-55-55-58-60 on first row. When cuff measures approx 15 cm (or required length) cast off loosely. Assembly: Sew seam under sleeves, edge to edge with neat sts – seam will sit approx 1 cm from centre of sleeve because of the edge under sleeve. Sew openings under sleeves (by side piece). Neckline: Worked in garter st. Beg mid front (from the RS). Pick up approx 120 -170 sts round the neck (also over front bands each side) with Alpaca. K 1 row from WS. Insert 4 MT round neck as follows: MT-1 and MT-4: each side after 19 sts from mid front. MT-2 and MT-3: each side after 30 sts from mid front. These MT are to be used for working Turns. Now also insert another 2 MT, 1 each side on back piece in transition between sleeve and back piece. These MT are to be used for dec. Continue with Turns – see explanation above. At the same time, on every row from RS dec 1 st on each side of both MT on back piece (= 4 dec). At the same time when neckline measures approx 1.5 cm mid front cast off for 1 buttonhole in line with others on front band by casting off the 4th st from mid front. On next row cast on 1 new st in the same place. Continue with Turns and dec until neckline measures approx 4 cm (measured mid back). Dec on back piece are now complete. K 1 row from RS, at the same time dec 20 sts evenly between MT-2 and MT-3. K 1 row from WS. Continue with Turns as before. When neckline measures approx 6 cm mid back K 1 row from RS, at the same time inc 25 sts evenly between MT-2 and MT-3. Continue with Turns until neckline measures 7 cm (measured mid back). Cast off loosely. Crochet border round jacket: Crochet a border round jacket with crochet hook size 3.5 mm and Alpaca as follows, beg at neck mid back, work round neck, down along front band, along bottom edge, up along front band and round neck to mid back: * 1 dc, 2 ch, skip approx 1 cm *, repeat from *-* and finish with 1 sl st in dc from beg of round. Note! Make sure border isn’t too tight. Crochet border round sleeves: Crochet a similar border round sleeve edges. Assembly: Sew on buttons. Also see Knitting tip-2! |
|
 |
|
Have you finished this pattern?Tag your pictures with #dropspattern or submit them to the #dropsfan gallery. Do you need help with this pattern?You'll find 20 tutorial videos, a Comments/Questions area and more by visiting the pattern on garnstudio.com. © 1982-2026 DROPS Design A/S. We reserve all rights. This document, including all its sub-sections, has copyrights. Read more about what you can do with our patterns at the bottom of each pattern on our site. |
|


With over 40 years in knitting and crochet design, DROPS Design offers one of the most extensive collections of free patterns on the internet - translated to 17 languages. As of today we count 324 catalogues and 12291 patterns translated into English (UK/cm). 12291
We work hard to bring you the best knitting and crochet have to offer, inspiration and advice as well as great quality yarns at incredible prices! Would you like to use our patterns for other than personal use? You can read what you are allowed to do in the Copyright text at the bottom of all our patterns. Happy crafting!
Post a comment to pattern DROPS 110-2
We would love to hear what you have to say about this pattern!
If you want to leave a question, please make sure you select the correct category in the form below, to speed up the answering process. Required fields are marked *.