
Popular categories
Looking for a yarn?






























Comments / Questions (62)
 Synnöve Helmersdotter wrote:
Beskrivning på tröjans bakstycke var finns den för halsen ?
29.04.2024 - 08:41DROPS Design answered:
Hei Synnöve. Under Bakst. står det: ...... När arb mäter 26-29-33 (35-38) cm avm de mittersta 24-26-30 (32-36) m till hals. Vidare avm 1 m i var sida på nästa v mot halsen. Maska av när arb mäter 28-31-35 (37-40) cm. Da har du felt av til hals og under Montering står det hvordan halsen strikkes. Slik: Plocka upp 70-80 m runt halsen på strumpst 2,5 med vit och sticka 1,5 cm rätst fram och tillbaka på st, maska av. mvh DROPS Design
29.04.2024 - 11:43
 Copla wrote:
Pour les manches : À 16-20-22 (24-27) cm de hauteur totale, rabattre 6 m sous la manche = 6m de chaque côté du marqueur ou 6m : 3 et 3 ?
06.02.2024 - 22:34DROPS Design answered:
Bonjour Mme Copla, on doit rabattre 6 mailles sous la manche, autrement dit, 3 mailles avant le marqueur à la fin du tour et 3 mailles au début du tour, après le marqueur. Bon tricot!
07.02.2024 - 08:20
Eva Hanak wrote:
Jag undrar om det är så att rät maska bara stickas rät från rätsida? I detta mönster står det bara rät maska och avig maska ingen ytterligare förklaring. Jag vill inte sticka vidare då jag börjar tro att det är fel som jag gjort. I tidigare mönster jag använt så har det tex stått att rät maska stickas avig från avigsidan. Tacksam för klargörande i detta. Gäller mönster Bunny Hugs
19.09.2022 - 13:26
Mona Kennerhed wrote:
Hej! beskrivning till bakstycket Bunny Hugs 3-17 saknas!
20.01.2022 - 10:00DROPS Design answered:
Hej Mona, jo det hittar du precis under Höger framstycke :)
20.01.2022 - 15:38
 Dominique Plasman wrote:
La base du pt fantaisie est-elle bien tous les rangs à l'endroit en aller retour (et donc chaque carré représentant un pt à l'envers que ce soit sur l'envers ou sur l'end. du tricot)?. La première ligne du diagramme est-elle bien sur l'endroit de l'ouvrage ? merci
06.01.2021 - 12:40DROPS Design answered:
Bonjour Mme Plasman, le diagramme montre tous les rangs du motif, vus sur l'endroit, autrement dit, vous lisez les rangs endroit (rangs 1, 3, 5, etc) de droite à gauche et les rangs envers (rangs 2, 4, 6, etc) de gauche à droite. Sur l'endroit, vous tricoterez donc le 1er rang à l'endroit, sur l'envers vous tricoterez pour le 2ème rang par ex. (1 m end (= carré noir, ce sera 1 m env, vu sur l'endroit) et 1 m env (= carré blanc, ce sera 1 m jersey, vu sur l'endroit) alternativement. Bon tricot!
06.01.2021 - 13:30
 Mandy wrote:
Hallo, wird die Rückreihe gestrickt wie die Maschen zu sehen sind oder laut Diagramm? Also Runde 1 Hinreihe , Runde 2 Rückreihe?
03.12.2020 - 21:20DROPS Design answered:
Liebe Mandy, alle Reihen sind im Diagram gezeigt, dh Hinreihen werden rechts nach links gelesen/gestrickt und Rückreihen von links nach rechts. Hier lesen Sie mehr über Diagramme. Viel Spaß beim stricken!
04.12.2020 - 07:40
 Jonna Christensen wrote:
Hejsa, hvordan skal denne opskrift forstå. 1 pind, skal strikkes ret, da det er på ret siden, hvad så med næste pind, skal jeg så stikke 1 vrang og 1 ret ? Der står jo at mønstret er set fra retsiden? er total forviret. Eller skal alle vrangpindende strikkes vrang
31.10.2020 - 21:06
LISOIR wrote:
Pour tricoter les manches, je ne comprends pas si il faut tricoter en rond ou bien en aller retour. Je ne comprends pas quand vous dites d'augmenter 2 m sous la manche...
22.04.2020 - 16:21DROPS Design answered:
Bonjour Mme Lisoir, les manches se tricotent en rond sur les aiguilles doubles pointes. Augmentez 2 mailles au milieu sous la manche permet d'élargir la manche, procédez ainsi: tricotez le tour jusqu'à ce qu'il reste 1 maille avant la fin du tour, augmentez 1 maille, tricotez 2 mailles (le début du tour se trouve entre ces 2 mailles), augmentez 1 maille. Bon tricot!
22.04.2020 - 16:37
JpJt wrote:
Rebonjour et merci pour votre réponse. Seulement je n'ai pas tricoté en rond parce que ça n'est pas indiqué, je vais donc suivre votre conseil et tricoter en rond. Ensuite à 5cm de hauteur totale je vais tricoter en rang "augmenter1 maille pour la couture, tourner et tricoter le rang suivant sur l'envers, augmenter 1 maille pour la couture, tourner et continuer ainsi en rangs sur toutes les mailles" OK mais ensuite après ça je continue en rond ou en rang?
24.09.2019 - 11:26DROPS Design answered:
Bonjour JpJt, après avoir monté 1 maille de chaque côté, au début et à la fin du 1er rang, vous continuez en rangs = en allers et retours. Quand le short sera terminé, vous pourrez faire la couture à 1 m lisière des bords (la partie tricotée en allers et retours). Bon tricot!
24.09.2019 - 13:45
JpJt wrote:
Bonjour, je ne comprends pas comment faire "diviser l'ouvrage à l'intérieur de la jambe et terminer en allers retours"? Que faut'il faire? merci pour votre réponse. Jpjt
24.09.2019 - 09:33DROPS Design answered:
Bonjour JpJt, à la hauteur indiquée, vous ne tricotez plus en rond mais en rangs, quand vous arrivez à la fin du tour, au lieu de continuer le tour suivant, augmenter 1 maille pour la couture, tournez et tricotez le rang suivant sur l'envers, augmentez 1 maille pour la couture, tournez et continuez ainsi en rangs sur toutes les mailles. Bon tricot!
24.09.2019 - 10:55
|
|||||||
Bunny Hugs#bunnyhugsjacket |
|||||||
 |
 |
||||||
DROPS jacket with textured pattern and shorts in “Safran”.
DROPS Baby 3-17 |
|||||||
|
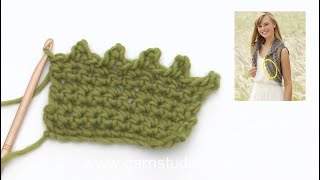
JACKET: Knitting tension: 24 sts x 32 rows on needles size 3 mm in stocking sts = 10 x 10 cm. Garter st, back and forth on needle: Knit all rows. Pattern: See diagram. The diagrams show the pattern from the RS. Front and back piece: Worked back and forth on circular needle from mid front. Cast on 134-152-170 (182-188) sts on circular needle size 2.5 mm with white and work 2-2-3 (3-3) cm garter st. Change to needle size 3 mm and continue in pattern with 7 sts each side towards mid front in garter st. At the same time, make buttonhole on right front piece when piece measures 2 cm and then make a further 4 buttonholes with approx 4.5-5-6.5 (7-7.5) cm between each. 1 buttonhole = cast off the middle 3 of the 7 garter sts and cast on 3 new sts on return row. Remember the knitting tension. When piece measures 16-18-21 (22-23) cm work next row as follows from the RS: 35-40-44 (47-49) sts = front piece, cast off 4 sts for armhole, 56-64-74 (80-82) sts = back piece, cast off 4 sts for armhole, 35-40-44 (47-49) sts = front piece. Now complete front and back pieces separately. Left front piece: = 35-40-44 (47-49) sts. Dec to shape the armhole on every other row as follows: 1 st 2-4-4 (3-3) times = 33-36-40 (44-46) sts. When piece measures 24-27-31 (33-36) cm cast off to shape the neckline on every other row: 14-15-17 (18-19) sts 1 time, 2 sts 2 times and 1 st 2 times. Cast off remaining sts when piece measures 28-31-35 (37-40) cm. Right front piece: like left front piece. Back piece: = 56-64-74 (80-82) sts. Dec for armhole on every other row: 1 st 2-3-4 (3-2) times = 52-58-66 (74-78) sts. When piece measures 26-29-33 (35-38) cm cast off the middle 24-26-30 (32-36) sts for neck and dec 1 st on neckline on next row. Cast off remaining sts when piece measures 28-31-35 (37-40) cm. Sleeve: Cast on 36-38-40 (42-42) sts on double pointed needles size 2.5 mm with white and work 2-2-3 (3-3) cm garter st. Change to needle size 3 mm and continue in pattern, at the same time inc 0-4-8 (10-10) sts evenly on first round = 36-42-48 (52-52) sts. Now inc 2 sts mid under arm a total of 11-10-10 (10-15) times as follows: Size 3 months: on every 4th round Size 6/9 + 12/18 months: on every 5th round Size 2 years: on every 6th round Size 3 years: on every 4th and 5th round alternately = 58-62-68 (72-82) sts – incorporate new sts in pattern as you go along. When piece measures 16-20-22 (24-27) cm cast off 6 sts mid under arm and complete sleeve back and forth on needle. Cast off to shape the sleeve cap each side on every other row: 5 sts 2-3-3 (3-3) times. Cast off when sleeve measures 18-22-24 (26-29) cm. Assembly: Sew shoulder seams. Pick up 70-80 sts round the neck on needle size 2.5 mm with white and work 1.5 cm garter st, cast off. Set in sleeves and sew on buttons. ------------------------------------------------------- SHORTS: Size: 3 – 6/9 – 12/18 months (2 – 3) years DROPS circular needle and double pointed needles size 2.5 mm and 3 mm Crochet hook size 2.5 mm Knitting tension: 24 sts x 32 rows on needles size 3 mm in stocking sts = 10 x 10 cm. Moss st: first row *K1, P1*, second row P over K and K over P. Repeat second row. Right leg: Cast on 58-62-62 (68-68) sts on double pointed needles size 2.5 mm with pink Safran and work 2 cm moss st. Change to double pointed needles size 3 mm and continue in stocking st, at the same time inc 20-22-22 (22-22) sts evenly on first round = 78-84-84 (90-90) sts. When piece measures 4-5-6 (7-8) cm divide piece at inside leg (= split) and complete piece back and forth on needle. Inc 1 st each side for seam = 80-86-86 (92-92) sts. When piece measures 6-7-8 (9-10) cm cast off 4 sts each side = 72-78-78 (84-84) sts. Put piece aside and knit the other leg. Left leg: like right leg. Trousers: Put both legs in on the same circular needle = 144-156-156 (168-168) sts, at the same time inc 1 st in the last st on each leg = 146-158-158 (170-170) sts. Now inc mid back on both sides of the middle 2 sts on every 3rd round: 1 st 3 times, at the same time dec mid front on every 3rd round on both sides of the middle 2 sts: 1 st 4 times – dec as follows: K2 tog into back of st, K2 middle sts, K2 tog = 144-156-156 (168-168) sts. When piece measures 23-26-29 (31-32) cm change to needle size 2.5 mm, at the same time dec 14-16-16 (18-18) sts evenly = 130-140-140 (150-150) sts. Work 3 cm stocking st, P 1 round = folding edge, and work 3 cm stocking st, cast off. Fold edge double towards WS and fasten, leave an opening and pull through a ribbon. Assembly: Sew tog split inside each leg to the cast off stitches and sew the opening between legs from mid front to mid back of the trousers. Crochet a border around both legs on crochet hook size 2.5 mm as follows: 1 dc, *3 ch, 1 dc in first ch, skip 1 st, 1 dc*, repeat from *-*. |
|||||||
Diagram explanations |
|||||||
|
|||||||
 |
|||||||
 |
|||||||
 |
|||||||
Have you finished this pattern?Tag your pictures with #dropspattern #bunnyhugsjacket or submit them to the #dropsfan gallery. Do you need help with this pattern?You'll find 14 tutorial videos, a Comments/Questions area and more by visiting the pattern on garnstudio.com. © 1982-2026 DROPS Design A/S. We reserve all rights. This document, including all its sub-sections, has copyrights. Read more about what you can do with our patterns at the bottom of each pattern on our site. |
|||||||






With over 40 years in knitting and crochet design, DROPS Design offers one of the most extensive collections of free patterns on the internet - translated to 17 languages. As of today we count 333 catalogues and 12532 patterns translated into English (UK/cm). 12521
We work hard to bring you the best knitting and crochet have to offer, inspiration and advice as well as great quality yarns at incredible prices! Would you like to use our patterns for other than personal use? You can read what you are allowed to do in the Copyright text at the bottom of all our patterns. Happy crafting!
Post a comment to pattern DROPS Baby 3-17
We would love to hear what you have to say about this pattern!
If you want to leave a question, please make sure you select the correct category in the form below, to speed up the answering process. Required fields are marked *.