Comments / Questions (26)
![]() Mirjan wrote:
Mirjan wrote:
Hoe komt het dat het patroon schuin wordt? Wat doe ik fout?
10.11.2025 - 10:51DROPS Design answered:
Dag Mirjam,
Het is jammer dat ik niet met je mee kan kijken, als je het patroon volgt zou je het niet scheef moeten worden. Misschien is het mogelijk om even met je werkstuk bij bijvoorbeeld een breiwinkel langs te gaan, zodat iemand mee kan kijken.
12.11.2025 - 10:45
![]() Dorothea wrote:
Dorothea wrote:
Very badly written pattern.
10.10.2025 - 23:47
![]() Aurousseau wrote:
Aurousseau wrote:
Comment coudre poche gilet daphnè? voir tuto
13.11.2024 - 16:19
![]() Mowy wrote:
Mowy wrote:
Bonjour, Peut-on utiliser, sans adaptation, les explications du modèle Daphne (Gilet sans manches tricoté en côtes anglaises) mais en utilisant les côtes anglaises avec mailles doubles plutôt qu'avec jetés Merci pour ce beau modèle en 2 exemplaires et au plaisir de vous lire
06.10.2024 - 18:13DROPS Design answered:
Bonjour Mme Mowy, vérifiez votre échantillon en largeur et en hauteur, et ajustez la taille des aiguilles/les explications (les hauteurs par ex) en conséquence si besoin. il est également possible que la quantité de laine en soit affectée. Bon tricot!
07.10.2024 - 08:21
![]() Annica wrote:
Annica wrote:
Hej! Hur mycket större än mina kroppsmått är det tänkt att västen ska vara, så jag vet när jag väljer storlek.
04.08.2024 - 14:58DROPS Design answered:
Hej Annica, det bestemmer du selv, mål evt en vest/bluse du synes om at have på og vælg så den størrelse - i måleskitsen nederst i opskriften - med samme mål :)
06.08.2024 - 14:23
![]() Annica wrote:
Annica wrote:
Hej! Vilken ease är det tänkt att västen ska ha, så jag vet när jag väljer storlek.
05.07.2024 - 17:52DROPS Design answered:
Hei Annica. Dette er ikke en vanskelig oppskrift om man forstår helpatent / forklaringen som er gitt, men strikke en prøvelapp med helpatent og se hvordan det går. mvh DROPS Design
08.07.2024 - 14:10
![]() Inge wrote:
Inge wrote:
Jeg vil gerne strikke vesten, men jeg kan se på spørgsmål, at det ser ud til at der er fejl i opskriften?
02.02.2024 - 16:12DROPS Design answered:
Hei Inge. Hvilket spørsmål refererer du til? Ser at Raisa Feygin fra 06.02.2021 hadde en Kommentar at vrangborden var feil på den amerikanske oppskriften. Den er rettet og en rettelse link (rød) er lagt til oppskriften (+ på de språk det var feil på), men det var ikke feil på den danske oppskriften, så her er det ingen rettelse link i rødt. Eller er det en annen Kommentar/Spørsmål du tenker på? mvh DROPS Design
12.02.2024 - 11:22
![]() Carolien Baars wrote:
Carolien Baars wrote:
Hoe voorkom ik dat de voorbies krom trekt!! Hij trekt zo het voorpand een beetje bol zeg maar. Heb al geprobeerd om de eerste steek wel en niet mee te breien. Ik hoor graag van u.
04.04.2023 - 08:19DROPS Design answered:
Dag Carolien,
Vlak voordat de minderingen voor de hals beginnen brei je 2 naalden alleen over de 4 voorbiessteken. Dus je breit de 4 steken dan keer je het werk en je breit terug. Hierdoor ontstaat er meer ruimte in de bocht. Verder kun je, nadat je het werk klaar hebt, de biezen voorzichtig oppersen, door er een natte doek overheen te leggen en heel voorzichtig te deppen met het strijkijzer.
05.04.2023 - 07:43
![]() Manuela wrote:
Manuela wrote:
Die norwegische Anleitung zum Muster habe ich jetzt so verstanden: 1.R: *rm lm* 2.R (Rückenteil): *linke Masche Umschlag nächste Masche wie zum Rechtsstricken abheben* 2.R(Seitenteil): *Umschlag nächste Masche wie zum rechtsstricken abheben linke Masche* 3. R: * rechte Masche die nächsten beiden Maschen (umschlag und abgehobene Masche) links zusammenstricken* 2. und 3. Runde wiederholen Ich hoffe, es stimmt so.
04.01.2023 - 11:15
![]() Manuela wrote:
Manuela wrote:
Das Oatentmuster im Video ist Vollpatent. In der Abbildung der Weste siehtves aber so aus, als sei diese im Halbpatent gestrickt und die linke Seite des Halbpatentes für die Vorderseite genommen worden. Die Angaben für das Strickmustercsind total verwirrend, weder Halb-noch Vollpatent. Ich würde die Weste gerne stricken. Was soll ich machen?
04.01.2023 - 00:59DROPS Design answered:
Liebe Manuela, das Patentmuster wurde hier korrigiert, danke für den Hinweis. Viel Spaß beim stricken!
04.01.2023 - 10:00
Daphne#daphne |
|
 |
 |
English rib DROPS waistcoat in ”Alaska” with wide shoulders and pockets. Size: S to XXXL
DROPS 104-34 |
|
|
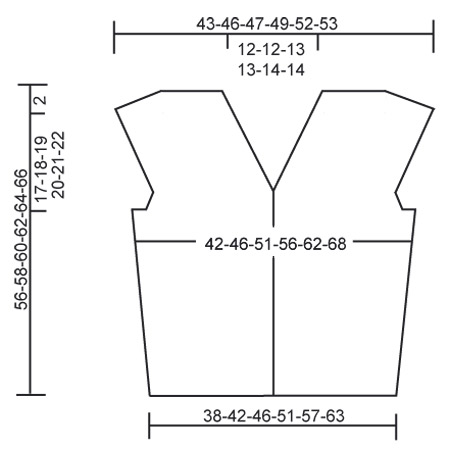
Knitting tension: 16 sts x 27 rows English rib = 10 x 10 cm English rib: Knit English rib as follows: 1st row (RS): * K1, P1 *, repeat from *-*. 2nd row back piece: *P1, yo, slip 1 st as if to K*, repeat from*-*. 2nd row front piece: *yo, slip 1 st as if to K, P1* repeat from*-*. 3rd row: *K1, P tog yo and loose st from last row*, repeat from *-*. Continuing, repeat 2nd and 3rd rows. Decreasing tip: Dec within 4 sts garter sts. All decreases are done from RS! Dec as follows before and after 4 garter sts: P2 sts tog. NOTE: Due to English rib it will sometimes be yo and lose sts from previous row that is cast off. Yo and lose sts are then counts as one. Increasing tip 1: Inc 2 sts by casting on 2 new sts on end of row. Increasing tip 2: Inc within 4 garter sts. All increases are done from RS! Yo 1 sts on needle for inc . On next row knit into back of yo to avoid hole (i.e.e knit into back of sts in stead of front part). Buttonhole: Cast off for buttonhole on right front band. 1 buttonhole = cast off 3rd sts on front band. On next row cast on 1 new sts over cast off sts. Cast off for buttonhole when piece measures: Size S: 2, 9, 16, 23, 30 and 37 cm. Size M: 2, 10, 17, 24, 31 and 38 cm. Size L: 2, 9, 17, 25, 33 and 40 cm. Size XL: 2, 10, 18, 26, 34 and 41 cm. Size XXL: 2, 8, 15, 22, 29, 36 and 43 cm. Size XXXL: 2, 9, 16, 23, 30, 37 and 44 cm. Back piece: Knit piece back and forth. Cast on 78-84-93-102-114-126 sts (incl 1 edge sts on each side) on needles size 5 mm with Alaska. Then knit as follows (1st row = RS): 1 edge st, * P1, K2 * repeat from *-* and finish off with 1 P and 1 edge st. Continue with K over K and P over P until piece measures 4-4-4-6-6-6 cm. K2 rows at the same time dec on 1st row 15-15-18-19-21-23 sts evenly = 63-69-75-83-93-103 sts. Continue with English rib – see explanation above – with 1 edge sts on each side until complete measurement. Remember knitting tension! When piece measures 8-9-10-11-12-13 cm inc 2 sts – read Increasing tip 1 – on each side, repeat inc when piece measures 24-25-26-27-28-29 cm = 71-77-83-91-101-111 sts (incorporate new sts into English rib as you go). When piece measures 36-37-38-39-40-41 cm knit 7-8-9-9-10-11 sts continuing on each side in garter sts. Read entire section before knitting commences! When piece measures 37-38-39-40-41-42 cm cast off 3-4-5-5-6-7 sts on each side for armhole. Continuing knit 4 sts garter sts on each side until completed measurement. Continuing dec 1 sts – read Decreasing tip: on every other row 3-4-5-8-10-13 times in total = 59-61-63-65-69-71 sts. Then inc 1 sts for wide shoulder – read Increasing tips 2: on every 4th row 5-6-6-7-7-7 times in total = 69-73-75-79-83-85 sts. Knit new sts into English rib as you go. At the same time when piece measures 52-54-56-58-60-62 cm knit garter sts on 27-27-29-29-31-31 sts mid back (knit other sts like before). When piece measures 54-56-58-60-62-64 cm start cast off for shoulder on each side on every other row as follows: Cast off 4-6-6-7-8-8 sts 1 time and 3 sts 1 time. At the same time on 1st row also cast off middle 17-17-19-19-21-21 sts for neck, continuing cast off 1 sts on next row towards neck (continue with 4 sts garter sts on each side at neckline). When all cast offs are completed 18-18-18-19-19-20 sts are left on each shoulder. Piece measures approx 56-58-60-62-64-66 cm. Cast off loosely. Left front piece: Cast on 43-46-49-55-61-67 sts (incl 4 front band sts and 1 edge sts) on needles size 5 mm with Alaska. Then knit as follows (1st row = RS): 1 front edge sts * K2, P1 *, repeat from *-* and finish with 2 K and 4 front edge sts (knit front edge in garter sts on each row until completed measurement). Continue with K over K and P over P until piece measures 4-4-4-6-6-6 cm. K2 rows at the same time dec on 1st row 8-7-8-10-10-12 sts evenly = 35-39-41-45-51-55 sts. Continue with English rib – see explanation above – with 1 edge sts on each side and 4 front edge sts mid front until complete measurement. When piece measures 16-17-18-19-20-21 cm inc 2 sts on side – red Increasing tip 1. Repeat inc when piece measures 32-33-34-35-36-37 cm = 39-43-45-49-55-59 sts. When piece measures 36-37-38-39-40-41 cm knit 7-8-9-9-10-11 sts continuously in garter sts. Cast off for armhole and inc for wide shoulder on side like back piece. At the same time when piece measures 38-39-41-42-44-45 cm knit 2 rows back and forth but only on front band, continue over all sts at the same time as dec 1 sts for neckline – read Decreasing tips – on every other row 13-14-14-14-16-15 times in total. At the same time when piece measures 54-56-58-60-62-64 cm cast off for shoulder on side as back piece. When all cast offs are completed 18-18-18-19-19-20 sts are left on each shoulder. Piece measures approx 56-58-60-62-64-66 cm. Cast off loosely. Right front piece: Knit like left piece but reversed. Remember to close off for button hole – see explanation above. Assembly: Sew shoulder seams. Sew tog side seams within 1 edge st. Pocket: Cast on 19-19-21-21-23-23 sts on needle size 5 mm with Alaska. Knit 2 rows garter sts. Continue with English rib (knit 2nd row English rib like on back piece) with 2 sts garter sts on each side. Continue as follows until pocket measures approx 12-12-13-13-14-14 cm (ensure finishing off with 1 row from RS). Knit 3 row garter sts. Cast off loosely. Knit another pocket. Sew 1 pocket on each front piece. Sew on pocket approx 6 cm from cast on edge and approx 6 cm from mid front. |
|
 |
|
Have you finished this pattern?Tag your pictures with #dropspattern #daphne or submit them to the #dropsfan gallery. Do you need help with this pattern?You'll find 20 tutorial videos, a Comments/Questions area and more by visiting the pattern on garnstudio.com. © 1982-2026 DROPS Design A/S. We reserve all rights. This document, including all its sub-sections, has copyrights. Read more about what you can do with our patterns at the bottom of each pattern on our site. |
|


Post a comment to pattern DROPS 104-34
We would love to hear what you have to say about this pattern!
If you want to leave a question, please make sure you select the correct category in the form below, to speed up the answering process. Required fields are marked *.