
Popular categories
Looking for a yarn?


Comments / Questions (19)
![]() David Porter wrote:
David Porter wrote:
Hi Just to add has anyone else knitted this and had the same problem David
02.01.2022 - 00:55DROPS Design answered:
Dear David, you might want to try and put that question up in th eDROPS Workshop group on Facebook. Maybe there will you find someone who also made this piece. Happy Stitching!
03.01.2022 - 02:03
![]() David Porter wrote:
David Porter wrote:
Very disappointed in this, i am 3 quarter through the pattern and i thought i would put the stitches on a piece of yarn to try it on. Its far too small i cant get both arms in to pull it over my head. David 😭😢
01.01.2022 - 23:55
![]() David Porter wrote:
David Porter wrote:
Further to my question, I am talking about normal straight needles not DPN'S.. David
15.12.2021 - 23:54DROPS Design answered:
Sure - see answer below
16.12.2021 - 07:29
![]() David Porter wrote:
David Porter wrote:
Is it possible to do this pattern on straight needles please. Looking forward to hearing from you. David Porter
15.12.2021 - 23:44DROPS Design answered:
Dear Mr Porter, this lesson explains how to adjust a pattern for circular needles into straight needles and should be able to help you. Happy knitting!
16.12.2021 - 07:28
![]() David Porter wrote:
David Porter wrote:
How can the pattern start 24cm up, the picture doesnt show that. Is this pattern suppose to be top down then i can understand the 24cm bit. There isnt 24cm at the bottom before the pattern starts looking at the picture
22.11.2021 - 10:48DROPS Design answered:
Dear Mr Porter, diagram 1 is worked when piece measures 24 cm from cast on edge, but on the picture you cannot see the very bottom of jumper because ribbing edge is tightening the bottom of jumper. Happy knitting!
22.11.2021 - 16:09
![]() David Porter wrote:
David Porter wrote:
So do you start the pattern straight after the increase
22.11.2021 - 00:02DROPS Design answered:
Dear David no. After the ribbing, you increase the stitches, knit stockinett with black until the piece is 24 cm long, and then start the pattern. Happy stitching!
22.11.2021 - 00:50
![]() David Porter wrote:
David Porter wrote:
Hi can anyone help please, i dont understand the bit after the rib on the body, where it says work 24cm before starting M1. Has the pattern been printed incorrectly. David Porter
20.11.2021 - 01:07DROPS Design answered:
Dear David, after the ribbing you will have to increase the number of stitches. See THIS video on how to increase evenly. Then you will have to start knitting the pattern when your piece is 24 cm long (from the casting on- so including the ribbing). Happy Stitching!
21.11.2021 - 15:01
![]() David Porter wrote:
David Porter wrote:
What does in mean steek stitching for armhole, i would love to knit thus but not done armholes like this before. I have done it in nordic patterns where t goes in with stitches knitted from stitch holder or normal sown in ones. Looking forward to hearing from you David
11.11.2021 - 18:36DROPS Design answered:
Dear Mrs Porter, steek stitches are stitches you cast on extra over armholes instead of casting off and dividing piece and you will then continue working in the round. This video shows how to work steek stitches and cut piece for armholes. and This one another way to work and cut these sts for a jacket. Happy knitting!
12.11.2021 - 07:37
![]() Christina Faurbye wrote:
Christina Faurbye wrote:
Hejsa Jeg vil gerne strikke den her trøje med de her farver, men farverne stemmer slet ikke overens med billedet. Som det fremgår af billedet er bundfarven sort, men der står marineblå, og denne er slet ikke den samme farve. Ingen af farverne i karisma stemmer overens med de her stærke farver. Lilla 012, findes overhovedet ikke i karisma. Jeg tænker om det er noget helt andet garn end karisma, som trøjen er strikket i? Mvh Christina
10.04.2014 - 19:00DROPS Design answered:
Hej Christina. Farver kan fremkomme anderledes paa din computer ifm indstillinger/lys osv. Men den er i bundfarven marineblaa. Og den er strikket i Karisma, men det er ogsaa en gammel sag, saa farverne i Karisma er tilpasset siden da. Findes en farve ikke mere, saa er der alternativer du kan vaelge.
11.04.2014 - 09:48
|
|||||||||||||
DROPS 16-13 |
|||||||||||||
|
|
|||||||||||||
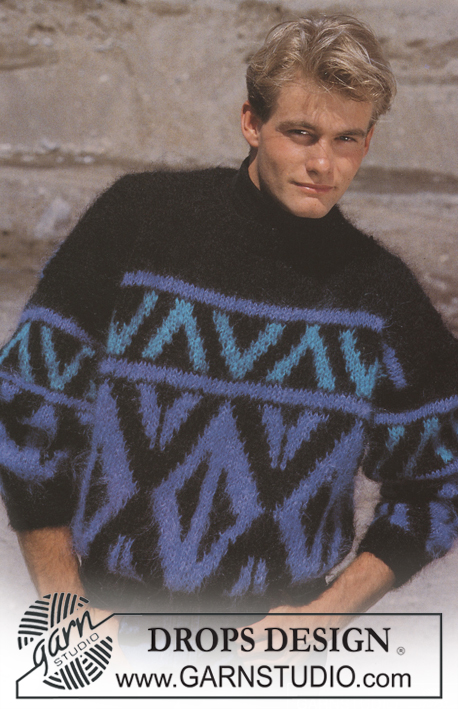
DROPS Men ’s jumper with diamond pattern in “Karisma. Size S – L.
DROPS 16-13 |
|||||||||||||
|
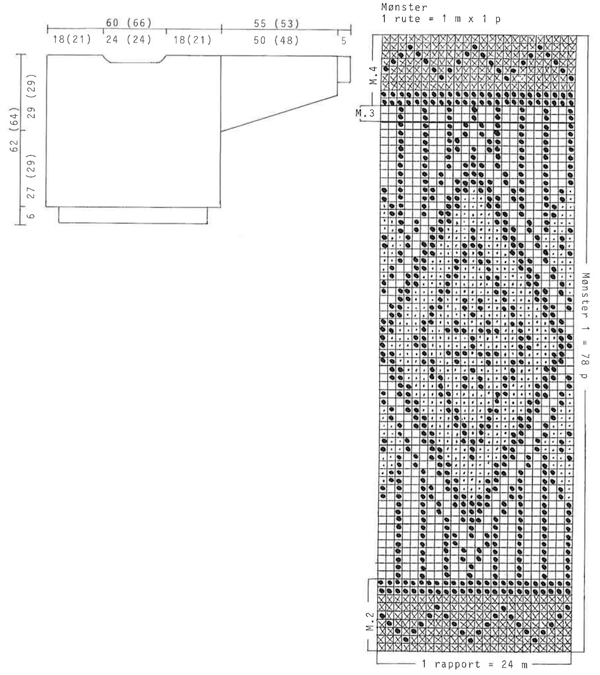
Pattern: See diagram. The diagram shows the pattern from the RS and the entire pattern is worked in stocking st. Pattern sleeve: 1 cm navy blue, M.2, navy blue until piece measures 31.5-29.5 cm, M.2, 7 cm of M.3, M.4, complete piece in navy blue. Rib: * K1 into back of loop, P1 *, repeat from *-*. Body: The jumper is worked in the round on circular needle and cut for armholes afterwards. Cast on 190-200 sts on circular needle size 2.5 mm with navy blue and work 6 cm rib. Change to circular needle size 4 mm and continue in stocking st, at the same time inc 50-64 sts evenly on first round = 240-264 sts. Remember the knitting tension! When piece measures 24 cm work M.1 and then complete piece in navy blue. At the same time when piece measures 33-35 cm inc 5 sts each side (to be cut for armhole afterwards and not included in pattern). When piece measures 59-61 cm cast off the middle 44 sts mid front for neck and complete piece back and forth on needle. Cast off to shape the neckline towards mid front on every other row: 1 st 2 times. At the same time when piece measures 61-63 cm cast of the middle 46 sts on back piece and dec 1 st on neckline on next row. Cast off remaining sts on shoulder when piece measures 62-64 cm. Sleeve: Cast on 46-48 sts on double pointed needles size 2.5 mm with navy blue and work 5 cm rib. Change to double pointed needles size 4 mm and continue in pattern – see above – at the same time inc 13-13 sts evenly on first round = 59-61 sts. At the same time after the rib inc 2 sts mid under arm a total of 29-28 times on every 4th round = 117-117 sts. When piece measures 55-53 cm work 5 rounds in reverse stocking st (for sewing sleeve to body piece). Cast off. Assembly: Insert a marking thread in the middle of the inc sts for armhole. Sew 2 seams on a sewing machine around the marking thread, 1st seam = ½ st from the MT, 2nd seam = ½ st from the 1st seam. Cut for armholes. Sew the shoulder seams. Pick up approx 100 sts round the neck on circular needle size 2.5 mm with navy blue and work 3 cm rib, cast off. Set in sleeves as follows: sew the last row in stocking st on sleeves to row after machine seam on armhole. Turn jumper inside out and fasten piece in reverse stocking st on sleeve to body piece. |
|||||||||||||
Diagram explanations |
|||||||||||||
|
|||||||||||||
 |
|||||||||||||
 |
|||||||||||||
Have you finished this pattern?Tag your pictures with #dropspattern or submit them to the #dropsfan gallery. Do you need help with this pattern?You'll find 27 tutorial videos, a Comments/Questions area and more by visiting the pattern on garnstudio.com. © 1982-2026 DROPS Design A/S. We reserve all rights. This document, including all its sub-sections, has copyrights. Read more about what you can do with our patterns at the bottom of each pattern on our site. |
|||||||||||||


With over 40 years in knitting and crochet design, DROPS Design offers one of the most extensive collections of free patterns on the internet - translated to 17 languages. As of today we count 324 catalogues and 12290 patterns translated into English (UK/cm). 12290
We work hard to bring you the best knitting and crochet have to offer, inspiration and advice as well as great quality yarns at incredible prices! Would you like to use our patterns for other than personal use? You can read what you are allowed to do in the Copyright text at the bottom of all our patterns. Happy crafting!
Post a comment to pattern DROPS 16-13
We would love to hear what you have to say about this pattern!
If you want to leave a question, please make sure you select the correct category in the form below, to speed up the answering process. Required fields are marked *.