
Popular categories
Looking for a yarn?


Comments / Questions (165)
![]() Georgina Inwards wrote:
Georgina Inwards wrote:
I would like to make this dress in cotton for summer . Please could you recamend the correct yarn to use. Thank you.
15.02.2017 - 18:58
![]() Vigdis Oven Sørensen wrote:
Vigdis Oven Sørensen wrote:
Hei. Jeg har heklet ferdig både kjole og hatt. Og er oppskriften feil? Det står at man skal hoppe over 2-2.5 cm på borden mellom dobbeltstavene. Er det riktig? Og er det riktig å bare hekle en rad? Hvordan får man da bremmen til å stå ut? Det blir jo mer en lue enn hatt !!!
28.06.2016 - 20:33DROPS Design answered:
Hej Vigdis. Du hekler to omg af blondekanten og 2-2.5 passer.
29.06.2016 - 12:45
![]() Bernadette Fleischmann wrote:
Bernadette Fleischmann wrote:
Gerade rechtzeitig zum Osterfest das Kleid und Schuhe fertig bekommen. Super Anleitung, tolle Hilfsvideos
26.03.2016 - 14:40
![]() Rosanna wrote:
Rosanna wrote:
Alpaca è lana 100%. E' proprio estivo? Il colore 3720 è rosa chiaro e non rosa antico. Mi suggerite un filato estivo per questo modello? Grazie, ciao
09.02.2016 - 18:47DROPS Design answered:
Buonasera Rosanna, abbiamo corretto il nome del colore, il 3720 è rosa medio. Per quanto riguarda il filato Alpaca è un filato leggero, che viene spesso usato anche per capi estivi, in ogni caso qui può trovare i filati alternativi che può utilizzare per questo vestitino, in particolare i cotoni Safran, DROPS Loves you 6 e il nuovo DROPS Loves you 7. Buon lavoro!
09.02.2016 - 20:56
![]() Rosenbusch Franziska wrote:
Rosenbusch Franziska wrote:
Hallo, ich habe gerade mit dem Kleidchen begonnen. Leider scheitere ich bereits an der 1. Reihe. Ich komme bei 135 Lm immer auf 114 Stb. Ich habe 135 Lm, dann das 1Stb in die 4.Lm, 1Lm leer, dann 6Stb jeweils in eine Lm wieder eine leer und dann wieder 6 immer so weiter bis ans Ende. Die letzten Stb sind dann nur noch 4. Können Sie mir veraten wo ich den Fehler gemacht habe? Vielen Dank im Voraus. Gruß
02.02.2016 - 13:10DROPS Design answered:
Die 6 Stb gelten für Gr. 2 Jahre nur am Ende der R. Ansonsten überspringen Sie 1 Lm und häkeln 3 Stb im Wechsel. Auf diese Weise überspringen Sie 32 Lm, bleiben also 103 Lm, in die Sie Stb häkeln, dabei zählen die ersten 3 Lm als 1 Stb, somit sind es 101 Stb.
06.02.2016 - 14:05
![]() Manuela wrote:
Manuela wrote:
Ich gestehe, dass ich auf das Kleid nur wegen des entzückenden Kindes aufmerksam wurde! Zu guterletzt habe ich das gesamte Ensemble aus Kleid, Jacke, Schuhe (mit Riemchen! DER Bringer) und Hut gearbeitet und viele bewundernde Kommentare bekommen.
15.06.2015 - 11:20
![]() Diana wrote:
Diana wrote:
Hallo, Ich habe das süsse Kleid fast fertig, verstehe aber bei der Anleitung für die Spitzenkante die letzte Reihe 5 nicht ganz. Wie ist es gemeint, eine feste Masche in die Gruppe der Doppelstäbchen zu häkeln? Macht man die fM so locker,dass sie über die ersten vier Doppelstäbchen geht oder häkelt man die Doppelstäbchen zusammen? So ganz klar geworden ist mir das nicht. Vielen Dank!
09.04.2015 - 09:44DROPS Design answered:
Sie häkeln die Doppelstäbchen zusammen, maschen also 4 D-Stb gemeinsam ab. Die 4. Rd haben Sie mit 1 Kett-M in die 4. Lm des Rd-Beginns beendet. Dann folgt direkt eine "Büschel-Masche", d.h. die 4 zusammengehäkelten D-Stb. In diese M können Sie nun die erste fM häkeln. Dann kommen 6 Lm, womit Sie den Abstand zur nächsten "Büschel-M" überbrücken.
11.04.2015 - 08:45
![]() Diana wrote:
Diana wrote:
Hallo, Ich habe das süsse Kleid fast fertig, verstehe aber bei der Anleitung für die Spitzenkante die letzte Reihe 5 nicht ganz. Wie ist es gemeint, eine feste Masche in die Gruppe der Doppelstäbchen zu häkeln? Macht man die fM so locker,dass sie über die ersten vier Doppelstäbchen geht oder häkelt man die Doppelstäbchen zusammen? So ganz klar geworden ist mir das nicht. Vielen Dank!
08.04.2015 - 22:13DROPS Design answered:
Antwort siehe oben! :-)
11.04.2015 - 08:50
![]() Tanja wrote:
Tanja wrote:
Bonjour, comment faites vous pour faire tenir le chapeau debout comme dans la photo? Le mien ne garde pas sa jolie forme de cloche et les rebords de "rebiquent" pas, tout est mou et flasque. Dois-je amidonner l'ouvrage et si oui, comment ?
06.04.2015 - 23:12DROPS Design answered:
Bonjour Tanja, vérifiez bien votre tension - vous pouvez amidonner légèrement la bordure si vous souhaitez. Votre magasin DROPS pourra vous donner des conseils si nécessaire. Bon crochet!
07.04.2015 - 10:29
![]() Lena Brandt wrote:
Lena Brandt wrote:
Jag virkar klänningen i strl 1/33 mån och undrar hur man gör följande av minskning (växelvis varje och vartannat v) "Nu virkas det 1 st i varje st samtidigt som det avm 1 st i varje sida totalt 12 ggr - läs avm.tips-1: På stl 1/3 mån: växelvis varje och vartannat v"
30.03.2015 - 14:49DROPS Design answered:
Hej Lena, när vi skriver "växelvis varje och vartannat v" menar vi minska på varv 1,2,4,5,7,8,10 osv. Lycka till!
15.05.2015 - 12:01
|
|
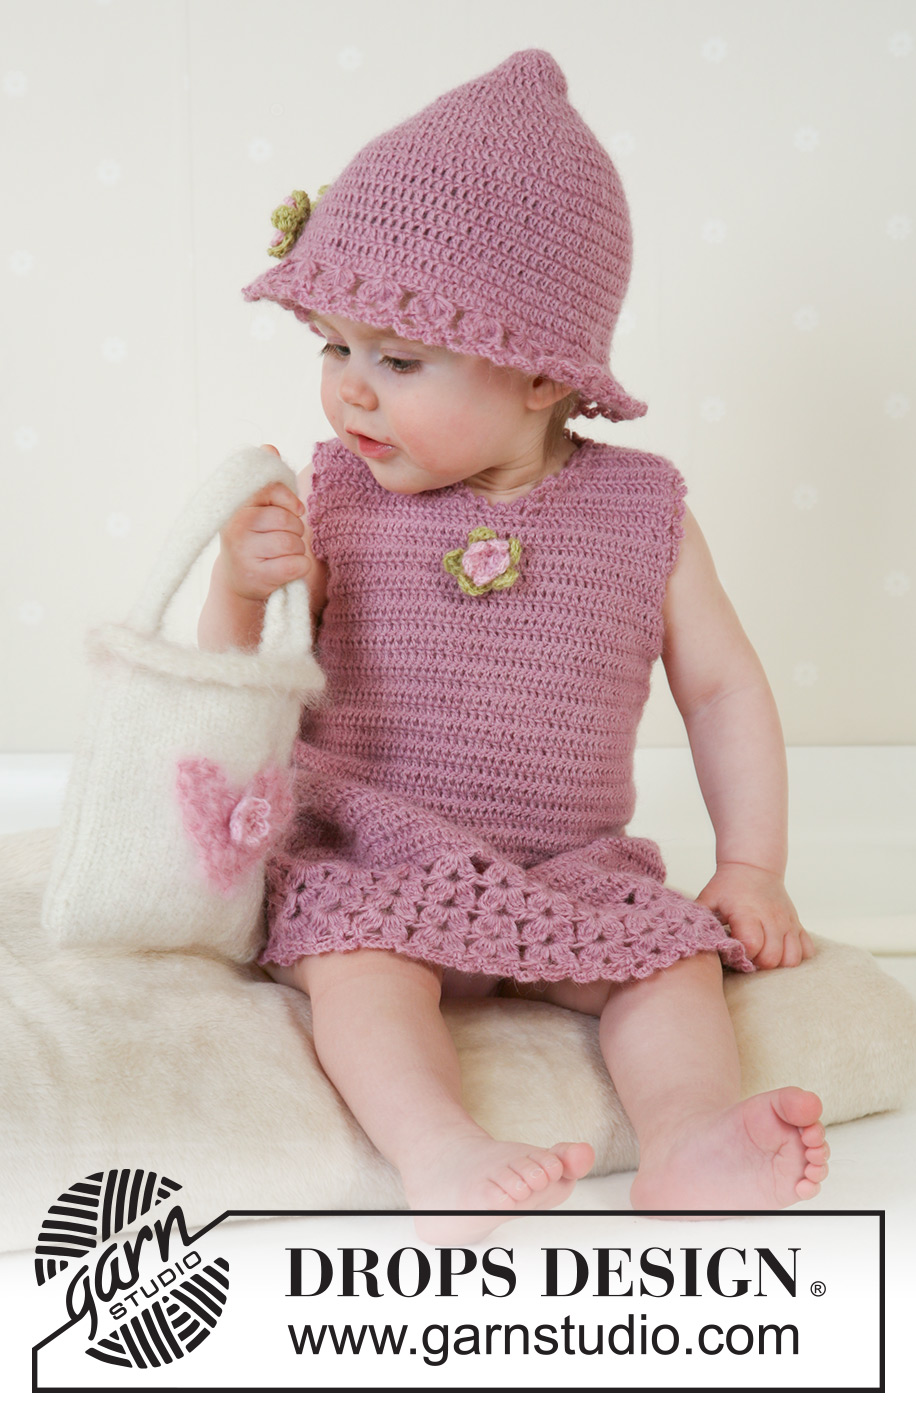
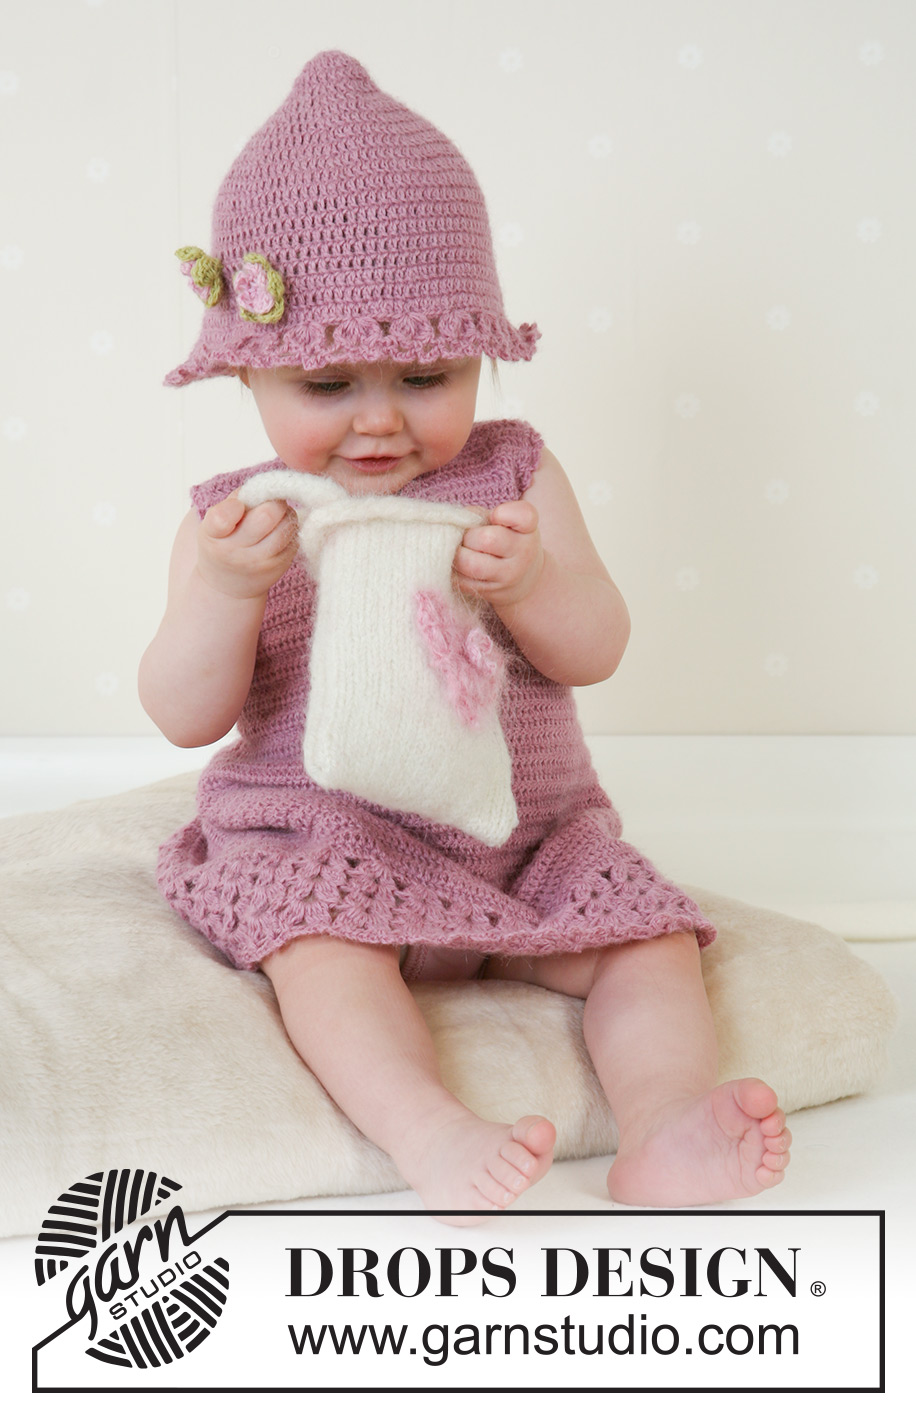
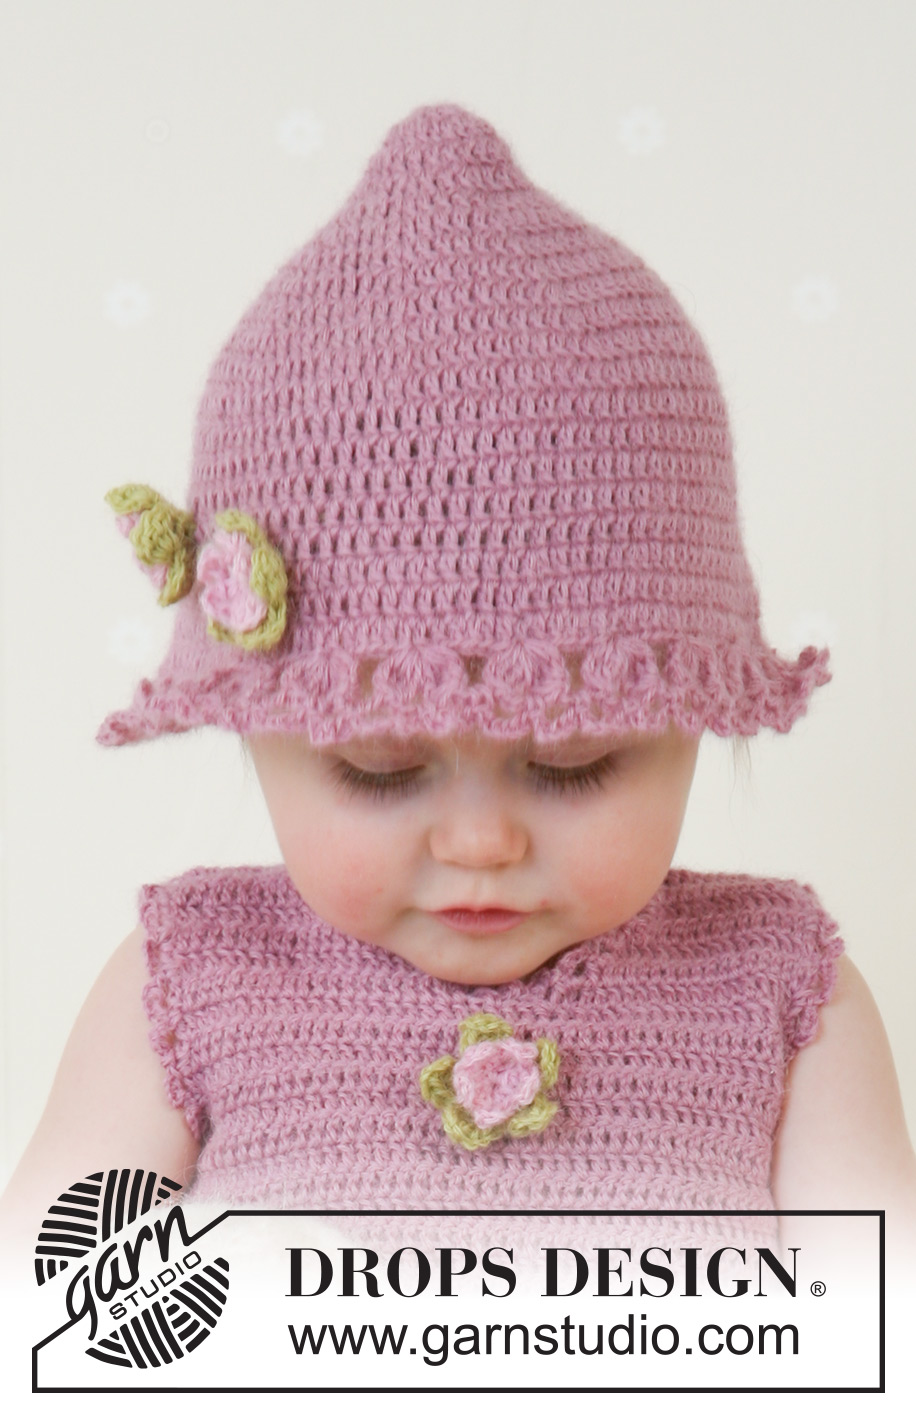
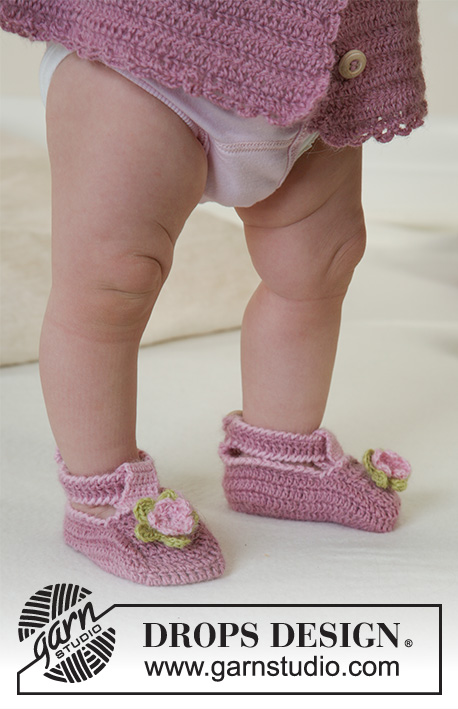
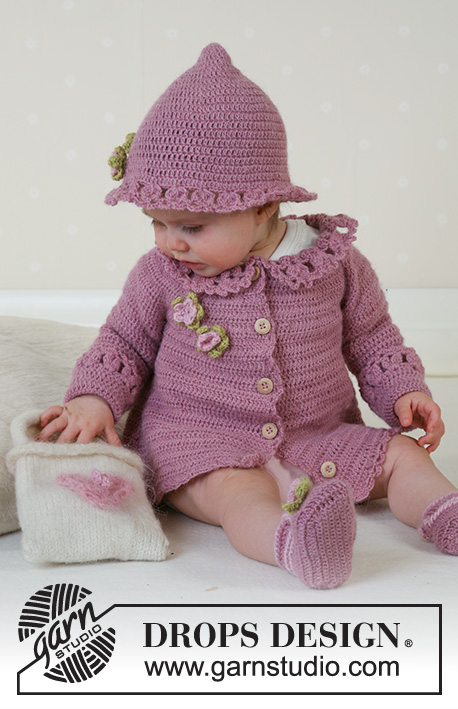
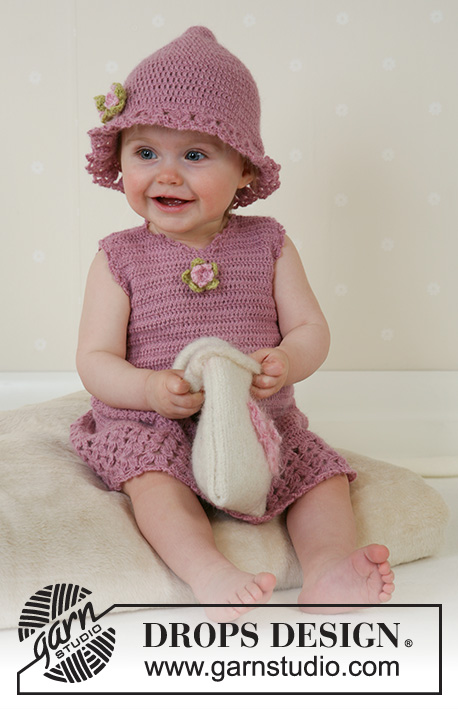
Little Miss Berry#littlemissberrydress |
|
 |
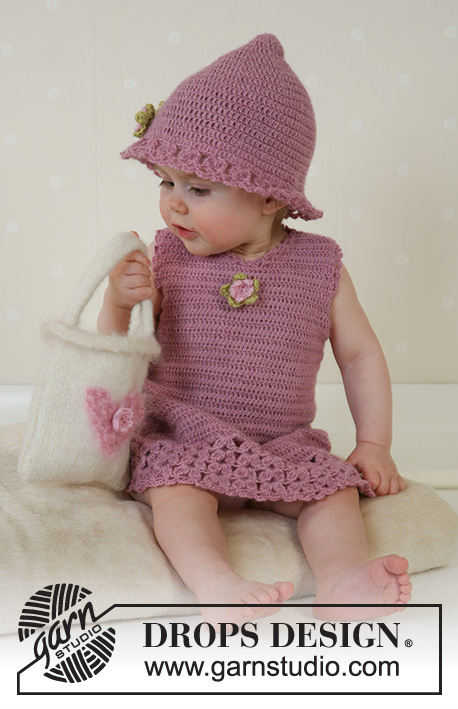 |
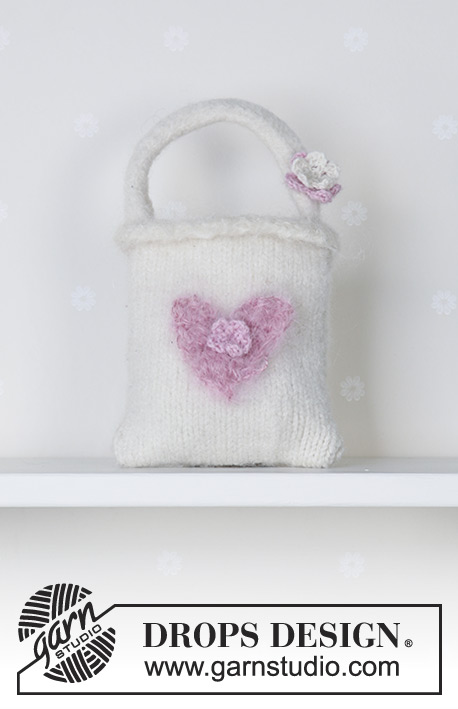
Crochet dress and summer hat in DROPS Alpaca. Knitted and felted bag in DROPS Alaska. Sizes for baby and children, 1 month to 4 years.
DROPS Baby 14-4 |
|
|
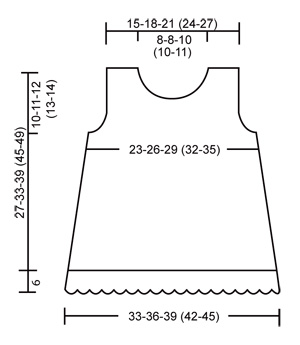
Crochet tension: 24 sts (= tr) x 13 rows in Alpaca on hook no. 3 = 10 x 10 cm Knitting tension: 16 sts x 20 rows on needles size 5.5 mm with Alaska in stocking sts = 10 x 10 cm Binding off tips-1: Bind off 1 tr as follows: Crochet 2 tr tog. This means crochet 1 tr but wait with the last yrh and pull through (= 2 sts on hook), crochet 1 tr in the next tr and pull the last yrh through all 3 sts on hook. Binding off tips-2: Bind off as follows at beginning of row: Replace 1 dc/tr with a sl st. Bind off as follows at the end of row: Turn the piece when number of dc/tr left on row = number of st to bind off and crochet back. Crochet info: At the beginning of each row with tr replace 1st tr with 3 ch and at the end of row crochet the last tr in the 3rd ch from beginning of previous row. Crochet in to each tr (not in between). DRESS: Front piece: Read Crochet info! Crochet 106-116-126 (135-145) ch loosely (inclusive of 3 ch to turn with) on hook no. 3 and old rose Alpaca. Crochet first row as follows: 1 tr in the 4th ch from hook, *skip 1 ch, 1 tr in the next 3 ch* , repeat from *-* until end of row –NB: In size 1/3 month + 12/18 month finish with a tr in each of the last 5 ch (instead of the last 3 ch) in Size 2 years finish with a tr in each of the last 6 ch (instead of the last 3 ch) ) and in Size 3/4 years finish with a tr in each of the last 4 ch = 79-86-94 (101-108) tr, turn the piece. Continue to crochet 1 tr in to each tr at the same time bind off 1 tr each side a total of 12 times – see bind off tips – 1: on Size 1/3 month: alternate between every and every other row, Size 6/9+ 12/18 month: On every other row and Size 2 + 3 /4 years: On every 3rd row = 55-62-70 (77-84) tr. When the piece measures approx. 17-22-27 (32-35) cm bind off for armhole each side on every row – see bind off tips-2: 5 tr 1 time, 2 tr 1 time and 1 tr 3 times = 35-42-50 (57-64) tr. When the piece measures 23-29-35 (40-44) cm insert a marking thread in the middle of the piece (For size 1/3 month and 2 years insert a marking thread in the middle st). Then bind off for the neck as follows: Crochet from the shoulder and in towards the neck until 2-3-5 (5-6) tr left before the marking thread (for size 1/3 month and 2 years the number of tr is before the tr with the marking thread) turn the piece. Continue to bind off for the neck on every row –read bind off tips-2: 2 tr 2 times and 1 tr 3 times = 8-11-13-(16-19) tr left for shoulder. Cut and sew the thread when the piece measures approx. 27-33-39 (45-49) cm and repeat for the other side of the neck. Back piece: Crochet as front piece - insert a marking thread in the middle of the piece (For size 1/3 month and 2 years insert a marking thread in the middle st). Bind off for armholes as for the front but when the piece measures 19-25-31 (37-41) cm split the piece mid back to a slit and continue to crochet each part separately (For size 1/3 month and 2 years do not crochet the middle tr with the marking thread). When the piece measures approx. 25-31-37 (43-47) cm bind off for the neck as follows: crochet 9-12-14 (17-20) tr from the shoulder in towards the neck, turn the piece and bind off 1 tr on the next row – read Bind off tips -2. Crochet until end of row and cut and sew the thread when the piece measures approx. 27-33-39 (45-49) cm. Repeat for the other side. Assembly: Sew the shoulder seams. Sew the side seams edge against edge, with small neat sts. Crochet edge: At last crochet an edge along the neck opening (and the slit at the back) and around both armholes with hook no. 3 and old rose Alpaca as follows: 1 dc in the first st, *6 ch, skip approx. 1 to 1.5 cm, 1 dc in the next st*, repeat from *-* and finish with 6 ch and 1 sl st in the first dc from beginning of round. Sew 2 buttons along the right slit at the back (approx. 0.5 cm from the slit edge) –the top button should be placed 0.5 – 1 cm from the top edge, and use the ch loops at the opposite slit edge as button holes). Lace Border: Crochet a lace border along the bottom edge of the dress with hook no. 3 and old rose Alpaca as follows: Crochet tips: When crocheting more dtr tog. do as follows: Crochet 1 dtr but wait with the last yrh and pull through (= 2 sts on hook), crochet the next dtr but wait with the last yrh and pull through (= 3 sts on hook) , continue this way until crochet the no. of dtr which need to be crochet tog. and pull the last yrh through all sts on hook. 1st round: Begin at the side. 1 dc in the 1st tr, 4 ch (= 1 dtr), crochet 2 dtr tog. in the same tr, 3 ch and 3 dtr tog. still in the same tr, *skip approx. 2 – 2.5 cm, crochet 3 dtr tog. in the next tr, 3 ch and 3 dtr tog.*, repeat from *-* until end of round and finish with a sl st in the 4th ch crochet at beginning of round. 2nd round: Crochet sl st until first ch-loop, 4 ch (=1 dtr), crochet 3 dtr tog. around the same ch-loop, 4 ch, 4 dtr tog. around the same ch-loop, *in the next ch-loop crochet 4 dtr tog., 4 ch and 4 dtr tog.*, repeat from *-* until end of round and finish with a sl st in the 4th ch crochet at beginning of round. 3rd round: Crochet as 2nd round. 4th round: Crochet as 2nd round but crochet 5 ch in each ch-loop (instead of 4 ch). 5th round: Crochet 1 dc in the top of the first dtr group, *6 ch, 1 dc in the next dtr group*, repeat from *-* until end of round and finish with 6 ch and 1 sl st in 1. dc at beginning of round. Crochet flower: Crochet 3 ch with hook no. 3 and light rose and make a loop with a sl st. 1st round: Crochet 5 dc around the loop and finish with a sl st in the dc from beginning of round. 2nd round: *4 ch, 1 tr in the 1st of the 4 ch, 1 dc in the next st*, repeat from *-* = 5 leaves, cut the thread. Crochet 3 ch with hook size 3 and lime and make a loop with a sl st. 1st round: Crochet 5 dc around the loop and finish with a sl st in the dc from beginning of round. 2nd round: *4 ch, 3 tr in the 1st of the 4 ch, 1 dc in the next st*, repeat from *-* = 5 leaves, cut the thread. Sew the light rose flower on to the lime flower and sew the flower to the dress at mid front. --------------------------------------------------------------------- HAT: Size: 1/3 -6/18 month (2/4) years To fit head circumference: approx 40/42 –44/46 (48/50) cm Crochet info: At the beginning of each round with tr, replace the 1. tr with 3 ch and finish the round with a sl st in the 3. ch from beginning of round. Crochet in each tr (not in between) Hat: Crochet 4 ch with hook no. 3 and old rose and make a loop with a sl st. 1st round: Crochet 12 tr around the loop –read Crochet info! 2nd round: Crochet 2 tr in each tr = 24 tr 3rd round: Crochet 1 tr in each tr = 24 tr 4th round: *1 tr in each of the 2 first tr, 2 tr in the next tr*, repeat from *-* until end of round = 32 tr. 5th round: *1 tr in each of the 3 first tr, 2 tr in the next tr*, repeat from *-* until end of round = 40 tr. 6th round: *1 tr in each of the 4 first tr, 2 tr in the next tr*, repeat from *-* until end of round = 48 tr. 7th round: *1 tr in each of the 5 first tr, 2 tr in the next tr*, repeat from *-* until end of round = 56 tr. 8th round: *1 tr in each of the 6 first tr, 2 tr in the next tr*, repeat from *-* until end of round = 64 tr. 9th round: *1 tr in each of the 7 first tr, 2 tr in the next tr*, repeat from *-* until end of round = 72 tr. 10th round: *1 tr in each of the 8 first tr, 2 tr in the next tr*, repeat from *-* until end of round = 80 tr. Finish the increases here for size 1/3 month 11th round: *1 tr in each of the 9 first tr, 2 tr in the next tr*, repeat from *-* until finish round = 88 tr. Finish the increases here for size 6/18 month 12th round: *1 tr in each of the 10 first tr, 2 tr in the next tr*, repeat from *-* until finish round = 96 tr. All sizes: Continue round with tr without any increases until the piece measures 13-14 (16) cm from the top. Crochet 1 round as follows: 2 tr in every 8th tr = 90-99 (108) tr on round. Crochet 1 round of tr without any increases and continue to crochet 1 round of tr with 2 tr in every 6th tr ( for the middle size 3 tr left on round after the last increase instead of 6) = 105-115 (126) tr on round. Lace border: 1st round: Crochet 4 ch (= 1 dtr), crochet 2 dtr tog. –see crochet tips under dress, 3 ch and 3 dtr tog in the first tr, *skip approx. 2 – 2.5 cm, crochet 3 dtr tog. in the next tr, 3 ch and 3 dtr tog.*, repeat from *-* until end of round and finish with a sl st in the 4th ch crochet at beginning of round. 2nd round: Crochet 1 dc in the top of the first dtr group, *6 ch, 1 dc in the next dtr group*, repeat from *-* until end of round and finish with 6 ch and 1 sl st in the 1st dc at beginning of round. Cut and sew the thread, the hat measures approx. 18-19 (21) cm from the top. Crochet flower: Crochet 2 flowers as explained under the dress and sew the flowers to the hat. --------------------------------------------------------------------- BAG: Measures: Before felting: Approx. 16 cm wide and 24 cm long After feltning: Approx. 12 cm wide and 15 cm long. Bag: Cast on loosely 27 sts (inclusive of an edge st each side) on needles size 5.5 mm and off white Vienna. Knit 2 rows of garter sts and change to Alaska and knit in stocking sts until the piece measures approx. 47 cm –Adjust so that the next row is knitted from the wrong side. Change back to off white Vienna, and knit 2 rows of garter sts. Bind off loosely. Strap: Cast on 5 sts on needle size 5.5 with Alaska and knit in stocking sts until the strap measures approx. 25 cm, bind off. Fold the strap double – lengthwise and purl side against purl side and sew it tog. in the most outer part of the outer st. Assembly: Fold the bag double and sew the side seams inside the edge st. Sew the strap to the bag each side. FELTING: The piece can be felted either in the washing machine or the tumble dryer – read description below. Remember: Subsequent washes are as for a normal wool garment. IN WASHING MACHINE: Washing machines will vary when felting. If the piece is not felted enough, it can be felted again. If it is felted too much, it can be stretched to the correct size while still wet. DO THE FOLLOWING: Lay the piece in the washing machine, using a programme of approx. 40 minutes (not a wool programme). Wash at 40 degrees without pre-wash, detergent is optional. After washing, shape the piece while it is still wet. IN TUMBLE DRYER: Felting in a tumble dryer gives good control over the degree of felting. The tumble dryer can be opened during drying to check the size of the piece. If it is not felted enough it can be thoroughly wetted and felted again. If it is felted too much it can be stretched to the correct size while still wet. DO THE FOLLOWING: Lay the piece in water so it becomes completely wet, then place it in the tumble dryer and begin the drying process. Dry to the desired size, checking regularly. Crochet Heart: Crochet 2 ch on hook size 6 with rose Vienna and crochet 1 dc in the first of the 2 ch, turn the piece. Crochet 1 ch, crochet 3 dc in dc from previous row, turn the piece. Crochet 1 ch, 2 dc in the first dc, 1 dc in the next dc and 2 dc in the last dc = 5 dc, turn the 1 ch, 2 dc in the first dc, 1 dc in the next dc, 2 dc in the following dc, 1 dc in the next dc and 2 dc in the last dc = 8 dc, turn the piece. *Crochet 1 ch, skip a dc, 1 dc in each of the next 3 dc, turn the piece. Crochet 1 ch skip 1 dc, 1 dc in each of the next 2 dc, turn the piece. Crochet 1 ch, 1 dc in each of the 2 dc, turn the piece. Crochet 1 ch and 1 sl st in the ch from beginning of previous row, cut and sew the thread*. Repeat from *-* for the other side of the heart and sew the heart to the bag. Crochet flower: Crochet 3 ch with hook no. 3 and light rose Alpaca and make a loop with a sl st. 1st round: Crochet 5 dc around the loop and finish with a sl st in the dc from beginning of round. 2nd round: *4 ch, 1 tr in the 1st of the 4 ch, 1 dc in the next st*, repeat from *-* = 5 leaves, cut the thread. Sew the flower to the heart. |
|
 |
|
Have you finished this pattern?Tag your pictures with #dropspattern #littlemissberrydress or submit them to the #dropsfan gallery. Do you need help with this pattern?You'll find 19 tutorial videos, a Comments/Questions area and more by visiting the pattern on garnstudio.com. © 1982-2026 DROPS Design A/S. We reserve all rights. This document, including all its sub-sections, has copyrights. Read more about what you can do with our patterns at the bottom of each pattern on our site. |
|


With over 40 years in knitting and crochet design, DROPS Design offers one of the most extensive collections of free patterns on the internet - translated to 17 languages. As of today we count 324 catalogues and 12290 patterns translated into English (UK/cm). 12290
We work hard to bring you the best knitting and crochet have to offer, inspiration and advice as well as great quality yarns at incredible prices! Would you like to use our patterns for other than personal use? You can read what you are allowed to do in the Copyright text at the bottom of all our patterns. Happy crafting!
Post a comment to pattern DROPS Baby 14-4
We would love to hear what you have to say about this pattern!
If you want to leave a question, please make sure you select the correct category in the form below, to speed up the answering process. Required fields are marked *.