
Popular categories
Looking for a yarn?


Comments / Questions (34)
![]() Marit Rasmussen wrote:
Marit Rasmussen wrote:
If you are using sticks 5 1/2mm, 2 rows will be almost 1 cm. Then 18 rows will be 9 cm. Try it!
21.07.2009 - 20:00Ester Reis wrote:
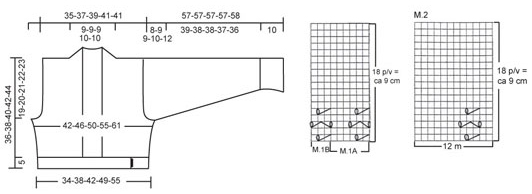
I"m from Brazil after reading the pattern I still can not understand this «18 p/v = ca 9 cm» – 18 rows = approx. 9 cm. Thank you!
15.07.2009 - 19:38
![]() Drops Nathalie wrote:
Drops Nathalie wrote:
Les mesures correspondant aux tailles S/M/L/XL/XX/ sont indiquées dans le schéma en bas de page, elles sont fiables et vous permettent d'adapter le boléro à votre taille. Bon tricot !
25.11.2008 - 09:25
![]() Biagioni wrote:
Biagioni wrote:
Les tailles S/m/l/xl/xxl correspondent à quelle taille p.e. dim. épaules, taille, poitrine ? Merci de votte réponse. Evelyne
24.11.2008 - 18:35
![]() Bianca wrote:
Bianca wrote:
Merci beaucoup! Je n'avais pas regardé comme il faut . Merci encore
14.01.2008 - 01:11
![]() Drops Nathalie wrote:
Drops Nathalie wrote:
Bianca, en bas de page figurent les diagrammes M1 et M2. Le diagramme M1 est divisé en 2 parties : M1A et M1B, ce sont les motifs à tricoter et répéter aux endroits indiqués dans les explications.
13.01.2008 - 12:25
![]() Bianca wrote:
Bianca wrote:
Que veux dire M1A M1B et M2
12.01.2008 - 22:36
![]() DROPS Design wrote:
DROPS Design wrote:
The translations for the Diagrams for all Garnstudio patterns are included within the text of the Pattern itself. If you look, you will find lines starting with an = sign. These are the translations, and they are given in the same vertical order as the chart symbols within the diagram.
30.08.2007 - 21:15
![]() Debra wrote:
Debra wrote:
Can anyone tell me what stitches the symbols in the pattern charts represent. Thank you
30.08.2007 - 21:10
![]() Karen wrote:
Karen wrote:
Hi Melissa, the diagram describes the pattern (not the design, i.e shape of the cardigan). To knit the pattern you follow the lines in the diagram, the symbols of which translate as follows: blank square means: K from RS, P from WS. An ovaal + line over 2 squares means: K2 tog, make a yo. An oval either end + 2 lines over 3 sqaures means: make a yo, slip 1 st as if to knit, K2 tog, passo, make 1 yo. Hope this helps. Karen
25.11.2006 - 15:48
|
||||||||||
DROPS 87-15 |
||||||||||
|
|
||||||||||
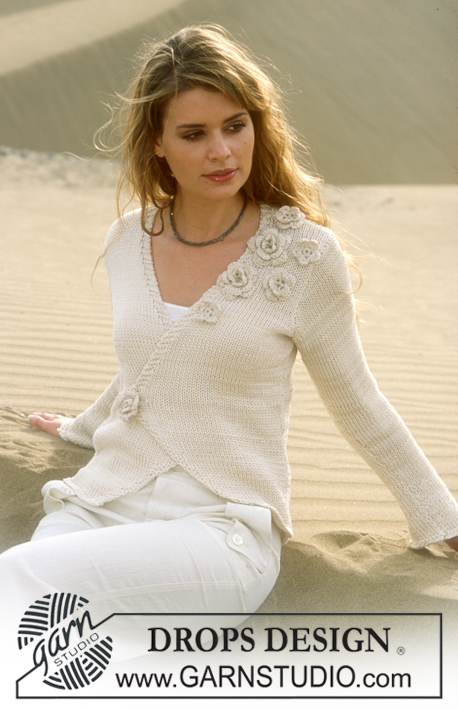
DROPS Bolero in Alpaca, Vivaldi and Glitter.
DROPS 87-15 |
||||||||||
|
Gauge: 15 sts x 21 rows with 1 strand of each yarn (3 strands) on larger needles in stockinette st = 10 x 10 cm. Pattern: See charts. The pattern is seen from the right side. The chart on the left (M.2) is Pattern 2. The chart on the right shows Patterns 1A and 1B (M.1A and M.1B) «18 p/v = ca 9 cm» – 18 rows = approx. 9 cm. Back: Cast on 53-59-65-75-85 sts on smaller needles with 1 strand of each yarn (= 3 strands). Knit 2 rows garter st, change to larger needles and stockinette st. When the piece measures 5 cm P 1 row (right side), then 2 rows stockinette st, K 1 row (wrong side) and 2 rows stockinette st. Read the entire next section before knitting: Establish pattern on the next row as follows from right side: K 1 (edge st knit in garter st), 3-0-3-2-1 sts stockinette st, Pattern 1A over the following 42-54-54-66-78 sts, Pattern 1B (= 3 sts), 3-0-3-2-1 sts stockinette st and K 1 (edge st knit in garter st). Continue in pattern as established. When Pattern 1 is complete repeat Pattern 2 a total of 2 times (Pattern 2 starts inside of 1 edge st + the increased sts at each side (see instructions below) + 3-0-3-2-1 sts stockinette st at each side so that the lace pattern in Pattern 2 comes between the 2 lace patterns in Pattern 1). After Pattern 2 continue in stockinette st to finished measurements. Side inc: When the piece measures 9 cm inc 1 st at each side a total of 6-6-6-5-4 times: Sizes S + M + L: every other row Size XL: every 3 rows, and Size XXL: every 4 rows = 65-71-77-85-93 sts – knit the increased sts in stockinette st. Armhole: When the piece measures 17-18-19-20-21 cm bind off for armhole at each side every other row: 3 sts 1 time, 2 sts 0-1-2-3-4 times and 1 st 3-3-2-3-5 times = 53-55-59-61-61 sts. When the piece measures 34-36-38-40-42 cm bind off the center 11-11-11-13-13 sts for the neck. On the next row dec 1 st at each neck edge = 20-21-23-23-23 sts remain on each shoulder. Bind off when the piece measures 36-38-40-42-44 cm. Right front: Cast on 46-49-52-57-62 sts on smaller needles with 1 strand in each yarn (= 3 strands). Knit 2 rows garter st, change to larger needles and stockinette st but keep the outermost st at the center front edge in garter st throughout. When the piece measures 5 cm, P 1 right side row (keep edge st at the center front edge in garter st as before), 2 rows stockinette st and K 1 wrong side row. Knit the next row as follows from right side: bind off the outermost 19 sts at the center front edge for tie, then K 1 (edge st knit in garter st), K 1, P 1, K 1, P 1 (= 5 edge sts) and K 22-25-28-33-38 = 27-30-33-38-43 sts. P 1 row back, keeping the outermost 5 edge sts at the center front in rib and 1 garter st at the edge as established. Read the entire next section before knitting: Pattern: Knit the next row as follows (right side row): 5 edge sts as before, 3 sts stockinette st, Pattern 1A over the following 12-18-18-24-30 sts, Pattern 1B (= 3 sts), 3-0-3-2-1 sts stockinette st and K 1 (edge st knit in garter st). Continue in pattern as established. When Pattern 1 is complete repeat Pattern 2 a total of 2 times (start Pattern 2 inside of 5 edge sts and 3 sts in stockinette st from center front edge so that the lace pattern in Pattern 2 comes between the 2 lace patterns in Pattern 1). After Pattern 2 continue in stockinette st to finished measurements. Side inc: When the piece measures 9 cm inc at the side as on back = 33-36-39-43-47 sts – knit the increased sts in stockinette st. Armhole: When the piece measures 17-18-19-20-21 cm bind off for armhole at the side as on back = 27-28-30-31-31 sts. When the piece measures 36-38-40-42-44 cm bind off the 20-21-23-23-23 sts on shoulder. Continue neckband over the remaining 7-7-7-8-8 sts as before. When neckband measures approx. 4-4.5 cm from shoulder (the edge should stretch slightly when sewn to neckband) put sts on a st holder. Left front: Cast on and knit the same as the right reversing shaping. Sleeve: Cast on 38-40-42-44-46 sts on smaller needles with 1 strand in each yarn (= 3 strands). Knit 2 rows garter st, change to larger needles and stockinette st, decreasing 4 sts evenly distributed on the 1st row = 34-36-38-40-42 sts. Read the entire next section before knitting: When the piece measures 10 cm, P 1 right side row, 2 rows stockinette st, K 1 wrong side row, and 2 rows stockinette st. Pattern: Establish pattern on the next row as follows (right side row): K 1 (edge st knit in garter st), 1-2-0-1-2 sts stockinette st, Pattern 1A over the following 30-30-36-36-36 sts, 1-2-0-1-2 sts stockinette st and K 1 (edge st knit in garter st). Continue the pattern as established. When Pattern 1 has been knit 1 time (18 rows), repeat Pattern 2 a total of 3 times (54 rows). Place Pattern 2 above Pattern 1. After Pattern 2 continue in stockinette st to finished measurements. When the piece measures 14 cm inc 1 st at each side every 3.5-3.5-3-2.5-2.5 cm a total of 10-10-11-12-13 times = 54-56-60-64-68 sts. When sleeve measures 49-48-48-47-46 cm bind off for sleeve cap at each side every other row 3 sts 1 time, 2 sts 2-2-2-3-3 times and 1 st 2-3-3-2-4 times, continue to bind off 2 sts at each side until piece measures 56-56-56-56-57 cm, then bind off 3 sts 1 time at each side. Bind off the remaining sts, the piece measures approx. 57-57-57-57-58 cm. Assembly: sew shoulder seams. Neckband: Join neckband at center back with Kitchener st. Sew the edge to back neckband. Sew in sleeves. Sew sleeve and side seams using edge sts as a seam allowance. |
||||||||||
Diagram explanations |
||||||||||
|
||||||||||
 |
||||||||||
Have you finished this pattern?Tag your pictures with #dropspattern or submit them to the #dropsfan gallery. Do you need help with this pattern?You'll find 19 tutorial videos, a Comments/Questions area and more by visiting the pattern on garnstudio.com. © 1982-2026 DROPS Design A/S. We reserve all rights. This document, including all its sub-sections, has copyrights. Read more about what you can do with our patterns at the bottom of each pattern on our site. |
||||||||||


With over 40 years in knitting and crochet design, DROPS Design offers one of the most extensive collections of free patterns on the internet - translated to 17 languages. As of today we count 324 catalogues and 12290 patterns translated into English (UK/cm). 12290
We work hard to bring you the best knitting and crochet have to offer, inspiration and advice as well as great quality yarns at incredible prices! Would you like to use our patterns for other than personal use? You can read what you are allowed to do in the Copyright text at the bottom of all our patterns. Happy crafting!
Post a comment to pattern DROPS 87-15
We would love to hear what you have to say about this pattern!
If you want to leave a question, please make sure you select the correct category in the form below, to speed up the answering process. Required fields are marked *.