
Popular categories
Looking for a yarn?


Comments / Questions (42)
![]() Hahnwald wrote:
Hahnwald wrote:
Ich verstehe den Tipp nicht. Heißt das auf der Vorderseite 2 Maschen zusammen stricken dann 1 randmasche, 1 li, 2 Re, 1 li, 2 Maschen zusamenstricken dannMuster weiter stricken dann 2 Maschen zusammen, 1 randmasche, 1 li, 2 Re,1 li,2 Maschen zusammen stricken. Das macht aber kein Sinn
15.01.2023 - 20:35
![]() Mieke Baras wrote:
Mieke Baras wrote:
In vervolg op je antwoord op 3 september: mijn probleem zit in wat je precies moet doen na dat je 24 st overhoudt. Kant af aan de mouw die bij het rugpand zit, 1 st 4 keer op elke nld. Tegelijk aan de kant van de mouw die bij het voorpand zit, 8 st 2 keer op elke nld. Wil dat zeggen dat je ineens 8st afkant en dit tweemaal? Dan heb je 4 st over en dus zie ik niet hoe die mouw dan met 4st gaat passen tussen voorpand en rug. Ik snap het echt niet hoor
13.09.2021 - 13:06DROPS Design answered:
Dag Mieke,
Klopt je kant 2 keer 8 steken af aan de kant van het voorpand en 1 keer 4 steken aan de kant van het achterpand. (Dit zorgt ervoor dat de ronding van de hals doorloopt in de mouw.) Tot slot kant je de laatste steken van de mouw af.
17.09.2021 - 10:09
![]() Mieke Baras wrote:
Mieke Baras wrote:
Hoeveel steken blijven er over op de mouw als alle afkantingen zijn gebeurd?
01.09.2021 - 14:22DROPS Design answered:
Dag Mieke,
Je begint met 88-92-96-102 steken. Je kant 25-26-27-27 steken aan weerszijden af = 38-40-42-48 steken. Dan nog een keer 7-8-9-12 keer 1 steek = 24-24-24-24 steken over.
03.09.2021 - 09:28
![]() Mieke Baras wrote:
Mieke Baras wrote:
Uw antwoord op 27/8 gaat over M3, terwijl ik het heb over de decoratiekant nadat M3 is gebreid.
28.08.2021 - 15:02
![]() Mieke Baras wrote:
Mieke Baras wrote:
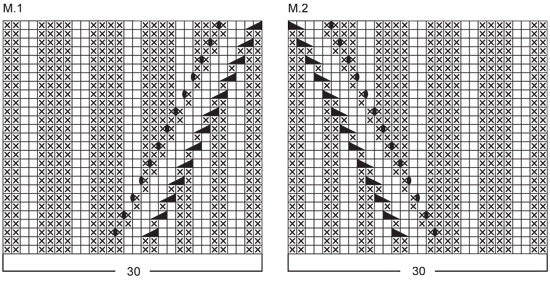
Ik wil een suggestie doen om de uitleg van de decoratiekant te verduidelijken. Maak bvb duidelijk dat de eerste nld waar je de omslagen breit niet bij de 4 tricotnld horen. Zo krijg je inderdaad na de nld met de omslagen 4 tricotnlden, en pas daarna moet je de koppen van de langgerekte steken ophalen! Er zijn dus in totaal 6 naalden nodig voor deze ribbel.
27.08.2021 - 20:36
![]() Mieke Baras wrote:
Mieke Baras wrote:
Hoeveel naalden gaan er in 1 decoratiekant die ik brei in de mouw van 74-7? 4 of 5 ? De beschrijving zegt 4 naalden. Klopt het dat die beginnen nadat je de eerste naald met omslagen hebt gebreid? Brei je op de teruggaande naalden averecht of recht? Als ik tricot brei dan ziet het resultaat er bij mij heel anders uit dan op de foto. Graag je hulp aub
26.08.2021 - 09:23DROPS Design answered:
Dag Mieke,
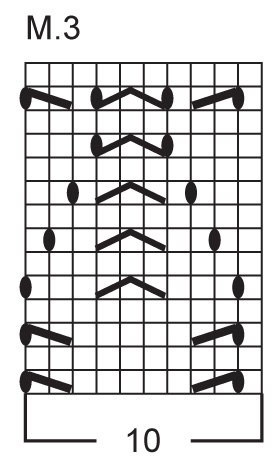
Je breit eerst een naald aan de verkeerde kant. Dan begin je met telpatroon M.3 heen en weer gebreid. Het telpatroon herhaal je 3 keer in de hoogte. (In de breedte 6 of 7 keer, afhankelijk van je maat.) Dus als je alle naalden van het telpatroon hebt gebreid, doe je dit daarna nog 2 keer.
27.08.2021 - 10:27
![]() Mieke Baras wrote:
Mieke Baras wrote:
Ik brei 74-7 en ben nu met de decoratiekant van de mouwen bezig. Hoeveel naalden bevat dit? Je begint aan de goede kant met de omslagen. Die laat je vallen op de averechte kant. Wat doe je dan op de 3de naald, de goede kant? Op de 4de naald sluit je al deze lange steken, maar hoe doe je dat als je niet weet wat je op de 3de naald moet doen?
25.08.2021 - 18:36DROPS Design answered:
Dag Mieke,
De omslagen laat je niet vallen op de mouw, maar brei je averecht op de verkeerde kant, zodat er een gaatje ontstaat.
27.08.2021 - 10:30
![]() Mieke Baras wrote:
Mieke Baras wrote:
De diagrammen tonen dus zowel teruggaande als heengaande naalden, maar hoe kan ik de 30st boord 2/2 ook minderen nadat de telpatronen 1x in de hoogte zijn gebreid? Kan je mij uitleggen hoe ik dan het motief opnieuw kan breien? Ik zie het echt niet.
30.07.2021 - 16:31DROPS Design answered:
Dag Mieke,
Je breit door in het motief, totdat de diagonale lijn helemaal weg is in de zijnaden en je alleen nog maar 2 recht, 2 averecht hebt. Dus de plek war je moet minderen en waar je een omslag moet maken verschuift steeds 1 steek, dit zet je gewoon voort, totdat je alleen boordsteek hebt.
19.08.2021 - 13:23
![]() Mieke Baras wrote:
Mieke Baras wrote:
Ik heb de naalden op de beide diagrammen M1 en M2 genummerd van 1 tot en met 53, zijnde de heengaande nlden. Nlden 2 tot en met 54 zijn de teruggaande of de nld aan de verkeerde kant. Dan brei ik de steken zoals ze zich voordoen. Is dat fout? Op de eerste pg vd werkbeschrijving staat immers: de diagrammen tonen het motief vd heengaande nld! Hoeveel naalden bevatten deze diagrammen dus? 27 of 53? Met andere woorden, na hoeveel naalden zijn deze motieven klaar? Met veel dank
30.07.2021 - 10:22DROPS Design answered:
Dag Mieke,
Alle naalden zijn in het telpatroon weergegeven, dus zowel de heengaande als de teruggaande naalden. Naald 1 is aan de goede kant, naald 2 aan de verkeerde kant, enzovoort. De teruggaande naalden brei je inderdaad de steken zoals ze zich voordoen.
02.08.2021 - 21:09
![]() Antonia wrote:
Antonia wrote:
Hallo, mir ist nicht ganz klar wieviel Maschen beim Vorderteil noch auf der Nadel sind , wenn die Abnahmen von V-Ausschnitt und Ärmel komplett abgeschlossen sind?
23.06.2021 - 19:12DROPS Design answered:
Liebe Antonia, es sind keine Maschen mehr am Ende von den beiden Seiten beim Vorderteil, dh es wird für den Raglan und dann gleichzeitig für den V-Ausschnitt abgenommen, bis keine Maschen übrig sind. Viel Spaß beim stricken!
24.06.2021 - 08:25
|
|||||||||||||||||||||||||
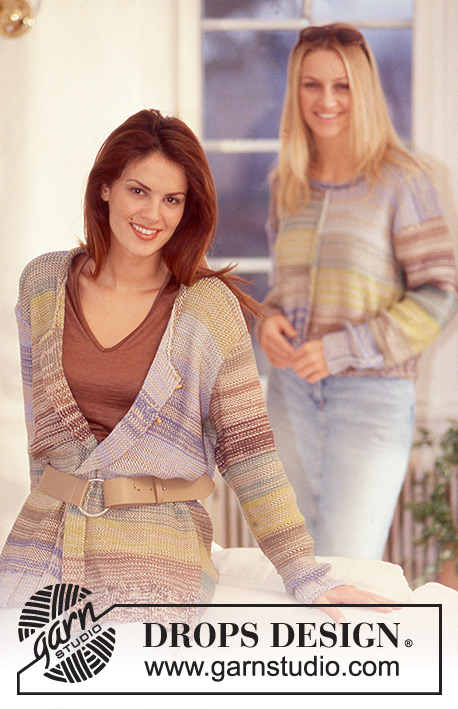
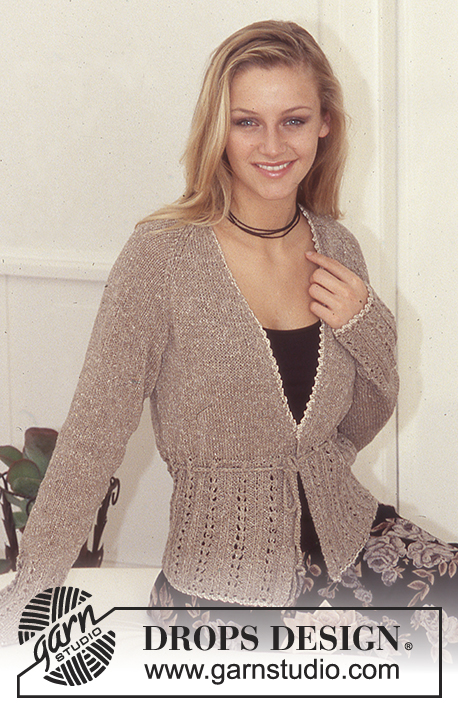
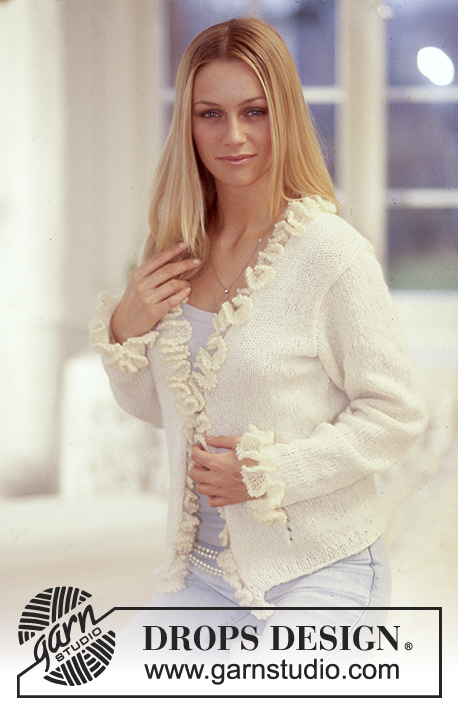
DROPS 74-7 |
|||||||||||||||||||||||||
|
|
|||||||||||||||||||||||||
DROPS Ribbed Pullover in Safran
DROPS 74-7 |
|||||||||||||||||||||||||
|
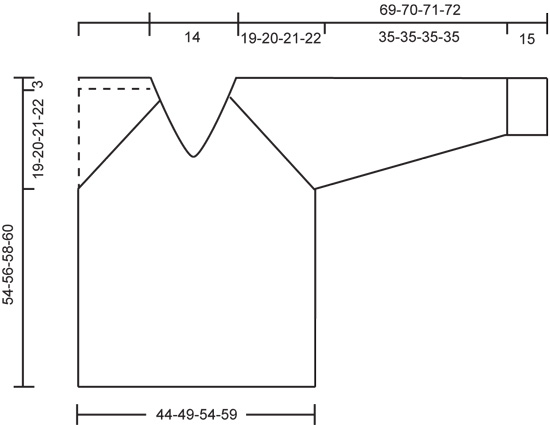
Gauge: 24 sts x 32 rows = 10 x 10 cm in stockinette st. Pattern: See charts. The pattern is seen from the right side. Rib-1: * K 2, P 2 *, repeat from * - *. Rib-2: * K 2, P 4 * , repeat from * - *. Knitting tips for decreasing (for raglan shaping on Body): Dec 1 st for raglan shaping inside 5 sts knit as follows from edge: K 1 (edge st), P 1, K 2 and P 1. On right side rows: After 5 sts: P 2 tog. Before 5 sts: Slip 2, return to left needle 1 by 1, twisting each st, P 2 tog. On wrong side rows: After 5 sts: Slip 1 st as if to knit, K 1, psso. Before 5 sts: K 2 tog. Tucked Ridges on sleeves: Knit first row as follows (right side row): * K 1, yo *, repeat from * - *, finish with K 1. Knit 4 rows stockinette st, letting yo loops drop on 1st row (long sts). Knit the next row (wrong side row) as follows: * pull up the top of sts from rows with long sts. Put loop on right needle, P 1, pull loop over purled st so that the loop binds the st off *, repeat from * - *. ____________________________________________________________________ Front: Cast on 108-120-132-144 sts. Establish pattern on the first row as follows: Rib-1 over 24-30-36-42 sts: Sizes S and L: start with P 2 Sizes M and XL: start with K 2 then (all sizes): Pattern 1 (30 sts), Pattern 2 (30 sts), and Rib-1 over 24-30-36-42 sts (starting with K 2). Continue in pattern as established until all the rows of Pattern 1 and Pattern 2 are complete – these sts are now in Rib-2. Continue until the piece measures 33-34-35-36 cm, then bind off 6 sts at each side for armhole = 96-108-120-132 sts. Read the entire next section before knitting: Raglan shaping: Dec for raglan inside 5 sts at each side - see knitting tips. Dec 1 st every other row 30-28-25-22 times and then 1 st every row until the neck shaping overlaps raglan shaping - NOTE: for size S the neck shaping will overlap the raglan while still decreasing every other row, so that you will not need to dec every row. Neck shaping: When the piece measures 38-39-41-42 cm purl and bind off the 2 center sts for the neck. Put left side on a st holder. Right side: Dec 1 st for the neck every other row until all sts are bound off - the neck shaping will overlap the raglan shaping. when all sts are bound off the piece measures approx. 51-53-55-57 cm. Left side: Put sts on st holder back on needles and knit the same as the right side, reversing all shaping - knit the 1st row from center front on wrong side row - start by picking up 1 st in the first bound-off st and knit together with 1st st on needles. Back: Cast on and knit the same as the front, but instead of yo in the pattern, inc by pulling up a st from the previous row (see «Pattern» symbol description). Shape raglan as on front as follows: dec 1 st every other row 30-28-25-22 times and then 1 st every row 0-8-17-26 times. Put the remaining 36 sts on a st holder, the piece measures approx. 51-53-55-57 cm. Sleeve: Cast on loosely 62-62-72-72 sts. Knit 1 row (wrong side row), on the next row begin Pattern 3, keeping 1 st at each edge in garter st throughout. Repeat pattern 3 times total. The piece measures approx. 13 cm. Knit 2 rows stockinette st. Then knit 1 tucked ridge - see instructions above, then 2 rows stockinette st, then knit 1 tucked ridge. The piece measures approx. 15 cm, continue with stockinette st to finished measurements. At the same time (after tucked ridges) inc 1 st at each side 16-18-15-18 times every 7-6-7-6 rows = 94-98-102-108 sts. When the piece measures 50 cm bind off 3 sts at each side for sleeve cap = 88-92-96-102 sts. Then dec 1 st at each edge every other row 25-26-27-27 times and then every row 7-8-9-12 times. Now dec 1 st every row at the side which will be seamed to the back 4 times and at the same time bind off 8 sts every other row 2 times at the side which will be seamed to the front, bind off remaining sts. Sleeve measures approx. 69-70-71-72 cm. Assembly: Sew raglan seams using edge sts as seam allowance (there will be 2 stockinette st sts at the raglan transition). Sew sleeve and side seams using edge sts as a seam allowance. Neckband: The neckband is knit in the round from center front. Pick up from center front, approx. 116-132 sts (divisible by 4) around the neck. K 1 row on wrong side row. Then knit rib-1 keeping 1 st in garter st + K 2 at each side at the center front. When neckband measures 2 cm bind off all sts in rib. Lay one side over the other at center front and stitch down. |
|||||||||||||||||||||||||
Diagram explanations |
|||||||||||||||||||||||||
|
|||||||||||||||||||||||||
 |
|||||||||||||||||||||||||
 |
|||||||||||||||||||||||||
 |
|||||||||||||||||||||||||
Have you finished this pattern?Tag your pictures with #dropspattern or submit them to the #dropsfan gallery. Do you need help with this pattern?You'll find 27 tutorial videos, a Comments/Questions area and more by visiting the pattern on garnstudio.com. © 1982-2026 DROPS Design A/S. We reserve all rights. This document, including all its sub-sections, has copyrights. Read more about what you can do with our patterns at the bottom of each pattern on our site. |
|||||||||||||||||||||||||


With over 40 years in knitting and crochet design, DROPS Design offers one of the most extensive collections of free patterns on the internet - translated to 17 languages. As of today we count 324 catalogues and 12290 patterns translated into English (UK/cm). 12290
We work hard to bring you the best knitting and crochet have to offer, inspiration and advice as well as great quality yarns at incredible prices! Would you like to use our patterns for other than personal use? You can read what you are allowed to do in the Copyright text at the bottom of all our patterns. Happy crafting!
Post a comment to pattern DROPS 74-7
We would love to hear what you have to say about this pattern!
If you want to leave a question, please make sure you select the correct category in the form below, to speed up the answering process. Required fields are marked *.