
Popular categories
Looking for a yarn?


Comments / Questions (6)
![]() Mahal wrote:
Mahal wrote:
Hi, For the front decreases “1st 16 times every 2&3 row”, does that mean I am working in the 8 row repeat and work the decreases over 8 repeats?
03.05.2025 - 03:56DROPS Design answered:
Dear Mahal, you decrease 1 stitch 16 times alternately on every 2nd and 3rd row. This means that you decrease the stitch right next to the neck band stitches 16 times but you will work the decreases as follows: *1 decrease row, 1 normal row, 1 decrease row, 2 normal rows*. Repeat until you have worked a total of 16 decrease rows. The charts are continued as before and are independent from the decreases. Happy knitting!
04.05.2025 - 22:32
![]() Hirn Marion wrote:
Hirn Marion wrote:
Hallo In der Anleitung für das Vorderteil steht, dass man innerhalb der 4 Blendenmaschen abnehmen muss. Ist das korrekt?
02.04.2025 - 23:48DROPS Design answered:
Liebe Frau Hirn, ja ganz genau, dh nehmen Sie so ab: beim rechten Vorderteil: nach den 4 Blenden-Maschen; beim linken Vorderteil: vor den 4 Blenden-Maschen. Viel Spaß beim Stricken!
03.04.2025 - 09:53
![]() Anne Bade wrote:
Anne Bade wrote:
Ist es richtig, daß für die Vorderteile zusammen mehr Maschen gerechnet werden, als für das Rückenteil (die Maschen für die Blenden nicht mitgerechnet). Die Vorderteile scheinen somit weiter als das Rückenteil.
07.04.2021 - 16:46DROPS Design answered:
Liebe Frau Bade, ja richtig, bei den Vorderteilen strickt man Zöpfe (nicht beim Rückenteil) deshalb braucht man mehr Maschen. Viel Spaß beim stricken!
08.04.2021 - 07:02
![]() Cecil wrote:
Cecil wrote:
Hello, I don't understand the line "Inc each side of marker threads as follows: 1 st 6 (9-10) times for S: every 8th row, for M/L: every 5th row = 236 (248-258) sts." for the bodice part. Does this mean I increase 1 sts on each side of the stitch marker (I have 2 stitch markers on the needle) 9 times on every 5th row? (I'm working with size M). If so, is there any changes for the M2 diagram? since it would be (multiple of 6 + 4 sts) on the first increased row. Thank you!
24.12.2020 - 08:12DROPS Design answered:
Hi Cecil! Increase 1 st on each side of marker threads 9 times every 5th row = 248 sts. You increase 4 sts in each row with increases. Work the increased sts in M.2, just adjust the pattern in the sides. Happy knitting!
25.12.2020 - 00:09
![]() Sonia wrote:
Sonia wrote:
I don’t understand the line: “then 1 st 16 times alternatively on every 2nd and 3rd row” (decreasing fronts for neck). Should I be casting off from WS and RS? How do I make them look the same? Thanks!
06.05.2020 - 01:15DROPS Design answered:
Dear Sonia, correct, you will decrease both from RS and from WS ( P2 tog from WS will look like K2 tog from WS and slip 1 as if to P, P1, psso, from WS will look like slip 1 as if to K, K1, psso from RS). Happy knitting!
06.05.2020 - 11:03Dawn wrote:
Where are the instructions for the crocheted edge?
07.03.2015 - 16:35DROPS Design answered:
Dear Dawn, crocheted edge is worked as follows: 1 dc (UK crochet terminology), *ch3, 1 dc in the 1st ch, skip 2 sts, 1 dc*, repeat from *-* - (will be updated asap). Happy crocheting!
07.03.2015 - 17:59
|
||||||||||||||||||||||
DROPS 33-20 |
||||||||||||||||||||||
 |
 |
|||||||||||||||||||||
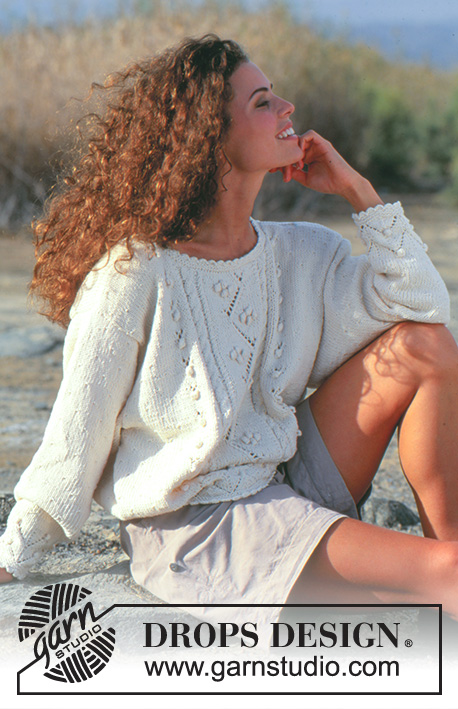
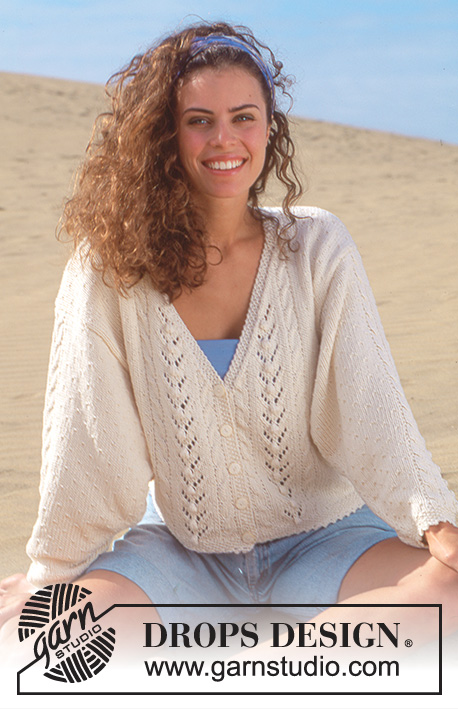
Drops jacket with cables and bobbles in “Muskat”
DROPS 33-20 |
||||||||||||||||||||||
|
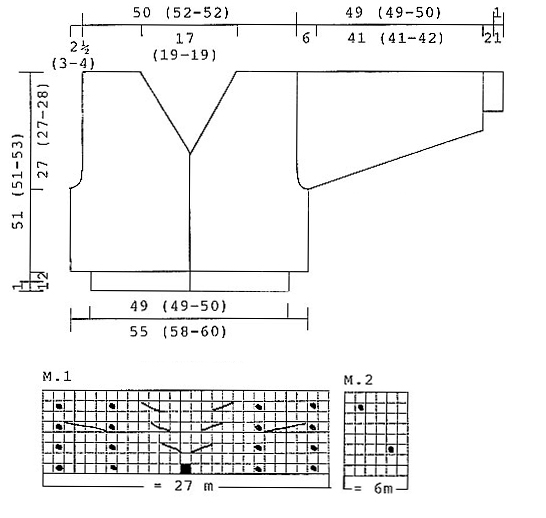
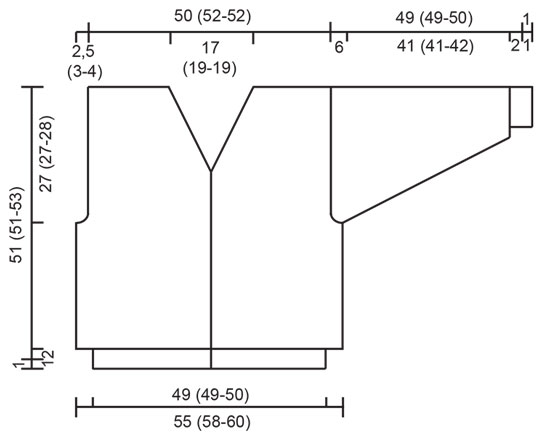
Knitting Tension: 20 sts x 26 rows on needle size 4mm in M.2. = 10x10cm. Moss st: 1st row: K1, P1. 2nd row: Work K over P and P over K. Repeat rows 1 and 2. Bobble: Inc to 3 sts in one st. Work 3 rows across these 3 sts. 4th row: K 3 tog. Pattern: See diagram (1 diagram = 1 repeat). Pattern is seen from RS. Body: Jacket is worked back and forth on circ needle up to arm hole. Cast on 212 (212-218) sts on long circ needle size 3mm with cream. Work 2 cm in moss st. The 4 sts each side = front bands – these are worked in moss st till finished length. At the same time when piece measures 1 (1-1), 6 (6-7), 12 (12-14), 18 (18-20) and 25 (25-27) cm, make button holes as follows: K 3rd and 4th st tog, and cast on 1 st in next row. After 2 cm in moss st, change to circ needle size 4mm and put a marker thread each side, after front = 57 (57-59) sts, back = 98 (98-100) sts. Next row: 4 sts in moss st, M.1, 150 (150-156) sts in M.2, M.1, 4 sts in moss st. Continue in pattern. Remember to check knitting tension. Inc each side of marker threads as follows: 1 st 6 (9-10) times for S: every 8th row, for M/L: every 5th row = 236 (248-258) sts. Continue until body measures 24 (24-25) cm. Next row: Work 61 (64-67) sts across front, cast off 4 sts for arm hole, work 106 (112-116) sts across back, cast off 4 sts for arm hole, work 61 (64-67) sts across front. Finish back and fronts separately. Fronts: = 61 (64-67) sts. Dec for arm hole on every other row as follows: 2 sts once, 1 st 1 (2-4) times = 58 (60-61) sts. Continue until piece measures 25 (25-27) cm. Dec for neck inside the 4 sts worked in moss st. (front bands) on every other row as follows: 1 st 9 (11-12) times, then 1 st 16 times alternatively on every 2nd and 3rd row. Continue until piece measures 51 (51-53) cm. Cast off. Back: = 106 (112-116) sts. Dec for arm hole as fronts = 100 (104-104) sts. Continue until piece measures 49 (49-50) cm. Work 3 rows in moss st across centre 42 (46-46) sts. Cast off centre 34 (38-38) sts for neck. Continue until piece measures 51 (51-53) cm and work the 4 sts each side of neck in moss st. Cast off. Sleeves: Cast on 48 (48-48) sts on double pointed needles size 3mm with cream. Work 2 cm in moss st. Change to double pointed needles size 4mm and work stocking st , and at the same time inc 8 (8-10) sts evenly on first round = 56 (56-58) sts. Work M.1 on centre top of sleeve and M.2 each side. Inc underneath sleeve alternatively on every 3rd and 4th round as follows: 2 sts 26 (26-27) times = 108 (108-112) sts. Work the inc sts in M.2. Continue until piece measures 43 (43-44) cm. Cast off centre 6 sts under sleeve and finish working back and forth on needle. Dec each side on every other row as follows: 4 sts 6 times. Work measures approx 49 (49-50) cm. Cast off. Assembly: Sew shoulder seams. Sew sleeves to body. Crochet edge on needle no 3 with cream along the edge of body and sleeves and around neck as follows: 1 dc, *ch3, 1 dc in the 1st ch, skip 2 sts, 1 dc*, repeat from *-*. Sew on buttons. |
||||||||||||||||||||||
Diagram explanations |
||||||||||||||||||||||
|
||||||||||||||||||||||
 |
||||||||||||||||||||||
 |
||||||||||||||||||||||
Have you finished this pattern?Tag your pictures with #dropspattern or submit them to the #dropsfan gallery. Do you need help with this pattern?You'll find 29 tutorial videos, a Comments/Questions area and more by visiting the pattern on garnstudio.com. © 1982-2026 DROPS Design A/S. We reserve all rights. This document, including all its sub-sections, has copyrights. Read more about what you can do with our patterns at the bottom of each pattern on our site. |
||||||||||||||||||||||


With over 40 years in knitting and crochet design, DROPS Design offers one of the most extensive collections of free patterns on the internet - translated to 17 languages. As of today we count 324 catalogues and 12290 patterns translated into English (UK/cm). 12290
We work hard to bring you the best knitting and crochet have to offer, inspiration and advice as well as great quality yarns at incredible prices! Would you like to use our patterns for other than personal use? You can read what you are allowed to do in the Copyright text at the bottom of all our patterns. Happy crafting!
Post a comment to pattern DROPS 33-20
We would love to hear what you have to say about this pattern!
If you want to leave a question, please make sure you select the correct category in the form below, to speed up the answering process. Required fields are marked *.