
Popular categories
Looking for a yarn?


Comments / Questions (9)
![]() Anna wrote:
Anna wrote:
Ach ja. Am Schalkragen habe ich auch noch Maschen abgenommen nachdem die Verzopfung weggelassen wurde. Es hat sich bei mir sonst unschön gewellt. Meiner Schwägerin steht die Jacke hervorragend.
02.10.2024 - 11:29
![]() Anna wrote:
Anna wrote:
Falls es jemanden interessiert: die Jacke ist seit ein paar Wochen fertig und gut geworden. Eine sehr schöne Farbe. Ich habe nur 64 Maschen für die Vorderteile aufgenommen und dann dementsprechend nur 13 M abgenommen. Zum Glück. Hinten hatte ich nur 108 M aber es hätten auch da weniger sein können. Bei dem vergleichbaren Pullover wurden auch nur 100M! aufgenommen. Den Armausschnitt habe ich 21cm hoch gemacht, damit der Ärmel reinpasst (und mein Arm natürlich auch ;-) So sitzt sie prima.
02.10.2024 - 11:24
![]() Anna wrote:
Anna wrote:
Hallo liebes Drops-Team. Ich verstehe nicht, was das mit Größe S zu tun hat. Ich habe doch immer Größe L angegeben. Haben Sie evtl. den ersten Teil nicht gelesen?
30.07.2024 - 14:00
![]() Anna wrote:
Anna wrote:
Ich bin gerade auf die Anleitung des Pullovers 241-33 gestoßen. Da wird der Armausschnitt bei 35 cm begonnen. Das würde dann ja passen. Zum Glück geht es hier ja nur um eine Masche. Da kann man ein bisschen schummeln ;-) , denn das Rückenteil ist bereits fertig. Oder übersehe ich doch noch was? Könnten Sie mir nur kurz mitteilen, ob ich richtig liege, damit ich weiter komme. Eigentlich dachte ich: dicke Nadeln, einfacher Schnitt - das geht schnell.
29.07.2024 - 14:39DROPS Design answered:
Liebe Anna, in S werden die Armausschnitte nach 35 cm bearbeitet (genau, 1 M beidseitig abketten); dann stricken Sie bis 50 cm von der Anschlagskante und dann wird man die Schulterschrägung mit verkürzten Reihen stricken und gleichzeitig für den Halsausschnitt abketten. Die Jacke wird dann ca 54 cm von der Schulter beim Hals bis zur Anschlagskante messen. Viel Spaß beim Stricken!
30.07.2024 - 08:26
![]() Anna wrote:
Anna wrote:
Außer ein paar kleineren unwichtigen Fehlern (z.B ist einmal A3 statt A5 beim linken Vorderteil angegeben: In dieser Weise weiterstricken, d.h. 1 Masche kraus rechts an der Seite, glatt rechts, A.3 und 7 Blenden-Maschen kraus rechts.), kann auch die Höhe des Armausschnitts nicht stimmen. Bei Größe L wird bei 39 cm für den Armausschnitt abgenommen und bei 56 cm die Schulterschrägung begonnen. Das sind 17 cm. Also ein Umfang von 34 cm. Das passt nicht zum Umfang des Ärmels (ca 42 cm).
29.07.2024 - 14:24
![]() Anna wrote:
Anna wrote:
Hauptsache man kommt hinterher auf die 53 Maschen. (32 Maschen Schulter+ 1 Masche Armausschnitt + 20 Maschen Schalkragen.) ;-)
16.07.2024 - 17:26
![]() Anna wrote:
Anna wrote:
Oh. Das ist aber unglücklich für mich, da es ein Geburtstagsgeschenk werden soll. Ich glaube, ich werde einfach mit 68 Maschen anfangen. Dann passt auch der Rest (Maschen für die Schulter etc). Hoffentlich habe ich nichts übersehen. Viel Grüße und schöne Urlaubszeit
16.07.2024 - 17:17
![]() Anna wrote:
Anna wrote:
Hallo liebes Drops-Team. Nach dem Bündchen der Vorderteile sind 74 Maschen (Größe L) auf der Nadel. Wenn ich 7 Blenden-Maschen + 13 Maschen Muster A3 + 49 Maschen glatt rechts + 1 Rand-Masche zusammenzähle komme ich aber nur auf 70 Maschen. Was übersehen ich? Außerdem verstehe ich nicht, warum beim linken Vorderteil sogar nur 48 Maschen glatt rechts gestrickt werden. Dann käme man ja nur auf 69 Maschen.
09.07.2024 - 15:11DROPS Design answered:
Antwort siehe unten! :-)
16.07.2024 - 17:13
![]() Anna wrote:
Anna wrote:
Hallo liebes Drops-Team, ich habe bei den Vorderteilen ein rechnerisches Problem. Nach dem Bündchen sind 74 Maschen (Größe L) auf der Nadel. Wenn ich 7 Blenden-Maschen + 13 Maschen Muster A3 + 49 Maschen glatt rechts + 1 Rand-Masche zusammenzähle komme ich aber nur auf 70 Maschen. Was übersehen ich? Außerdem verstehe ich nicht, warum beim linken Vorderteil sogar nur 48 Maschen glatt rechts gestrickt werden. Dann käme man ja nur auf 69 Maschen. Ich finde meinen Fehler nicht.
04.07.2024 - 09:23DROPS Design answered:
Liebe Anna, da scheint tatsächlich etwas unstimmig zu sein. Die Anleitung wird noch einmal geprüft, allerdings ist gerade Urlaubszeit, sodass das noch etwas dauern kann. Ich bitte daher noch um Geduld.
15.07.2024 - 22:19
|
||||||||||||||||
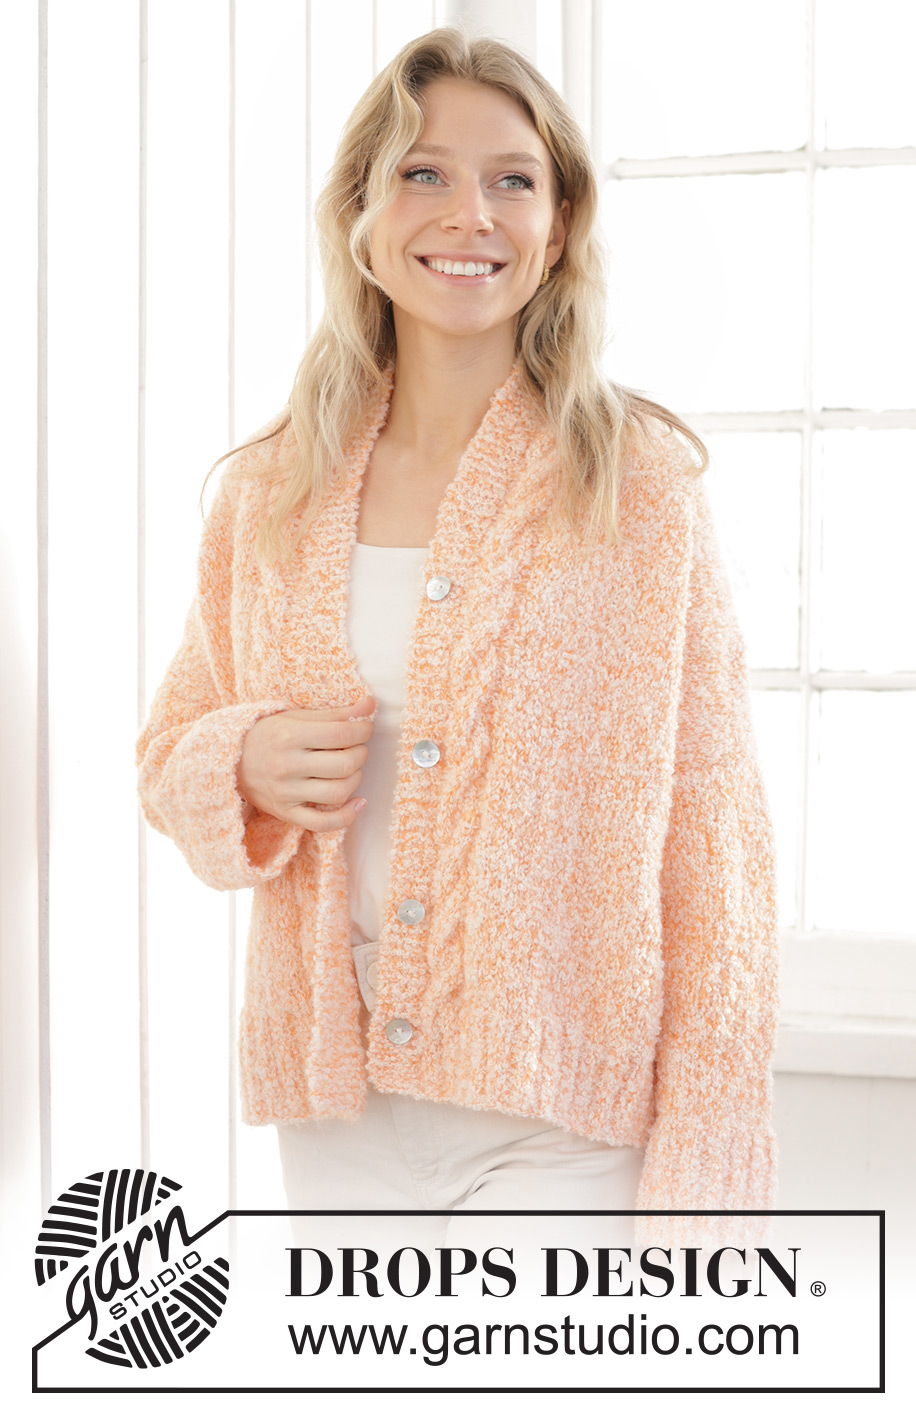
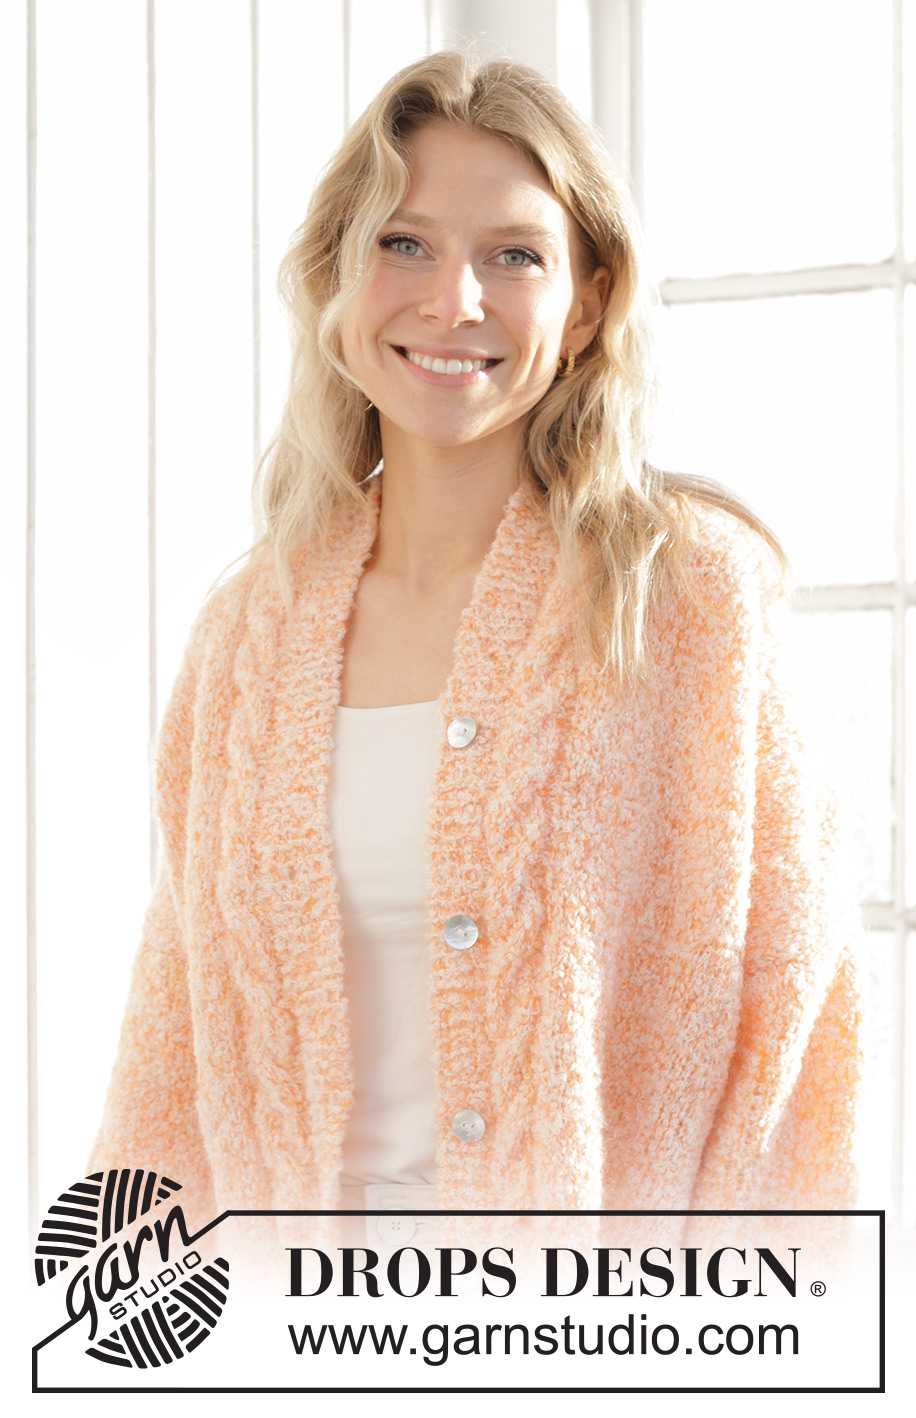
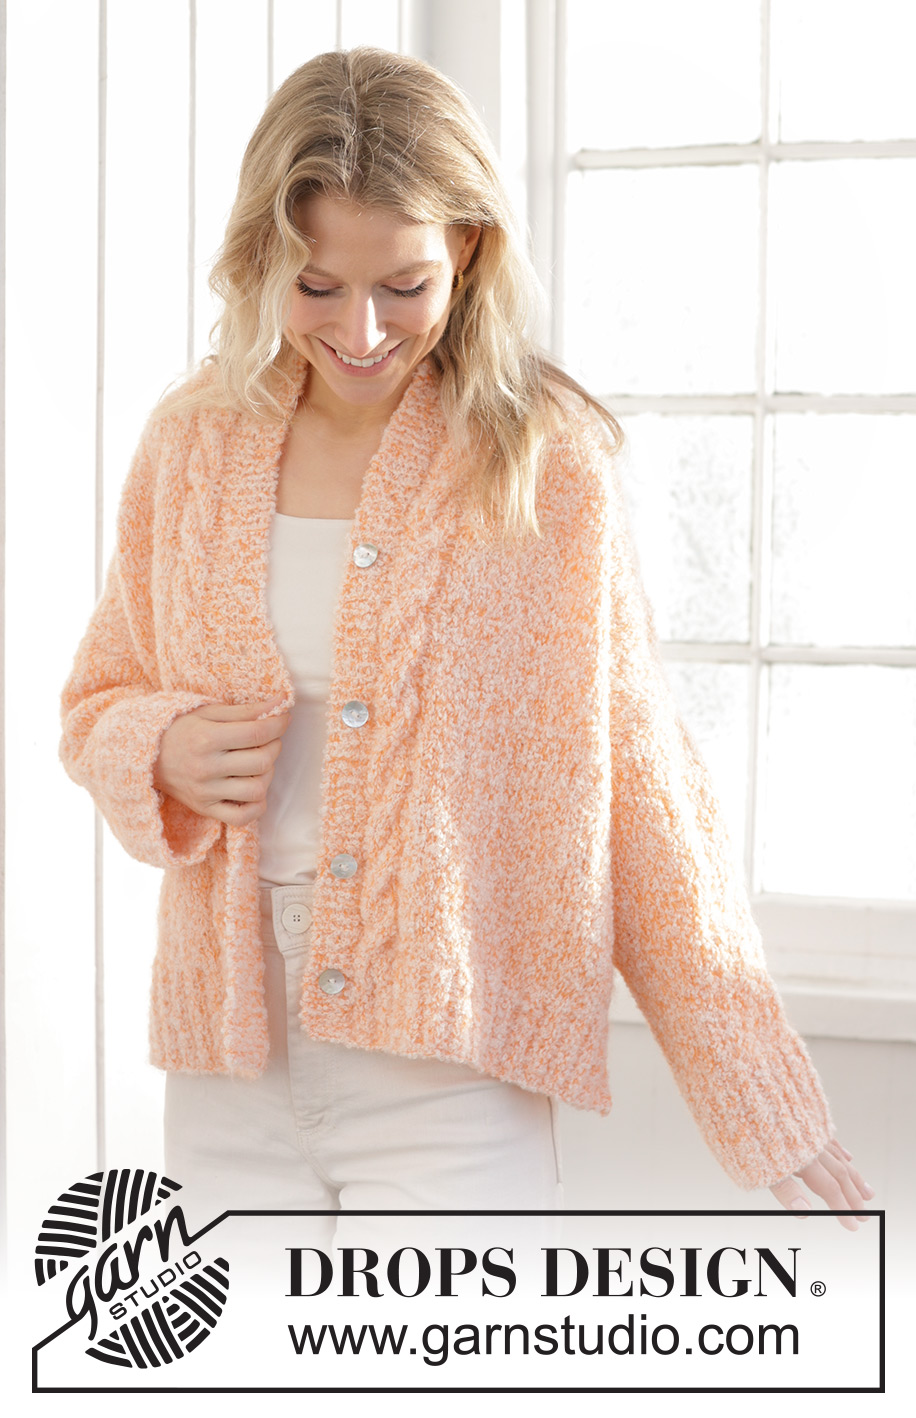
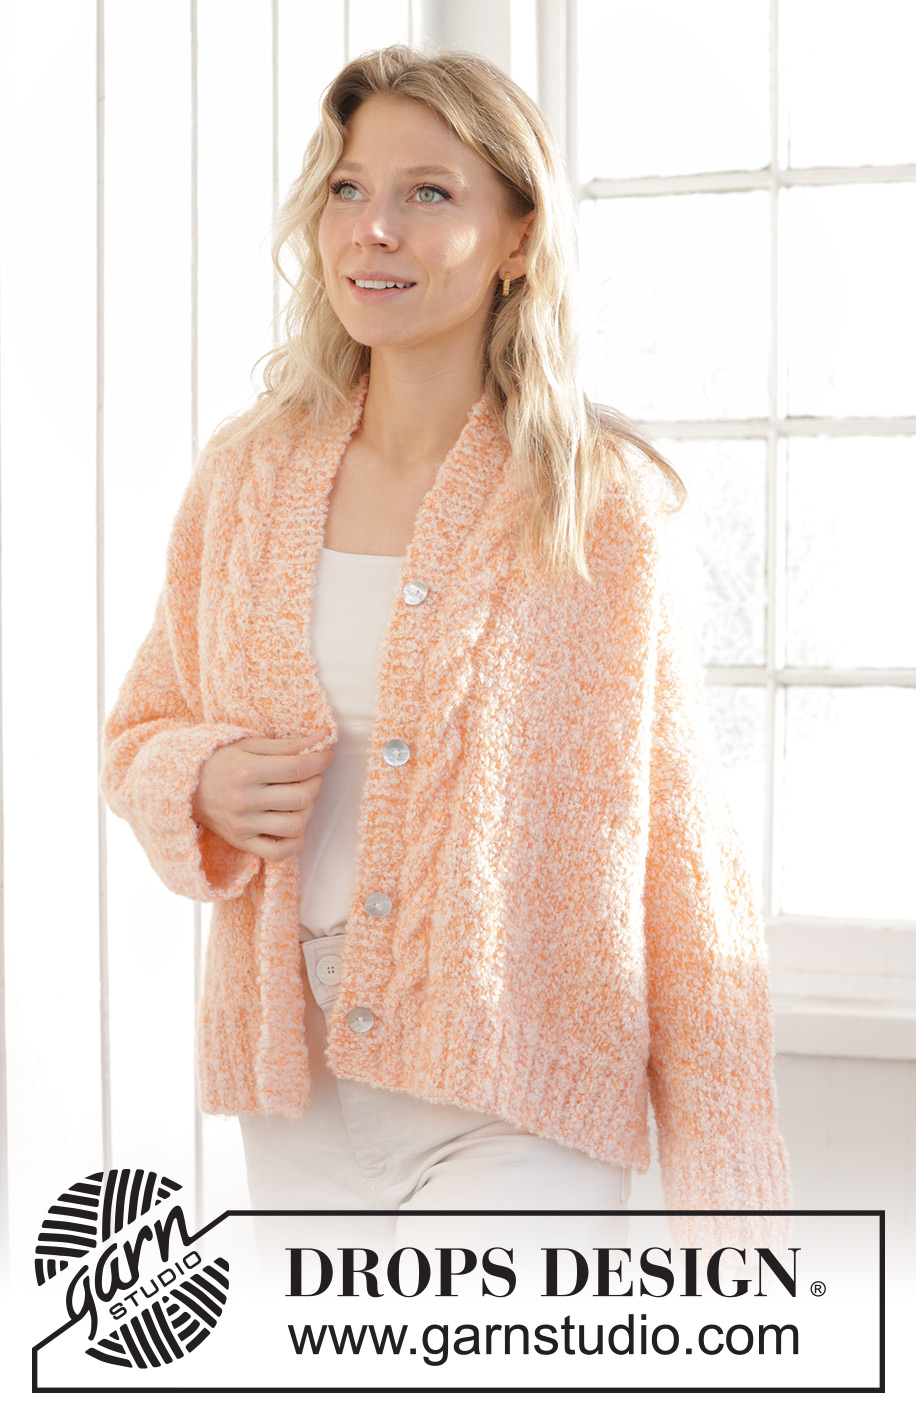
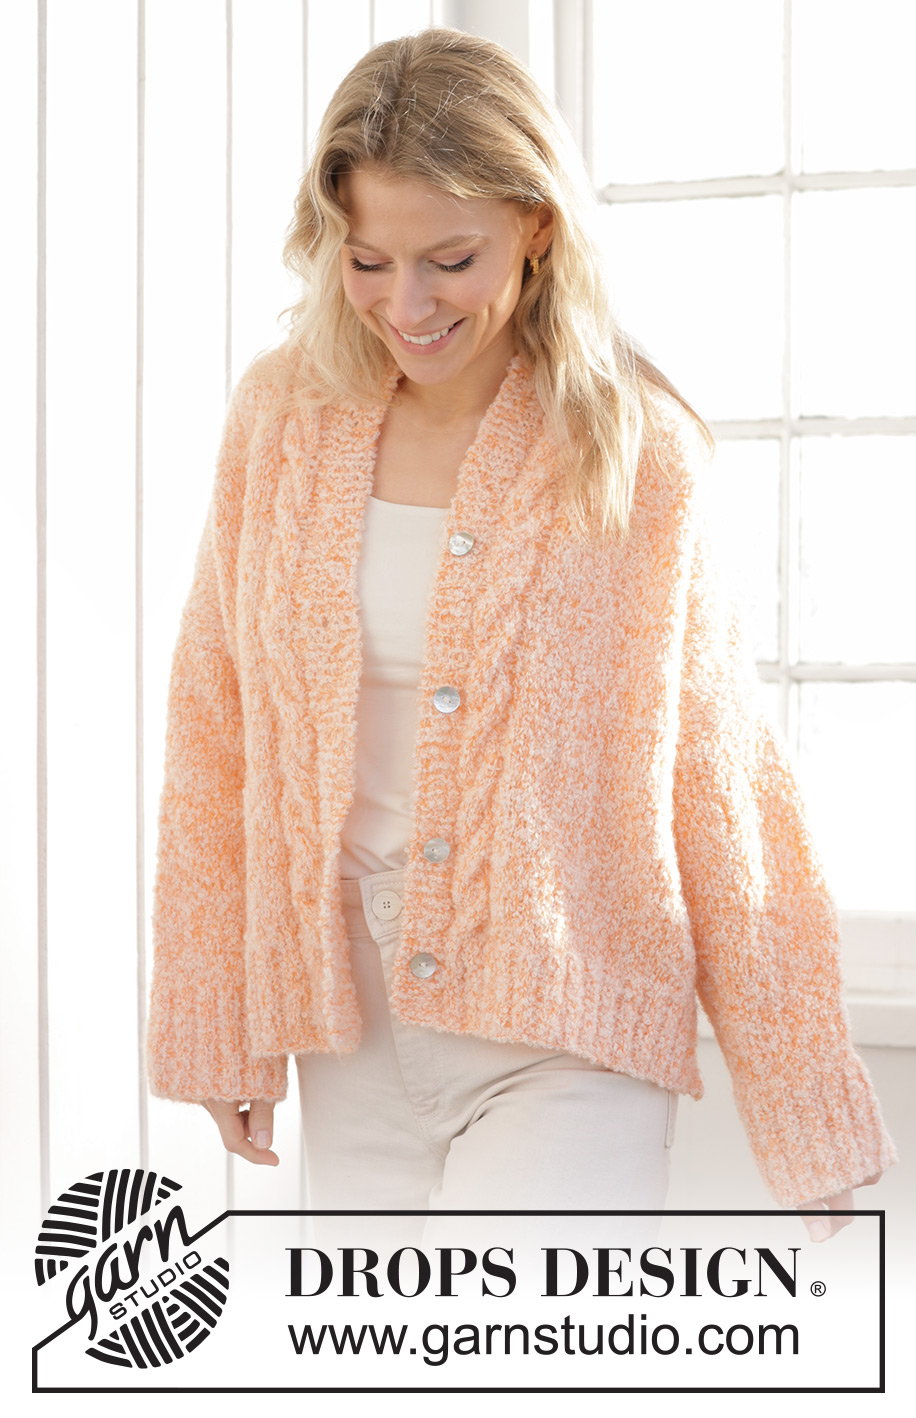
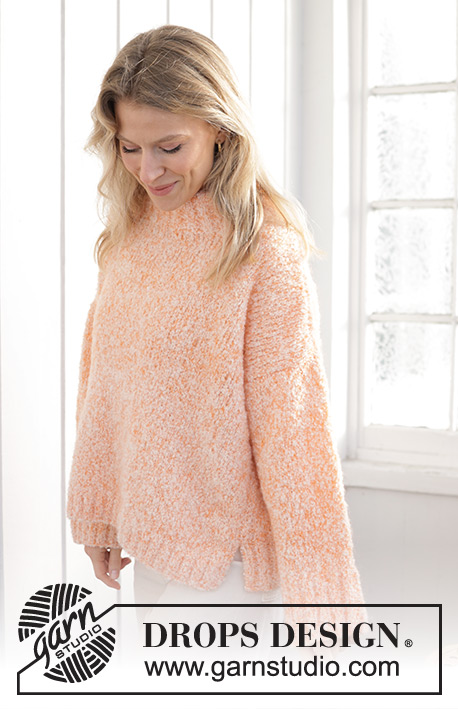
Peach Blossom Cardigan#peachblossomcardigan |
||||||||||||||||
 |
 |
|||||||||||||||
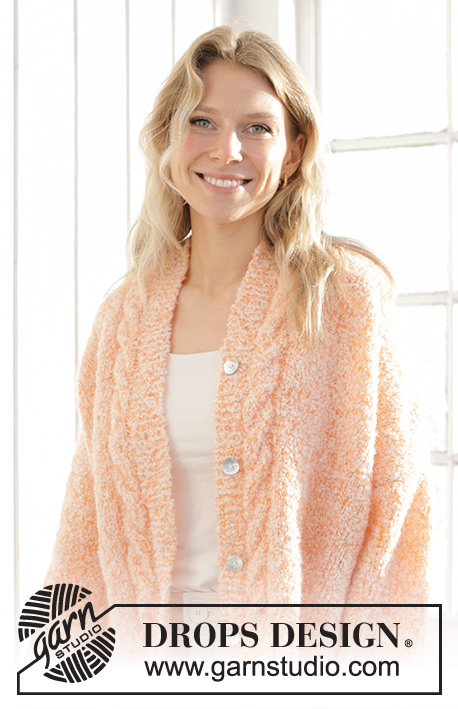
Knitted jacket in DROPS Alpaca Bouclé and DROPS Kid-Silk. The piece is worked bottom up with cables, stocking stitch and split in sides. Sizes XS - XXL.
DROPS 241-34 |
||||||||||||||||
|
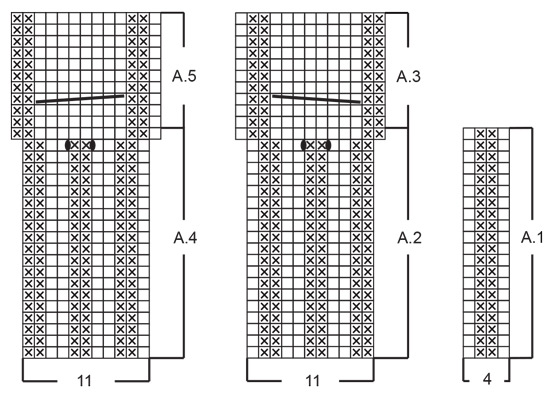
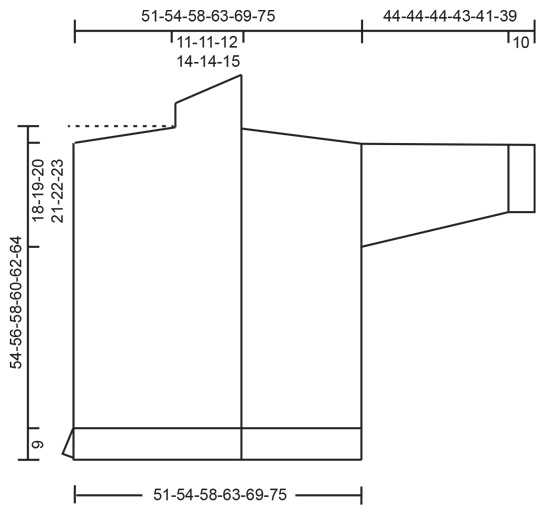
------------------------------------------------------- EXPLANATIONS FOR THE PATTERN: ------------------------------------------------------- RIDGE/GARTER STITCH (worked back and forth): Knit all rows. 1 ridge = knit 2 rows. PATTERN: See diagrams A.1 to A.5. The diagrams show all rows in the pattern from the right side. INCREASE TIP (for sleeves): Start 1 stitch before the marker thread, 1 yarn over, knit 2 (marker thread sits between these 2 stitches), 1 yarn over. On the next round knit the yarn overs twisted to avoid holes (2 stitches increased). Then work the new stitches in stocking stitch. BUTTONHOLES: Work buttonholes on the right band. 1 BUTTONHOLE = knit together the 3rd and 4th stitch from the edge, make 1 yarn over. On the next row, knit the yarn over to leave a hole. Work buttonholes when the piece measures: XS: 6, 14, 22 and 30 cm. S: 6, 14, 22 and 30 cm. M: 6, 14, 23 and 32 cm. L: 7, 16, 25 and 34 cm. XL: 7, 14, 21, 28 and 35 cm. XXL: 7, 14, 21, 28 and 35 cm. ------------------------------------------------------- START THE PIECE HERE: ------------------------------------------------------- JACKET - SHORT OVERVIEW OF THE PIECE: The back and front pieces are worked separately, back and forth and bottom up. The sleeves are worked in the round, bottom up, with double pointed needles/short circular needle. BACK PIECE: Cast on 96-100-108-116-128-140 stitches with circular needle size 5 mm, 1 strand DROPS Alpaca Bouclé and 1 strand DROPS Kid-Silk. Purl 1 row from the wrong side. Work the next row as follows from the right side: 1 stitch in GARTER STITCH – read description above, knit 1, work A.1 until there are 2 stitches left, knit 1 and 1 garter stitch. When A.1 is finished in height, work with stocking stitch and decrease 28-28-30-32-36-40 stitches evenly on the first row = 68-72-78-84-92-100 stitches. The piece measures approx. 9 cm. Change to circular needle size 7 mm. Continue with stocking stitch and 1 garter stitch on each side. REMEMBER THE KNITTING TENSION! When the piece measures 36-37-38-39-40-41 cm, cast off 1 stitch on each side for the armholes = 66-70-76-82-90-98 stitches. Continue working until the piece measures 50-52-54-56-58-60 cm. Now you cast off for the neck and work the diagonal shoulders, working the next row from the right side as follows: Knit 27-29-31-33-37-40 and place these stitches on a thread for the shoulder, cast off the next 12-12-14-16-16-18 stitches for the neck = 27-29-31-33-37-40 stitches left on the needle. Work as follows: Row 1 (right side): Cast off 1 stitch for the neck = 26-28-30-32-36-39 stitches. Knit until there are 6-7-7-8-9-9 stitches left, turn. Row 2 (wrong side): Purl. Row 3 (right side): Knit until there are 12-14-14-16-18-18 stitches left, turn. Row 4 (wrong side): Purl. Row 5 (right side): Knit until there are 18-21-21-24-27-27 stitches left, turn. Row 6 (wrong side): Purl. Loosely cast off the remaining stitches with knit from the right side. The back piece measures approx. 54-56-58-60-62-64 cm. Place the stitches from the thread back onto circular needle size 7 mm and work in the same way as the first shoulder, but start with the first row from the wrong side. RIGHT FRONT PIECE: Cast on 60-64-68-72-76-80 stitches with circular needle size 5 mm and 1 strand of each quality (2 strands). Purl until there are 7 stitches left, work 7 band stitches in garter stitch. Work the next row as follows from the right side: 7 band stitches in garter stitch, A.2, work A.1 until there are 2 stitches left, knit 1, 1 garter stitch. Continue this pattern – AT THE SAME TIME work the buttonholes – read description above. When A.1 and A.2 are finished in height, there are 2 increased stitches in A.2 = 62-66-70-74-78-82 stitches. The piece measures approx. 9 cm. Change to circular needle size 7 mm. Work pattern as follows: 7 band stitches in garter stitch, work A.3 over A.2, work 41-45-49-53-57-61 stitches in stocking stitch and decrease 17-19-20-21-21-21 stitches evenly over these stitches, 1 garter stitch = 45-47-50-53-57-61 stitches. Continue this pattern. When the piece measures 36-37-38-39-40-41 cm, cast off 1 stitch from the side for the armhole = 44-46-49-52-56-60 stitches. Continue working until the piece measures 50-52-54-56-58-60 cm. Now you work the diagonal shoulder, starting from the right side as follows: Row 1 (right side): Work pattern as before until there are 6-7-7-8-9-9 stitches left, turn. Row 2 (wrong side): Work pattern as before. Row 3 (right side): Work pattern as before until there are 12-14-14-16-18-18 stitches left, turn. Row 4 (wrong side): Work pattern as before. Row 5 (right side): Work pattern as before until there are 18-21-21-24-27-27 stitches left, turn. Row 6 (wrong side): Work pattern as before until there are 18-18-19-20-20-21 stitches left by the neck, place these stitches on a thread for the collar = 26-28-30-32-36-39 stitches on the needle. Loosely cast off these stitches with knit from the right side. COLLAR: Place the 18-18-19-20-20-21 stitches from the thread on circular needle size 7 mm. Work as follows from the wrong side: 0-0-0-1-1-2 garter stitches, knit over knit and purl over purl until there are 7 stitches left, 7 band stitches in garter stitch. Continue like this (i.e.no more cables) and work short rows as follows: ROW 1 (right side): Work the first 14-14-15-15-15-16 stitches, turn, tighten the strand. ROW 2 (wrong side): Work the first 14-14-15-15-15-16 stitches, turn. ROW 3: Work all stitches, tighten the strand, turn. ROW 4 (wrong side): Work all stitches. Repeat rows 1 to 4 until the collar measures 7-8-8-9-9-9 cm at its shortest point – the collar should reach mid-back when stretched slightly. Work 1 ridge over all stitches. Cast off. LEFT FRONT PIECE: Cast on 60-64-68-72-76-80 stitches with circular needle size 5 mm and 1 strand of each quality (2 strands). Work 7 band stitches in garter stitch, purl to the end of the row. Work the next row as follows from the right side: 1 garter stitch, knit 1, work A.1 until there are 18 stitches left, work A.4 and 7 band stitches in garter stitch. When A.1 and A.4 are finished in height, 2 stitches have been increased in A.4 = 62-66-70-74-78-82 stitches. The piece now measures approx. 9 cm. Change to circular needle size 7 mm. Work pattern as follows: 1 garter stitch, work 41-45-49-53-57-61 stitches in stocking stitch and decrease 17-19-20-21-21-21 stitches evenly over these stitches, work A.5 over A.4, 7 band stitches in garter stitch = 45-47-50-53-57-61 stitches. Continue this pattern. When the piece measures 36-37-38-39-40-41 cm, cast off 1 stitch from the side for the armhole = 44-46-49-52-56-60 stitches. Continue working until the piece measures 50-52-54-56-58-60 cm. Now you work the diagonal shoulder, starting from the wrong side as follows: Row 1 (wrong side): Work pattern as before until there are 6-7-7-8-9-9 stitches left, turn. Row 2 (right side): Work pattern as before. Row 3 (wrong side): Work pattern as before until there are 12-14-14-16-18-18 stitches left, turn. Row 4 (right side): Work pattern as before. Row 5 (wrong side): Work pattern as before until there are 18-21-21-24-27-27 stitches left, turn. Row 6 (right side): Work pattern as before until there are 18-18-19-20-20-21 stitches left by the neck, place these stitches on a thread for the collar = 26-28-30-32-36-39 stitches on the needle. Loosely cast off these stitches with knit from the right side. COLLAR: Place the 18-18-19-20-20-21 stitches from the thread on circular needle size 7 mm. Work as follows from the right side: 0-0-0-1-1-2 garter stitches, knit over knit and purl over purl until there are 7 stitches left, 7 band stitches in garter stitch. Continue like this (i.e.no more cables) and work short rows as follows: ROW 1 (wrong side): Work the first 14-14-15-15-15-16 stitches, turn and tighten the strand. ROW 2 (right side): Work the 14-14-15-15-15-16 stitches. ROW 3 (wrong side): Work all stitches, turn and tighten the strand. ROW 4 (right side): Work all stitches. Repeat rows 1 to 4 until the collar measures 7-8-8-9-9-9 cm at its shortest point – matching it to the collar on the right front piece. Work 1 ridge over all stitches. Cast off. SLEEVES: Cast on 56-56-60-60-64-64 stitches with double pointed needles size 5 mm and 1 strand of each quality (2 strands). Knit 1 round, then work rib (knit 2, purl 2) for 10 cm. Knit 1 round and decrease 21-20-22-21-24-22 stitches evenly spaced = 35-36-38-39-40-42 stitches. Change to double pointed needles size 7 mm. Insert 1 marker-thread at the beginning of the round (mid-under sleeve). Work stocking stitch. When the sleeve measures 14-13-13-12-11-13 cm, increase 1 stitch on each side of the marker-thread - read INCREASE TIP. Increase like this every 5½-4½-4½-4-3½-3 cm a total of 6-7-7-8-9-9 times = 47-50-52-55-58-60 stitches. Cast off when the sleeve measures 44-44-44-43-41-39 cm. Work 1 more sleeve in the same way. ASSEMBLY: Sew the shoulder seams inside 1 stitch. Sew the collar together mid-back and sew the collar to the neck-line. Sew in the sleeves. Sew the side seams inside 1 edge stitch down to the rib, leaving a split in the sides. Sew the buttons onto the left band. |
||||||||||||||||
Diagram explanations |
||||||||||||||||
|
||||||||||||||||
 |
||||||||||||||||
 |
||||||||||||||||
Have you finished this pattern?Tag your pictures with #dropspattern #peachblossomcardigan or submit them to the #dropsfan gallery. Do you need help with this pattern?You'll find 29 tutorial videos, a Comments/Questions area and more by visiting the pattern on garnstudio.com. © 1982-2026 DROPS Design A/S. We reserve all rights. This document, including all its sub-sections, has copyrights. Read more about what you can do with our patterns at the bottom of each pattern on our site. |
||||||||||||||||


With over 40 years in knitting and crochet design, DROPS Design offers one of the most extensive collections of free patterns on the internet - translated to 17 languages. As of today we count 324 catalogues and 12290 patterns translated into English (UK/cm). 12290
We work hard to bring you the best knitting and crochet have to offer, inspiration and advice as well as great quality yarns at incredible prices! Would you like to use our patterns for other than personal use? You can read what you are allowed to do in the Copyright text at the bottom of all our patterns. Happy crafting!
Post a comment to pattern DROPS 241-34
We would love to hear what you have to say about this pattern!
If you want to leave a question, please make sure you select the correct category in the form below, to speed up the answering process. Required fields are marked *.