
Popular categories
Looking for a yarn?


Comments / Questions (24)
![]() Nathalie wrote:
Nathalie wrote:
Bonjour, Dans la Manche vous dites : tricoter la tête de la manche en allers retours sur les aiguilles circulaires jusqu'a la fin Qu'est ce que c'est la tête de la manche? En vous remerciant. Nathalie
09.07.2024 - 18:35DROPS Design answered:
Bonjour Nathalie, la tête de la manche est cette partie de la manche que sera cousue le long de l'emmanchure. Bon tricot!
12.07.2024 - 14:40
![]() Guylaine Rondeau wrote:
Guylaine Rondeau wrote:
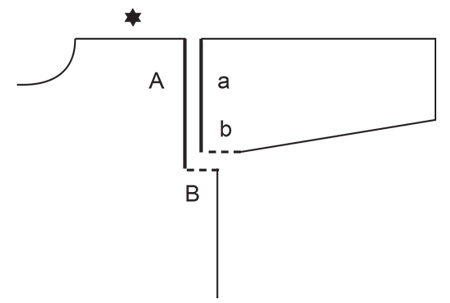
Pour ce modèle y a t il des tutoriels, car j aimerais comprendre comment coudre la manche le long du bas de l emmanchure: Coudre a contre A et b Contre B merci Et comment faire la pointe du V au devant.. merci
14.04.2024 - 02:17DROPS Design answered:
Bonjour Mme Rondeau, tout à fait, vous pouvez retrouver tous nos tutoriels vidéos et leçons en haut de page, dans les onglets à droite des Explications. Pour la couture des manches, cette vidéo devrait pouvoir vous aider. Bon assemblage!
15.04.2024 - 07:45
![]() Besnier wrote:
Besnier wrote:
Je vais faire le modèle 230-6 avec drops belle en taille s je voulais savoir 450 g coloris 01,blanc correspond à combien de pelotes de laines.
17.03.2024 - 19:11DROPS Design answered:
Bonjour Mme Besnier, les pelotes DROPS Belle se présentent en 50 g - cf nuancier; il vous faudra ainsi 450/50 = 9 pelotes en taille S. Bon tricot!
18.03.2024 - 09:32
![]() Mari wrote:
Mari wrote:
Utrolig fin genser! Hvilken størrelse bruker modellen?
26.08.2023 - 11:16DROPS Design answered:
Hei Mari, Du finner en målskisse på bunnen av oppskriften, med alle mål til de forskjellige størrelsene. Finner du din størrelse får du samme fasongen som modellen har i bildet. God fornøyelse!
28.08.2023 - 06:49
![]() Valborg Hillberg wrote:
Valborg Hillberg wrote:
Hur vet jag hur långt jag ska sticka på ärmen, ärmkullen
31.07.2023 - 14:23DROPS Design answered:
Hej Valborg Det beror på vilken storlek du stickar: När ärmen mäter 51-50-49-48-46-44 cm, stickas ärmkullen fram och tillbaka på rundsticka till färdigt mått. Sticka slätstickning från mitt i A.1 till ärmen mäter ca 52-51-51-51-51-51 cm (= färdigt mått). Maska av.
07.08.2023 - 11:45
![]() Hanan Salah wrote:
Hanan Salah wrote:
Je ne comprend pas cette partie ENCOLURE DOS: En commençant sur l'endroit, à l'une des coutures d'épaule, relever pour l'encolure dos environ 42 à 46 mailles (y compris les mailles en attente) jusqu'à la couture de l'épaule suivante.
13.02.2023 - 22:21DROPS Design answered:
Bonjour Mme Salah, pour l'encolure dos, vous avez mis en attente les 38-40 ou 42 m centrales, pour l'encolure dos, on va rabattre avec la technique du I-cord, pour cela, on a besoin de relever les mailles le long de l'encolure dos: en commençant à la couture de l'épaule gauche (sur l'endroit) relever les mailles, tricotez les mailles en attente et relevez les mailles jusqu'à la couture de l'épaule droite, et rabattez maintenant les mailles à partir des 3 mailles du devant droit. Bon tricot!
14.02.2023 - 13:54
![]() Hanan Salah wrote:
Hanan Salah wrote:
ENCOLURE DOS: En commençant sur l'endroit, à l'une des coutures d'épaule, relever pour l'encolure dos environ 42 à 46 mailles (y compris les mailles en attente) jusqu'à la couture de l'épaule suivante.
13.02.2023 - 22:18
![]() Hanan Salah wrote:
Hanan Salah wrote:
Bonjour madame puis-je travailler les 2 manches au même temps ensemble sur aiguilles circulaires 3 et 4 ?
26.01.2023 - 15:42DROPS Design answered:
Bonjour Mme Salah, si vous en avez l'habitude, alors oui, sinon, préférez réaliser l'une manche après l'autre, ce sera plus simple. Bon tricot!
26.01.2023 - 15:51
![]() Hanan Salah wrote:
Hanan Salah wrote:
Bonjour madame par rapport aux rangs raccourcis les mailles non tricotées resteront sur l’aiguille à chaque fois sur chaque ligne et ensuite je les tricote toutes ensembles ? Je ne comprends pas bien vraiment ( je ne suis pas française je suis égyptienne un peux de soucis avec la langue française ) merci bien
24.01.2023 - 14:12DROPS Design answered:
Bonjour Mme Salah, tout à fait, lorsque vous tricotez les rangs raccourcis en tricotant jusqu'à ce qu'il reste par ex. 6-6-7-7-8-8 mailles, ces mailles ne sont pas tricotées, la fois suivante, tricotez 3 ou 4 mailles en moins (cf taille). Lorsque toutes les mailles seront mises en attente sur un fil, reprenez toutes les mailles en attente et rabattez-les toutes en une seule fois. Bon tricot!
24.01.2023 - 16:40
![]() Hanan Salah wrote:
Hanan Salah wrote:
Bonjour madame, je ne comprends pas bien cette partie ( les diminutions ) Continuer ainsi et diminuer pour l'encolure V : 10-10-11-11-12-12 fois tous les 2 rangs et 7 fois tous les 4 rangs = 29-32-33-36-37-39 mailles pour l'épaule.
21.01.2023 - 20:56DROPS Design answered:
Bonjour Mme Salah, tricotez comme indiqué, soit pour l'épaule/devant gauche (vu sur l'endroit): 1 m point mousse, jersey et A.3 sur les 11 dernières mailles. Et vous diminuez avant A.3 (= comme la 1ère fois) d'abord tous les 2 rangs (tous les rangs sur l'endroit) puis tous les 4 rangs (tous les 2 rangs sur l'endroit) - suivez le nombre de fois indiqué pour votre taille. Bon tricot!
23.01.2023 - 09:20
|
||||||||||||||||||||||
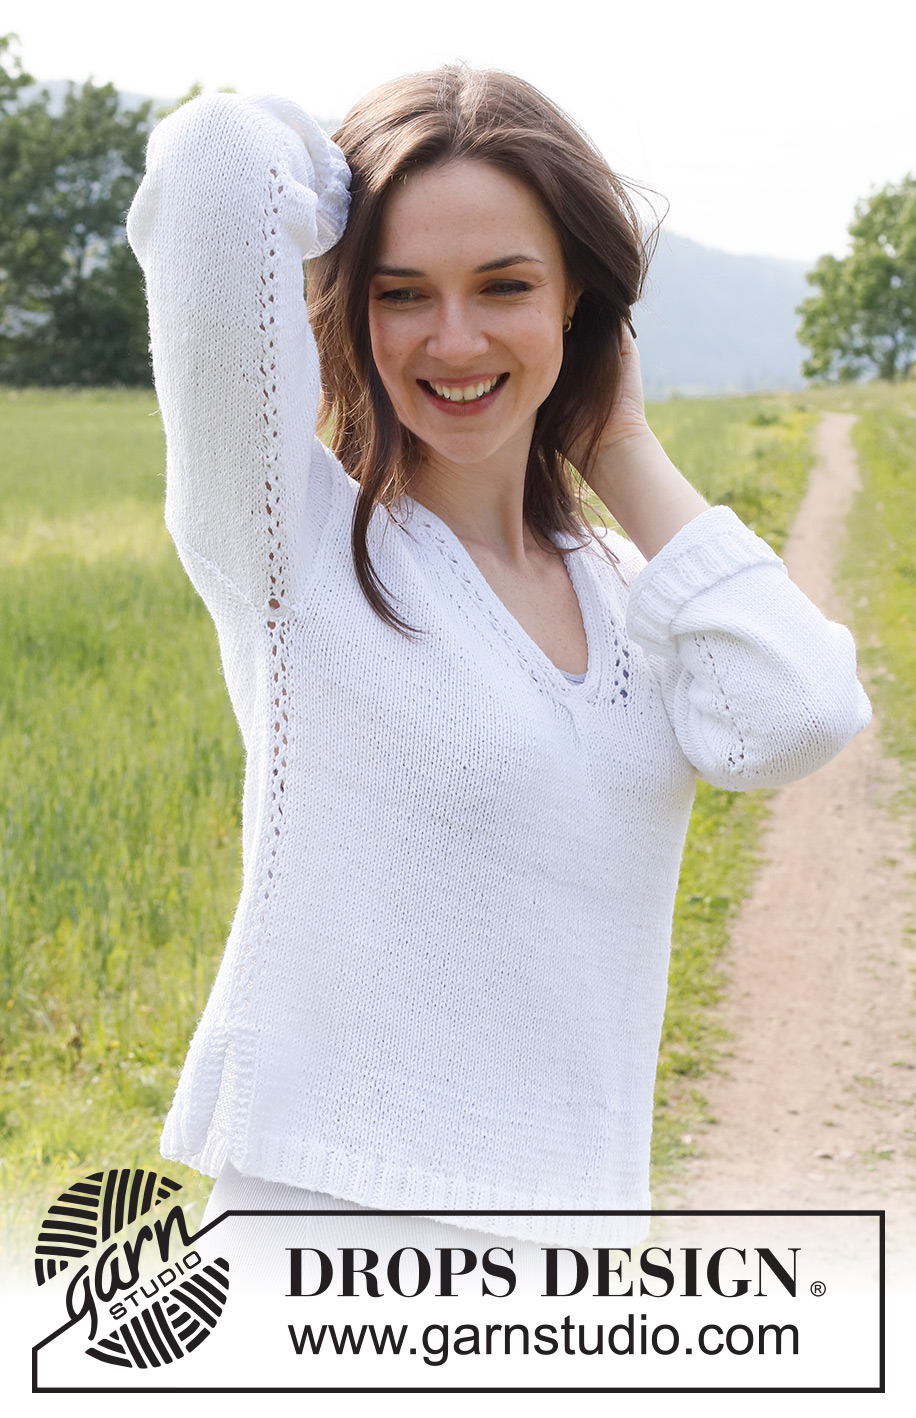
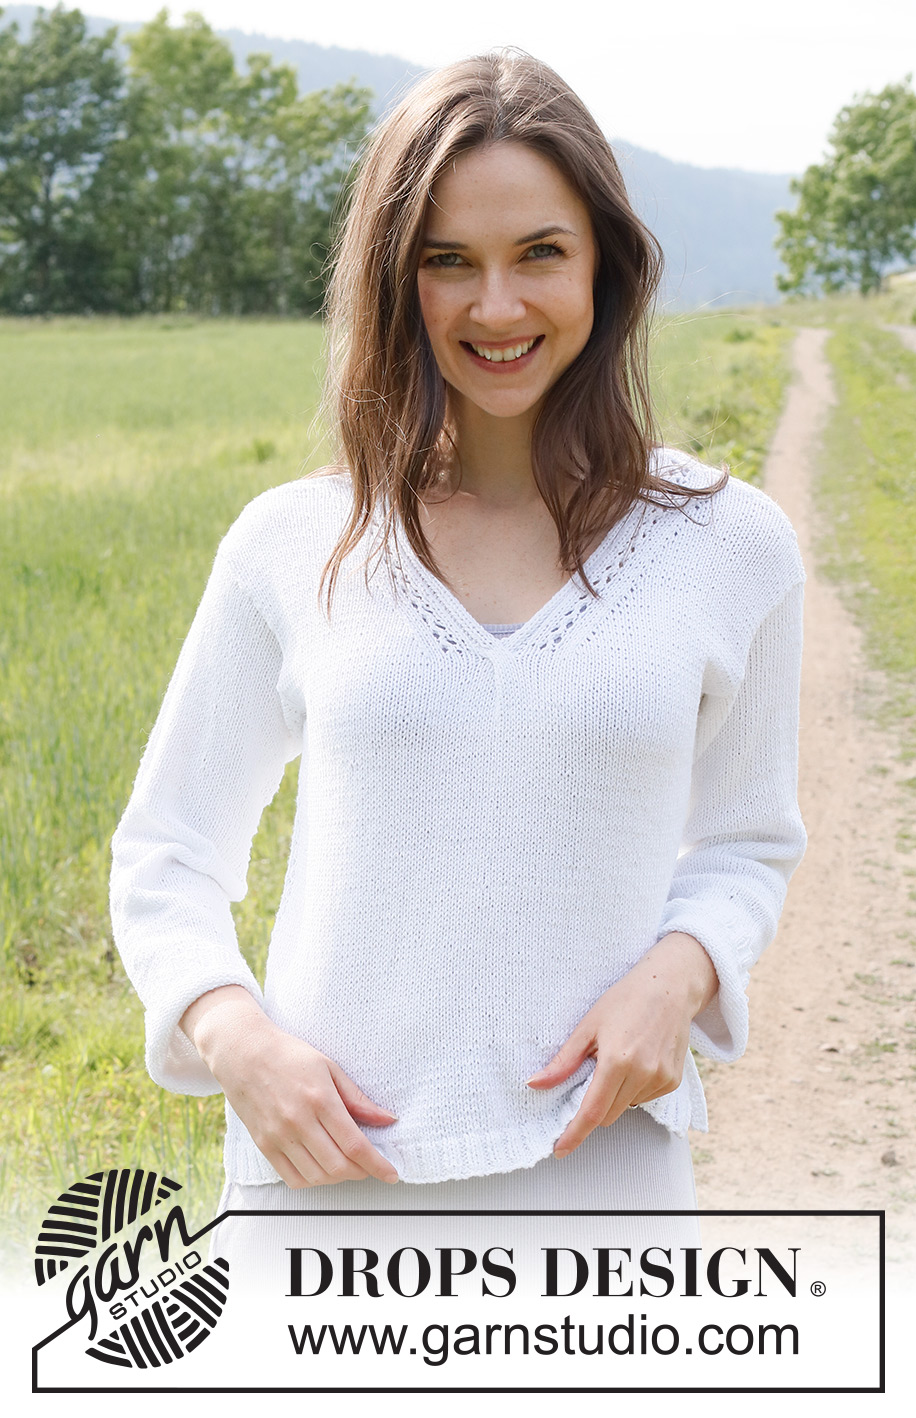
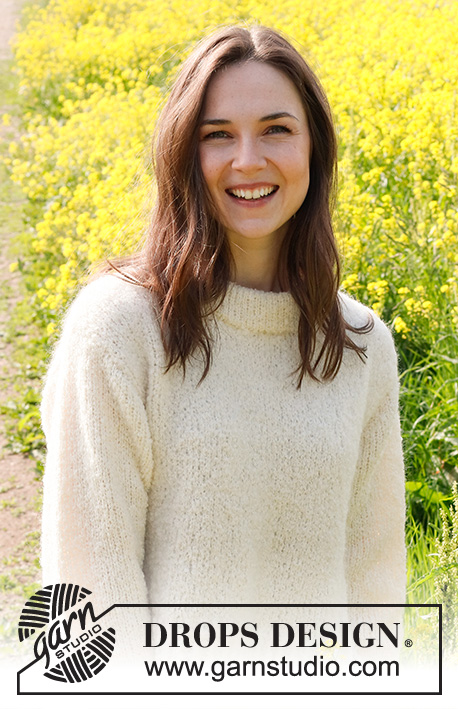
White Trail#whitetrailsweater |
||||||||||||||||||||||
 |
 |
|||||||||||||||||||||
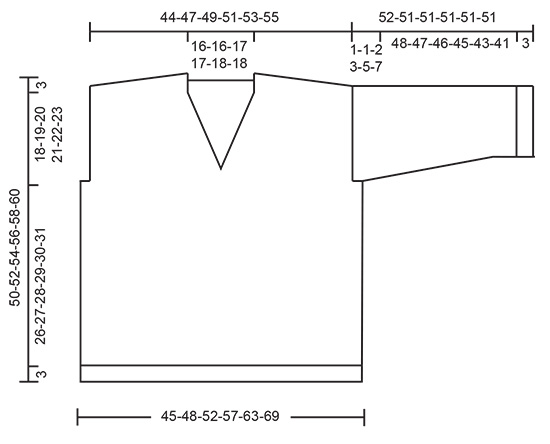
Knitted jumper in DROPS Belle. Piece is knitted bottom up with V-neck and lace pattern. Size: S - XXXL
DROPS 230-6 |
||||||||||||||||||||||
|
---------------------------------------------------------- EXPLANATION FOR THE PATTERN: ---------------------------------------------------------- GARTER STITCH (back and forth): Knit all rows. 1 ridge vertically = knit 2 rows. GARTER STITCH (worked in the round): 1 ridge vertically = 2 rounds, i.e. knit 1 round and purl 1 round. PATTERN: See diagrams A.1 to A.4. Diagrams show all rows in pattern seen from the right side. DECREASE TIP (evenly): To calculate how to decrease evenly, use number of stitches on needle (e.g. 106 stitches) and divide stitches by number of decreases to be done (e.g. 18) = 5,8. In this example decrease by knitting approx. every 5th and 6th stitch together. INCREASE TIP (applies to under sleeves): Work until 2 stitches remain before A.1, make 1 yarn over, knit 2, A.1, knit 2, make 1 yarn over (= 2 stitches increased). On next round knit yarns over twisted to avoid holes. Then work the new stitches in stocking stitch. ---------------------------------------------------------- START THE PIECE HERE: ---------------------------------------------------------- JUMPER - SHORT OVERVIEW OF THE PIECE: Work back piece and front piece first back and forth on circular needle separately until vent is done. Then work body in the round on circular needle up to armholes. Then work front piece and back piece back and forth separately. Work sleeves in the round on double pointed needles/circular needle up to sleeve cap, then work the rest of sleeve back and forth. Finish with a edge i-cord at the back of neck. BACK PIECE: Cast on 112-124-136-148-164-180 stitches on circular needle size 3 mm with DROPS Belle. Purl 1 row from wrong side. Then work rib as follows: Work 3 stitches in GARTER STITCH - read explanation above, work rib (knit 2/purl 2) until 5 stitches remain on needle, knit 2, work 3 stitches in garter stitch. Continue rib back and forth like this until piece measures 3 cm. Work next row from right side as follows: Work 3 stitches in garter stitch, knit the next 106-118-130-142-158-174 stitches and decrease at the same time 18-24-26-28-32-36 stitches evenly – read DECREASE TIP, work 3 stitches in garter stitch = 94-100-110-120-132-144 stitches. Switch to circular needle size 4 mm. Purl 1 row with 3 stitches in garter stitch in each side. Now work in stocking stitch with 3 stitches in garter stitch in each side until piece measures 8 cm, adjust so that next row is worked from right side. REMEMBER THE KNITTING TENSION! Cut the yarn. Put piece aside. FRONT PIECE: Work the same way as on back piece but do not cut the yarn. BODY: Now insert front piece and back piece on to same circular needle size = 188-200-220-240-264-288 stitches. Work in stocking stitch in the round and continue with GARTER STITCH - read explanation above (= 6 stitches in garter stitch in each side). When 2 ridges have been worked over the 6 stitches, work pattern as follows: Knit 1 stitch. Insert a marker thread here (after this stitch). This is now the beginning of round. Knit over the first 92-98-108-118-130-142, A.1 over the next 2 stitches (= over the middle 2 stitches over the 6 stitches in garter stitch), knit over the next 92-98-108-118-130-142 stitches, work A.1 over the last 2 stitches (= over the middle 2 stitches of the 6 stitches in garter stitch). Continue in the round like this until piece measures 29-30-31-32-33-34 cm from cast-on edge. Now cast off stitches for armholes in each side as follows: Begin 2-2-5-7-11-15 stitches before beginning of round, cast off the next 2-2-8-12-20-28 stitches for armhole, work until 0-0-3-5-9-13 stitches remain before next A.1, cast off the next 2-2-8-12-20-28 stitches for armhole, work the rest of round = 92-98-102-108-112-116 stitches both for front piece and back piece. FRONT PIECE: = 92-98-102-108-112-116 stitches. Work back and forth in stocking stitch and with 1 edge stitch in garter stitch in each side. When piece measures 32-33-34-35-36-37 cm (approx. 3 cm from where stitches for armholes were cast off in each side), work first row in A.2 over the middle 10 stitches on needle. Work next row from wrong side as follows: 1 edge stitch in garter stitch, purl the next 45-48-50-53-55-57 stitches before slipping them on a thread (= 46-49-51-54-56-58 stitches for right front piece/shoulder), purl the next 45-48-50-53-55-57 stitches, 1 edge stitch in garter stitch (= 46-49-51-54-56-58 stitches for left front piece/shoulder). LEFT FRONT PIECE/ SHOULDER: Work pattern as follows: 1 edge stitch in garter stitch, stocking stitch until 13 stitches remain, knit 2 together (= 1 stitch decreased for V-neck), work A.3 over the last 11 stitches. Work 1 row from wrong side with A.3 towards V-neck, 1 edge stitch in garter stitch towards armhole and stocking stitch over the remaining stitches. Continue pattern like this and decrease for V-neck every other row 10-10-11-11-12-12 times and every 4th row 7 times = 29-32-33-36-37-39 stitches for shoulder. Continue to work until piece measures 47-49-51-53-55-57 cm. Now work short rows over shoulder (continue pattern as before over the 11 stitches towards the neck) as follows: ROW 1 (= right side): Work over all stitches. ROW 2 (= wrong side): Turn, work until 6-6-7-7-8-8 stitches remain on needle. ROW 3: Turn, tighten yarn and work the rest of the row. ROW 4: Work until 3-3-3-4-4-4 stitches more remain than on previous time. ROW 5: Turn, tighten yarn and work the rest of the row. ROW 6: Work until 3-3-3-4-4-4 stitches more remain than on previous time. ROW 7: Turn, tighten yarn and work the rest of the row. ROW 8: Work until 3-3-3-4-4-4 stitches more remain than on previous time. ROW 9: Turn, tighten yarn and work the rest of the row. ROW 10: Work the first 3 stitches before slipping them on a thread (use stitches later for neck edge on back piece), cast off the remaining stitches on shoulder. RIGHT FRONT PIECE/ SHOULDER: Work pattern from the right side as follows: A.4 over the first 11 stitches, slip 1 stitch knitwise, knit 1, pass slipped stitch over stitch worked (= 1 stitch decreased for V-neck), knit until 1 stitch remains, 1 edge stitch in garter stitch. Work 1 row from wrong side with A.4 towards V-neck, stocking stitch and 1 edge stitch in garter stitch towards the armhole. Continue pattern like this and decrease for V-neck every other row 10-10-11-11-12-12 times and every 4th row 7 times = 29-32-33-36-37-39 stitches for shoulder. Continue to work until piece measures 47-49-51-53-55-57 cm. Now work short rows over shoulder (continue pattern as before over the 11 stitches towards the neck) as follows: ROW 1 (= right side): Work until 6-6-7-7-8-8 stitches remain on needle. ROW 2: Turn, tighten yarn and work the rest of the row. ROW 3: Work until 3-3-3-4-4-4 stitches more remain than on previous time. ROW 4: Turn, tighten yarn and work the rest of the row. ROW 5: Work until 3-3-3-4-4-4 stitches more remain than on previous time. ROW 6: Turn, tighten yarn and work the rest of the row. ROW 7: Work until 3-3-3-4-4-4 stitches more remain than on previous time. ROW 8: Turn, tighten yarn and work the back. ROW 9: Work the first 3 stitches before slipping them on a thread, cast off the remaining stitches by knitting. BACK PIECE: = 92-98-102-108-112-116 stitches. Work back and forth in stocking stitch and with 1 edge stitch in garter stitch in each side. When piece measures 46-48-50-52-54-56 cm, slip the middle 38-38-40-40-42-42 stitches on a thread for neck, and finish each shoulder separately. Then on next row from the neck, cast off 1 stitch = 26-29-30-33-34-36 stitches for shoulder. Continue back and forth with stocking stitch and 1 edge stitch in garter stitch in each side, at the same time on next row from right side work short rows on shoulders as follows: Right shoulder: ROW 1 (= right side): Work over all stitches. ROW 2 (= wrong side): Turn, work until 6-6-7-7-8-8 stitches remain on needle. ROW 3: Turn, tighten yarn and work the rest of the row. ROW 4: Work until 3-3-3-4-4-4 stitches more remain than on previous time. ROW 5: Turn, tighten yarn and work the rest of the row. ROW 6: Work until 3-3-3-4-4-4 stitches more remain than on previous time. ROW 7: Turn, tighten yarn and work the rest of the row. ROW 8: Work until 3-3-3-4-4-4 stitches more remain than on previous time. ROW 9: Turn, tighten yarn and work the back. When short rows are done, cast off all stitches by purling from wrong side. Jumper measures approx. 50-52-54-56-58-60 cm from shoulder and down. Left shoulder: ROW 1 (= right side): Work until 6-6-7-7-8-8 stitches remain on needle. ROW 2: Turn, tighten yarn and work the rest of the row. ROW 3: Work until 3-3-3-4-4-4 stitches more remain than on previous time. ROW 4: Turn, tighten yarn and work the rest of the row. ROW 5: Work until 3-3-3-4-4-4 stitches more remain than on previous time. ROW 6: Turn, tighten yarn and work the rest of the row. ROW 7: Work until 3-3-3-4-4-4 stitches more remain than on previous time. ROW 8: Turn, tighten yarn and work the back. When short rows are done, cast off all stitches by knitting from right side. Jumper measures approx. 50-52-54-56-58-60 cm from shoulder and down. SLEEVES: Cast on 64-68-72-72-76-76 stitches on double pointed needles size 3 mm with Belle. Knit 1 round. Then work rib (= knit 2/purl 2) in the round for 3 cm. Knit 1 round while decreasing 12-14-16-14-16-14 stitches evenly - remember DECREASE TIP = 52-54-56-58-60-62 stitches. Switch to double pointed needles size 4 mm. Work pattern as follows: A.1 over the first 2 stitches, knit the remaining stitches on round. When piece measures 8-8-8-8-6-7 cm, increase 1 stitch on each side of A.1 - read INCREASE TIP. Increase like this approx. every 3½-3-3-2½-2½-2 cm 12-13-14-15-16-17 times in total = 76-80-84-88-92-96 stitches. When sleeve measures 51-50-49-48-46-44 cm, work sleeve cap back and forth on circular needle until finished measurements. Continue to work in stocking stitch from the middle of A.1 until sleeve measures approx. 52-51-51-51-51-51 cm. Cast off. Work the other sleeve the same way. ASSEMBLY: Sew shoulder seams inside cast-off edges - begin at the edge on shoulder and sew one and one stitch in towards the neck until 3 stitches remain on front piece (there are 3 stitches more on front piece than on back piece). Sew sleeve cap to armhole. Then sew vent at the top of sleeve to bottom of armhole - see chart. BACK NECK EDGE: Begin from right side at one shoulder seam and pick up approx. 42 to 46 stitches (including stitches from thread) up to next shoulder seam on back piece. Cut the yarn, now work an i-cord in these stitches, as follows: Slip the 3 stitches from thread on edge on right front piece on needle size 3 mm. Work i-cord from right side as follows: Knit 2, knit next stitch twisted together with the first/next stitch picked up on back piece. Move the 3 stitches from right needle back on to left needle (in the order they have). Continue like this along the entire neck edge on back piece until there are no stitches left to work. Cast off the remaining stitches. Sew the last 3 stitches together with the 3 stitches on thread on left front piece. Fasten off. |
||||||||||||||||||||||
Diagram explanations |
||||||||||||||||||||||
|
||||||||||||||||||||||
 |
||||||||||||||||||||||
 |
||||||||||||||||||||||
 |
||||||||||||||||||||||
Have you finished this pattern?Tag your pictures with #dropspattern #whitetrailsweater or submit them to the #dropsfan gallery. Do you need help with this pattern?You'll find 28 tutorial videos, a Comments/Questions area and more by visiting the pattern on garnstudio.com. © 1982-2026 DROPS Design A/S. We reserve all rights. This document, including all its sub-sections, has copyrights. Read more about what you can do with our patterns at the bottom of each pattern on our site. |
||||||||||||||||||||||


With over 40 years in knitting and crochet design, DROPS Design offers one of the most extensive collections of free patterns on the internet - translated to 17 languages. As of today we count 324 catalogues and 12290 patterns translated into English (UK/cm). 12290
We work hard to bring you the best knitting and crochet have to offer, inspiration and advice as well as great quality yarns at incredible prices! Would you like to use our patterns for other than personal use? You can read what you are allowed to do in the Copyright text at the bottom of all our patterns. Happy crafting!
Post a comment to pattern DROPS 230-6
We would love to hear what you have to say about this pattern!
If you want to leave a question, please make sure you select the correct category in the form below, to speed up the answering process. Required fields are marked *.