
Popular categories
Looking for a yarn?


Comments / Questions (38)
![]() Chantal Brees wrote:
Chantal Brees wrote:
Kraag (halve) over 11 st in totaal te breien : . 9 x 2 ribbels ( = 4 nld) over alle steken en 9 x 1 ribbel (= 2 nld) over 7 steken. Is dus 9 x 6 nld = 56 nld voor de lange kant en 9 x 4 nld = 32 nld voor de korte kant van de kraag. 10 x 10 is ongeveer 15 nld Kraag moet aan korte zijde volgens patroon 8 cm meten ? Denk dat er toch een fout in patroon zit want nu kom ik op veel meer cm uit! Wat moet het dan wel zijn? Alvast bedankt.
08.12.2021 - 22:00
![]() Sarah Harcombe wrote:
Sarah Harcombe wrote:
Hello, I am knitting the collar. It says *work 2 ridges over all stitches and work 1 ridge over first 6 stitches*. Repeat *-* 9 times. So is this 27rows? The collar should be 8cm. Is this the length of the collar because mine is about 20cm. Id be grateful for any help! Thank you
04.11.2021 - 08:42DROPS Design answered:
Dear Sarah, 2 ridges = 4 rows, 1 ridge = 2 rows, so one repeat of the short rows is = 6 rows, So if you repeat that 9 times, you will have 36 rows on the shorter edge and 56 rows on the lomnger edge. The difference to your number of rows should cover the difference in length. I hope this helps. Happy Stitching!
04.11.2021 - 10:04
![]() Martine wrote:
Martine wrote:
Thank your for the reply, I did not see the garter seam in the picture. Is the seaming technique the one shown in the "How to sew garter stitch pieces together" video? If so it would also be helpful to put that video on the list of relevant tutorial videos for this pattern.
01.11.2021 - 15:35DROPS Design answered:
Dear Martine, correct and thanks for the tip. Happy knitting!
03.11.2021 - 07:39
![]() Martine wrote:
Martine wrote:
For sewing the sleeve and side seams, there is 1 edge stitch in garter on the sleeve and 2 on the sides. It say to sew these in the outermost stitch. Would that not leave the garter edge visible at least on the side seams, since there is 2 stitches? In other patterns the seams are sewn inside the edge stitch and that gives a very neat result. Can I also do that here or is it not possible since there is 2 edge stitches on the body part?
01.11.2021 - 08:57DROPS Design answered:
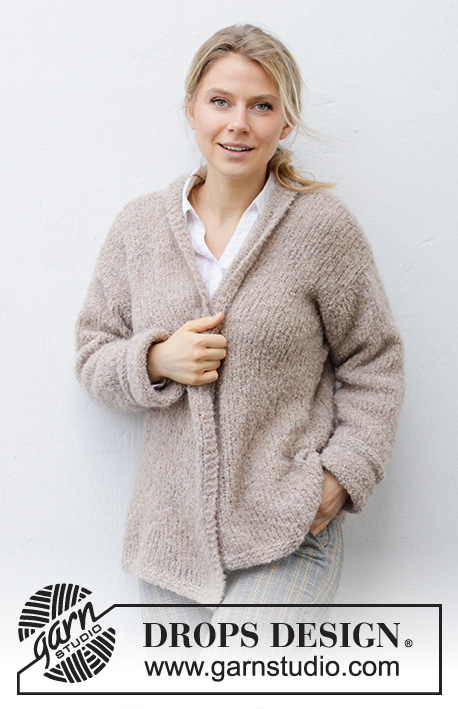
Dear Martine, you can see in the third photo that in the seam you can see the stitches in garter stitch, so it's a design choice that the garter stitch is seen. You can do the same as in the other patterns but you will decrease 2 stitches on each side of the garment and the seam will be bulky. In order to avoid this, you should work an edge stitch on each side of the pieces, instead of two. Happy knitting!
01.11.2021 - 13:50
![]() Marie Kalisch wrote:
Marie Kalisch wrote:
I did my gauge as suggested, however, no needle was given. My first sample was knit on a 6mm which is what the body of the sweater will be knit on and the gauge was small - 8.5 x 8.5 approx. I then knit my next sample on 7mm which the band will be knit on and it did come out at 10 x 10. Please advise
22.08.2021 - 18:49DROPS Design answered:
Hi Marie, you should knit your samlple on needle size 7 mm, so your sample is correct. You should use the same needles as indicated in the pattern. The garter stitch edges will be knit on circular needle size 6 mm. Happy knitting!
22.08.2021 - 20:12
![]() Ruth Schwabe wrote:
Ruth Schwabe wrote:
Hallo, ich verstehe die cm- Angaben der Ärmel nicht: je größer desto weniger cm??? Danke für eine Aufklärung. Gruß Ruth
13.08.2021 - 17:14DROPS Design answered:
Liebe Frau Schwabe, ja genau, die Ärmel werden etwas kürzer in die größeren Größe, weil die Schuter auch breiter sein. Alle Maße für jede Größe finden Sie in der Skizze, damit können Sie für Ihre eigene Größe auch mal anpassen, wenn nötig. Viel Spaß beim stricken!
16.08.2021 - 07:30
![]() Claudia wrote:
Claudia wrote:
Wenn ich den Kragen an den Voderteilen nach Anleitung Stricke, ist er nicht 8 cm wie beschrieben lang, sondern 18 cm. Wie kommt das? Ist das richtig?
08.06.2021 - 17:46DROPS Design answered:
Liebe Claudia, die Seite von Kragen, der am Halsausschnitt zusammengenäht wird, muss die Seite sein, wo Sie weniger Reihen bei den verkürzten Reihen gestrickt haben, bzw die kürzere Seite, die längere Seite wird aussen sein. Viel Spaß beim stricken!
09.06.2021 - 07:28
![]() Claudia wrote:
Claudia wrote:
Wenn ich die Anleitung befolge, wird mein Kragen nicht 8cm, sondern 18 cm. Ist das richtig?
08.06.2021 - 17:43
![]() Mieke wrote:
Mieke wrote:
Maar in de beschrijving lees ik:* 2 ribbels over alle steken, dat zijn m.i. toch 4 naalden recht over alle steken, dan 1 ribbel over 6 steken, is 2 nld recht over de 6 steken * en dit ** 9x herhalen??? Zo staat het beschreven. Volgens U 1x over de 10 en 1x over de 6 en dit 9x herhalen?? Wat is nu juist?
08.04.2021 - 09:27DROPS Design answered:
Dag Mieke,
Ja, je hebt inderdaad gelijk: 2 ribbels over alle steken en 1 ribbel over alleen 6 steken. Was fout van mij.
08.04.2021 - 09:51
![]() Mieke Kouters wrote:
Mieke Kouters wrote:
Ik heb een vraag over de kraag,: ik heb 4 keer 2 ribbels over de 10 steken gebreid en 4 keer 1 ribbel over de 6 steken en heb nu al een lengte van 8 cm. Kan dit kloppen? 2 ribbels zijn m.i. toch 4 naalden recht? 1 ribbel 2 naalden recht?
07.04.2021 - 12:50DROPS Design answered:
Dag Mieke,
Het is de bedoeling dat je afwisselend over alle 10 steken en alleen over 6 steken breit. Dus je breit eerst een ribbel over 10 steken. Dan een ribbel over 6 steken, dan weer een ribbel over 10 steken, enzovoorts. Aan de kant waar de kraag aan het pand genaaid wordt, wordt hij dan korter.
08.04.2021 - 09:16
|
||||
Good Book Cardigan#goodbookcardigan |
||||
 |
 |
|||
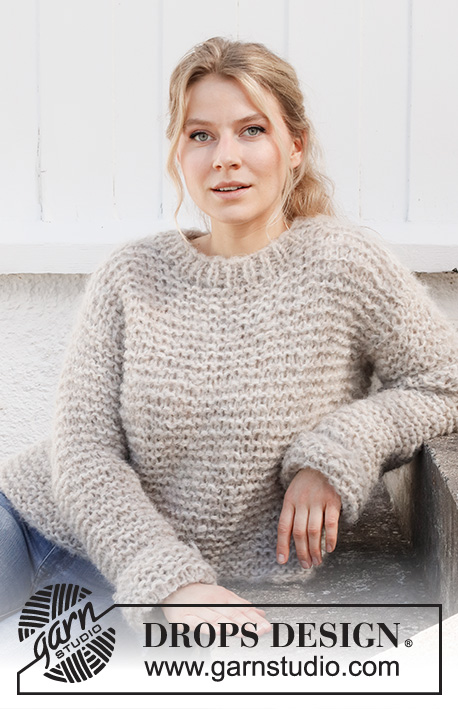
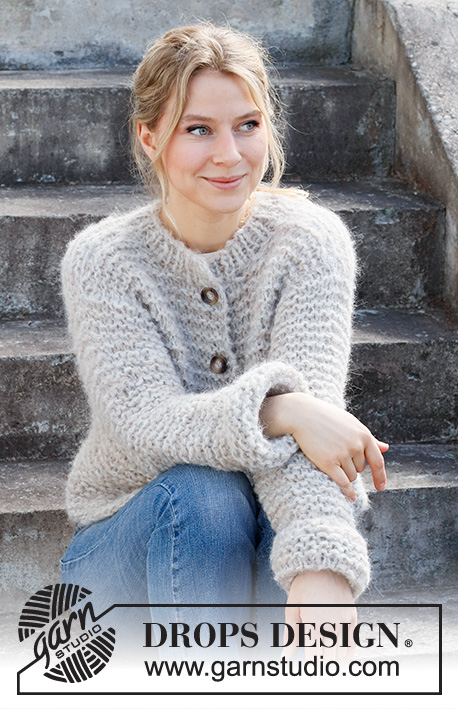
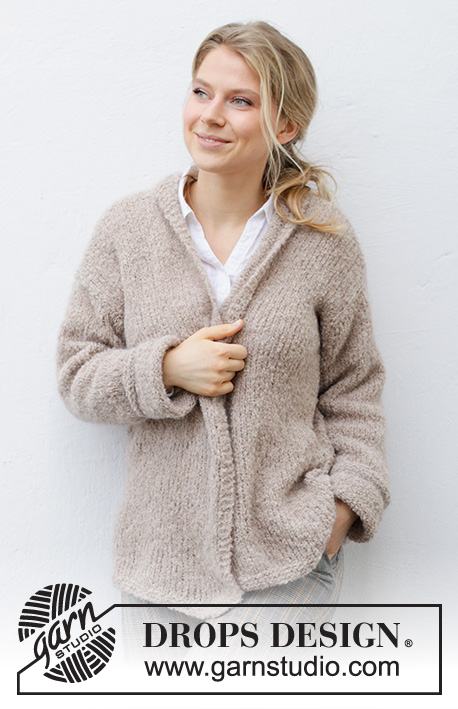
Knitted jacket in DROPS Alpaca Bouclé and DROPS Kid-Silk. The piece is worked in stocking stitch with a small shawl-collar and turn-ups on the sleeves. Sizes XS - XXL.
DROPS 215-36 |
||||
|
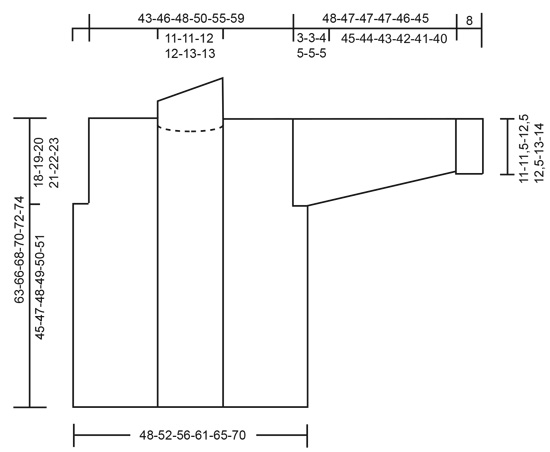
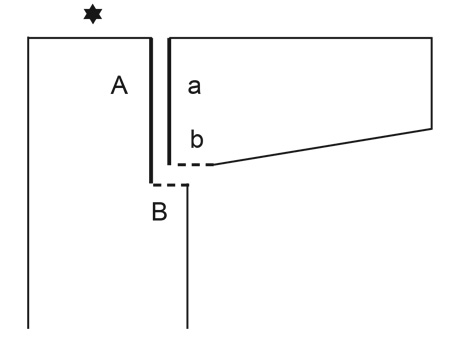
------------------------------------------------------- EXPLANATIONS FOR THE PATTERN: ------------------------------------------------------- RIDGE/GARTER STITCH (worked back and forth): Knit all rows. 1 ridge in height = Knit 2 rows. MEASURING TIP: All widths are taken with the piece lying flat and without stretching. All lengths are taken holding the piece up or the jacket will be too long when worn. INCREASE TIP (for sides of sleeves): Increase 1 stitch on the inside of the 2 edge stitches by making 1 yarn over. On the next row work the yarn over twisted to avoid a hole. Then work the new stitch in stocking stitch. CASTING-OFF TIP: To avoid the cast-off edge being tight you can cast off with a larger size needle. If the edge is still tight, make 1 yarn over after approx. each 4th stitch at the same time as casting off and the yarn overs are cast off as normal stitches. ------------------------------------------------------- START THE PIECE HERE: ------------------------------------------------------- JACKET – SHORT OVERVIEW OF THE PIECE: The whole garment is worked with 1 strand of each quality (2 strands). The back/front pieces and the sleeves are worked separately, back and forth with circular needle and bottom up. The garment is then sewn together as described in the text. BACK PIECE: Cast on 62-68-73-79-85-91 stitches with circular needle size 7 mm and 2 strands Kid-Silk and 1 strand Alpaca Bouclé (= 3 strands). Remove 1 of the strands of Kid-Silk (the rest of the back piece is worked with 1 strand of each quality; casting on with 3 strands prevents the cast-on edge being tight). Change to circular needle size 6 mm and work 3 RIDGES back and forth – read description above. Change back to circular needle size 7 mm and work stocking stitch back and forth with 2 edge stitches in garter stitch on each side. REMEMBER THE KNITTING TENSION! When the piece measures 45-47-48-49-50-51 cm – read MEASURING TIP, cast off 3-4-5-7-7-7 stitches for the armholes at the beginning of the next 2 rows = 56-60-63-65-71-77 stitches. Continue as before with 1 edge stitch in garter stitch on each side. When the piece measures 61-64-66-68-70-72 cm, cast off the middle 10-10-11-11-13-13 stitches for the neck and each shoulder is finished separately. Continue working as before and cast off 2 stitches on the next row from the neck = 21-23-24-25-27-30 stitches on the shoulder. Continue until the piece measures 63-66-68-70-72-74 cm. Loosely cast off with knit from the right side – read CASTING-OFF TIP! Work the other shoulder in the same way. RIGHT FRONT PIECE: Cast on 34-37-39-42-45-48 stitches with circular needle size 7 mm and 2 strands Kid-Silk and 1 strand Alpaca Bouclé (= 3 strands). Remove 1 of the strands of Kid-Silk (the rest of the front piece is worked with 1 strand of each quality). Change to circular needle size 6 mm and work 3 ridges back and forth. Change back to circular needle size 7 mm and work stocking stitch back and forth with 2 edge stitches in garter stitch towards the side and 3 edge stitches in garter stitch towards mid front. When the piece measures 45-47-48-49-50-51 cm, cast off 3-4-5-7-7-7 stitches for the armhole at the beginning of the next row from the wrong side = 31-33-34-35-38-41 stitches. Continue as before with 1 edge stitch in garter stitch towards the armhole and 3 edge stitches in garter stitch towards mid front. When the piece measures 63-66-68-70-72-74 cm, cast off for the shoulder as follows, on the next row from the wrong side: Cast off the first 21-23-24-25-27-30 stitches and knit the remaining 10-10-10-10-11-11 stitches = collar. The collar is worked as described below. RIGHT COLLAR: = 10-10-10-10-11-11 stitches. Keep the stitches on circular needle size 7 mm. Start from the right side and work ridges back and forth with 1 strand of each quality as follows: * Work 2 ridges over all stitches, work 1 ridge over just the first 6-6-6-6-7-7 stitches towards mid front *, work from *-* until the collar measures 7-7-8-8-8-8 cm on the inside, where it is shortest. Loosely cast off with knit from the right side. LEFT FRONT PIECE: Cast on 34-37-39-42-45-48 stitches with circular needle size 7 mm and 2 strands Kid-Silk and 1 strand Alpaca Bouclé (= 3 strands). Remove 1 of the strands of Kid-Silk (the rest of the front piece is worked with 1 strand of each quality). Change to circular needle size 6 mm and work 3 ridges back and forth. Change back to circular needle size 7 mm and work stocking stitch back and forth with 2 edge stitches in garter stitch towards the side and 3 edge stitches in garter stitch towards mid front. When the piece measures 45-47-48-49-50-51 cm, cast off 3-4-5-7-7-7 stitches for the armhole at the beginning of the next row from the right side = 31-33-34-35-38-41 stitches. Continue as before with 1 edge stitch in garter stitch towards the armhole and 3 edge stitches in garter stitch towards mid front. When the piece measures 63-66-68-70-72-74 cm, cast off for the shoulder as follows, on the next row from the right side: Cast off the first 21-23-24-25-27-30 stitches and knit the remaining 10-10-10-10-11-11 stitches = collar. The collar is worked as described below. LEFT COLLAR: = 10-10-10-10-11-11 stitches. Keep the stitches on circular needle size 7 mm. Start from the wrong side and work ridges back and forth with 1 strand of each quality as follows: * Work 2 ridges over all stitches, work 1 ridge over just the first 6-6-6-6-7-7 stitches towards mid front *, work from *-* until the collar measures 7-7-8-8-8-8 cm on the inside, where it is shortest. Knit 1 row from the wrong side. Loosely cast off with knit from the right side. SLEEVE: Cast on 28-30-32-32-34-36 stitches with circular needle size 7 mm and 2 strands Kid-Silk and 2 strands Alpaca Bouclé (= 4 strands). Remove 1 strand of each quality (the rest of the sleeve is worked with 1 strand of each quality; casting on with 4 strands avoids the cast-on edge being tight). Change to circular needle size 6 mm and work 3 ridges back and forth. Change back to circular needle size 7 mm and purl 1 row from the right side with 1 edge stitch in garter stitch on each side. Continue with stocking stitch (knit from right side, purl from wrong side) and 1 edge stitch in garter stitch on each side. When the sleeve measures 8 cm, insert 1 marker in each side. These mark where the sleeve will be turned up; the piece is now measured from these markers. Continue with stocking stitch and 1 edge stitch in garter stitch on each side. When the piece measures 9 cm from the markers increase 1 stitch on each side – read INCREASE TIP. Increase like this every 4-3½-3½-3-2½-2½ cm a total of 9-10-10-11-12-12 times on each side = 46-50-52-54-58-60 stitches. When the sleeve measures 45-44-43-42-41-40 cm from the markers insert 1 new marker in each side. These mark where the bottom of the armhole starts. Continue working until the sleeve measures 48-47-47-47-46-45 cm from the markers at the bottom of the sleeve. Loosely cast off with knit from the right side – read CASTING-OFF TIP! The whole sleeve measures approx. 56-55-55-55-54-53 cm from the cast-on to the cast-off edge. Work the other sleeve in the same way. ASSEMBLY: Sew the shoulder seams inside the cast-off edge. Sew in the sleeves inside the 1 edge stitch and sew the bottom of the armholes – the markers inserted in each side at the top of the sleeves should match the sides of the body. Sew the sleeve and side seams in one go – sew in the outermost loop of the outermost stitch so the seam is flat. Sew the collar together mid back; make sure the seam turns to the wrong side when the collar is turned down. Sew the collar to the neck. Turn up the bottom 8 cm on each sleeve and sew down with a couple of small stitches if necessary. |
||||
Diagram explanations |
||||
|
||||
 |
||||
 |
||||
Have you finished this pattern?Tag your pictures with #dropspattern #goodbookcardigan or submit them to the #dropsfan gallery. Do you need help with this pattern?You'll find 21 tutorial videos, a Comments/Questions area and more by visiting the pattern on garnstudio.com. © 1982-2026 DROPS Design A/S. We reserve all rights. This document, including all its sub-sections, has copyrights. Read more about what you can do with our patterns at the bottom of each pattern on our site. |
||||


With over 40 years in knitting and crochet design, DROPS Design offers one of the most extensive collections of free patterns on the internet - translated to 17 languages. As of today we count 324 catalogues and 12290 patterns translated into English (UK/cm). 12290
We work hard to bring you the best knitting and crochet have to offer, inspiration and advice as well as great quality yarns at incredible prices! Would you like to use our patterns for other than personal use? You can read what you are allowed to do in the Copyright text at the bottom of all our patterns. Happy crafting!
Post a comment to pattern DROPS 215-36
We would love to hear what you have to say about this pattern!
If you want to leave a question, please make sure you select the correct category in the form below, to speed up the answering process. Required fields are marked *.