
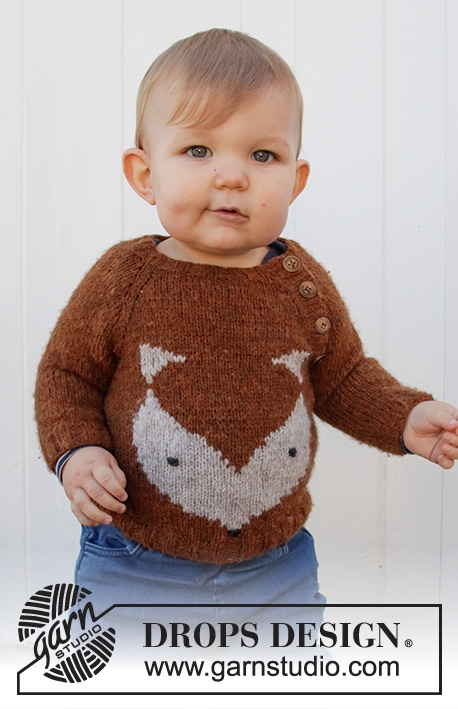
Popular categories
Looking for a yarn?


Comments / Questions (94)
![]() Hannah wrote:
Hannah wrote:
Thanks for the very cute free pattern. Although, this seems a very odd shape! I followed the pattern exactly and the legs are alarmingly long compared to the torso. I see that the cuffs are turned up in the modelled pictures, but still. I made the 1-3 months size. Are the rest like this?
17.03.2024 - 22:25DROPS Design answered:
Dear Hanna, please check your knitting gauge, and compare your piece to the measurements given on the schematic drawing at the bottom of the pattern. At the same time, we have to note that the legs are intentionally longer than usual, because they are turned up, so the garnment fits the small ones for longer time. Happy Knitting!
17.03.2024 - 22:55
![]() Marita wrote:
Marita wrote:
Hei! Jeg har kommet til dette punktet i oppskriften: «Strikk 1 omgang rett og juster maskeantallet til (95) 115-120-140-145 (160-165) masker (dvs det økes (0) 3-0-4-1 (4-1) masker og felles (1) 0-0-0-0 (0-0) maske).» Spørsmålet mitt er nå i dette tilfellet ang størrelse 3/4 år, men er like gjeldene for de andre gangene det skal økes (og den ene fellingen). Hvor skal økningene skje for at det skal stemme ut videre i oppskriften?
10.02.2024 - 21:27DROPS Design answered:
Hei Marita, I størrelsen 3/4 år øker du bare 1 maske (ingen felte masker). Denne masken kan økes på begynnelsen av omgangen. God fornøyelse!
12.02.2024 - 08:17
![]() Nele wrote:
Nele wrote:
2 vragen; 1; Plaats je de markeerder in tweede pijp in spiegelbeeld t.o.v. de eerste pijp? 2; komt de markeerder na het verplaatsen in het midden van de pijp uit? Volgens de instucties namelijk niet (maat 80/86); na het meerderen heb ik 8 van de 70 steken rechts van de markeerder, dus als ik 35 steken verplaats heeft de markeerder 27 steken enerzijds en 43 steken anderzijds. Wat is de bedoeling?
15.01.2024 - 14:35
![]() Katharina wrote:
Katharina wrote:
Hallo, ich habe leider meinen Markierer für die hintere Mitte verloren, haben Sie vielleicht einen Tipp, wie ich die richtige Stelle abmessen kann, um Rücken- und Vorderteil korrekt zu platzieren? Liebe Grüße Katharina
06.12.2023 - 18:03DROPS Design answered:
Liebe Katharina, legen Sie die Arbeit flach und zählen Sie die Maschen so daß die hintere Mitte ist zwischen die beiden Markierungen an den Seiten. Viel Spaß beim stricken!
07.12.2023 - 08:31
![]() Helen wrote:
Helen wrote:
Je veux faire ce modèle mais pour une taille 3-6 mois. Comment je peux convertir votre modèle ? Merci
22.11.2023 - 16:34DROPS Design answered:
Bonjour Helen, nos modèles sont généralement disponibles uniquement soit en 1/3 mois soit en 6/9 mois; pour vous aider à mieux choisir la taille, vérifiez les mesures d'après le schéma en bas de page - retrouvez plus d'infos sur les tailles ici. Bon tricot!
23.11.2023 - 08:25
![]() Ilona wrote:
Ilona wrote:
Buonasera. Parlate di Ferri a doppia punta all inizio della gambina. Ma mi sembra di capire che devo lavorare in tondo. Sbaglio?
03.08.2023 - 19:45DROPS Design answered:
Buonasera Ilona, si, corretto, si lavora in tondo. Buon lavoro!
03.08.2023 - 20:26
![]() Lisa wrote:
Lisa wrote:
Hi, ich bin mit der Erhöhung fertig. Für mich ist unklar, wann die Teilung in Vorder- und Rückseite erfolgt. In einem Kommentar von 2020 steht, dass dies am Ende vom Abschnitt "Hose" erklärt wird, dieser Teil scheint aber nicht mehr in der Anleitung so vorhanden zu sein. Vielen Dank!
15.05.2023 - 00:00DROPS Design answered:
Liebe Lisa, wenn alle verkürzten Reihen fertig sind, stricken Sie 1 Reihe bis Anfang der Runde. Dann stricken Sie 1 Runde mit Zu- oder Abnahmen (siehe Größe) und dann wird der Anfang der Runde verschoben, so daß Vorderteil und Rückenteil richtig passen; stricken Sie dann 4 cm Rippenmuster und dann wird die Arbeit für Vorder- und Rückenteil verteilt. Viel Spaß beim stricken!
15.05.2023 - 09:00
![]() Kristina wrote:
Kristina wrote:
When increasing the stitch on the legs, does the marker stay where it is after the increase or move to back to the beginning of the round?
28.04.2023 - 12:07DROPS Design answered:
Dear Kristina, you work 1 yarn over before the last stitch on the round and after the first stitch in the round, so you shouldn't move the marker; otherwise the next increases would be misaligned. Only move the marker when it specifies so, later in the paragraph. Happy knitting!
30.04.2023 - 21:50
![]() Fleur wrote:
Fleur wrote:
Beste, Wat een ontzettend leuk patroon en fijne uitleg! Enkel aan het einde kom ik er niet uit. Bij het afkanten van het voorpand na twee ribbels, loopt het voorpand heel breed uit. Dit is natuurlijk doordat het hele deel ervoor in boordsteek is gebreid, maar bij het dragen blijft dit bovenste deel ‘flubberig’. Is het mogelijk om dmv minderen dit laatste deel (twee ribbels en afkanten) beter aan te laten sluiten op de rest van het voorpand? Met hartelijke groet!
17.03.2023 - 15:52DROPS Design answered:
Dag Fleur,
Wat je zou kunnen doen is steken minderen vlak voordat je de ribbels gaat breien. Bijvoorbeeld alle 2 averechte steken samenbreien. Het kan ook helpen om de bovenkant een beetje op te persen. Dit doe je door een natte theedoek erover te leggen en zeer voorzichtig te deppen op dat gebied. Let erop dat je dit heel voorzichtig doet, anders verniel je de structuur van het breiwerk.
19.03.2023 - 16:51
![]() Emma wrote:
Emma wrote:
Ich habe eine Frage bzgl. Der Knopflöcher. Muss ich nur eine Reihe mit Umschlag und Zusammenstricken machen? Oder mehrere? Und nur in der Hinreise jeweils? Wie Stricke ich dann in der Rückreihe? Was mache ich dann mit dem Umschlag? Danke für eine kurze Antwort.
12.03.2023 - 21:23DROPS Design answered:
Liebe Emma, dieses Video zeigt, wie man so ein Knopfloch strickt (2 M rechts zusammen, 1 Umschlag), bei der Rückreihe stricken Sie die Maschen wie zuvor, Umschläge stricken Sie in der vordere Maschenglied, damit ein Loch ensteht. Viel Spaß beim stricken!
13.03.2023 - 10:26
|
||||
Afternoon Playdate#afternoonplaydatejumpsuit |
||||
 |
 |
|||
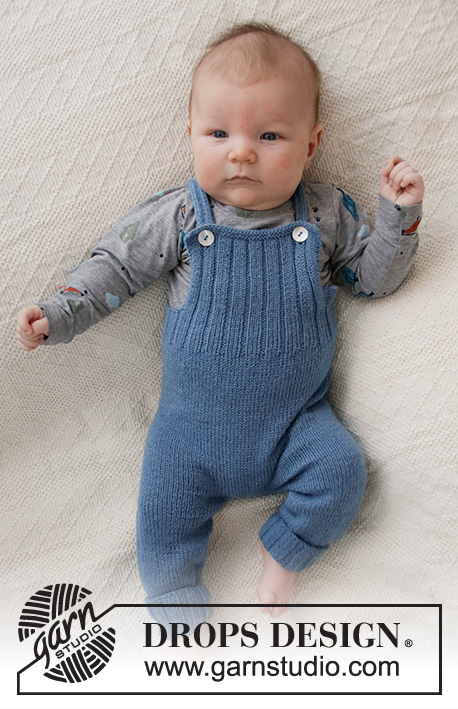
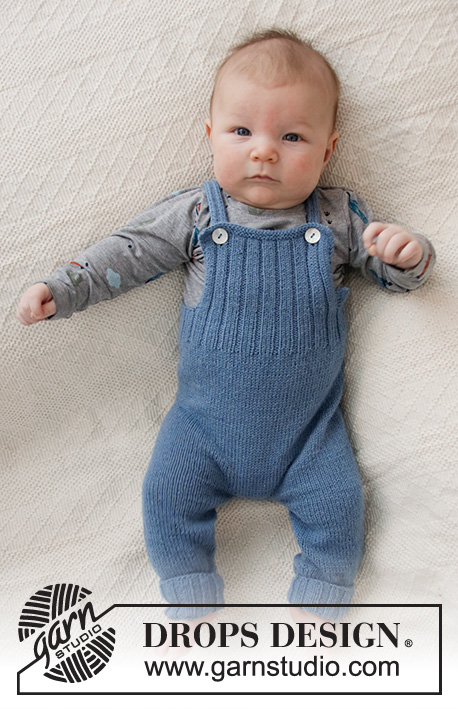
Knitted jumpsuit for babies in DROPS Flora. The piece is worked with rib and stocking stitch. Sizes: Premature – 4 years.
DROPS Baby 36-4 |
||||
|
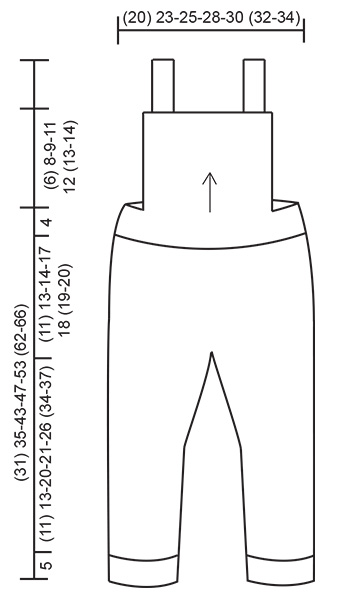
------------------------------------------------------- EXPLANATIONS FOR THE PATTERN: ------------------------------------------------------- RIDGE/GARTER STITCH (worked back and forth): 1 ridge in height = Knit 2 rows. INCREASE TIP (for sides of legs): Work until there is 1 stitch left before the marker, 1 yarn over, knit 2 (marker sits between these 2 stitches), 1 yarn over. On the next round knit the yarn overs twisted to avoid holes. Then work the new stitches in stocking stitch. DECREASE TIP: Decrease 1 stitch on each side of the marker as follows: Work until there are 3 stitches left before the marker, knit 2 together, knit 2 (marker sits between these 2 stitches), slip 1 stitch as if to knit, knit 1, pass the slipped stitch over the knitted stitch. Decrease like this at both markers. ------------------------------------------------------- START THE PIECE HERE: ------------------------------------------------------- TROUSERS – SHORT OVERVIEW OF THE PIECE: Each leg is worked separately with double pointed needles before putting them together and casting on stitches for the crutch. The piece is continued in the round with short circular needle. Front and back pieces are worked back and forth. LEG: Cast on (40) 44-48-48-56 (60-64) stitches with double pointed needles size 2.5 mm and Flora. Knit 1 round. Then work rib (= knit 2, purl 2). When the piece measures 5 cm, change to double pointed needles size 3 mm and continue with stocking stitch. Insert 1 marker at the beginning of the round. Allow the marker to follow your work onwards; it marks the inside of the leg and will be used when increasing later. REMEMBER THE KNITTING TENSION! When the piece measures (8) 7-7-7-6 (8-10) cm, increase 1 stitch on each side of the marker – read INCREASE TIP (= 2 stitches increased). Increase like this every (5) 2-2-2-3 (4-5) cm a total of (2) 6-9-10-9 (8-7) times = (44) 56-66-68-74 (76-78) stitches. Work stocking stitch until the piece measures (16) 18-25-26-31 (39-42) cm. Move the marker (22) 28-33-34-37 (38-39)) stitches (= outside of leg). Allow the marker to follow your work onwards; it marks the outside of the leg and will be used when decreasing later. Cut the strand. Work the other leg in the same way. JUMP SUIT: Now place both legs on circular needle size 3 mm and continue in the round as follows: Cast on (4) 4-4-6-6 (8-8) stitches, work the stitches from the one leg, cast on (4) 4-4-6-6 (8-8) stitches and work the stitches from the other leg = (96) 120-140-148-160 (168-172) stitches. The round starts mid-back, between the first (4) 4-4-6-6 (8-8) stitches. Continue in the round with stocking stitch. When the piece measures 2 cm from where the legs were joined, decrease (0) 1-1-1-1 (1-1) stitch on each side of both markers – read DECREASE TIP. Decrease like this every (0) 8-3-6-4 (8-10) cm a total of (0) 2-5-3-4 (3-2) times = (96) 112-120-136-144 (156-164) stitches. Work stocking stitch until the piece measures (11) 13-14-17-18 (19-20) cm from the join. Now work an elevation at the back as follows: Knit (7) 7-9-9-9 (9-9), turn, tighten the strand and purl (14) 14-18-18-18 (18-18) stitches, turn, tighten the strand and knit (20) 20-26-26-26 (26-26) stitches, turn, tighten the strand and purl (26) 26-34-34-34 (34-34) stitches back. Continue like this, working (6) 6-8-8-8 (8-8) more stitches each time you turn and until you have worked over a total of (50) 50-66-66-82 (82-82) stitches. Turn, work to beginning of the round (= mid back). Knit 1 round and adjust the number of stitches to (95) 115-120-140-145 (160-165) stitches (i.e. increase (0) 3-0-4-1 (4-1) stitches and decrease (1) 0-0-0-0 (0-0) stitch). To make sure the front piece and back piece are placed correctly, the start of the round is now displaced as follows: Move size premature: Knit until 1 stitch remains on round, now round starts here. Move size 0/1 - 1/3 - 6/9 - 12/18 months (2 - 3/4) years: Knit 1, now round starts here. Change to short circular needle size 2.5 mm. Work as follows in all sizes: Work rib (= purl 2, knit 3) over all stitches. When the rib measures 4 cm, cast off stitches as follows: Purl 2, knit 3, purl 2, knit 3, work 1 stitch in GARTER STITCH – read description above, cast off the next (19) 24-24-34-34 (39-39) stitches, work 2 stitches in garter stitch, continue with rib over the next (33) 38-43-43-48 (53-58) stitches, work 2 stitches in garter stitch (= front piece), cast off the next (19) 24-24-34-34 (39-39) stitches, work 1 stitch in garter stitch and work rib over the remaining (8) 13-13-13-13 (13-13) stitches. BACK PIECE: = (20) 25-25-25-25 (25-25) stitches. Continue back and forth with rib and 1 edge stitch in garter stitch on each side until the piece measures (2) 3-3-4-4 (5-5) cm from the division. The next row is worked as follows: Work 1 stitch in garter stitch, knit 3, purl 2, knit 3, 1 stitch in garter stitch, cast off the next (0) 5-5-5-5 (5-5) stitches, work 1 stitch in garter stitch, knit 3, purl 2, knit 3 and 1 stitch in garter stitch = 10 stitches left for each shoulder strap. SHOULDER STRAP: Continue with rib and 1 edge stitch in garter stitch on each side, back and forth until the strap measures approx. 18-24 cm (or to desired length). Cast off and repeat on the other side. FRONT PIECE: = (37) 42-47-47-52 (57-62) stitches. Continue back and forth with rib and 2 edge stitches in garter stitch on each side until the piece measures (4) 6-7-9-10 (11-12) cm, work 2 buttonholes from the right side as follows: Work 2 stitches in garter stitch, knit 3, purl 2, knit 2 together, 1 yarn over, work as before until there are 10 stitches left, knit 2 together, 1 yarn over, knit 1, purl 2, knit 3, 2 stitches in garter stitch. When the piece measures (5) 7-8-10-11 (12-13) cm, change to circular needle size 2.5 mm and work 2 ridges over all stitches. Cast off. ASSEMBLY: Sew together the stitches in the crutch. Sew 1 button on each strap. |
||||
Diagram explanations |
||||
|
||||
 |
||||
Have you finished this pattern?Tag your pictures with #dropspattern #afternoonplaydatejumpsuit or submit them to the #dropsfan gallery. Do you need help with this pattern?You'll find 26 tutorial videos, a Comments/Questions area and more by visiting the pattern on garnstudio.com. © 1982-2026 DROPS Design A/S. We reserve all rights. This document, including all its sub-sections, has copyrights. Read more about what you can do with our patterns at the bottom of each pattern on our site. |
||||


With over 40 years in knitting and crochet design, DROPS Design offers one of the most extensive collections of free patterns on the internet - translated to 17 languages. As of today we count 324 catalogues and 12291 patterns translated into English (UK/cm). 12291
We work hard to bring you the best knitting and crochet have to offer, inspiration and advice as well as great quality yarns at incredible prices! Would you like to use our patterns for other than personal use? You can read what you are allowed to do in the Copyright text at the bottom of all our patterns. Happy crafting!
Post a comment to pattern DROPS Baby 36-4
We would love to hear what you have to say about this pattern!
If you want to leave a question, please make sure you select the correct category in the form below, to speed up the answering process. Required fields are marked *.