
Popular categories
Looking for a yarn?


Comments / Questions (20)
![]() Patrice wrote:
Patrice wrote:
Bonjour, quand je parle d’une fentes dans le dos, je pense à la veste, pas au gilet sans manche. Je ne comprends pas ce que viens faire cette fente au milieu du dos
23.12.2025 - 19:14DROPS Design answered:
Bonjour Patrice, c'est une simple fente au milieu du dos comme dans des vestes type tailleur; cette fente mesure entre 16 et 18 cm de hauteur selon les tailles, puis on va réunir les 2 moitiés de la veste et monter 3 mailles entre les 2 côtés (au-dessus des 3 mailles rabattues côté milieu dos au dernier rang de chaque partie). Bon tricot!
02.01.2026 - 12:07
![]() Patrice wrote:
Patrice wrote:
Bonjour, pourquoi y a t il une fente au milieu dos, et n'existe il pas une photo pour la visualiser ? D’avance merci .
23.12.2025 - 15:13DROPS Design answered:
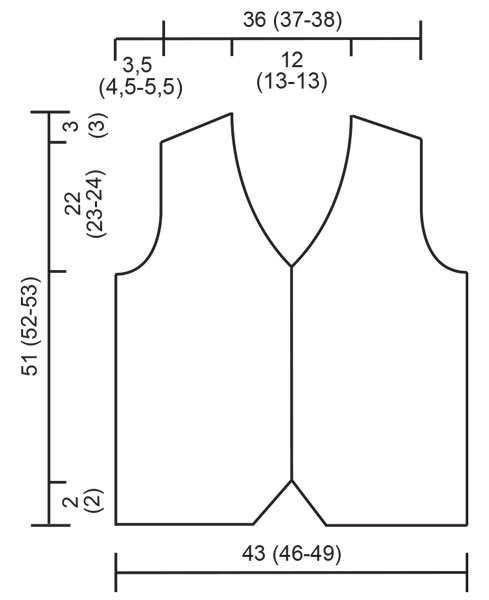
Bonjour Patrice, il n'y a pas de fente au milieu dos pour le gilet sans manches, on augmente seulement de chaque côté pour les devants. Bon tricot!
23.12.2025 - 17:44
![]() Joelle wrote:
Joelle wrote:
Merci pour cette réponse si rapide !
28.11.2025 - 09:32
![]() Joelle wrote:
Joelle wrote:
Je ne comprends pas la correction apportée au gilet. Où dois-je augmenter devant le nombre de mailles au point mousse ? Merci par avance Le modèle est très beau et j'adore karisma, une laine qui fait toujours de belles choses
28.11.2025 - 07:58DROPS Design answered:
Bonjour Joelle, la correction ne s'applique que si vous aviez imprimé les explications avant la date de cette correction, autrement les corrections sont déjà faites dans le texte. Ce sont les mailles de la bordure devant que l'on va augmenter pour former le col, vous allez augmenter le nombre de mailles au point mousse en en tricotant 1 en plus tous les 4 rangs (vous aurez ainsi 1 m en moins de M.1 tous les 4 rangs). Bon tricot!
28.11.2025 - 08:27
![]() Gilly Reece-Jones wrote:
Gilly Reece-Jones wrote:
I would like to make the Scolarly Set vest pattern but I can only find the cardigan pattern. Is it still available?
04.11.2025 - 14:01DROPS Design answered:
Hi Gilly, scroll down, the vest pattern is below the cardigan. Happy knitting!
27.11.2025 - 22:52
![]() Ulrike Holtmann wrote:
Ulrike Holtmann wrote:
Mit der Anleitung habe ich leider immer wieder Probleme. Einiges reime ich mir dann aber doch zusammen. Das gilt auch für die folgenden Frage. Sicherheitshalber hätte ich aber doch gern eine Antwort. Was heißt "innerhalb der Krausrippen abnehmen".
12.08.2025 - 14:08DROPS Design answered:
Liebe Frau Holtmann, beim Rückenteil z.B. wenn mann innerhlab der 3 Krausrippen abnehmen muss, wird man nach den 3 ersten Maschen (die krausrechts gestrickt sind) sowie vor den 3 letzten Maschen (die auch krausrechts gestrickt sind) abnehmen. Bei den Vorderteilen nehmen Sie dann für den Halsausschnitt nach den 6 ersten Maschen beim rechten Vorderteil / vor den 6 ersten Maschen beim linken Vorderteil. Viel Spaß beim Stricken!
12.08.2025 - 16:08
![]() Ulrike Holtmann wrote:
Ulrike Holtmann wrote:
Sorry, aber ich komme mit der Anleitung einfach nicht klar. Hier meine dritte Frage. Wenn beim Muster 1 die Maschenanzahl teilbar durch 2 sein muss warum soll ich denn eine ungerade Maschenanzahl aufnehmen? Bei der Weste sind zum Beispiel für den Maschenanschlag 181/191/207 M für Größe S angegeben.
06.08.2025 - 13:05DROPS Design answered:
Liebe Frau Holtmann, so wird das Muster genauso anfangen/enden so ist es symmetrisch. Nach Armausschnitte ist die Maschenanzahl auch wieder ungerade. Viel Spaß beim Stricken!
06.08.2025 - 16:19
![]() Ulrike Holtmann wrote:
Ulrike Holtmann wrote:
?????? diesen Teil der Anleitung verstehe ich gar nicht. Linkes Vorderteil: Wie das rechte Vorderteil jedoch wie folgt für den Hals abn.: Auf der rechten Seite wie folgt abn.: 2 re. zusammennähen. Auf der linken Seite wie flolgt: 2 li. zusammennähen.
06.08.2025 - 10:54DROPS Design answered:
Liebe Frau Holtmann, hier sollte man "stricken" anstatt "nähen" lesen, eine Korrektur erfogt, danke für den Hinweis. So wird man hier anstatt 2 Maschen rechts / links zusammenstricken. Viel Spaß beim Stricken!
06.08.2025 - 16:04
![]() Ulrike Holtmann wrote:
Ulrike Holtmann wrote:
Frage: Folgendes verstehe ich überhaupt nicht. Ich weiß leider nicht wie ich das stricken soll. Bitte helfen sie mir, Gleichzeitig innerhalb der 6 Blendenm aufnehmen: 1 M. x 12 (12-12) = 205 (215-231) M. Die neuen Maschen werden nach und nach ins Muster eingestrickt. Soll ich vielleicht jede zweite Reihe vor bzw nach der Blende 1M zunehmen. Mit besten Grüßen U. Holtmann
05.08.2025 - 20:04DROPS Design answered:
Liebe Frau Holtmann, diese Zunahmen stricken Sie in jeder Reihe, dh bei den Hin- sowie bei den Rückreihen jeweils am Anfang der Reihe nach den 6 Blenden-Maschen und am Ende der Reihe vor den 6 Blenden-Maschen. Wenn alle Zunahmen fertig sind, haben Sie 12 Reihen gestrickt. Viel Spaß beim Stricken!
06.08.2025 - 07:49
![]() Kieselbach, Kirsten wrote:
Kieselbach, Kirsten wrote:
Guten Tag, ich möchte Modell 58-1 gern stricken, allerdings ist mein Hüftumfang breiter als die Angaben auf dem Schnittmuster für large. Statt 49cm x 2, habe ich 52cm x 2 für Vorder- und Rückenteil insgesamt 104cm. Kann ich die Weste trotzdem stricken und einfach mehr Maschen anschlagen? Freundliche Grüße Kirsten Kieselbach
08.05.2025 - 11:31DROPS Design answered:
Liebe Frau Kieselbach, in die grössere Größe sind es 49 cm / 98 cm Umfang - wenn Sie aber kein negativ Ease möchten, dann sollen Sie am besten die Anleitung nach den gewünschten fertigen Maßnahmen anpassen. Viel Spaß beim Stricken!
08.05.2025 - 13:28
|
|
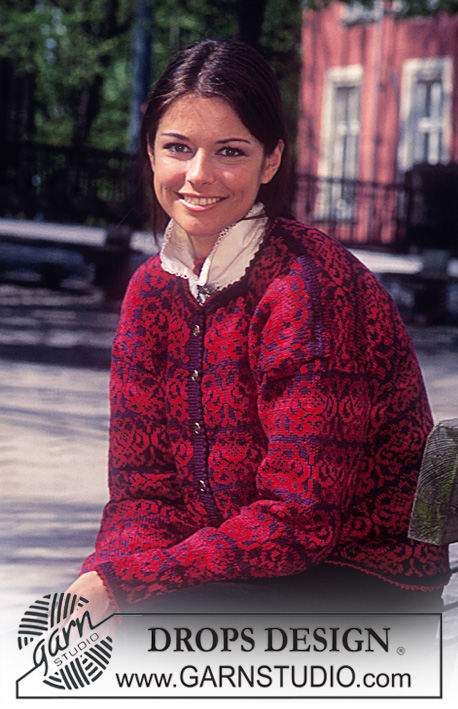
Scholarly Set |
|
 |
 |
DROPS Cardigan in Karisma Superwash.
DROPS 58-1 |
|
|
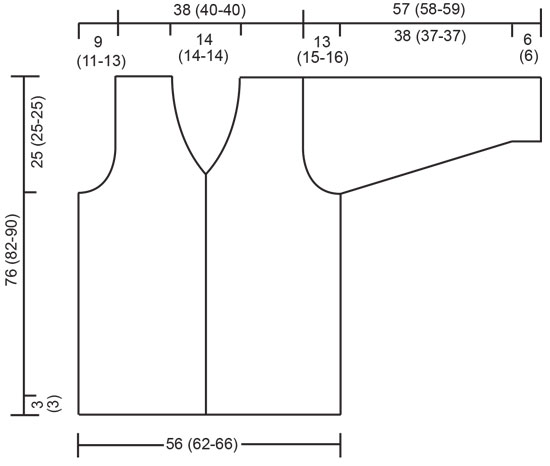
Gauge: 22 sts and 30 rows on larger needles in Pattern 1 = 10 x 10 cm . Pattern 1: The pattern is divisible by 2 sts. Row 1 (right side): knit all sts. Row 2 (wrong side): * knit 1, purl 1 * Row 3: knit all sts. Row 4 (wrong side): * knit 1, purl 1 * Repeat these four rows. Garter st, when knitting flat: Knit all sts all rows. Garter st, when knitting in the round: *Rnd 1, knit. Rnd 2, purl *. Repeat from * - *. Rib: * Knit 1, purl 1 *. Repeat from * - *. Buttonholes: When the work measures 2 (2-2) cm , 13 (14-13) cm , 24 (26-24) cm , 35 (38-36) cm , 46 (50-47) cm , 56 (62-58) cm , X (X-70) cm , make buttonholes on the right front as follows: Bind off the 4th and 5th sts and cast on 2 new sts over the bound-off sts on the next row. Pocket lining (Knit 2): Cast on 32 sts on larger double pointed needles with gray and knit stockinette st for 24 cm . Put sts on a st holder. BODY Right side piece: There is a split at the center back, so the cardigan body is knit in two parts for the first 16 (17-18) cm. Cast on 132 (146-154) sts on larger needles and knit 16 rows in garter st. Begin Pattern 1 (see instructions above) with 6 sts in garter st at the center front for the button band and 3 sts in garter st at the center back. Remember to make buttonholes on the right front (see instructions above). When the work measures 16 (17-18) cm bind off the 3 sts in garter st at the center back and put the work aside. Left side piece: Cast on and knit like the right side piece, but reverse all shaping. Put both side pieces on the same needles so that the 3 st garter st sections are together at the center of the row, and cast on 3 sts at the center back between the side pieces = 261 (289-305) sts. Continue in Pattern 1. When the work measures 20 (25-27) cm , with right side facing and keeping in Pattern stitch, knit the next row as follows: Knit 18 (18-20) sts, put 32 sts on a stitch holder, knit until 50 (50-52) sts remain, put 32 sts on a stitch holder, knit 18 (18-20) sts. On the next row put the pocket lining in on the needle in the opening over the 32 sts on the stitch holder. Continue with the pattern. When the work measures 51 (57-65) cm , knit the next row as follows: 66 (73-77) sts for the front, bind off 4 sts for armhole, 121 (135-143) sts for the back, bind off 4 sts for armhole, 66 (73-77) sts for the front. Knit the rest of each part separately from this point. Fronts: 66 (73-77) sts. Keep the center front 6 sts in garter st for the button band. Bind off for armholes every other row: 3 sts 3 (4-4) times, 2 sts 4 (4-6) times, 1 st 2 (3-3) times. 47 (50-50) sts. When the work measures 56.5 (62.5-70.5) cm , or two rows of garter st after the last buttonhole, shape the collar: increase the number of sts worked in garter st in the button band and dec the number of sts worked in Pattern 1 as follows: 1 st every 4th row until there are 21 (21-21) sts in garter st including the 6 sts for the button band. Work even until the work measures 76 (82-90) cm , then bind off the 26 (29-29) shoulder sts. Continue in garter st over the remaining 21 (21-21) sts for 7 cm more, bind off. Back: 121 (135-143) sts. Bind off for armholes as for front = 83 (89-89) sts. When the work measures 74 (80-88) cm , bind off the center 27 (27-27) sts for the neck. Bind off 2 sts at each neck edge on the next row. Bind off when the work measures 76 (82-90) cm . Sleeves: Cast on 64 (68-68) sts on larger double pointed needles. Join, being careful not to twist the sts. Place a marker at the join and knit 12 cm in garter st. This section will be folded over double later and is measured as 6 cm . Knit Pattern 1 and at the same time inc 1 st on each side of the marker 21 (19-19) times every 5th row. Knit the increased sts into Pattern 1. 106 (106-106) sts. When the work measures 44 (43-43) cm (remember to measure the garter st section as 6 cm ), bind off 2 sts on each side of marker and knit the rest back and forth on the needles. Bind off for sleeve caps on each side every other row: 1 st 10 (12-12) times, 2 sts 7 (7-9) times, 4 sts 2 (2-2) times. Bind off. The work measures approx. 57 (58-59) cm . Assembly: Sew shoulder seams. Sew the collar together at the center back and sew the collar to the neck. Put the sts from the stitch holder on smaller needles and inc 1 st on the 1st row = 33 sts. Purl 1 row, knit 2 cm rib as follows: knit 1, *knit 1, purl 1*, repeat * - * until 2 sts remain, knit 2. Purl 1 row and bind off in rib. Fold the pocket lining double, sew the edges and then sew the pocket lining to the first row of the ribbing on the pocket. Sew on the sleeves and the buttons. |
|
 |
|
 |
|
Have you finished this pattern?Tag your pictures with #dropspattern or submit them to the #dropsfan gallery. Do you need help with this pattern?You'll find 25 tutorial videos, a Comments/Questions area and more by visiting the pattern on garnstudio.com. © 1982-2026 DROPS Design A/S. We reserve all rights. This document, including all its sub-sections, has copyrights. Read more about what you can do with our patterns at the bottom of each pattern on our site. |
|


With over 40 years in knitting and crochet design, DROPS Design offers one of the most extensive collections of free patterns on the internet - translated to 17 languages. As of today we count 324 catalogues and 12291 patterns translated into English (UK/cm). 12291
We work hard to bring you the best knitting and crochet have to offer, inspiration and advice as well as great quality yarns at incredible prices! Would you like to use our patterns for other than personal use? You can read what you are allowed to do in the Copyright text at the bottom of all our patterns. Happy crafting!
Post a comment to pattern DROPS 58-1
We would love to hear what you have to say about this pattern!
If you want to leave a question, please make sure you select the correct category in the form below, to speed up the answering process. Required fields are marked *.