
Popular categories
Looking for a yarn?


|
|
Scholarly Set |
|
 |
 |
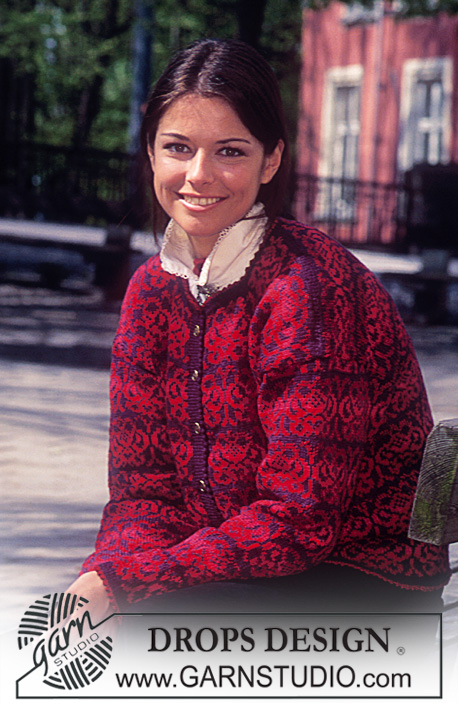
DROPS Cardigan in Karisma Superwash.
DROPS 58-1 |
|
|
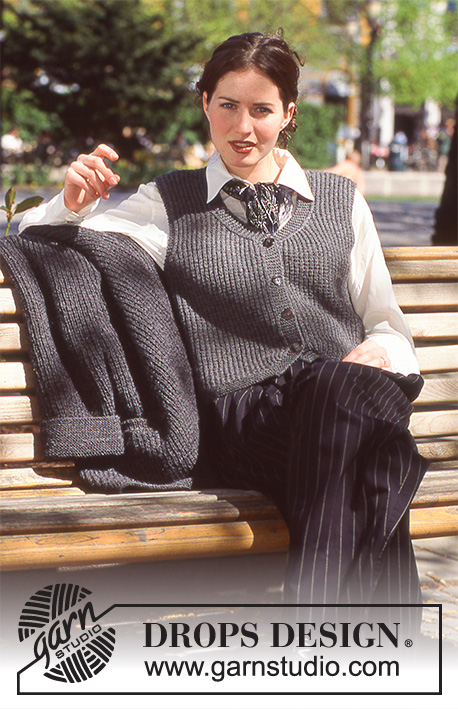
Gauge: 22 sts and 30 rows on larger needles in Pattern 1 = 10 x 10 cm [4" x 4"]. Pattern 1: The pattern is divisible by 2 sts. Row 1 (right side): knit all sts. Row 2 (wrong side): * knit 1, purl 1 * Row 3: knit all sts. Row 4 (wrong side): * knit 1, purl 1 * Repeat these four rows. Garter st, when knitting flat: Knit all sts all rows. Garter st, when knitting in the round: *Rnd 1, knit. Rnd 2, purl *. Repeat from * - *. Rib: * Knit 1, purl 1 *. Repeat from * - *. Buttonholes: When the work measures 2 (2-2) cm [0.75"], 13 (14-13) cm [5-⅛" (5.5" - 5-⅛")], 24 (26-24) cm [9.5" (10.25" - 9.5")], 35 (38-36) cm [13.75" (15" - 14-⅛")], 46 (50-47) cm [ 18-⅛" (19-⅝" - 18.5")], 56 (62-58) cm [22» (24-⅜" - 22-⅞")], X (X-70) cm [X (X-27.5")], make buttonholes on the right front as follows: Bind off the 4th and 5th sts and cast on 2 new sts over the bound-off sts on the next row. Pocket lining (Knit 2): Cast on 32 sts on larger double pointed needles with gray and knit stockinette st for 24 cm [9.5"]. Put sts on a st holder. BODY Right side piece: There is a split at the center back, so the cardigan body is knit in two parts for the first 6.25" (6.75" - 7-⅛"). Cast on 132 (146-154) sts on larger needles and knit 16 rows in garter st. Begin Pattern 1 (see instructions above) with 6 sts in garter st at the center front for the button band and 3 sts in garter st at the center back. Remember to make buttonholes on the right front (see instructions above). When the work measures 16 (17-18) cm [6.25" (6.75" - 7-⅛")] bind off the 3 sts in garter st at the center back and put the work aside. Left side piece: Cast on and knit like the right side piece, but reverse all shaping. Put both side pieces on the same needles so that the 3 st garter st sections are together at the center of the row, and cast on 3 sts at the center back between the side pieces = 261 (289-305) sts. Continue in Pattern 1. When the work measures 20 (25-27) cm [7-⅞" (9-⅞" - 10-⅝")], with right side facing and keeping in Pattern stitch, knit the next row as follows: Knit 18 (18-20) sts, put 32 sts on a stitch holder, knit until 50 (50-52) sts remain, put 32 sts on a stitch holder, knit 18 (18-20) sts. On the next row put the pocket lining in on the needle in the opening over the 32 sts on the stitch holder. Continue with the pattern. When the work measures 51 (57-65) cm [20-⅛" (22.5" - 25-⅝")], knit the next row as follows: 66 (73-77) sts for the front, bind off 4 sts for armhole, 121 (135-143) sts for the back, bind off 4 sts for armhole, 66 (73-77) sts for the front. Knit the rest of each part separately from this point. Fronts: 66 (73-77) sts. Keep the center front 6 sts in garter st for the button band. Bind off for armholes every other row: 3 sts 3 (4-4) times, 2 sts 4 (4-6) times, 1 st 2 (3-3) times. 47 (50-50) sts. When the work measures 56.5 (62.5-70.5) cm [22.25" (24-⅝" - 27.75")], or two rows of garter st after the last buttonhole, shape the collar: increase the number of sts worked in garter st in the button band and dec the number of sts worked in Pattern 1 as follows: 1 st every 4th row until there are 21 (21-21) sts in garter st including the 6 sts for the button band. Work even until the work measures 76 (82-90) cm [29-⅞" (32.25" - 35.5")], then bind off the 26 (29-29) shoulder sts. Continue in garter st over the remaining 21 (21-21) sts for 7 cm [2.75"] more, bind off. Back: 121 (135-143) sts. Bind off for armholes as for front = 83 (89-89) sts. When the work measures 74 (80-88) cm [29-⅛" (31.5" - 34.75")], bind off the center 27 (27-27) sts for the neck. Bind off 2 sts at each neck edge on the next row. Bind off when the work measures 76 (82-90) cm [29-⅞" (32.25" - 35.5")]. Sleeves: Cast on 64 (68-68) sts on larger double pointed needles. Join, being careful not to twist the sts. Place a marker at the join and knit 12 cm [4.75"] in garter st. This section will be folded over double later and is measured as 6 cm [2-⅜"]. Knit Pattern 1 and at the same time inc 1 st on each side of the marker 21 (19-19) times every 5th row. Knit the increased sts into Pattern 1. 106 (106-106) sts. When the work measures 44 (43-43) cm [17-⅜" (16-⅞" - 16-⅞")] (remember to measure the garter st section as 6 cm [2-⅜"]), bind off 2 sts on each side of marker and knit the rest back and forth on the needles. Bind off for sleeve caps on each side every other row: 1 st 10 (12-12) times, 2 sts 7 (7-9) times, 4 sts 2 (2-2) times. Bind off. The work measures approx. 57 (58-59) cm [22.5" (22-⅞" -23.25")]. Assembly: Sew shoulder seams. Sew the collar together at the center back and sew the collar to the neck. Put the sts from the stitch holder on smaller needles and inc 1 st on the 1st row = 33 sts. Purl 1 row, knit 2 cm [0.75"] rib as follows: knit 1, *knit 1, purl 1*, repeat * - * until 2 sts remain, knit 2. Purl 1 row and bind off in rib. Fold the pocket lining double, sew the edges and then sew the pocket lining to the first row of the ribbing on the pocket. Sew on the sleeves and the buttons. VEST: Sizes: Small (Medium-Large) Finished Measurements: 86 (92-98) cm [33.25" (36.25" - 38.5")] Materials: DROPS KARISMA SUPERWASH from Garnstudio 100% Pure New Wool, 50 g = 120 yds. 250 (300-350) g in Color No. 16, Gray Alternate Materials: See list above for cardigan. 4 DROPS shell buttons (No. 526). DROPS 3.5 mm [US 4] circular needles, or size needed to obtain correct gauge. Gauge: 22 sts and 30 rows in Pattern 1 = 10 x 10 cm [4" x 4"]. Pattern 1: (Over an even number of sts) Row 1: (right side) Knit all sts. Row 2: (wrong side) * K 1, P 1 *. Repeat from * - *. Row 3: Knit all sts Row 4: *Knit 1, purl 1 *. Repeat from * - *. Repeat these four rows. Garter st, when knitting flat: Knit all sts all rows. Garter st, when knitting in the round: *Rnd 1, knit. Rnd 2, purl. Repeat from * - *. Buttonholes: When the work measures 7 (7-7), 14 (14.5-15), 21 (22-23), 28 (29.5-31) cm [2.75" (2.75" - 2.75"), 5.5" (5-⅝" - 5-⅞"), 8.25" 98-⅝" - 9»), 11» (11.5" - 12.25")], make buttonholes on the right front as follows: Bind off the 4th and 5th sts and cast on 2 new sts over the bound-off sts on the next row. Body: Cast on 181 (191-207) sts on and knit 8 rows garter st (approx. 2 cm [0.75"]). Place a marker at each side of the vest (each front = 40 (42-46) sts and back = 101 (107-115) sts). Knit Pattern 1 (see instructions above), keeping the outer 6 sts on each side at the center front in garter st for the button band. At the same time, inc 1 st every row at each edge, inside the garter st band 12 (12-12) times (work the increased sts into the Pattern stitch), keeping the 6 sts of the button band in garter st. 205 (215-231) sts. Remember to make buttonholes on the right side of the button band (see instructions above). When the work measures 24 (24-24) cm [9.5" (9.5" - 9.5")], knit the next row as follows: 49 (52-56) sts for the front, knit 10 sts in garter st, 87 (91-99) sts for the back, knit 10 sts in garter st, 49 (52-56) sts for the front. After 6 rows knit the next row as follows: 6 sts button band, 42 (45-49) sts for the front in Pattern 1, 3 sts garter st, bind off 6 sts for armhole, 3 sts garter st, 85 (89-97) sts for the back in Pattern 1, 3 sts garter st, bind off 6 sts for armhole, 3 sts garter st, 42 (45-49) sts for the front in Pattern 1, 6 sts button band. Knit the rest of each part separately from this point. Back: 91 (95-103) sts. The 3 sts on each side continue to be knit in garter st. At the same time, dec 1 st for armholes inside the 3 edge garter sts every other row 6 (7-10) times. 79 (81-83) sts. When the work measures 47 (48-49) cm [18.5" (18-⅞" - 19.25")], knit garter st over the center 39 (41-41) sts and continue to finished dimensions. When the work measures 48 (49-50) cm [18-⅞" (19.25" - 19-⅝")], bind off for the shoulder every other row: 5 (5-5) sts 4 times, 6 (6-7) sts 1 time and at the same time, when the work measures 49 (50-51) cm [19.25" - 19-⅝" - 20-⅛")] bind off the center 23 (25-25) sts for the neck. Bind off 2 sts at each neck edge on the next row. Bind off all sts when the work measures approximately 51 (52-53) cm [20-⅛" (20.5" - 20-⅞")]. Right front: 51 (54-58) sts. Continue to knit the outer 3 sts at the side and the outer 6 sts at the center front in garter st. Dec 1 st for armhole inside the 3 outer garter sts every other row 6 (7-10) times. When the work measures 29 (30-32) cm [11» (11.75" - 12-⅝")] (2 rows after the last buttonhole), dec 1 st for the neck inside the 6 garter st button band every row 13 (15-15) times. (Decrease as follows on the right side: slip 1, knit 1 st of Pattern 1, pass slipped st over. Decrease as follows on the wrong side: purl 2 together into back of st.) Then dec 1 st every other row (from the right side) 6 (6-6) times. When the work measures 48 (49-50) cm [18-⅞" (19.25" - 19-⅝")], bind off for the shoulder every other row: 5 (5-5) sts 4 times, 6 (6-7) sts 1 time. All sts should be bound off and the work measures approximately 51 (52-53) cm [20-⅛" (20.5" - 20-⅞")]. Left front: Knit like the right, but when bind off for the neck as follows: On the right side: knit 2 together. On the wrong side: purl 2 together. Assembly: Sew shoulder seams. Sew on buttons. |
|

|
|

|
|
|
Have you made this or any other of our designs? Tag your pictures in social media with #dropsdesign so we can see them! Do you need help with this pattern?You'll find tutorial videos, a Comments/Questions area and more by visiting the pattern on garnstudio.com. © 1982-2024 DROPS Design A/S. We reserve all rights. This document, including all its sub-sections, has copyrights. Read more about what you can do with our patterns at the bottom of each pattern on our site. |
|


With over 40 years in knitting and crochet design, DROPS Design offers one of the most extensive collections of free patterns on the internet - translated to 17 languages. As of today we count 304 catalogs and 11422 patterns - 11417 of which are translated into English (US/in).
We work hard to bring you the best knitting and crochet have to offer, inspiration and advice as well as great quality yarns at incredible prices! Would you like to use our patterns for other than personal use? You can read what you are allowed to do in the Copyright text at the bottom of all our patterns. Happy crafting!
Comments / Questions (9)
Hello! I'm working on the vest at the moment and I have reached the top of the back panel. I am a bit confused on the following bit: "Bind off 2 sts at each neck edge on the next row" would those two stitches happen to be after the center neck stitches as in before the 6 sts for each button band/ ridge, or before the button band ridge? I wish your answer clarifies in steps exactly what to do :)
25.03.2024 - 15:37DROPS Design answered:
Dear Bee, there are no button bands in the back panel. The 2 stitches would be those closest to the neck. They should be at the sides of the 27 stitches that you had cast off before at the mid back, for the neck. Happy knitting!
31.03.2024 - 22:58For the vest I have reached 24cm in height but it is unclear how to follow with the stitch pattern after this it says to knit 49 st then 10 garter then 87 st then 10 garter and 49 st for front, do i continue in the rib pattern as pattern 1 indicates or knit for rs and purl for wr? also do I make the button band in garter st as well during these 6 rows? thank you!
18.03.2024 - 23:47DROPS Design answered:
Dear Dd, you will continue the pattern as before over the sts on front and back pieces and work the 10 sts on each side in garter stitch = knit from RS and from WS. When yo have worked 6 rows like this, there are 3 ridges over the 10 sts n each side, you will cast off the stitches for armhole. Happy knitting!
19.03.2024 - 11:16I am having trouble figuring out where the correction for the vest works into the original pattern. Is this a substitution for part of the original (and where does it apply) or is this added at some point (and where does that occur)? Thanks, Stephanie
20.11.2023 - 18:18DROPS Design answered:
Dear Stephanie, correction applies only if you printed the pattern before the correction day, otherwise online pattern is already edited. Happy knitting!
21.11.2023 - 08:52Bonjour, pouvez vous me dire combien il faut de laine pour faire le gilet seulement merci à vous
14.08.2023 - 17:22DROPS Design answered:
Bonjour Mme Chalot, vous trouverez les quantités nécessaires pour chaque taille un peu plus bas sur la page, après les explications de la veste. Il vous faudra par exemple 250 g DROPS Karisma/50 g la pelote = 5 pelotes en taille S. N'hésitez pas à utiliser le convertisseur si vous souhaitez voir les autres alternatives possibles et leur quantité correspondante. Bon tricot!
15.08.2023 - 08:58Hallo, ich wollte die Weste stricken, aber ich verstehe nicht, wie ich die 12x1 Masche am Anfang ins Muster aufnehnen soll. Wird jede Reihe eine dazu aufgenommen oder wie ist das zu verstehen? Vielen Dank im voraus
09.01.2023 - 14:23DROPS Design answered:
Liebe Mirja, die neuen Maschen sollen das Muster erweitern, dh wenn die nächste/vorrige Masche eine Rechte Masche (2. und 4. Reihe) sein soll, dann wird die Zunahmen links gestrickt, und wenn die nächste/vorrige Masche eine linke Masche sein soll, dann wird die Zunahme (2. und 4. Reihe) rechts gestrickt. Viel Spaß beim stricken!
09.01.2023 - 16:45Hello, Re: Scholarly Set pattern I'd like to know how much yarn the vest uses. Thank you. Paula
27.04.2020 - 14:41DROPS Design answered:
Dear Paula, you will find the total weight of yarn required in each size at the top of the pattern -in the header. read more here. Happy knitting!
27.04.2020 - 15:34Hei, jeg har kommet hit på vesten: Når arb måler 24 (24-24) cm strikkes neste p slik: 49 (52-56) m forstk, strikk 10 m rille, 87 (91-99) m bakstk, strikk 10 m rille, 49 (52-56) m forstk. Jeg klarer ikke å se på bildet at det skal være noen riller i det området. Dessuten stemmer ikke maskeantallet med f.eks. bakstykket; det skal jo være 101 m. Fint om jeg kan få en forklaring som gjør det mer forståelig. Ellers tusen takk for mange fine og gode oppskrifter :)
26.05.2019 - 11:12DROPS Design answered:
Hei Sølvi. Du begynte med å dele inn arbeidet til for og bakstykker, men siden har du økt en del masker på hvert forstykke, og inndelingen endrer seg når du feller til ermhull. Det strikkes riller rundt ermhullsåpningen. De 10 maskene = under armen, og strikkes kun over 6 pinner. Videre feller du av de midterste 6 av disse, og de 3 rillemaskene i hver side av åpningen fortsetter i rille. Herfra strikkes delene hver for seg oppover. Bakstykket går nå over 91 masker, mens hvert forstykke går over 51 makser. God fornøyelse
28.05.2019 - 08:08Bonjour, j'aimerais réaliser le gilet sans manches du modèle 58-1 mais la taille L est trop petite. J'ai suivi vos conseils : J'ai mesuré un vêtement qui va bien et c'est trop petit. Est-il possible d'avoir les explications dans une taille supérieure. XL par exemple ? Merci beaucoup. Cordialement, Rita
28.10.2018 - 18:15DROPS Design answered:
Bonjour Rita, nous ne sommes malheureusement pas en mesure de pouvoir ajuster chacun de nos modèles à chaque demande. Vous pouvez vous aider d'autres modèles similaires de même tension pour vous aider, et/ou contacter votre magasin DROPS pour toute assistance complémentaire. Bon tricot!
29.10.2018 - 08:29Leider verstehe ich nicht wie die Tasche gearbeitet wird! Bitte Hilfe!
24.09.2014 - 11:15DROPS Design answered:
Liebe Barbara, Sie haben ja die beiden Taschen separat gestrickt und dann beim Rumpfteil (Vorder- und Rückenteil) 2x 32 M stillgelegt. An die Stelle der stillgelegten M legen Sie nun die M der separat gestrickten Taschen und stricken dann einfach weiter. Am Ende legen Sie die je 32 stillgelegten M des Rumpfteils wieder auf die Nadel und stricken das Bündchen an.
27.09.2014 - 10:12