
Popular categories
Looking for a yarn?


Comments / Questions (43)
![]() Dina wrote:
Dina wrote:
Waarom zijn die patronen moeilijk te begrijpen wat je moet doen
20.07.2020 - 14:34DROPS Design answered:
Dag Dina,
We proberen de patronen zo goed mogelijk voor iedereen te beschrijven. Ook staan bij elk patroon instructievideo's die je kunt bekijken. Daarnaast kun je een lijst met veel gestelde vragen vinden. Als je iets niet begrijpt kun je een vraag posten en aangeven waar je precies tegenaan loopt, zodat we kunnen proberen je te helpen.
23.07.2020 - 11:29
![]() Dina wrote:
Dina wrote:
Het gaat erom je moet bijde panden haken tot 8 centimeter ik heb de voorpand met drie lossen aanmekaar gehaakt hoe gaat het verder da Dank je
20.07.2020 - 10:14DROPS Design answered:
Dag Dina,
Je kan het voorpand met een halve vaste aan het achterpand vast maken en daarna gewoon verder haken.
23.07.2020 - 10:57
![]() Dina wrote:
Dina wrote:
Ik begrijp. Het patroon niet van dit topje
19.07.2020 - 13:43DROPS Design answered:
Dag Dina,
Zou je wat specifieker aan kunnen geven waar je tegenaan loopt. Dan kunnen we je wellicht beter helpen? Heb je al een proeflapje gemaakt om te controleren of de stekenverhouding klopt?
20.07.2020 - 08:32
![]() Fabienne wrote:
Fabienne wrote:
Doit on faire A2 lorsqu'on débute l'ouvrage avec A1, ou doit on débuter uniquement avec A1 ?
11.06.2020 - 16:45DROPS Design answered:
Bonjour Fabienne, on ne crochète qu'A.1 au début, mais vous pouvez tout à fait commencer chaque rang par A.2 (sans les mailles coulées bien sûr). Bon crochet!
12.06.2020 - 07:23
![]() Fabienne wrote:
Fabienne wrote:
Bonjour, si j'ai bien compris, le 1er RG de A1 je saute 1b puis je fais 1b dans m suivante puis je reviens en arrière sur la b sautée ?
14.05.2020 - 15:24DROPS Design answered:
Bonjour Fabienne, c'est bien ça, cette vidéo vous montre comment crocheter ces brides croisées. Bon crochet!
14.05.2020 - 16:16
![]() Martine wrote:
Martine wrote:
Bonjour, à partir de l'emmmanchure pour le dos en taille S, on 74 m. Faire 5 mc de chaque côté, reste donc 64 m. On est dans A3, on ne fait pas les diminutions du diagramme.…? On fait juste ce qui est écrit.....à chaque rang... Merci
16.04.2020 - 23:12DROPS Design answered:
Bonjour Martine, avant de diviser pour les emmanchures vous avez 144 mailles en taille S soit 72 m pour le devant et 72 m pour le dos, en taille M vous avez 156 m au total soit 78 m pour le devant et autant pour le dos. Vous diminuez effectivement 4 ou 5 m (S ou M) de chaque côté, il va rester: 64 m en S et 68 m en M. Vous crochetez maintenant A.3 - les flèches indiquent ici quand ajuster le début de A.3 et plus les rangs où diminuer/augmenter. Bon crochet!
17.04.2020 - 08:51
![]() Martine7 wrote:
Martine7 wrote:
Merci, j'ai un doute pour relier le dos avec le devant. Je suis au rang 10 pour relier. Après la dernière maille en l'air, pour passer sur le devant , faut il passer directement au groupe de 7 Brides du devant ? Merci pour votre aide.
28.03.2020 - 00:24DROPS Design answered:
Bonjour Martine7, quand vous crochetez le 1er rang (tour) au-dessus du dos et du devant, vous crochetez simplement le tour suivant sur les mailles du dos, puis sur celles du devant, si vous êtes au tour 9, alors vous terminez le dos par 1 ms dans la dernière maille, puis sautez les 2 premières m du devant pour crocheter les 7 brides dans la bride suivante et continuer A.1 jusqu'à la fin du devant. Bon crochet!
30.03.2020 - 09:01
![]() Martine wrote:
Martine wrote:
Bonjour, les petits bouts devant et dos sont arrêtés, c'est à dire que l'on coupe les fils...? Puis on repart sur le dos à droite, sur l'endroit ? Ensuite on ne crochète pas en rond, mais on tourne, c'est bien cela? Merci d'avance, portez-vous bien.
27.03.2020 - 16:02DROPS Design answered:
Bonjour Martine, vous crochetez d'abord les 8 cm du bas du dos, vous pouvez mettre en attente sans couper le fil. Crochetez ensuite les 8 cm du bas du devant, coupez le fil. Reprenez ensuite le dos et crochetez d'abord le dos, puis le devant en rond dans le sens où on va fermer chaque tour par 1 mc mais on va continuer à crocheter alternativement sur l'endroit et sur l'envers (pour conserver la même texture que pour les 8 cm du bas). Bon crochet!
27.03.2020 - 16:42
![]() Fabienne wrote:
Fabienne wrote:
Que veut dire "ajuster"? Hâte de continuer, j'aime beaucoup votre site.
26.02.2020 - 00:07DROPS Design answered:
Bonjour Fabienne, la hauteur doit être modifiée si besoin pour que le tour suivant soit celui indiqué dans les explications, par ex au début en taille S, à 10 cm ou bien un peu avant/un peu après tant que le tour suivant est un des tours avec une flèche dans le diagramme. Bon crochet!
26.02.2020 - 09:44
![]() Ekaterina wrote:
Ekaterina wrote:
Dear Drops! Should I crochet Back and Front pieces according to A1or A3 after the devision at the armholes?
28.09.2019 - 17:27DROPS Design answered:
Dear Ekaterina, you are continuing working A.3 after division for armholes. Happy crocheting!
30.09.2019 - 09:47
|
|||||||||||||||||||||||||||||||||||||||||||
Miami Chill#miamichilltop |
|||||||||||||||||||||||||||||||||||||||||||
 |
 |
||||||||||||||||||||||||||||||||||||||||||
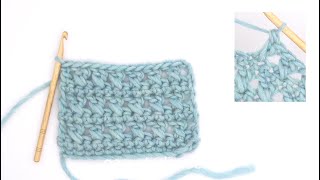
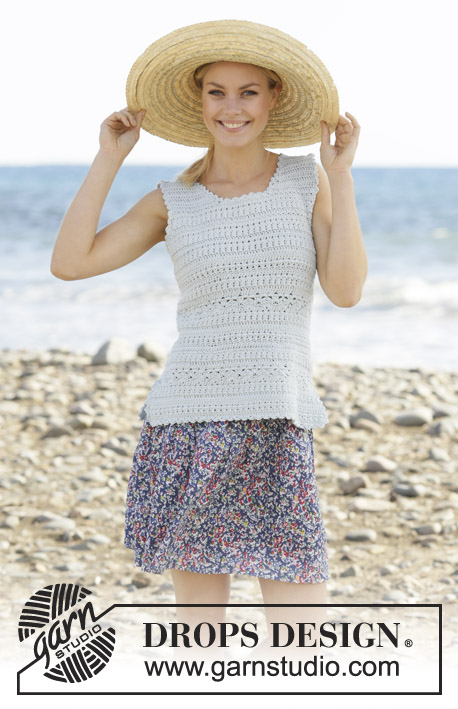
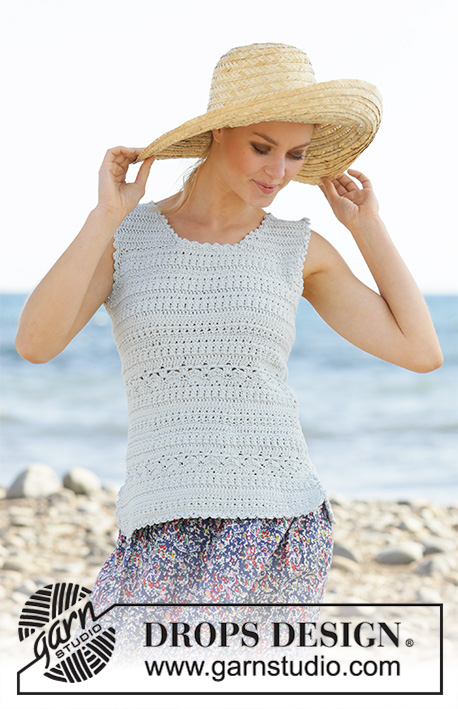
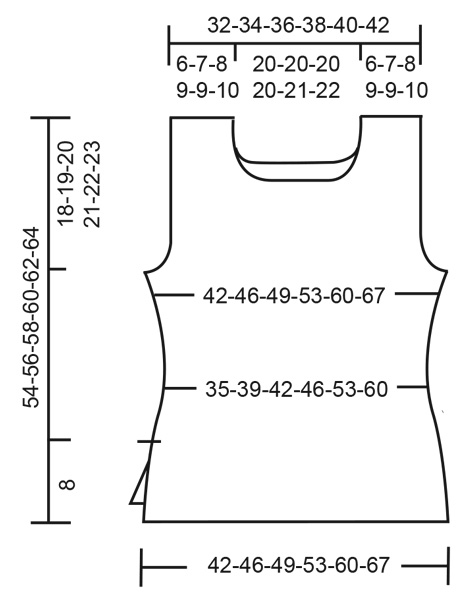
Crocheted top in DROPS Muskat. Piece is crocheted with texture pattern. Size: S - XXXL
DROPS 199-52 |
|||||||||||||||||||||||||||||||||||||||||||
|
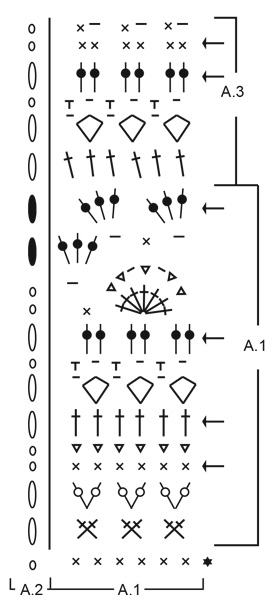
---------------------------------------------------------- EXPLANATION FOR THE PATTERN: ---------------------------------------------------------- PATTERN: See diagrams A.1 to A.3. (A.2 shows how round begins/ends when working in the round.) CROCHET INFO (applies when working back and forth): At beginning of every round with treble crochet work 3 chain stitches (these chain stitches do not replace first treble crochet). At beginning of every round with double crochet work 1 chain stitch (this chain stitch does not replace first double crochet). DECREASE TIP-1: TREBLE CROCHET: Decrease 1 treble crochet by working 2 treble crochets together as follows: Work 1 treble crochet in first stitch, but wait with last yarn over and pull through (= 2 loops on hook), work 1 treble crochet in next stitch/around chain stitch, but on last pull through pull yarn through all 3 loops on hook (= 1 treble crochet decreased). DOUBLE CROCHET: Decrease 1 double crochet by working 2 double crochets together as follows: Work 1 double crochet but wait with last yarn over and pull through (= 2 loops on hook), then work next double crochet but on last pull through, pull yarn through all 3 loops on hook (= 1 double crochet decreased) DECREASE TIP-2 (evenly): To calculate how to decrease evenly, use the total number of stitches (e.g. 144 stitches) and divide stitches by number of decreases to be done (e.g. 6) = 24. In this example work approx. every 23rd and 24th stitch together. ---------------------------------------------------------- START THE PIECE HERE: ---------------------------------------------------------- TOP - SHORT OVERVIEW OF THE PIECE: There is a 8 cm vent at the bottom of top, first work piece back and forth until vent is done, then work piece in the round but turn on every round and work back on round to make the texture the same all the way. When piece is divided at the armhole, work back and forth again. BACK PIECE: Work 83-90-97-104-118-132 chain stitches on hook size 4 mm with Muskat. Continue with 1 double crochet in 2nd chain stitch from hook, then 1 double crochet in each of the next 4 chain stitches, * skip 1 chain stitch, 1 double crochet in each of the next 6 chain stitches *, repeat from *-* the entire row = 72-78-84-90-102-114 double crochets (chain stitch to turn with is also counted as 1 double crochet). Turn and work 1 double crochet in every double crochet. Now work according to diagram A.1 - read CROCHET INFO and REMEMBER CROCHET TENSION! After 8 cm put piece aside and work the front piece. FRONT PIECE: Work 83-90-97-104-118-132 chain stitches on hook size 4 mm with Muskat. Continue with 1 double crochet in 2nd chain stitch from hook, then 1 double crochet in each of the next 4 chain stitches, * skip 1 chain stitch, 1 double crochet in each of the next 6 chain stitches *, repeat from *-* the entire row = 72-78-84-90-102-114 double crochets (chain stitch to turn with is also counted as 1 double crochet). Turn and work 1 double crochet in every double crochet. Now work according to diagram A.1. Continue until piece measures 8 cm - finish on the same row as on back piece. TOP after vent: Continue pattern like this - first work stitches over back piece, then work stitch over front piece, then work round together with a slip stitch in 1st/3rd stitch at beginning of round, work chain stitch/chain stitches in A.2, turn piece and work back, finish with 1 slip stitch in 1st/3rd/4th chain stitch at beginning of round. Insert 1 marker thread in transitions between front and back piece = sides. Continue like this back and forth with pattern according to diagram A.1 and A.2. On rounds with treble crochets or double crochets there are now 144-156-168-180-204-228 stitches on round (A.2 is not counted in number of stitches). When piece measures approx. 10-11-12-13-14-15 cm - adjust so that next round is a round with treble crochets or double crochets (marked on diagram with arrow), decrease 6 stitches evenly - read DECREASE TIP-1 and DECREASE TIP-2 (evenly). Decrease like this 4 times in total on the marked rounds with treble crochets or double crochets = 120-132-144-156-180-204 stitches on a round with treble crochets or double crochets. After last decrease round work pattern as before for approx. 3 cm – adjust so that next round is a round marked with arrow (piece now measures approx. 22-23-24-25-26-27 cm). Now increase 6 stitches evenly on round by working 2 stitches in 1 stitch. Increase like this 4 times in total vertically at the rounds marked in diagram = 144-156-168-180-204-228 stitches on a round with treble crochets or double crochets after last increase. When piece measures approx. 34-35-36-37-38-39 cm – adjust after a round marked with arrow, finish top according to diagram A.3 (turn as before with diagram A.2). When piece measures 36-37-38-39-40-41 cm, divide the piece for back and front piece at the armholes. BACK PIECE: Work slip stitches over the first 4-5-4-5-6-7 stitches, then work until 4-5-4-5-6-7 stitches remain before marker thread in the other side, turn piece. On next row work the 4 outermost stitches in each side together 2 by 2 – remember DECREASE TIP! Repeat decrease on every row 0-0-1-1-2-3 more times. On next row work the 2 outermost stitches in each side together, repeat decrease on every row 2-2-2-3-4-5 more times. After all decreases are done, 54-58-62-64-68-72 stitches remain on row. When piece measures 48-49-50-51-52-53 cm, finish each shoulder separately. SHOULDER: Continue with treble crochets over the first 17-19-21-22-23-24 stitches from right side, turn and work the first 4 stitches together 2 by 2 for neck, then work the rest of row. Turn and work until 4 stitches remain before neck, work these together 2 by 2, turn. On next row work the first 2 stitches together, then work the rest of row. Turn and work until 2 stitches remain, work these together. Turn, work the first 2 stitches together, work the rest of row = 10-12-14-15-16-17 stitches on shoulder. Continue until piece measures 54-56-58-60-62-64 cm, fasten off. Work the other shoulder the same way but reversed. I.e.: Begin from right side, decreases for neck are done at the end of rows from wrong side. FRONT PIECE: Work slip stitches over the first 4-5-4-5-6-7 stitches, then work until 4-5-4-5-6-7 stitches remain before marker thread in the other side, turn piece. On next row work the 4 outermost stitches in each side together 2 by 2 – remember DECREASE TIP! Repeat decrease on every row 0-0-1-1-2-3 more times. On next row work the 2 outermost stitches together, repeat decrease on every row 2-2-2-3-4-5 more times. After all decreases are done, 54-58-62-64-68-72 stitches remain on row. When piece measures 44-45-46-47-48-49 cm, finish each shoulder separately. Work shoulder as on back piece. ASSEMBLY: Sew shoulder seams edge to edge to avoid a chunky seam. DECORATING EDGE: Work a decorating edge around the neck, each armhole and at the bottom of body - as well as up and down each vent. Work decorating edge as follows: 1 double crochet, * 3 chain stitches, 1 treble crochet in 3rd chain stitch from hook, skip approx. 1 cm and make 1 double crochet *, repeat from *-* the entire round, finish with 1 slip stitch in first double crochet at beginning of round. |
|||||||||||||||||||||||||||||||||||||||||||
Diagram explanations |
|||||||||||||||||||||||||||||||||||||||||||
|
|||||||||||||||||||||||||||||||||||||||||||
 |
|||||||||||||||||||||||||||||||||||||||||||
 |
|||||||||||||||||||||||||||||||||||||||||||
Have you finished this pattern?Tag your pictures with #dropspattern #miamichilltop or submit them to the #dropsfan gallery. Do you need help with this pattern?You'll find 17 tutorial videos, a Comments/Questions area and more by visiting the pattern on garnstudio.com. © 1982-2026 DROPS Design A/S. We reserve all rights. This document, including all its sub-sections, has copyrights. Read more about what you can do with our patterns at the bottom of each pattern on our site. |
|||||||||||||||||||||||||||||||||||||||||||


With over 40 years in knitting and crochet design, DROPS Design offers one of the most extensive collections of free patterns on the internet - translated to 17 languages. As of today we count 324 catalogues and 12290 patterns translated into English (UK/cm). 12290
We work hard to bring you the best knitting and crochet have to offer, inspiration and advice as well as great quality yarns at incredible prices! Would you like to use our patterns for other than personal use? You can read what you are allowed to do in the Copyright text at the bottom of all our patterns. Happy crafting!
Post a comment to pattern DROPS 199-52
We would love to hear what you have to say about this pattern!
If you want to leave a question, please make sure you select the correct category in the form below, to speed up the answering process. Required fields are marked *.