
Popular categories
Looking for a yarn?


Comments / Questions (49)
![]() MARCHAND wrote:
MARCHAND wrote:
Bonjour : je ne comprends pas les explications apès avoir plié mon ouvrage en deux envers sur envers : comment relever les mailles sur la ligne de montage ?MERCI
18.01.2024 - 20:29DROPS Design answered:
Bonjour Mme Marchand, vous travaillez maintenant sur l'endroit du boléro et relevez les mailles tout autour en suivant par exemple cette vidéo. Bon tricot!
19.01.2024 - 09:15
![]() Valeria Di Stasio wrote:
Valeria Di Stasio wrote:
Non riesco a capire come fare il bordo. Le 5 maglie a legaccio vanno saltate?? 122 sono il totale delle maglie comprese le maniche...
15.12.2023 - 13:16DROPS Design answered:
Buongiorno Valeria, il bordo va lavorato su tutte le maglie come indicato. Buon lavoro!
30.12.2023 - 11:37
![]() Louise wrote:
Louise wrote:
Hej Jeg bøvler med aflukningen, den bliver for stram. Er det en hjælp at lave italiensk aflukning?
10.09.2023 - 11:42DROPS Design answered:
Hej Louise, du kan prøve, eller så lukker du af med dobbelt tråd. Vi har mange videoer som viser hvordan man kan lukke af :)
14.09.2023 - 15:44
![]() Mieke Baras wrote:
Mieke Baras wrote:
Ik brei de 2de maat en vraag me af wat jullie bedoelen met ‘ga verder met tricot OF brei textuurpatroon enz. ‘, als het werk 42cm is en 5x gebreid is in de hoogte. Ik vermoed dat, als het werk 48cm meet, je motief van 18 n niet volledig gebreid zal zijn en je dus alles in tricotsteek breit waarna 1 ribbel moet gebreid worden. Klopt dat? Vanwaar dan de OF? Mooi werk!
12.08.2023 - 11:53DROPS Design answered:
Dag Mieke,
In de foto zie je dat onderaan op het achterpand een stukje gebreid is in tricotsteek. Dit is wat er bedoeld wordt na het breien van A.1, 5 keer in de hoogte. Je kunt er ook voor kiezen om A.1 door te breien en halverwege het patroon te stoppen. Maar net wat je het mooist vindt.
14.08.2023 - 14:08
![]() Tanya wrote:
Tanya wrote:
Though I usually wear size S/M I decided to go with size L. The gauge was the same as in pattern. It turned out beautiful with just one big disappointment - it sits tight, not as pictured. Most likely the model is size XS and shows wearing size XXL. I think it should've been mentioned. Need to redo.
01.06.2023 - 00:23
![]() Lilian Gustafsson wrote:
Lilian Gustafsson wrote:
Förstår inte riktigt hur man gör när man lägger aviga mot aviga och lägger upp 146 m. Var kommer ärmhålet?
12.02.2023 - 20:02DROPS Design answered:
Hei Lillian I str. L, når arbeidet måler 51 cm strikkes det 2 rader med rettstrikk. Start så med kanten der det strikkes over de 146 maskene du nettopp har strikket over, samtidig som det økes med 34 masker jevnt fordelt = 180 masker. Legg arbeidet dobbelt, vrangen mot vrangen, slik at det blir en stor "tube", snu arbeidet slik at du kan plukke opp 146 masker langs oppleggskanten + at det samtidig økes 34 masker jevnt fordelt = 180 masker. Du har nå 360 masker på rundpinnnen og skal nå strikke vrangborden rundt. Ermhullene blir de 2 "hullene" i hver side "tuben". mvh DROPS Design
13.02.2023 - 13:44
![]() Birgit Nygaard wrote:
Birgit Nygaard wrote:
Kan jeg få opskriften i str xs/s? Vh Birgit
09.02.2023 - 13:17DROPS Design answered:
Hej Birgit, Den findes ikke mindre end S/M :)
09.02.2023 - 15:25
![]() Stefania Rossi wrote:
Stefania Rossi wrote:
HO INIZIATO QUESTO PRIMO MODELLO DROPS 201-27 E ANCHE CON L'AIUTO DEL TUTORIAL SU YOUTUBE STO PROCEDENDO MOLTO, BENE BASTA UN PO' DI INTUITO NELLE SPIEGAZIONI ED E' TUTTO OK - GRAZIE MILLE !!!
03.01.2023 - 11:36
![]() Nina Lang wrote:
Nina Lang wrote:
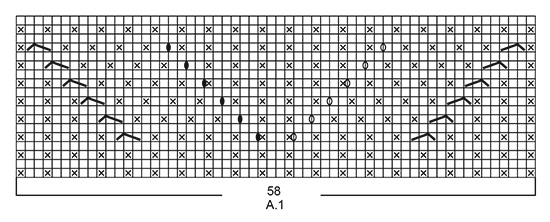
Chart A.1 indicates that wrong side rows are purled across all stitches. However, the photo CLEARLY looks like the 1-2 rib is continued, providing the definition in the waves. Can you please confirm: is the ribbing broken by WS rows?
28.03.2022 - 23:37DROPS Design answered:
Dear Mrs Lang, diagram is correct, from RS you work: (P1 (= cross), K2 (white squares) and from WS you purl all stitches. That way you will have a pattern like ribbing K2, 1 stitch in garter stitch (purled from RS and purled from WS). Happy knitting!
29.03.2022 - 09:12
![]() Ange wrote:
Ange wrote:
I have just completed this shrug using the alpaca and kid silk as per the pattern. Very happy with finished article. My question relates to blocking. With the blend of alpaca and kid silk what method of blocking do you recommend. wet, spray or steam? Thanks
05.09.2021 - 08:11DROPS Design answered:
Dear Ange, we recommend to use a cloth, to avoid direct contact of the iron and the cloth; to block from wrong side, and to use steam. Also, you should be extra careful while ironing the pattern itself. Sometimes, it's better to not block the garment at all.
05.09.2021 - 17:39
|
||||||||||||||||||||||
Sweet Angel#sweetangeljacket |
||||||||||||||||||||||
 |
 |
|||||||||||||||||||||
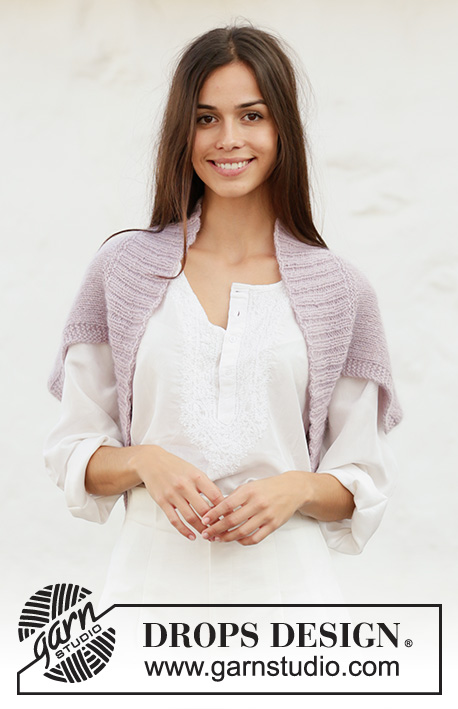
Knitted shoulder piece with displacements in DROPS Alpaca and DROPS Kid-Silk. Sizes S - XXXL.
DROPS 201-27 |
||||||||||||||||||||||
|
------------------------------------------------------- EXPLANATIONS FOR PATTERN: ------------------------------------------------------- RIDGE/GARTER STITCH (worked in the round): 1 ridge in height = 2 rounds; Knit 1 round and purl 1 round. RIDGE/GARTER STITCH (worked back and forth): Knit all rows. 1 ridge in height = Knit 2 rows. PATTERN: See diagram A.1. The diagram shows all rows in pattern seen from the right side. INCREASE TIP (evenly spaced): To work out how to increase evenly, count the total number of stitches on the needle (e.g. 122 stitches) and divide by the number of increases to be made (e.g. 24) = 5.1. In this example, increase by making 1 yarn over after approx. each 5th stitch. On the next round work the yarn overs twisted to avoid holes ------------------------------------------------------- START THE PIECE HERE: ------------------------------------------------------- SHOULDER PIECE - SHORT OVERVIEW OF THE PIECE: The piece is worked back and forth with circular needle. An edge is worked in the round to finish, with circular needle. SHOULDER PIECE: Cast on 122-132-146-160 stitches with circular needle size 5 mm and 1 strand Alpaca + 1 strand Kid-Silk (= 2 strands). Work 1 RIDGE – read description above, back and forth over all stitches on the needle, then purl 1 row. Now work pattern as follows: 5 stitches in garter stitch, 27-32-39-46 stitches in stocking stitch, A.1 (= 58 stitches), 27-32-39-46 stitches stocking stitch and 5 stitches in garter stitch. REMEMBER THE KNITTING TENSION! Continue back and forth like this until A.1 has been completed a total of 5-5-6-6 times in height. The piece measures approx. 42-42-50-50 cm. Continue with stocking stitch (as shown in the picture) or work texture as before over the middle 58 stitches on the row, 5 stitches in garter stitch on each side and stocking stitch over the remaining stitches on the row. When the piece measures 43-48-51-53 cm work 1 ridge over all stitches. EDGE: Now work an edge around the piece with 1 strand Alpaca and 1 strand Kid-Silk (= 2 strands) and circular needle size 4 mm from the right side as follows: Knit the 122-132-146-160 stitches on the row and at the same time increase 24-30-34-36 stitches evenly placed – read INCREASE TIP (= 146-162-180-196 stitches), fold the piece and lay wrong side to wrong side, knit up 146-162-180-196 stitches along the cast-on edge = 292-324-360-392 stitches around opening on shoulder piece. Work 2 RIDGES – read description above, in the round over all stitches. Then work rib (knit 2, purl 2) until the rib measures 10 cm. Cast off with knit over knit and purl over purl, but to avoid the cast-off edge being tight, make 1 yarn over after each 4th stitch; yarn overs cast off as normal stitches. |
||||||||||||||||||||||
Diagram explanations |
||||||||||||||||||||||
|
||||||||||||||||||||||
 |
||||||||||||||||||||||
 |
||||||||||||||||||||||
 |
||||||||||||||||||||||
Have you finished this pattern?Tag your pictures with #dropspattern #sweetangeljacket or submit them to the #dropsfan gallery. Do you need help with this pattern?You'll find 21 tutorial videos, a Comments/Questions area and more by visiting the pattern on garnstudio.com. © 1982-2026 DROPS Design A/S. We reserve all rights. This document, including all its sub-sections, has copyrights. Read more about what you can do with our patterns at the bottom of each pattern on our site. |
||||||||||||||||||||||


With over 40 years in knitting and crochet design, DROPS Design offers one of the most extensive collections of free patterns on the internet - translated to 17 languages. As of today we count 324 catalogues and 12290 patterns translated into English (UK/cm). 12290
We work hard to bring you the best knitting and crochet have to offer, inspiration and advice as well as great quality yarns at incredible prices! Would you like to use our patterns for other than personal use? You can read what you are allowed to do in the Copyright text at the bottom of all our patterns. Happy crafting!
Post a comment to pattern DROPS 201-27
We would love to hear what you have to say about this pattern!
If you want to leave a question, please make sure you select the correct category in the form below, to speed up the answering process. Required fields are marked *.