
Popular categories
Looking for a yarn?


Comments / Questions (56)
![]() Anne-Marie Silven wrote:
Anne-Marie Silven wrote:
Tack för hjälpen! Tog en kort rundsticka till hjälp för att sticka i ärmen Mvh Anne-Marie
03.05.2019 - 06:47
![]() GARRY Martine wrote:
GARRY Martine wrote:
S'il vous plait, comment lit-on le diagramme A2, étant donné que l'on tricote la manche en rond. Merci pour votre réponse
27.04.2019 - 22:19DROPS Design answered:
Bonjour Mme Garry, comme on tricote en rond, on va lire tous les rangs du diagramme de droite à gauche - au 2ème rang, les mailles que vous aviez tricoté à l'endroit sur l'envers dans A.1 vont maintenant se tricoter à l'envers sur l'endroit. Bon tricot!
29.04.2019 - 09:52
![]() MELAYE Claudine wrote:
MELAYE Claudine wrote:
Bonjour Je suis en train d'étudier le modèle 195-23 et je voudrais savoir quant à la réalisation du point fantaisie si pour les rangs envers les mailles se tricotent comme elles se présentent puisque le diagramme montre tous les rangs du motif vus sur l'endroit Merci pour votre réponse Cordialement Claudine
31.03.2019 - 18:00DROPS Design answered:
Bonjour Mme Melaye, les cases blanches montrent des mailles à tricoter en jersey = à l'end sur l'end et à l'env sur l'envers, celles avec un tiret vont se tricoter à l'endroit sur l'envers. Ainsi, sur l'envers, lisez les diagrammes de gauche à droite comme l'indique la légende. Bon tricot!
01.04.2019 - 13:55
![]() Vibeke Nilaus wrote:
Vibeke Nilaus wrote:
Hej. Jeg har købt 12 ngl, 600 g til str L, og har nu efter 7 cm brugt det første nøgle. Jeg er blevet usikker på, om der virkelig er nok garn? Jeg overholder strikkefasthed osv. Og jeg bruger Drops Cotton Merino - men det vil jo være ærgerligt at mangle til sidst. Hvis samme indfarvning ikke fås. Er I helt sikre på garnmængden? Jeg synes ikke, at det rækker så langt. Mvh Vibeke
30.03.2019 - 14:43DROPS Design answered:
Hej Vibeke, vi har ikke hørt at der ikke skulle være nok garn. De 12 nøgler stemmer helt fint med andre modeller i DROPS Cotton Merino. Men sørg for at overholde strikkefastheden både i bredde og højde. God fornøjelse!
05.04.2019 - 11:47
![]() Taru wrote:
Taru wrote:
Ich verstehe nicht ganz, wie die angegebene Arbeitshöhe zusammenkommt, z.B. 56 cm bei Größe S. Vor der Passe soll die Arbeit 31 cm hoch sein, die Passe soll 19 cm messen und die Halsblende 3 cm, das macht nur 53 cm, nicht aber 56 cm. In der Zeichnung sieht die Jacke außerdem hinten höher aus, als vorne, aber nirgendwo werden verkürzte Reihen für den Rücken gestrickt. Bitte um Aufklärung.
23.03.2019 - 19:12DROPS Design answered:
Liebe Taru, die Halsausschnitt wird hier gleich hinten und vorne sein (Skizze ist standard) - die gesamte Höhe wird inklusive Schulter (3 cm) und Halsblende (3 cm) 56 cm sein. Am Vorderteil wird die Jacke 3 cm weniger messen und 3 cm mehr in der gesamte Höhe wegen den Schultermaschen. Viel Spaß beim stricken!
25.03.2019 - 10:42
![]() Annette wrote:
Annette wrote:
Kann es sein, dass Im Diagramm A.4C (für XL) in der 9. Reihe noch eine Masche dazu muss? Es müssten also 6 Maschen und nicht wie angegeben 5 M rechts (da Hinreihe) gestrickt werden.? In A.3A ist mir in der 16. Reihe bereits ein Fehler aufgefallen (6M links - da Rückreihe statt wie angegeben 4M)
05.03.2019 - 11:38DROPS Design answered:
Liebe Annette, Danke für den Hinweis, Diagramme werden korrigiert. Viel Spaß beim stricken!
12.03.2019 - 12:36
![]() Annette wrote:
Annette wrote:
Mir ist gerade ein kleiner Fehler im Diagramm aufgefallen. Bei A.3A müssen es in der 16. Reihe statt 4 Maschen rechts in der Rückreihe 6 Maschen rechts sein. Sonst geht sich die Pyramidenform nicht so schön auf.
01.03.2019 - 09:12
![]() Vibeke Nilaus wrote:
Vibeke Nilaus wrote:
Ups har fundet A3 mønstrene. Glem mit spørgsmål. Mvh Vibeke
23.02.2019 - 20:53
![]() Vibeke Nilaus wrote:
Vibeke Nilaus wrote:
Hej. Der skal strikkes A3B og A3D i str M, men det er der ikke, kun A1 og A4. Hvor er A3? Mvh Vibeke
23.02.2019 - 20:52
![]() Vibeke Vassbotn wrote:
Vibeke Vassbotn wrote:
Finner ikke A1b i oppskriften men finner 2 A1a. Hvilken er da A1b?
27.01.2019 - 12:22DROPS Design answered:
Hei Vibeke. Det har du helt rett i. Det er den A.1 som består av 1 maske som er A.1B. Dette vil bli rettet snarest. Takk for beskjed, og god fornøyelse.
29.01.2019 - 15:15
|
|||||||||||||||||||
Golden Fairy Cardigan#goldenfairycardigan |
|||||||||||||||||||
 |
 |
||||||||||||||||||
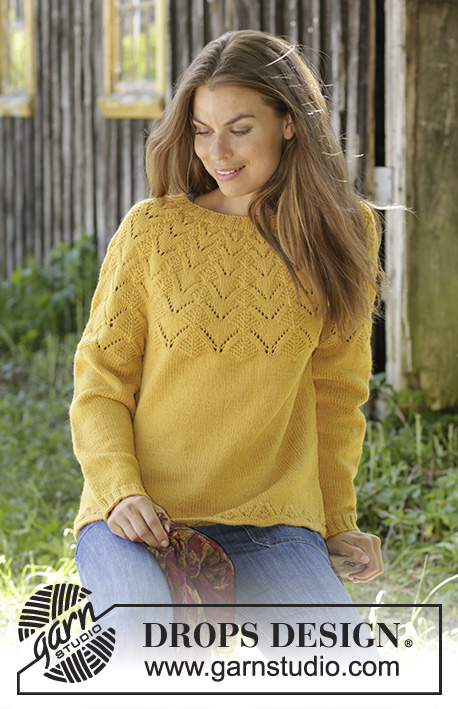
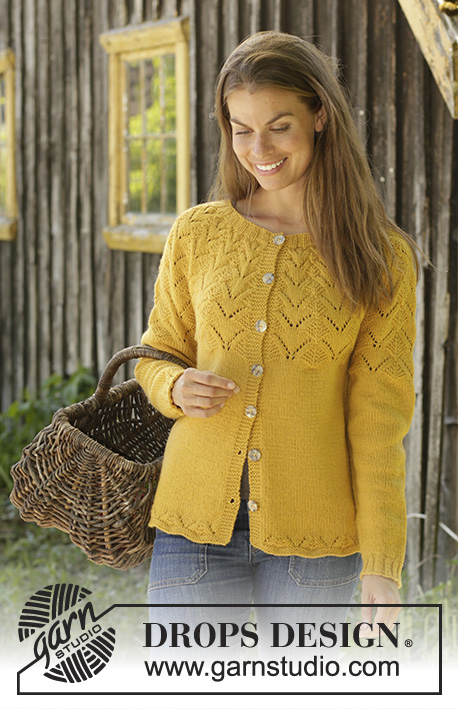
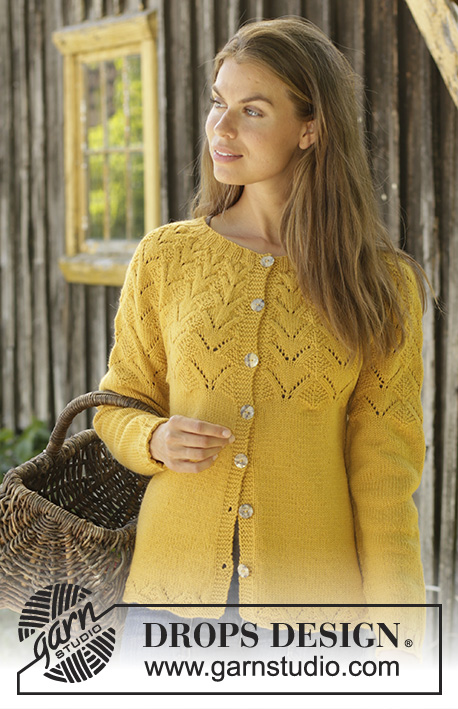
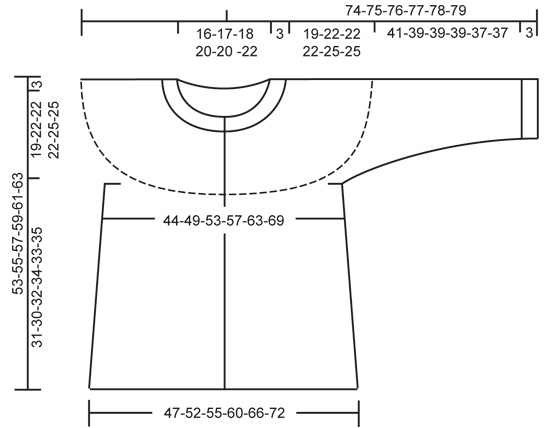
Knitted jacket in DROPS Cotton Merino or DROPS Lima. The piece is worked with round yoke and lace pattern. Sizes S - XXXL.
DROPS 195-23 |
|||||||||||||||||||
|
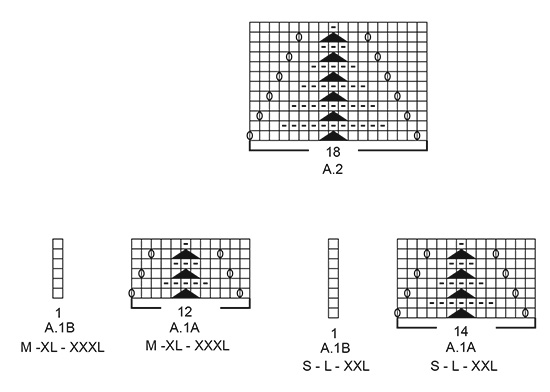
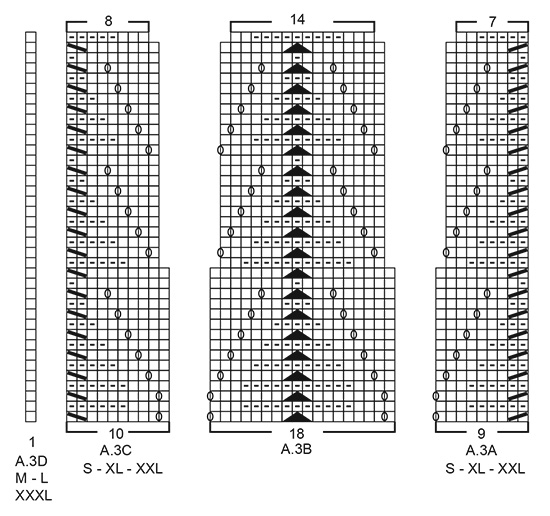
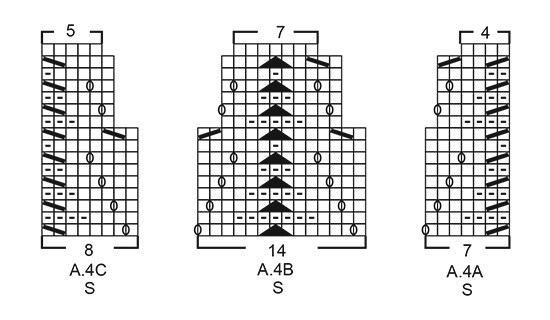
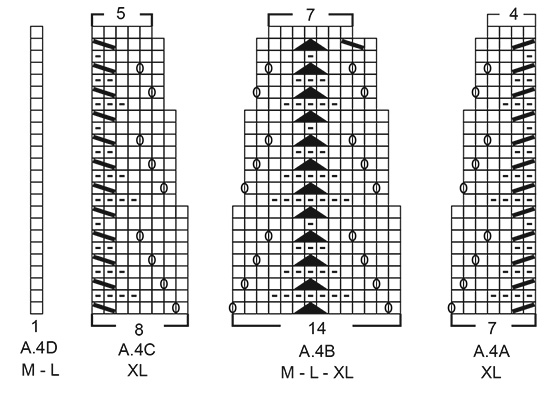
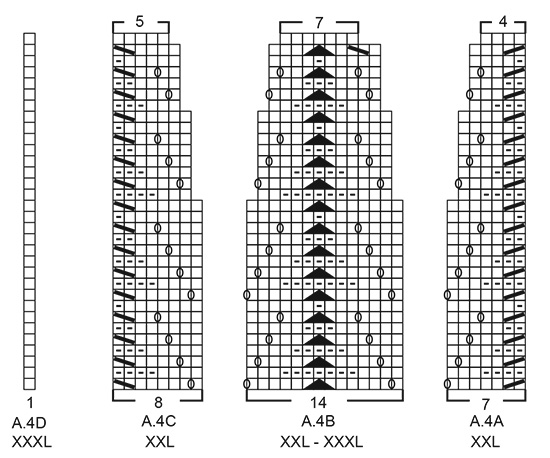
EXPLANATIONS FOR THE PATTERN: ------------------------------------------------------- RIDGE/GARTER STITCH (worked back and forth): 1 ridge = Knit 2 rows. PATTERN: See diagrams A.1 to A.4. Choose diagram for your size (applies to A.1 and A.4). The diagrams show all rows in the pattern seen from the right side. DECREASE/INCREASE TIP (evenly spaced): To work out how to decrease/increase evenly, count the total number of stitches on the needle (e.g. 249 stitches), minus the bands (e.g. 10 stitches) and divide the remaining stitches by the number of decreases/increases to be made (e.g. 6) = 39.8. In this example, decrease by knitting together approx. each 39th and 40th stitch. When increasing make 1 yarn over after approx. every 40th stitch; on the next row/round work the yarn overs twisted to avoid holes. Do not decrease/increase over the bands. DECREASE TIP (for sides of body): All decreases are made from the right side! Start 3 stitches before marker thread in side, knit 2 together, knit 2 (marker thread sits in between these 2 stitches), slip 1 stitch as if to knit, knit 1 and pass the slipped stitch over the knitted stitch (= 2 stitches decreased). INCREASE TIP (for mid under sleeves): Start 1 stitch before the marker thread, make 1 yarn over, knit 2 (marker thread sits between these 2 stitches), make 1 yarn over (= 2 stitches increased). On the next round knit the yarn overs twisted to avoid holes. Then work the increased stitches in stocking stitch. BUTTONHOLES (bottom up): Work buttonholes on right band. 1 BUTTONHOLE = knit second and third stitch from the edge together and make 1 yarn over. On the next row knit the yarn over to leave a hole. Work buttonholes when piece measures: S: 8, 15, 22, 29, 36, 43 and 51 cm M: 8, 15, 23, 30, 38, 45 and 53 cm L: 8, 16, 24, 32, 40, 48 and 55 cm XL: 8, 15, 22, 29, 36, 43, 50 and 57 cm XXL: 10, 17, 24, 31, 38, 45, 52 and 59 cm XXXL: 10, 17, 24, 31, 38, 45, 52 and 61 cm NOTE: The last of these 7-7-7-8-8-8 buttonholes is worked on the neck. ------------------------------------------------------- START THE PIECE HERE: ------------------------------------------------------- JACKET - SHORT OVERVIEW OF THE PIECE: The piece is worked back and forth with circular needle from mid front, bottom up as far as the armholes. The sleeves are worked in the round with double pointed needles/short circular needle bottom up. Body and sleeves are then placed on same circular needle and the yoke is finished working back and forth from mid front. BODY: Cast on 207-227-249-263-291-311 stitches (including 5 band stitches in each side towards mid front) with circular needle size 4 mm and Cotton Merino. Change to circular needle size 3.5 mm and work 2 RIDGES – read description above. Change back to circular needle size 4 mm and work 2 rows stocking stitch with 5 band stitches in garter stitch in each side. The next row is worked as follows from the right side: 5 band stitches in garter stitch, Work A.1A until there are 6 stitches left on row (= 14-18-17-21-20-25 repeats of 14-12-14-12-14-12 stitches), work A.1B (= 1 stitch) and finish with 5 band stitches in garter stitch. Continue this pattern. When A.1 has been completed, continue with stocking stitch and 5 band stitches in garter stitch in each side. AT THE SAME TIME on the first row from the right side decrease 0-0-6-0-4-0 stitches evenly on row = 207-227-243-263-287-311 stitches REMEMBER THE KNITTING TENSION! When the piece measures 8-8-8-8-10-10 cm insert 2 marker threads in the piece as follows from the right side: First marker thread is inserted after the first 54-59-63-68-74-80 stitches on the row (= right front piece when garment is worn), 2nd marker thread after the next 98-108-116-126-138-150 stitches (= back piece). There are 55-60-64-69-75-81 stitches left on row after the 2nd marker thread (= left front piece – NOTE: There is 1 more stitch on the left front piece than the right because of the pattern which will later be worked on sleeves and yoke). On the next row from the right side work BUTTONHOLE on right band – read description above. AT THE SAME TIME decrease 1 stitch on each side of both marker threads - read DECREASE TIP (= 4 stitches decreased). Continue to decrease on each side of both marker threads every 8-8-8-9-9-9 cm a total of 3 times in each side = 195-215-231-251-275-299 stitches. Continue working until the piece measures approx. 31-30-32-34-33-35 cm (measured from bottom of the curve in A.1). The next row is worked as follows from the wrong side: Work as before over the first 50-54-58-63-67-72 stitches and increase at the same time 1-6-2-6-2-6 stitches evenly over these stitches (= left front piece), cast off 4-6-6-6-10-12 stitches for armhole, work as before over the next 88-96-104-114-122-132 stitches and increase 2-12-4-12-4-12 stitches evenly over these stitches (= back piece), cast off 4-6-6-6-10-12 stitches for armhole, work the remaining 49-53-57-62-66-71 stitches as before and increase 1-6-2-6-2-6 stitches evenly over these stitches (= right front piece). There are now 50-59-59-68-68-77 stitches on the right front piece, 90-108-108-126-126-144 stitches on the back piece and 51-60-60-69-69-78 stitches on the left front piece. Lay the piece to one side and work sleeves as described below. SLEEVE: Cast on 48-52-56-56-60-60 stitches with double pointed needles size 3.5 mm and Cotton Merino. Knit 1 round. Then work rib in the round (= knit 2 / purl 2) for 3 cm. Knit 1 round where you decrease 6-8-10-10-10-8 stitches evenly on round = 42-44-46-46-50-52 stitches. Change to double pointed needles size 4 mm and work stocking stitch in the round. When the piece measures 10-8-11-11-9-9 cm insert 1 marker thread at the beginning of the round (= mid under sleeve). On the next round increase 2 stitches mid under sleeve - read INCREASE TIP. Increase like this every 2½-2½-1½-1½-1½-1½ cm a total of 13-13-19-19-19-19 times = 68-70-84-84-88-90 stitches (change to short circular needle when necessary). Continue working until the piece measures 40-38-38-38-36-36 cm (increases mid under sleeve should now be finished and measurements are shorter in larger sizes due to longer yoke). Knit 1 round where you increase 8-8-12-12-12-12 stitches evenly on round = 76-78-96-96-100-102 stitches. The next round is worked as follows: Work 2-3-3-3-5-6 stitches in stocking stitch, work A.2 over the next 72-72-90-90-90-90 stitches (= 4-4-5-5-5-5 repeats of 18 stitches) and finish with 2-3-3-3-5-6 stitches in stocking stitch. Continue this pattern until you just have the last row in A.2 left to work. The last round is worked as follows: Cast off 2-3-3-3-5-6 stitches for armhole, work last row in A.2 over the next 72-72-90-90-90-90 stitches and cast off the remaining 2-3-3-3-5-6 stitches for armhole. The sleeve measures approx. 44-42-42-42-40-40 cm from the top down. Lay the piece to one side and work the other sleeve in the same way. YOKE: Place sleeves on same circular needle size 4 mm as body, where you cast off stitches for armholes (without working the stitches) = 335-371-407-443-443-479 stitches on row. The first row is worked as follows from the right side: SIZES S, XL and XXL: 5 edge stitches in garter stitch, A.3A (= 9 stitches), work A.3B until there are 15 stitches left on row (= 17-23-23 repeats of 18 stitches), A.3C (= 10 stitches) and finish with 5 edge stitches in garter stitch. Continue this pattern (the pattern should match neatly on the sleeves too). When A.3 has been completed there are 263-347-347 stitches on the row. The next row is worked as follows from the right side: 5 edge stitches in garter stitch, work A.4A (= 7 stitches), A.4B until there are 13 stitches left on row (= 17-23-23 repeats of 14 stitches), A.4C (= 8 stitches) and finish with 5 edge stitches in garter stitch. Continue this pattern. When A.4 has been completed there are 138-180-180 stitches on row. Now go to ALL SIZES! SIZES M, L and XXXL: 5 edge stitches in garter stitch, work A.3B until there are 6 stitches left on row (= 20-22-26 repeats of 18 stitches), A.3D (= 1 stitch) and finish with 5 edge stitches in garter stitch. Continue this pattern (the pattern should match neatly on the sleeves too). When A.3 has been completed there are 291-319-375 stitches left on row. The next row is worked as follows from the right side: 5 edge stitches in garter stitch, work A.4B until there are 6 stitches left on row (= 20-22-26 repeats of 14 stitches), A.4D (= 1 stitch) and finish with 5 edge stitches in garter stitch. Continue this pattern. When A.4 has been completed there are 151-165-193 stitches on row. Now go to ALL SIZES! ALL SIZES: Knit 1 row from the right side where you decrease 30-39-49-56-56-61 stitches evenly on row – read DECREASE/INCREASE TIP = 108-112-116-124-124-132 stitches on row. The yoke now measures approx. 19-22-22-22-25-25 cm from where the sleeves and body were worked together. Now work NECK as described below. NECK: Change to circular needle size 3.5 mm and work the next row as follows from the wrong side: 5 band stitches in garter stitch, * purl 2, knit 2 *, work from *-* until there are 7 stitches left on row, purl 2 and finish with 5 band stitches in garter stitch. Continue this rib for 3 cm – remember the last buttonhole on right band. Then cast off loosely with garter stitch over garter stitch, knit over knit and purl over purl; to avoid the cast-off edge being tight you can cast off with circular needle size 4 mm. The whole jacket measures approx. 56-58-60-62-64-66 cm from the shoulder down. ASSEMBLY: Sew openings under sleeves. Sew buttons onto left band. |
|||||||||||||||||||
Diagram explanations |
|||||||||||||||||||
|
|||||||||||||||||||
 |
|||||||||||||||||||
 |
|||||||||||||||||||
 |
|||||||||||||||||||
 |
|||||||||||||||||||
 |
|||||||||||||||||||
 |
|||||||||||||||||||
Have you finished this pattern?Tag your pictures with #dropspattern #goldenfairycardigan or submit them to the #dropsfan gallery. Do you need help with this pattern?You'll find 28 tutorial videos, a Comments/Questions area and more by visiting the pattern on garnstudio.com. © 1982-2026 DROPS Design A/S. We reserve all rights. This document, including all its sub-sections, has copyrights. Read more about what you can do with our patterns at the bottom of each pattern on our site. |
|||||||||||||||||||


With over 40 years in knitting and crochet design, DROPS Design offers one of the most extensive collections of free patterns on the internet - translated to 17 languages. As of today we count 324 catalogues and 12290 patterns translated into English (UK/cm). 12290
We work hard to bring you the best knitting and crochet have to offer, inspiration and advice as well as great quality yarns at incredible prices! Would you like to use our patterns for other than personal use? You can read what you are allowed to do in the Copyright text at the bottom of all our patterns. Happy crafting!
Post a comment to pattern DROPS 195-23
We would love to hear what you have to say about this pattern!
If you want to leave a question, please make sure you select the correct category in the form below, to speed up the answering process. Required fields are marked *.