
Popular categories
Looking for a yarn?


Comments / Questions (64)
Anna wrote:
Hi there, Can I use the DROPS Brushed Alpaca Silk yarn for this sweater? Also do you recommend blocking using this material? Thanks! Anna
23.10.2018 - 19:53DROPS Design answered:
Hi Anna, If you use a different garn to the one suggested, it is important to do a trial piece with the new yarn to get the right knitting tension and then adjust the number of stitches in the pattern. Happy knitting!
24.10.2018 - 08:00Drops Design wrote:
Für Karin und Stefanie über die Schulterschrägung. Die Linie wurde weg, um Misveständnis zu vermeiden. Ohne die verkürzten Reihen wurden die Schulter etwas schräg, wegen Strickrichtung/Verschiebung. Viel Spaß beim stricken!
19.10.2018 - 08:56Drops Design wrote:
For Mrs Grainger - measurements are correct in the pattern, you will cast off for armhole while the decreases are not finished (adjust to cast off on a row where there is no decrease). Happy knitting!
19.10.2018 - 08:51
![]() Tanja wrote:
Tanja wrote:
Auch wie bei Modell ai-171 bitte ich Sie, die Anleitung zu überprüfen. Das ist nun das zweite Projekt, das beiseite liegt. Ich bin aber wirklich sehr dankbar für die tollen Anleitungen! Die Präsentation der tollen Modelle weckt aber auch Bedürfnisse. Die Wolle wurde gezielt gekauft/ bestellt, man freut sich auf das Projekt und dann ... bleibt man stecken... Das ist sehr frustrierend. Also update ich Ihre Seite jeden Tag um zu sehen, ob die Anleitung nun geprüft/ verbessert wurde.
18.10.2018 - 19:32
![]() Caroline wrote:
Caroline wrote:
Kan het kloppen dat de verkorte toeren die te breien zijn voor de schouders omgewisseld zijn. Als men ze breit zoals aangegeven in de uitleg, dan lopen de schouders naar binnen af.
18.10.2018 - 19:02DROPS Design answered:
Dag Caroline,
Volgens mij heb je gelijk. Ik heb het even doorgegeven aan afdeling design om te controleren en waarschijnlijk komt er binnenkort een correctie op het patroon.
EDIT:
Er is antwoord op je vraag van de designafdeling. De verkorte toeren zijn niet omgewisseld. Het lijkt een beetje ongewoon, maar door de breirichting (minderen in het midden en meerderen aan de zijkant) lopen de schouders al af vanaf de nek naar de schouder. Door de verkorte toeren op deze manier lopen ze nog steeds af, maar ietsje minder. Ik hoop dat het zo duidelijk is. 18.10.2018 - 19:36
![]() Chrissie Grainger wrote:
Chrissie Grainger wrote:
I am knitting size XL; for the right shoulder I have to decrease every 4th row 11 times = 44 rows. My tension is correct, so I am working 15cm, but the pattern asks me to cast off for the armhole after working 12cm. Can you help?
08.10.2018 - 22:37DROPS Design answered:
Dear Mrs Grainger, our design team will check this, thanks in advance for your patience.
09.10.2018 - 09:30
![]() Karin wrote:
Karin wrote:
Dir Schulterschrägung ist auch mein Problem. Wenn man nach Anleitung strickt wird eine eventuelle Schrägung aufgehoben. Soll eine Schrägung entstehen oder soll die Schrägung, die durch die Anschlagkante entstanden ist, ausgeglichen werden? Ich habe beide "Varianten" ausprobiert. Aber beides passt nicht richtig.
06.10.2018 - 20:02DROPS Design answered:
Liebe Karin, unser Designteam wird die Anleitung noch mal schauen - danke im voraus für Ihren Geduld.
09.10.2018 - 09:31
![]() Stefanie wrote:
Stefanie wrote:
Danke für die schnelle Antwort. Ich habe mich nicht richtig ausgedrückt. Laut Anleitung ist die tiefste Stelle der Schrägung auf der Ausschnittseite, laut Zeichnung ist diese jedoch an der Ärmelseite. ( Maschen bleiben am Ende der Rückreihe stehen = Halsausschnittseite) Vielen herzlichen Dank für Ihre Mühe!
03.10.2018 - 16:16DROPS Design answered:
Liebe Stefanie, Danke für die Erklärung, unser Designteam wird das noch mal schauen. Danke im voraus für Ihren Geduld.
04.10.2018 - 09:30
![]() Stefanie wrote:
Stefanie wrote:
Hallo, ich habe ein Problem mit der Schulterschräge. Wenn ich nach der Anleitungstricke ist die Zeichnung der Schulterschräge seitenverkehrt. Ist die Anleitung oder der Zeichnung richtig? Vielen Dank für Ihre Hilfe!
03.10.2018 - 14:36DROPS Design answered:
Liebe Stefanie, Anleitung stimmt so, es werden verkürtze Reihen bei beiden Vorderteile gestrickt, aber keine beim Rückenteil. Viel Spaß beim stricken!
03.10.2018 - 15:18
![]() Gopesto wrote:
Gopesto wrote:
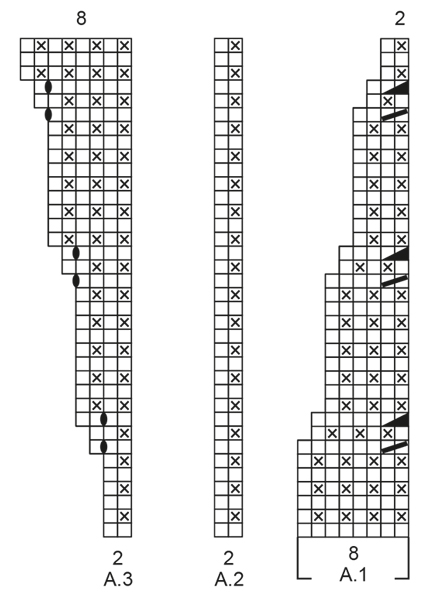
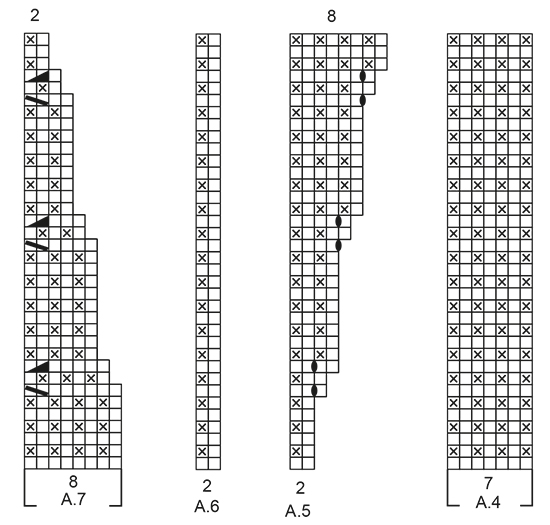
In Diagramm A3 und A5 ist in Reihe 7 und 9 ein Fehler. Hier werden die durch die Umschläge zugenommenen Maschen schon in Reihe 7 und 9 gezeigt, dabei entstehen sie erst in den jeweils darauf folgenden Reihen durch das Abstricken der Umschläge!
18.09.2018 - 10:50
|
|||||||||||||||||||
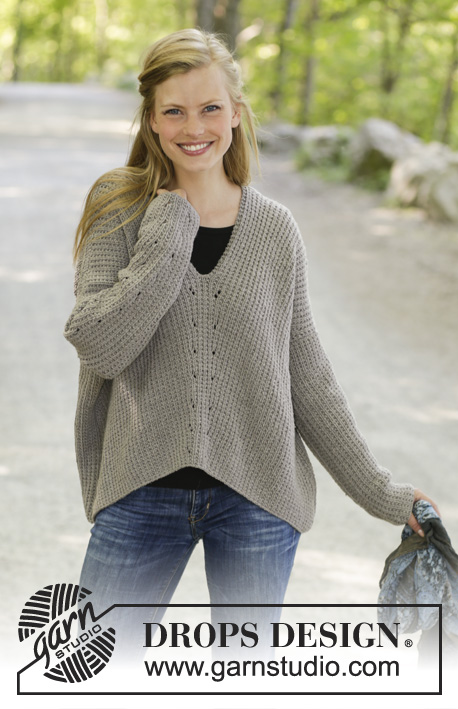
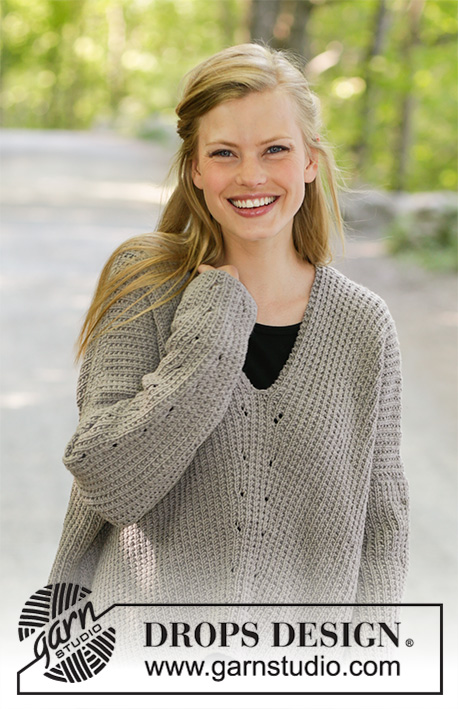
Wednesday Morning#wednesdaymorningsweater |
|||||||||||||||||||
 |
 |
||||||||||||||||||
Knitted jumper in DROPS Merino Extra Fine. The piece is worked back and forth with texture and displacement. Sizes S - XXXL
DROPS 197-27 |
|||||||||||||||||||
|
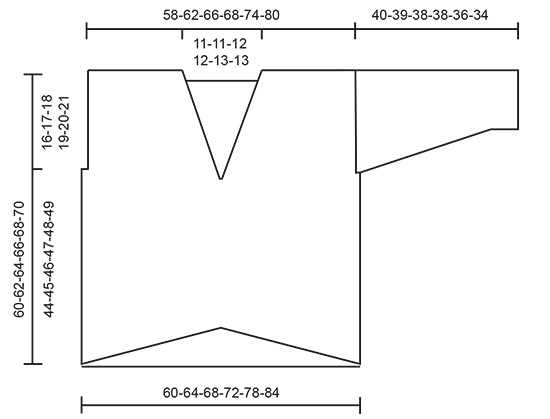
------------------------------------------------------- EXPLANATIONS FOR THE PATTERN: ------------------------------------------------------- RIDGE/GARTER STITCH (worked back and forth): 1 ridge = Knit 2 rows. PATTERN: See diagrams A.1 to A.7. The diagrams show all the rows in the pattern seen from the right side. DECREASE TIP: All decreases are made from the right side! Decrease in the same way as in diagrams A.1 and A.7 as follows: Decrease after the 1 edge stitch in garter stitch when the 2nd stitch on the row is worked in garter stitch as follows: Knit 2 together. Decrease after the 1 edge stitch in garter stitch when the 2nd stitch on the row is knitted as follows: Purl 2 together. Decrease before the 1 edge stitch in garter stitch when the next to last stitch on the row is in garter stitch as follows: Work until there are 3 stitches left on the row, slip 1 stitch as if to knit, knit 1 and pass the slipped stitch over the knitted stitch. Decrease before the 1 edge stitch in garter stitch when the next to last stitch on the row is knitted as follows: Work until there are 3 stitches left on the row, purl 2 together. ------------------------------------------------------- START THE PIECE HERE: ------------------------------------------------------- JUMPER - SHORT OVERVIEW OF THE PIECE: The piece is worked back and forth with circular needle in sections and sewn together to finish. The piece is worked bottom up. FRONT PIECE: Cast on 129-137-145-153-165-177 stitches with circular needle size 4.5 mm and Merino Extra Fine. Purl 1 row from the wrong side. Now work pattern from the right side as follows: 1 edge stitch in GARTER STITCH - read description above, work A.1 over the first 8 stitches, A.2 over the next 50-54-58-62-68-74 stitches, A.3 over the next 2 stitches, A.4 over the next 7 stitches (= the middle 7 stitches on the row), A.5 over the next 2 stitches, A.6 over the next 50-54-58-62-68-74 stitches, A.7 over the next 8 stitches and 1 edge stitch in garter stitch. Continue back and forth like this. The number of stitches stays the same, but the pattern is displaced. REMEMBER THE KNITTING TENSION! When the diagrams have been completed in height, continue the pattern in the same way, i.e. increase stitches in A.3 and A.5 and decrease stitches in A.1 and A.7. When the piece measures approx. 34-34-35-35-35-35 cm from the cast-on edge and up the side of the piece – adjust so that you finish after 5 rows after an increase, work the next row from the right side as follows: Work pattern as before over the first 64-68-72-76-82-88 stitches on the row, work 2 stitches in the next stitch (= mid-stitch), work pattern as before over the last 64-68-72-76-82-88 stitches on the row = 130-138-146-154-166-178 stitches. Insert a marker thread in each side of the piece. THE PIECE IS NOW MEASURED FROM HERE! Place the first 65-69-73-77-83-89 stitches (seen from the right side) on a thread for left shoulder and work the right shoulder. RIGHT SHOULDER: = 65-69-73-77-83-89 stitches. Work 1 row back from the wrong side. Now work pattern as follows from the right side: 2 edge stitches in garter stitch (= towards neck), continue pattern A.6 until there is 1 stitch left and work 1 edge stitch in garter stitch. AT THE SAME TIME on the first row from the right side decrease 1 stitch inside the 1 edge stitch in garter stitch towards the side - read DECREASE TIP. Decrease like this every 4th row a total of 10-10-11-11-12-12 times and when the piece measures 10-11-11-12-13-14 cm from the marker thread cast off 2-2-2-4-4-4 stitches for the armhole = 53-57-60-62-67-73 stitches left on shoulder. When the piece measures 17-18-19-20-21-22 cm from the marker thread (= 7-7-8-8-8-8 cm from where you cast off for the armhole) work short rows in pattern as before from the wrong side as follows: ROW 1 (wrong side): Work until there are 2 stitches left on the row, tighten strand. ROW 2 (right side): Work back. ROW 3: Work until there are 4 more stitches left on the row than the previous time (= 6 stitches), tighten strand. ROW 4: Work back. Repeat rows 3 and 4 and turn when there are 4-4-4-4-4-4 more stitches left than on the previous row 7-11-10-13-12-15 more times (= a total of 8-12-11-14-13-16 times) and then when there are 5-3-5-0-3-3 more stitches left than on the previous row 3-1-2-0-3-1 times. Work 1 ridge over all stitches on row where you decrease 5 stitches evenly on row = 48-52-55-57-62-68 stitches left on shoulder. Cast off. The piece measures approx. 60-62-64-66-68-70 cm from the shoulder down. LEFT SHOULDER: = 65-69-73-77-83-89 stitches. Work 1 row back from the wrong side. Now work pattern as follows from the right side: 1 edge stitch in garter stitch (towards armhole), continue pattern A.6 until there are 2 stitches left and work 2 edge stitches in garter stitch (= towards neck). AT THE SAME TIME on the first row from the right side decrease 1 stitch inside the 1 edge stitch in garter stitch towards the side - remember DECREASE TIP. Decrease like this every 4th row a total of 10-10-11-11-12-12 times and when the piece measures 10-11-11-12-13-14 cm from the marker thread cast off 2-2-2-4-4-4 stitches for the armhole = 53-57-60-62-67-73 stitches left on shoulder. When the piece measures 17-18-19-20-21-22 cm from the marker thread (= 7-7-8-8-8-8 cm from where you cast off for the armhole) work short rows in pattern as before from the right side as follows: ROW 1 (right side): Work until there are 2 stitches left on the row, tighten strand. ROW 2 (wrong side): Work back. ROW 3: Work until there are 4 more stitches left than the previous time (= 6 stitches), tighten strand. ROW 4: Work back. Repeat rows 3 and 4 and turn when there are 4-4-4-4-4-4 more stitches left than the previous row 7-11-10-13-12-15 more times (= a total of 8-12-11-14-13-16 times) and then when there are 5-3-5-0-3-3 more stitches left than the previous time 3-1-2-0-3-1 times. Work 1 ridge over all stitches on row where you decrease 5 stitches evenly on row = 48-52-55-57-62-68 stitches left on shoulder. Cast off. The piece measures approx. 60-62-64-66-68-70 cm from the shoulder down. BACK PIECE: Cast on 121-129-137-145-157-169 stitches with circular needle size 4.5 mm and Merino Extra Fine. Purl 1 row from the wrong side. Now work pattern as follows from the right side: 1 edge stitch in garter stitch, work A.2 until there are 2 stitches left on the row, work the first stitch in A.2 and 1 edge stitch in garter stitch. Continue back and forth like this. When the piece measures 44-45-46-47-48-49 cm – adjust to match the front piece where you cast off stitches for the armholes, and cast off 2-2-2-4-4-4 stitches at the beginning of the next 2 rows for the armholes in each side = 117-125-133-137-149-161 stitches. Continue working until the piece measures 56-58-60-62-64-66 cm. Now work garter stitch over the middle 25-25-27-27-29-29 stitches on the row. When you have worked 2 ridges over these stitches, cast off the middle 21-21-23-23-25-25 stitches for neck and each shoulder is finished separately = 48-52-55-57-62-68 stitches on each shoulder. Continue with texture and 1 edge stitch in garter stitch in the side and 2 stitches in garter stitch towards the neck. When the piece measures 59-61-63-65-67-69 cm work 1 ridge over all stitches. Cast off. Work the other shoulder in the same way. The piece measures approx. 60-62-64-66-68-70 cm from the shoulder down. SLEEVE: Cast on 45-45-49-49-53-53 stitches with circular needle size 4.5 mm and Merino Extra Fine. Purl 1 row from the wrong side. Now work pattern as follows from the right side: 1 edge stitch in garter stitch, A.2 over the next 16-16-18-18-20-20 stitches, A.3 over the next 2 stitches, A.4 over the middle 7 stitches on the sleeve, A.5 over the next 2 stitches, A.6 over the next 16-16-18-18-20-20 stitches and 1 edge stitch in garter stitch. Continue back and forth like this. You increase stitches on the middle of sleeve in diagrams A.3 and A.5. When the sleeve measures 7 cm decrease 1 stitch in each side - remember DECREASE TIP! NOTE: In size XXXL you do not decrease, but continue to work texture and increase stitches as before. Decrease like this every 10th-12th-18th-30th-28th-0 row a total of 10-8-6-4-4-0 times. When the diagrams have been completed in height continue to increase in the middle of the sleeve as before until you have increased a total of 20-20-18-18-18-16 times and there are 65-69-73-77-81-85 stitches on the needle. Then continue with texture until the sleeve measures 40-39-38-37-36-33 cm. Cast off. Work the other sleeve in the same way. ASSEMBLY: Sew the shoulder seams with grafting stitches. Sew sleeves to body inside the 1 edge stitch in garter stitch on the body and inside the cast-off edge on the sleeve. Sew sleeve and side seams in one go inside the 1 edge stitch in garter stitch. |
|||||||||||||||||||
Diagram explanations |
|||||||||||||||||||
|
|||||||||||||||||||
 |
|||||||||||||||||||
 |
|||||||||||||||||||
 |
|||||||||||||||||||
Have you finished this pattern?Tag your pictures with #dropspattern #wednesdaymorningsweater or submit them to the #dropsfan gallery. Do you need help with this pattern?You'll find 22 tutorial videos, a Comments/Questions area and more by visiting the pattern on garnstudio.com. © 1982-2026 DROPS Design A/S. We reserve all rights. This document, including all its sub-sections, has copyrights. Read more about what you can do with our patterns at the bottom of each pattern on our site. |
|||||||||||||||||||


With over 40 years in knitting and crochet design, DROPS Design offers one of the most extensive collections of free patterns on the internet - translated to 17 languages. As of today we count 324 catalogues and 12290 patterns translated into English (UK/cm). 12290
We work hard to bring you the best knitting and crochet have to offer, inspiration and advice as well as great quality yarns at incredible prices! Would you like to use our patterns for other than personal use? You can read what you are allowed to do in the Copyright text at the bottom of all our patterns. Happy crafting!
Post a comment to pattern DROPS 197-27
We would love to hear what you have to say about this pattern!
If you want to leave a question, please make sure you select the correct category in the form below, to speed up the answering process. Required fields are marked *.