
Popular categories
Looking for a yarn?


Comments / Questions (26)
![]() Delphine wrote:
Delphine wrote:
Bonjour, je ne parviens pas à faire coïncider les lignes du graphique A1 rang 13 après avoir fait les augmentations (flèche 2). J'ai utilisé la calculatrice pourtant. Est-ce normal ou bien ai-je raté quelque-chose ?
24.11.2025 - 22:31DROPS Design answered:
Bonjour Delphine, le jacquard ne sera pas aligné exactement comme dans le diagramme à cause des augmentations, mais vous aurez toujours un nombre multiple de 12, autrement dit, vous aurez suffisamment de mailles pour tricoter le motif. Bon tricot!
22.12.2025 - 17:00
![]() Mariel Zaiser wrote:
Mariel Zaiser wrote:
Como puedo acceder a los patrones y diagrama de puntos que siempre estaban disponibles y ahora no se los puede ver?
12.07.2024 - 19:53DROPS Design answered:
Hola Mariel, todos nuestros diagramas y patrones están disponibles gratis en la web. A veces, por el tráfico de la página web pueden tardar en cargar o cargarse incompletos; en ese caso prueba más tarde o prueba a usar otro navegador. Recuerda que puedes seleccionar el idioma al lado del botón de imprimir, en la barra antes de las instrucciones del patrón.
16.07.2024 - 18:29
![]() Jannie wrote:
Jannie wrote:
Str M. 8 nye m slået op og derefter strikket videre på bagstykket. 8 nye masker slået op og derefter strikket videre på højre forstykke. Ialt 163 m. Så ærmerne, Hvordan strikker jeg i de NYE masker (som lige blev strikket i forlængelse af hhv bag- og forstykkerne ? Jeres video til spørgsmålet er virker ikke.
24.07.2023 - 17:38DROPS Design answered:
Hei Jennie Ta en titt på denne videoen: Hvordan strikkes masker op under ærmet mvh DROPS Design
27.07.2023 - 14:30
![]() Sabine wrote:
Sabine wrote:
Es ist sehr ärgerlich, die weiße Wolle reicht nicht für den 2. Ärmel - da hätte man 2x50 g bestellen müssen - wenn ich jetzt nachbestelle , wird durch die Versandkosten das eine Knäul echt teuer -
04.02.2023 - 12:16
![]() Else-Marie Edelfeldt wrote:
Else-Marie Edelfeldt wrote:
Rättelse 1... från 2019....Var skall det in i mönstret. Hittar inte var det ska passa in. Mvh Els-Marie
21.01.2022 - 09:30DROPS Design answered:
Hej Else-Marie. Det är sist i stycket "FÖRHÖJNING BAK I NACKEN". Rättelsen är alltså inskriven i mönstret, så det är bara att följa mönstret. Mvh DROPS Design
21.01.2022 - 10:28
![]() Marianne Gaarder wrote:
Marianne Gaarder wrote:
Hej Venligst se bort fra mit forrige spørgsmål. Det fandt jeg ud af. Til gengæld forstår jeg ikke udtagningstips nr 1, hvor der står, at de masker man har slået op skal strikkes drejet ret på næste omgang, for dette er jo på en vrangpind? Vh Marianne
31.12.2021 - 13:35DROPS Design answered:
Hei Marianne. Her skal kastet strikkes vridd, ikke rett (vridd vrang). Vi skal få ordnet dette, takk for at du gjorde oss oppmerksom på dette. mvh DROPS Design
04.01.2022 - 15:33
![]() Marianne Gaarder wrote:
Marianne Gaarder wrote:
Er opskriften korrekt i forhold til når første knaphul strikkes? Der står det skal være i højre side, når trøjen er på og at det skal strikkes på retpinden, når der er 3 masker tilbage på pinden. Men som jeg ser det skal knaphullet strikkes i starten af pinden for at være i den rigtige side?
30.12.2021 - 21:15DROPS Design answered:
Hei Marianne. Så bra du fant ut av det selv. Svar på ditt 2. spørsmål se lengre opp. mvh DROPS Design
04.01.2022 - 15:31
![]() Ann-Mari Kindsbækken wrote:
Ann-Mari Kindsbækken wrote:
Gjelder Nougat Cardigan. Etter 2.øking stemmer ikke mønsterbord 3 med mønsterbord 2. Iflg mønster skal 1 maske farge hvete i mønsterbord 3 være rett over 1 maske lilla tåke i mønsterbord 2 (nederste spiss i bord 2). For å få det til å stemme må jeg strikke 4 masker lys grågrønn (istedenfor 3 som mønsteret sier) og da vil vel ikke resten av mønsterborden bli symmetrisk. Hvordan løser jeg dette? Mvh Ann-Mari K
08.08.2021 - 10:24DROPS Design answered:
Hei Ann-Mari. Pga økningene vil det ikke bli helt symmetrisk slik du ser det på diagrammet, men slik må det være. Om du ser på bildet er det "usymmetrisk", men det vises nesten ikke og det faller seg naturlig når plagget blir større ved økningene. mvh DROPS design
18.08.2021 - 07:50
![]() Helena Katajisto wrote:
Helena Katajisto wrote:
Hei. Olen kiinnostunut mallista ja langoista malliin 191-3 niin saako mukaan printattuja ohjeita vai onko ohjeet ainoastaan videolla?
06.01.2021 - 08:48DROPS Design answered:
Hei, voit tulostaa kaikkia ohjeitamme ilmaiseksi sivuiltamme.
12.03.2021 - 14:17
![]() Micheline Jans wrote:
Micheline Jans wrote:
Ik heb een vraag het design laat enkel de goede kant zien, wil zit zegen dat de aververchtse kant dezelfde steken beteken in dezelfde kleuren?
31.12.2020 - 20:51
|
||||||||||||||||
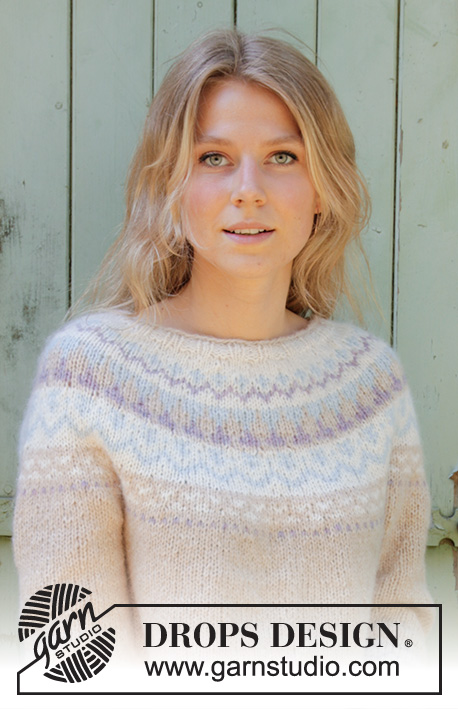
Nougat Cardigan#nougatcardigan |
||||||||||||||||
 |
 |
|||||||||||||||
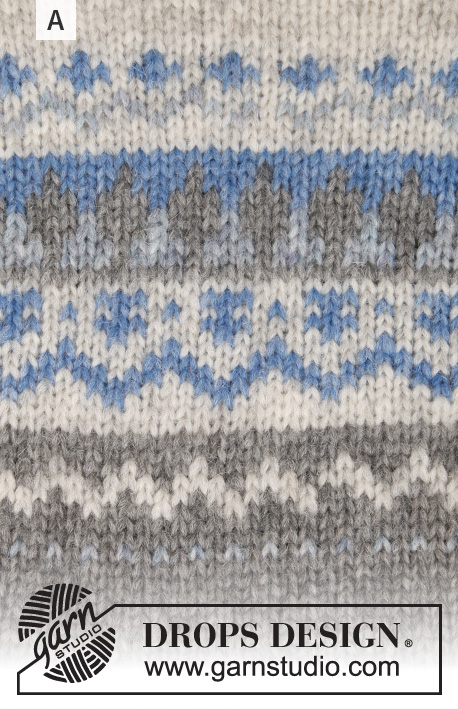
Knitted jacket with round yoke and multi-coloured Norwegian pattern, worked top down. Sizes S - XXXL. The piece is worked in DROPS Air.
DROPS 191-3 |
||||||||||||||||
|
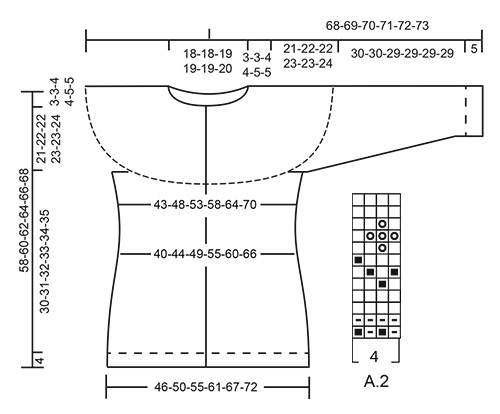
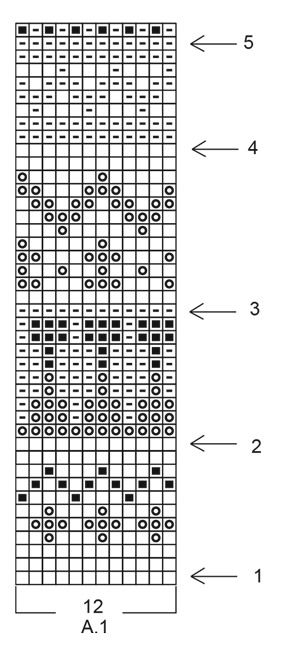
INFORMATION FOR THE PATTERN: RIDGE/GARTER STITCH (worked back and forth): 1 ridge = Knit 2 rows. PATTERN: See diagrams A.1 and A.2. The diagram shows all the rows in the pattern seen from the right side. INCREASE TIP-1 (evenly spaced): To work out how to increase evenly, count the total number of stitches on the needle (e.g. 92 stitches), minus the bands (e.g. 10 stitches) and divide the remaining stitches by the number of increases to be made (e.g. 27) = 3.037. In this example, increase by making 1 yarn over after approx. every 3rd stitch; on the next round work the yarn overs twisted to avoid holes. INCREASE TIP-2: Start 1 stitch before the marker thread, 1 yarn over, knit 2 stitches, 1 yarn over. On the next row purl the yarn overs twisted to avoid holes. DECREASE TIP: Decrease as follows before the marker thread (start 3 stitches before the marker thread): Knit 2 together, knit 1. Decrease as follows after the marker thread: Knit 1 stitch, slip 1 stitch as if to knit, knit 1, pass the slipped stitch over. KNITTING TIP: To avoid that the jacket loses its elasticity when working colour pattern it is important that the strands on the wrong side of piece are not too tight. If the pattern is to tight try going up a needle size. BUTTONHOLES: Work buttonholes on the right band (when the garment is worn): Work from the right side until there are 3 stitches left at the end of the row, make 1 yarn over, knit the next 2 stitches together and knit the last stitch. On the next row knit the yarn over to leave a hole. The first buttonhole is worked when the rib in the neck measures approx. 1½-2 cm. Then work the other 6 buttonholes with approx.9-9-9-10-10-10 cm between each one. ---------------------------------------------------------- JACKET: The piece is worked back and forth with circular needle from mid front, top down. You can work an elevation in the back of the neck for a better fit; the yoke will be a little higher in the back of the neck. You can also leave out the elevation if you wish; the neck will then be the same front and back – see description of elevation a bit further down in the text. Work buttonholes on the right band. After the yoke, the body is worked back and forth on circular needle. The sleeves are worked in the round with double pointed needles, top down NECK: Cast on 92-96-100-104-108-112 stitches with circular needle size 4.5 mm and wheat. Purl 1 row from the wrong side. Change to off white and work rib as follows – from the right side: 5 band stitches in GARTER STITCH – see description above, (knit 2 / purl 2) until there are 7 stitches left on the row, knit 2 and 5 band stitches in garter stitch. Continue back and forth like this until the rib measures 3-3-4-4-5-5 cm – remember BUTTONHOLES on right band – see description above. Change to circular needle size 5.5 mm. REMEMBER THE KNITTING TENSION! Now you can work an elevation in the back of the neck or go straight to working the yoke if you do not want an elevation. ELEVATION IN BACK OF NECK: Skip this section if you do not want an elevation. Insert 1 marker mid back (= 46-48-50-52-54-56 stitches in from each side) Start from the right side with off white and knit until you have worked 11-11-12-13-13-14 stitches past the marker, turn, tighten strand and purl 22-22-24-26-26-28 stitches. Turn, tighten strand and knit 33-33-36-39-39-42 stitches, turn, tighten strand and purl 44-44-48-52-52-56 stitches. Turn, tighten strand and knit to end of row. Purl 1 row from the wrong side, with 5 band stitches in garter stitch in each end. YOKE: Now work pattern - read KNITTING TIP, as follows: 5 band stitches in garter stitch, work the last stitch in A.1, A.1 (= 12 stitches) until there are 5 stitches left, 5 band stitches in garter stitch, AT THE SAME TIME increase stitches evenly on the rows marked with arrows in the diagram – read INCREASE TIP-1 (evenly spaced): Note: When working pattern with 2 colours on the yoke, use the background colour in the pattern over the 5 band stitches in garter stitch in each side. On the row marked with arrow-1 increase 27-35-31-39-35-43 stitches evenly on row = 119-131-131-143-143-155 stitches. On the row marked with arrow-2 increase 36-36-48-48-48-60 stitches evenly on row = 155-167-179-191-191-215 stitches. On the row marked with arrow-3 increase 36-36-48-48-48-60 stitches evenly on row = 191-203-227-239-239-275 stitches. On the row marked with arrow-4 increase 34-34-34-34-46-46 stitches evenly on row = 225-237-261-273-285-321 stitches. Continue the pattern like this: 5 band stitches in garter stitch, work the last stitch in A.1, A.1 (= 12 stitches) until there are 5 stitches left (the last time you work A.1 on the row, you just work the first 10 stitches in the diagram), 5 band stitches in garter stitch. On the row marked with arrow-5 increase 2-14-14-18-30-18 stitches evenly on row = 227-251-275-291-315-339 stitches. Change to wheat. Continue with wheat, stocking stitch and 5 band stitches in garter stitch in each side until the piece measures 24-25-26-27-28-29 cm from the cast-on edge and down mid front – adjust so that the next row is worked from the right side (if the knitting tension is correct in height, this measurement is attained in Size S when A.1 has been completed). The next row is worked as follows: Work the first 36-39-43-47-51-56 stitches (= left front piece), place the next 47-52-56-57-60-63 stitches on a thread for sleeve, cast on 8-8-8-10-10-10 new stitches on the needle (= in side under the sleeve), work the next 61-69-77-83-93-101 stitches (= back piece), place the next 47-52-56-57-60-63 stitches on a thread for sleeve, cast on 8-8-8-10-10-10- new stitches on the needle (= in side under the sleeve) and work the next 36-39-43-47-51-56 stitches (= right front piece). Body and sleeves are finished separately. THE PIECE IS NOW MEASURED FROM HERE! BODY: = 149-163-179-197-215-233 stitches. Insert a marker thread in each side, in the middle of the 8-8-8-10-10-10 new stitches cast on under the sleeves (= 4-4-4-5-5-5 new stitches on each side of the marker thread). Continue back and forth with wheat, stocking stitch and 5 band stitches in garter stitch in each side towards mid front. When the piece measures 4 cm, decrease 2 stitches in each side – read DECREASE TIP. Decrease like this every 4-4-5-5-6-6 cm a total of 3 times = 137-151-167-185-203-221 stitches. When the piece measures 15-15-17-17-19-19 cm, increase 2 stitches in each side – read INCREASE TIP-2. Increase in this way every 3 cm a total of 5 times = 157-171-187-205-223-241 stitches. When the piece measures 30-31-32-33-34-35 cm, increase 11-13-13-15-17-19 stitches evenly on row = 168-184-200-220-240-260 stitches. Change to circular needle size 4.5 mm and work rib as follows: 5 band stitches in garter stitch, (knit 2 /purl 2) until there are 7 stitches left on the row, knit 2, 5 band stitches in garter stitch. When the rib measures 4 cm cast off with knit over knit and purl over purl, but to avoid the cast-off edge being tight, you can make 1 yarn over after every 4th stitch at the same time as you cast off (the yarn overs are cast off as normal stitches). The jacket measures approx. 58-60-62-64-66-68 cm from the cast on edge down mid front. SLEEVE: = 47-52-56-57-60-63 stitches. Place the 47-52-56-57-60-63 stitches from the thread in the one side of the piece on double pointed needles size 5.5 mm and, in addition, knit up 1 stitch in each of the 8-8-8-10-10-10 new stitches cast on under the sleeve with wheat = 55-60-64-67-70-73 stitches. Insert 1 marker thread in the middle of the 8-8-8-10-10-10 new stitches (= 4-4-4-5-5-5 new stitches on each side of the marker thread). Start the round here and work stocking stitch in the round with wheat. When the piece measures 4-4-4-4-3-3 cm from the separation, decrease 2 stitches under the sleeve – read DECREASE TIP. Decrease like this every 4th-3rd-3rd-3rd-3rd-3rd round 10-12-13-13-14-14 times = 35-36-38-41-42-45 stitches. When the piece measures 24-24-23-23-23-23 cm, increase 1-4-2-3-2-3 stitches evenly on round = 36-40-40-44-44-48 stitches. Work A.2 (= 4 stitches) in the round. When the whole of A.2 has been completed in height, change to double pointed needles size 4.5 mm and off white. Work rib (knit 2 /purl 2) for 5 cm. Change to wheat, work 1 round rib as before and loosely cast off with wheat, knit over knit and purl over purl, but to avoid the cast-off edge being tight, you can make 1 yarn over after every 4th stitch at the same time as you cast off (the yarn overs are cast off as normal stitches). The sleeve measures 35-35-34-34-34-34 cm from the separation. Work the other sleeve in the same way. ASSEMBLY: Sew buttons onto left band. |
||||||||||||||||
Diagram explanations |
||||||||||||||||
|
||||||||||||||||
 |
||||||||||||||||
 |
||||||||||||||||
Have you finished this pattern?Tag your pictures with #dropspattern #nougatcardigan or submit them to the #dropsfan gallery. Do you need help with this pattern?You'll find 32 tutorial videos, a Comments/Questions area and more by visiting the pattern on garnstudio.com. © 1982-2026 DROPS Design A/S. We reserve all rights. This document, including all its sub-sections, has copyrights. Read more about what you can do with our patterns at the bottom of each pattern on our site. |
||||||||||||||||


With over 40 years in knitting and crochet design, DROPS Design offers one of the most extensive collections of free patterns on the internet - translated to 17 languages. As of today we count 324 catalogues and 12290 patterns translated into English (UK/cm). 12290
We work hard to bring you the best knitting and crochet have to offer, inspiration and advice as well as great quality yarns at incredible prices! Would you like to use our patterns for other than personal use? You can read what you are allowed to do in the Copyright text at the bottom of all our patterns. Happy crafting!
Post a comment to pattern DROPS 191-3
We would love to hear what you have to say about this pattern!
If you want to leave a question, please make sure you select the correct category in the form below, to speed up the answering process. Required fields are marked *.