
Popular categories
Looking for a yarn?


Comments / Questions (116)
![]() Ana Oliveira wrote:
Ana Oliveira wrote:
Bom dia , para aumento do arrendamento da manga para o tamanho L eu tenho que fazer 6 carreiras seguidas de aumento e depois 28 aumentos a cada 2 carreiras. Ao completar o esquema A2 ficam a faltar cerca de 9 carreiras de aumentos. Eu tenho que continuar a fazer a as carreiras de aumentos para além das carreiras que estão no vosso esquema A2? Obrigada
24.02.2026 - 12:29DROPS Design answered:
Bom dia, O esquema A.2 não mostra os aumentos. Apenas a expansão do ponto fantasia. Sim, deve continuar a fazer os aumentos de cada lado de fora de A.2. Bons tricôs! A equipa DROPS
24.02.2026 - 13:10
![]() Ana Oliveira wrote:
Ana Oliveira wrote:
Eu estou a fazer os aumentos para os arredondamentos das mangas tamanho L e fiz 6 carreiras seguidas de aumentos. Estes aumentos foram feitos imediatamente antes/depois dos 2 pontos liga do esquema A2 e as suas laçadas foram tricotadas em meia torcida. Agora tenho que fazer mais 28 aumentos a cada 2 carreiras. Estes aumentos continuam a ser na mesma imediatamente antes/depois de A2? Não estou a conseguir fazer o aumento para o arredondamento das mangas.
22.02.2026 - 20:09DROPS Design answered:
Bom dia, Sim, os aumentos vão continuar a ser feitos antes/depois das 2 malhas liga de A.2, mas, a partir de agora, a cada 2 carreiras (= carreira sim, carreira não) num total de 28 vezes. Entretanto, deve seguior o diagrama A.2 porque o ponto rendado vai expandir para os lados. NOTA IMPORTANTE: Os 21 primeiros aumentos tricotam-se em meia torcida, mas os aumentos eguintes tricotam-se em liga torcida. Como já fez 6 aumentos e os tricotou em meia torcida, deve fazer mais 15 aumentos e tricotá-los na mesma em meia torcida. Só depois, tricota os últimos 7 aumentos antes/depois de A.2 em liga torcida. Bons tricôs! A equipa DROPS
23.02.2026 - 11:11
![]() Ana Oliveira wrote:
Ana Oliveira wrote:
Nos aumentos para os arredondamentos das mangas, no tamanho L tenho que fazer 6 carreiras seguidas de aumentos . Quando faço esta última carreira de aumentos fico com (25 malhas) ou seja fico com as seguintes malhas: meia, meia, meia, meia, meia torcida, laçada, A2, laçada, meia torcida, meia, meia, meia, meia. Está correto? Caso não esteja pode por favor dizer como fica a carreira? Obrigada
11.02.2026 - 17:29DROPS Design answered:
Boa tarde, Tudo indica que sim. Ao fim dessas 6 carreiras, incorpora as malhas aumentadas em A.2 (ver o diagrama). Bons tricôs, A equipa DROPS
11.02.2026 - 19:05
![]() Ana Oliveira wrote:
Ana Oliveira wrote:
Estou a fazer os aumentos para o arredondamento das mangas no tamanho L. Na carreira 6 eu vou fazer o seguinte esquema: laçada (aumento), 5 malhas meia que eram os aumentos das carreiras anteriores, 2 malhas liga, 9 malhas meia, 2 malhas liga, 5 malhas em meia (aumentos carreiras anteriores) e laçada (aumento). Está correto? Como é o tamanho L faço 6 carreiras de aumento a carreira seguinte não faço aumento e depois só faço aumentos a cada duas carreiras 28 vezes. Está correto?
10.02.2026 - 15:05DROPS Design answered:
Boia tarde, Os aumentos para o arredondado das mangas para o tamanho L começam na carreira assinalada com uma flecha em A.2 (Não está numerada. mas não é a carreira 6). Deve fazer 1 laçada, A.2, 1 laçada, tricotar as costas, 1 laçada, A.2, 1 laçada, tricotar a frente. Na carrreira seguinte, tricota a laçada da carreira anterior em meia torcida, faz 1 laçada,tricota A.2, faz 1 laçada, tricota a laçada da carreira anterior torcida e repete até ao fim da carreira. E faz os aumentos para o arredondado das mangas em todas as carreiras num total de 6 vezes, tricotando os aumentos das carreiras anteriores (= laçadas) torcidos em meia. Bons tricôs! A equipa DROPS
10.02.2026 - 16:29
![]() Ana Oliveira wrote:
Ana Oliveira wrote:
Nos aumentos para o arredondamento das mangas por exemplo para o tamanho L eu tenho que fazer 6 carreiras de aumentos no diagrama A2. Estes aumentos são só nas carreiras em que se faz o trabalhado do A2 ou também se faz aumentos quando estamos a fazer a carreira em que parte das malhas é em meia ( ou seja caso estivessemos a fazer carreiras de ida e volta também tínhamos que fazer aumentos na carreira da parte do avesso do trabalho)?
09.02.2026 - 17:02DROPS Design answered:
Bom dia, Os aumentos fazem-se em todas as voltas porque são feitos do lado de fora do rendado (antes das 2 primeiras malhas liga e depois das últimas 2 malhas liga de A.2). Bons tricôs!
10.02.2026 - 11:40
![]() Ana Oliveira wrote:
Ana Oliveira wrote:
Eu vou começar a fazer os aumentos para os arredondados nas mangas e estou a fazer o tamanho L. Ao começar o dia grama A2 eu faço 2 malhas liga, 1 laçada (aumento) continuo como diagrama e antes das duas malhas liga faço outra laçada (aumento). Está correto? Como estou a fazer o tamanho L eu tenho que fazer os aumentos 6 vezes e em todas as carreiras e depois 28 vezes a cada duas carteiras, certo? As laçadas são tricotadas em meia torcida correto?
09.02.2026 - 10:41DROPS Design answered:
Bom dia, Os aumentos fazem-se de cada lado de A.2, ou seja, faz 1 laçada (1.º aumento) ,depois, tricota A.2 (onde estão as 2 malhas liga em cada um dos lados) e, depois, 1 laçada (2.º aumento). Como há 2 mangas, fazem-se 4 aumentos ao todo. Sim, para o tamanho L, fazem-se estes aumentos 6 vezes ao todo em todas as carreiras e depois 28 vezes ao todo a cada 2 carreiras. Estes aumentos fazem-se com laçadas que, na carreira seguinte, se tricotam, sim, em meia torcida (para não formarem buracos). Bons tricôs!
10.02.2026 - 11:34
![]() Paula Pedro wrote:
Paula Pedro wrote:
Olá. Gosto imenso deste modelo e estou a tentar tricotá-lo, mas confesso que estou a ter muitas dificuldades. Depois de rever os vários comentários anteriores, julgo que talvez não seja uma dificuldade apenas minha. A equipa da Drops não pode considerar rever as instruções para as tornar mais claras e tornar o modelo exequível? Obrigada
08.01.2026 - 19:50DROPS Design answered:
Bom dia, Todos os modelos trazem um separador com vários vídeos que a podem ajudar a tricotar os nossos modelos. Neste caso, pode encontrar a ajuda aqui: https://www.garnstudio.com/pattern.php?id=7933&cid=28 Bons tricôs!
09.01.2026 - 10:30
![]() Ilona wrote:
Ilona wrote:
Mam problem z dodawaniem oczek na zaokrąglenie rękawów. Przerabiam 1narzut, 2 lewe, ażur, 2 lewe, 1 narzut. W kolejnym okrążeniu z tego narzutu robię lewe. 2 lewe i ażur? Na zdjęciu w momencie dodawania oczek od razu jest ażur a z opisu wynika że pierwsze 6 dodanych oczek jest prawych. Dziękuję
23.10.2025 - 11:14DROPS Design answered:
Witaj Ilono, dodajesz oczka przed 2 oczkami lewymi i za 2 oczkami lewymi schematu A.2, w ten sposób masz coraz więcej oczek na kolejne powtórzenia ażuru. Pamiętaj, aby cały czas były przerabiane tylko 2 oczka lewe na bokach schematu A.2. Dodawane oczka są na bieżąco wchłaniane przez ażur, aż schemat A.2 zostanie zakończony. Pozostałe dodane oczka będą oczkami lewymi rękawa, które znajdują się na środku pod rękawem. Schemat A.2 będzie miał taką sama liczbę oczek na końcu we wszystkich rozmiarach. Będzie różniła się za to liczba oczek lewych na środku pod rękawem. Pozdrawiamy!
27.10.2025 - 15:18
![]() Ilona wrote:
Ilona wrote:
Dzień dobry. Zrobiłam rząd 13 i wg tego co zrozumiałam to dodaję oczka przed 3 i po 4 markerze, potem przerabiam do 2 markera bez dodawania oczek na przód i tył /przed 1 i 2 markeram/, odcinam nitkę i zaczynam przerabiac oczka od środka tyłu. Rozumiem, ze w tym okrążeniu również nie dodaję oczek przed 1 i po 2 markerze?
13.10.2025 - 08:57DROPS Design answered:
Witam, w rzędzie 13 (prawa strona robótki) dodajesz oczka przed 3 i za 4 markerem na przód/tył, potem przerabiasz na prawo do środka tyłu (= początek okrążenia) i przerabiasz dalej do markera 2 ale już bez dodawania oczek. Odcinasz nitkę. Dołączasz nitkę na środku tyłu i przerabiasz dalej na okrągło wg opisu. Pozdrawiamy!
15.10.2025 - 08:39
![]() Tina wrote:
Tina wrote:
I have finished tow 13 of yoke which was a right side row. I've reattached yarn to mid back as instructed. However this means the next row...14... will also be a right side row which misses out a wrong side row....row 12 in A2. Am I reading this wrong?
09.10.2025 - 00:47
|
||||||||||||||||||||||
Vanilla Kiss#vanillakisssweater |
||||||||||||||||||||||
 |
 |
|||||||||||||||||||||
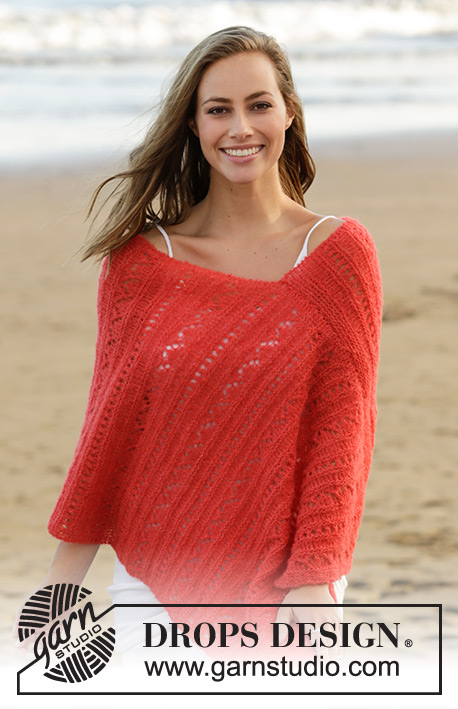
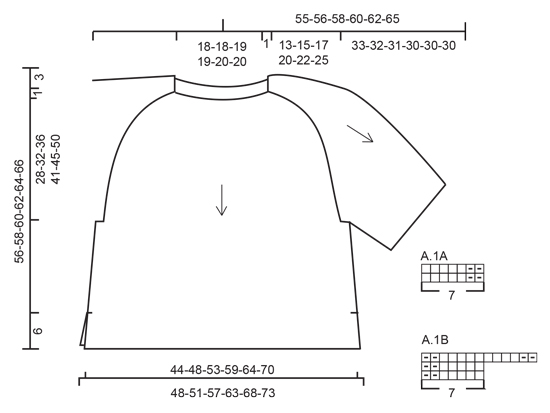
Jumper with lace pattern on shoulders and sleeves, knitted top down in DROPS Puna or Sky. Size: S - XXXL
DROPS 178-16 |
||||||||||||||||||||||
|
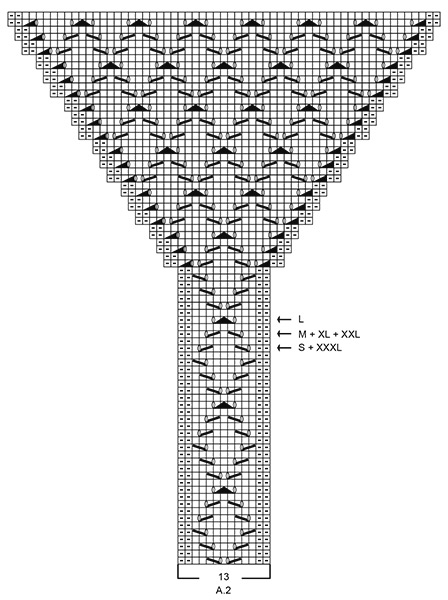
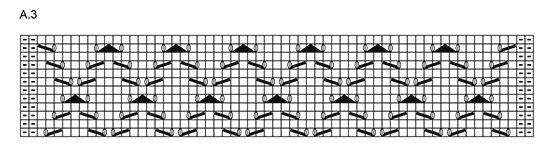
RIDGE/GARTER STITCH (worked in the round): 1 ridge = 2 rounds. Knit 1 round and purl 1 round. RIDGE/GARTER STITCH (worked back and forth): 1 ridge = Knit 2 rows. PATTERN: See diagrams A.1 to A.3. The diagrams show all rows in pattern seen from the right side. SHOULDER: NOTE: All increases worked from right side! On next row work yarn overs twisted to avoid holes. Increase 2 stitches as follows: INCREASE 2 STITCHES BEFORE MARKERS 1 AND 3: Start 3 stitches before marker, 1 yarn over, knit 2, 1 yarn over, knit 1, (= 2 stitches increased). INCREASE 2 STITCHES AFTER MARKERS 2 AND 4: Knit 1, 1 yarn over, knit 2, 1 yarn over (= 2 stitches increased). Increase 1 stitch as follows: INCREASE 1 STITCH BEFORE MARKERS 1 AND 3: Start 1 stitch before marker, 1 yarn over, knit 1 (= 1 stitch increased). INCREASE 1 STITCH AFTER MARKERS 2 AND 4: Knit 1, 1 yarn over (= 1 stitch increased). SLEEVE CAP: Increase 1 stitch by making 1 yarn over (make sure the yarn over is not too loose). On next round: work yarn over twisted to avoid holes – knit the first 21 stitches increased, purl the remaining stitches. next round purl yarn over twisted to avoid a hole – all increased stitches on sleeve cap are purled. INCREASE TIP (for sides of front and back pieces): Increase on inside of the 4 outermost stitches in each side (i.e. 3 edge stitches in garter stitch + 1 stitch in stocking stitch). Increase 1 stitch by making 1 yarn over, on next row work yarn over twisted to avoid a hole (the increased stitch is worked in stocking stitch). DECREASE TIP (for mid under sleeve): Start 3 stitches before marker mid under sleeve, purl 2 together, knit 2 (the marker sits in the middle of these 2 stitches), purl 2 together (= 2 stitches decreased). ---------------------------------------------------------- JUMPER The piece is worked in the round with circular needle, top down, as far as below the sleeves. Then the front and back pieces are worked separately back and forth. The sleeves are worked in the round. The photo deviates somewhat from pattern regarding increases in sleeve caps (A.2) – the fit has been improved. YOKE: Cast on 102-102-106-106-110-110 stitches with short circular needle size 3 mm and Puna. The round starts mid back. Insert a marker here which will follow your work onwards. Work 2 RIDGES in the round – see description above. Insert 4 new markers in the piece as follows (without working the stitches): Insert marker 1 after the first 19-19-20-20-21-21 stitches (= ½ back piece), marker 2 after the next 13 stitches (= shoulder/sleeve), marker 3 after the next 38-38-40-40-42-42 stitches (= front piece), marker 4 after the next 13 stitches (= shoulder/sleeve), there are now 19-19-20-20-21-21 stitches left after the last marker (= ½ back piece). Change to circular needle size 4 mm. Now work short rows over the stitches in the neck for a better fit, AT THE SAME TIME as you increase stitches to shoulder and work pattern on shoulders/sleeves (= 13 stitches) as follows: ROW 1 (from right side): Knit until 3 stitches before the marker 1, increase 2 stitches to SHOULDER – see description above, work A.1A (= 7 stitches), turn piece and tighten strand. ROW 2 (from wrong side): Work A.1A, purl as far as marker 4, A.1B (= 7 stitches –you read the diagram from left to right when working from the wrong side), turn the piece and tighten strand. ROW 3: Work A.1B, increase 2 stitches to shoulder, knit to 3 stitches before marker 1 and increase 2 stitches to shoulder, work A.2 (= 13 stitches), marker 2 is here, turn the piece and tighten strand. ROW 4: Work A.2, purl to marker 4, work A.2 – start on row 2 in the diagram, marker 3 is here, turn the piece and tighten strand. ROW 5: Work A.2, increase 2 stitches to shoulder, knit to 3 stitches before marker 1, increase 2 stitches to shoulder, continue A.2 and increase 2 stitches to shoulder on front piece, (i.e. you work as follows after marker 2: Knit 1, 1 yarn over, knit 2, 1 yarn over), knit 1, (= 4 stitches + 2 yarn overs on front piece), turn the piece and tighten strand. ROW 6: Purl to marker 2 (= purl 6 stitches on front piece), continue A.2, purl to marker 4, continue A.2, purl 4 stitches on front piece (= 4 stitches past marker 3) turn the piece and tighten strand. REMEMBER THE KNITTING TENSION! ROW 7: Knit 1, increase 2 stitches to shoulder (= 4 stitches + 2 yarn overs on front piece), continue A.2, increase 2 stitches to shoulder, knit to 3 stitches before marker 1, increase 2 stitches to shoulder, continue A.2, increase 2 stitches to shoulder on front piece and knit over 2 more stitches than on previous row on front piece (= 8 stitches + 2 yarn overs on front piece), turn the piece and tighten the strand. ROW 8: Purl to marker 2 (= 10 purled stitches on front piece), continue A.2, purl to marker 4, continue A.2 and purl over 2 stitches more than on the previous row on front piece (= 8 stitches on front piece), turn the piece and tighten strand. ROW 9: Knit to 3 stitches before the marker, increase 2 stitches to shoulder (= 8 knitted stitches + 2 yarn overs on front piece), continue A.2, increase 2 stitches to shoulder, knit to 3 stitches before marker 1, increase 2 stitches to shoulder, continue A.2, increase 2 stitches to shoulder on front piece, Knit over 2 stitches more than on the previous row on front piece (= 12 stitches + 2 yarn overs on front piece), turn piece and tighten strand. ROW 10: Purl to marker 2 (= 14 purled stitches on front piece), continue A.2, purl to marker 4, continue A.2 and purl over 2 stitches more than on previous row on front piece (= 12 stitches on front piece), turn the piece and tighten strand. ROW 11: Knit to 3 stitches before the marker, increase 2 stitches to shoulder (= 12 knitted stitches + 2 yarn overs on front piece), continue A.2, increase 2 stitches to shoulder, knit to 3 stitches before marker 1, increase 2 stitches to shoulder, continue A.2, increase 2 stitches to shoulder on front piece, knit over 2 more stitches than on the previous row on front piece (= 16 stitches + 2 yarn overs on front piece), turn the piece and tighten strand. ROW 12: Purl to marker 2 (= 18 purled stitches on front piece), continue A.2, purl to marker 4, continue A.2 and purl over 2 stitches more than on previous row on front piece (= 16 stitches on front piece), turn piece and tighten strand. ROW 13: Knit to 3 stitches before marker, increase 2 stitches to shoulder (= 18 stitches before next marker), continue A.2, increase 2 stitches to shoulder, knit to mid back (= start of the round). Continue with pattern but without increasing as far as marker 2. Now you have worked 11 rows of A.2. Cut the strand. You have now increased 2 stitches to shoulder in each side of the front piece 4 times and 2 stitches to shoulder in each side of the back piece 6 times = 142-142-146-146-150-150 stitches (= 54-54-56-56-58-58 stitches on front piece and 62-62-64-64-66-66 stitches on back piece). The short rows are now finished and you continue in the round with circular needle. Start at marker mid back. On the next round continue the increases to shoulder (= work the increased stitches on front and back piece in stocking stitch) and work A.2 as before, AT THE SAME TIME on round with arrow in A.2 (i.e. before the increases to shoulder are finished) start the increases to sleeve cap (= work the first 21 increased stitches knit. AT THE SAME TIME work the new stitches into A.2 as A.2 expands outwards). When A.2 has been completed in height, repeat A.3 over A.2 to finished length. Increase to shoulder and to sleeve cap as described below: INCREASE TO SHOULDER AS FOLLOWS: NOTE: You increase differently on front and back pieces and, on the rounds after increases, the yarn overs are knitted twisted to avoid holes - Remember SHOULDER! INCREASE ON BACK PIECE (= between markers 4 and 1): Increase 2 stitches every 2nd round a total of 2-3-5-7-8-10 times, then increase 1 stitch every 2nd round a total of 9-11-12-14-16-18 times. INCREASE ON FRONT PIECE (= between markers 2 and 3): Increase 2 stitches every 2nd round a total of 6-7-9-11-12-14 times, then increase 1 stitch every 2nd round a total of 5-7-8-10-12-14 times. After all increases to shoulder there are 88-96-108-120-130-142 stitches on both front and back pieces. INCREASE TO SLEEVE CAP AS FOLLOWS: On the round with an arrow in diagram A.2 start increasing to SLEEVE CAP – see description above. Increase 1 stitch on each side of A.2 on every shoulder/sleeve (= 4 stitches increased on round). Increase in this way every round a total of 1-4-6-4-4-2 times and then every 2nd round a total of 25-26-28-32-34-38 times. There should always be at least 2 purled stitches on each side of the lace pattern A.2 on sleeves. (These purl stitches are included in the diagram). A.2 expands outwards as diagram is worked, so that more and more stitches are included in the lace pattern. When all increases to sleeve cap are finished, there are 65-73-81-85-89-93 stitches on each sleeve. After all increases to shoulder and sleeve cap there are 306-338-378-410-438-470 stitches on the needle and piece measures 31-33-35-37-38-41 cm (measured from shoulder down). There are now 4-8-12-14-16-18 purled stitches on each side of the lace pattern (including the 2 stitches in each side of A.2/A.3). The next round is worked as follows: Work 44-48-54-60-65-71 stitches stocking stitch (= ½ back piece), place the next 65-73-81-85-89-93 stitches on 1 thread (= sleeve), cast on 4 new stitches on needle (= in side under sleeve), work 88-96-108-120-130-142 stitches stocking stitch (= front piece), place the next 65-73-81-85-89-93 stitches on 1 thread (= sleeve), cast on 4 new stitches on needle (= in side under sleeve) and work the remaining 44-48-54-60-65-71 stitches in stocking stitch (= ½ back piece). BODY: = 184-200-224-248-268-292 stitches. THE PIECE IS NOW MEASURED FROM HERE! Now divide the piece in the middle of the 4 new stitches under each sleeve and the front and back pieces are worked separately, back and forth on circular needle to finished length. BACK PIECE: = 92-100-112-124-134-146 stitches. Work stocking stitch with 3 edge stitches in GARTER STITCH – see description above, in each side. When piece measures 3 cm from the division, increase 1 stitch in each side – read INCREASE TIP (= 2 stitches increased). Increase in this way every 14th-14th-14th-14th-14th-14th row a total of 4 times in each side = 100-108-120-132-142-154 stitches. When piece measures 24-24-24-24-25-24 cm from the division, change to circular needle size 3 mm. Work 3 ridges, change back to circular needle size 4 mm and loosely cast off. The jumper measures approx. 56-58-60-62-64-66 cm from top of shoulder down. FRONT PIECE: = 92-100-112-124-134-146 stitches. Work in the same way as the back piece. SLEEVE: Place the 65-73-81-85-89-93 stitches from the thread in one side of the piece onto short circular needle/double pointed needles size 4 mm and, in addition, knit up 1 stitch in each of the 4 stitches cast on under the sleeve = 69-77-85-89-93-97 stitches on needle. Insert 1 marker in the middle of the 4 new stitches mid under sleeve and allow the marker to follow your work onwards. Continue A.3 as before, knit 1 stitch on each side of the marker mid under sleeve and purl the remaining stitches on the round. When piece measures 3 cm from the division, decrease 2 stitches mid under sleeve – read DECREASE TIP. Repeat the decrease when piece measures 8-8-7-7-6-6 cm = 65-73-81-85-89-93 stitches. Continue working until piece measures 14-12-11-11-11-12 cm from the division. Change to double pointed needles size 3 mm. Work 3 ridges over all stitches, change back to double pointed needles size 4 mm and cast off. Work the other sleeve in the same way. ASSEMBLY: Sew side seams in outermost loop of outermost stitch so that the seam is flat, but stop when there is 6 cm left in each side (= split). |
||||||||||||||||||||||
Diagram explanations |
||||||||||||||||||||||
|
||||||||||||||||||||||
 |
||||||||||||||||||||||
 |
||||||||||||||||||||||
 |
||||||||||||||||||||||
Have you finished this pattern?Tag your pictures with #dropspattern #vanillakisssweater or submit them to the #dropsfan gallery. Do you need help with this pattern?You'll find 34 tutorial videos, a Comments/Questions area and more by visiting the pattern on garnstudio.com. © 1982-2026 DROPS Design A/S. We reserve all rights. This document, including all its sub-sections, has copyrights. Read more about what you can do with our patterns at the bottom of each pattern on our site. |
||||||||||||||||||||||


With over 40 years in knitting and crochet design, DROPS Design offers one of the most extensive collections of free patterns on the internet - translated to 17 languages. As of today we count 324 catalogues and 12290 patterns translated into English (UK/cm). 12290
We work hard to bring you the best knitting and crochet have to offer, inspiration and advice as well as great quality yarns at incredible prices! Would you like to use our patterns for other than personal use? You can read what you are allowed to do in the Copyright text at the bottom of all our patterns. Happy crafting!
Post a comment to pattern DROPS 178-16
We would love to hear what you have to say about this pattern!
If you want to leave a question, please make sure you select the correct category in the form below, to speed up the answering process. Required fields are marked *.