
Popular categories
Looking for a yarn?


Comments / Questions (17)
![]() Gaetane wrote:
Gaetane wrote:
Bonjour ! Si l on veut l avoir plus long un peu on procède comment ? 49cm selon votre patron c est pas assez long pour moi ! Merci 🙏
01.05.2024 - 13:37DROPS Design answered:
Bonjour Gateane, notez bien que le poids du fil peut allonger l'ouvrage, essayez-le avant de continuer, et répétez le point ajouré A.3 (avec ou sans augmentation, au choix). Bon tricot!
02.05.2024 - 07:55
![]() Gaetane wrote:
Gaetane wrote:
Bonjour! Concernant les augmentations (1) au début, si j ai bien saisi, avant la 20 iemes m, je fait un jeté je tricote celle-ci,je passe mon marqueur, je tricote la m suivante,je fait un jeté et je continue ainsi de l autre côté, est-ce bien ça ? Merci , très jolie ce top 👍👍🙏🙏
24.04.2024 - 12:41DROPS Design answered:
Bonjour Gaetane, c'est bien cela, mais n'oubliez pas d'augmenter de chaque côté de la 20ème maille à partir de la fin du rang de la même façon (on augmente 4 mailles à chaque fois). Bon tricot!
24.04.2024 - 13:01
![]() Didier Annick wrote:
Didier Annick wrote:
Bonjour je suis étonnée pour le montage des mailles pour le devant, le dos est bien moins large que le devant surtout avec la poitrine,Merci pour votre retour
03.04.2024 - 11:37DROPS Design answered:
Bonjour Mme Didier, je ne suis pas bien sûre de comprendre votre question, le nombre de mailles à monter pour le dos et le devant est identique, on tricote le devant de la même façon que le dos, on va réunir les 2 pièces après les emmanchures. Pouvez-vous préciser votre question si j'ai mal compris? Merci pour votre compréhension!
03.04.2024 - 13:21
![]() Malgorzata wrote:
Malgorzata wrote:
Potrzebuje więcej zdjęć tej bluzki aby zobaczyć jak to wyglada pod pachą. Nie bardzo rozumie jak ja mam przerabiać ściegiem francuskim oczka gdzie jest przerwa między 9-79- 9 ??
10.05.2023 - 18:49DROPS Design answered:
Witaj Gosiu, na końcu karczku tyłu nabierasz nowe oczka z każdej strony robótki, które stanowią połowę podkroju rękawa (druga połowa podkroju rękawa będzie na karczku przodu). Przerabiasz te oczka ściegiem francuskim (tak samo jak pozostałe oczka) przez 4-4-4-5-5-5 cm (zależy od Twojego rozmiaru). Pozdrawiamy!
11.05.2023 - 08:14
![]() Torill Bjerke wrote:
Torill Bjerke wrote:
Hei! Jeg har strikka i over 50 år, og har også prøvd meg på disse oppskriftene med mønster ovenfra og ned. Men jeg liker det absolutt ikke! Kan ikke skjønne hvorfor dere må lage omtrent alle oppskrifter sånn nå? Dere har mange fine oppskrifter, og garn, jeg har brukt begge deler masse. . Kan dere ikke lage oppskrifter for både ovenfraog ned, + nedenfra og opp? Altså begge deler for de modellene dere har, da kan jo vi strikkere velge den fremgangsmåten vi liker best. Mvh Torill
27.03.2022 - 00:33DROPS Design answered:
Hej Torill, du kan let vælge alle de toppe som strikkes nedefra og op. Se her: Topper - nedenfra og opp
30.03.2022 - 14:31
![]() Ally wrote:
Ally wrote:
Thank you for the videos how to knit a jumper from the top. Unfortunately, this top is not knitted from top. It's started from the middle. Joining top section with bottom section by slip stich. And that where my question was. How do you slip stich from the completed yoke?
04.03.2021 - 16:03DROPS Design answered:
Dear Ally, this top is worked top down, you first work the yoke on back piece then yoke on front piece separately, but then simply slip all stitches on same needle to work the body in the round to the bottom edge. Happy knitting!
04.03.2021 - 16:12
![]() Ally wrote:
Ally wrote:
Hello, would you be able to point me out to a video on how to slip sts from yoke front and back on to the same circular needle size 3.5 mm? thank you
03.03.2021 - 16:26DROPS Design answered:
Dear Ally, we don't have such a video but maybe this video or this lessons both showing how to knit a jumper top down can help - Happy knitting!
04.03.2021 - 07:34
![]() Birgit Holmboe wrote:
Birgit Holmboe wrote:
Jeg vil gerne Downloaden denen opskrift
15.05.2020 - 12:42
![]() Malika Koubaili wrote:
Malika Koubaili wrote:
Bonjour quand j'arrive au motif 3 je ne comprend pas comment faire les augmentations sur mon aiguille g 136 maille et apparament je dois en avoir 170 pour la taille s merci de votre reponse
24.02.2019 - 19:23DROPS Design answered:
Bonjour Mme Koubaili, au rang 21 de A.3 vous allez faire 2 jetés (= 4 m end, 1 jeté, 1 m end, 1 jeté, 3 m end) et donc ainsi augmenter 2 m x 17= 34 augmentations + les 136 m = 170 m. Au rang 22 de A.3, tricotez ces jetés torse pour qu'ils ne fassent pas de trous. Bon tricot!
25.02.2019 - 11:10
![]() Sonia B. wrote:
Sonia B. wrote:
Bonjour, je suis arrivée au diagramme A.3. Moi aussi, le top arrive au milieu de la poitrine et j'ai dû prendre la taille L à cause de mon fil qui me donnait un échantillon de 25 m. au point ajouré. La largeur et la longueur sont exactement comme dans vos explications. Si j'ajoute 1 ou 2 rgs de m. serrées au crochet pour allonger les bretelles, croyez-vous que cela est une bonne idée? Je n'ai pas envie de tout recommencer. Mon travail est trop beau comme ça! Merci.
03.06.2018 - 19:19DROPS Design answered:
Bonjour Sonia B., vous pouvez tout à fait ajouter votre touche personnelle au modèle pour qu'il corresponde à vos envies. Pour toute assistance individuelle complémentaire, merci de bien vouloir contacter le magasin où vous avez acheté votre fil. Bon tricot!
04.06.2018 - 09:28
|
||||||||||||||||||||||
Aura |
||||||||||||||||||||||
|
|
||||||||||||||||||||||
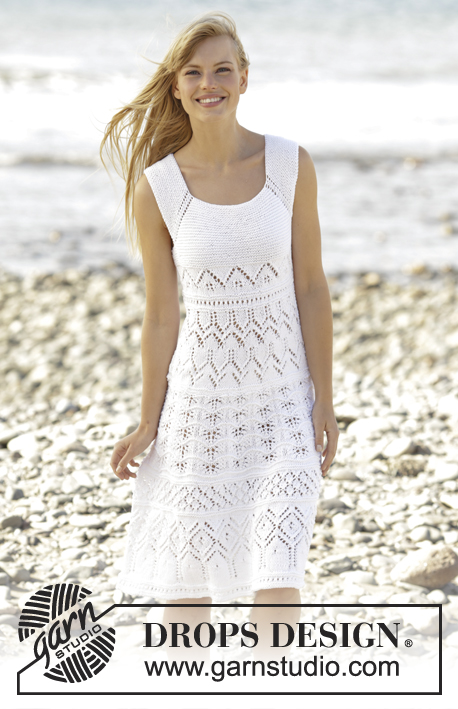
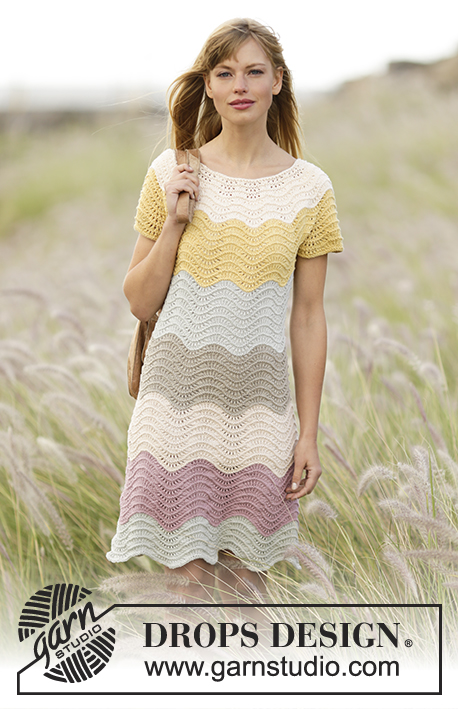
Knitted DROPS top with lace pattern worked top down in ”Muskat”. Size: S - XXXL.
DROPS Extra 0-1288 |
||||||||||||||||||||||
|
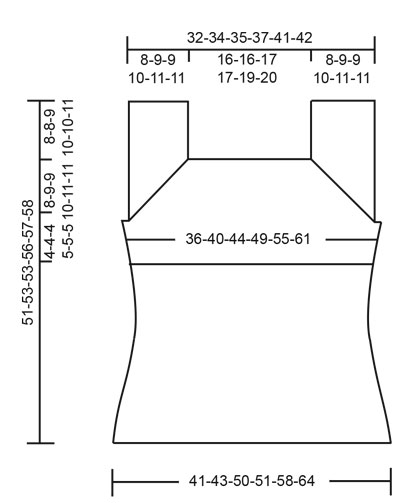
GARTER ST (back and forth): K all rows. 1 ridge = 2 rows K. GARTER ST (worked in the round): 1 ridge = 2 rounds. * K 1 round and P 1 round *, repeat from *-*. INCREASE TIP-1: Inc by making 1 YO on each side of st with marker in (= 2 sts inc). On next round K the YOs to make holes. DECREASE/INCREASE TIP (applies to distribution of dec/inc): To calculate how often dec/inc should be done, use the total no of sts on row (e.g. 154 sts) and divide by no of dec/inc to be done (e.g. 10) = 15.4. I.e. in this example K alternately approx. every 14th and 15th st and 15th and 16th st tog (when dec) or inc after alternately approx. every 15th and 16th st. NOTE: Inc 1 st by making 1 YO. On next round P YO twisted to avoid holes. PATTERN: See diagrams A.1 to A.3. Choose diagram for correct size. ---------------------------------------------------------- TOP: The piece is worked top down. First work yoke at the front and back, back and forth in 2 parts, then slip sts tog and work piece in the round until finished measurements. YOKE AT THE BACK: Worked back and forth on circular needle. Cast on 71-71-77-81-85-91 sts on circular needle size 3.5 mm with Muskat. Switch to circular needle size 3 mm and insert 1 marker in the 18th-18th-20th-22nd-22nd-24th st in from each side (= 35-35-37-37-41-43 sts between markers). K 1 row from WS. Then work in GARTER ST - see explanation above, AT THE SAME TIME on first row from RS inc on each side of the 2 sts with markers - READ INCREASE TIP-1 (= 4 sts inc). Repeat inc every other row (i.e. every row from RS) 18-20-20-22-25-25 times in total = 143-151-157-169-185-191 sts on needle. REMEMBER THE KNITTING TENSION K 1 row from WS after last inc. Piece measures approx. 8-9-9-10-11-11 cm. Work next row as follows from RS: Cast off the first 35-37-39-43-46-48 sts (= strap), K the next 73-77-79-83-93-95 sts (the first of these sts is already on right needle), then cast off the last 35-37-39-43-46-48 sts (= strap), cut the yarn. Work next row as follows from WS: Cast on 3-5-9-12-14-20 new sts at beg of row, work the 73-77-79-83-93-95 sts from needle and cast on 3-5-9-12-14-20 new sts at the end of row = 79-87-97-107-121-135 sts. Work in garter st back and forth for 4-4-4-5-5-5 cm – AT THE SAME TIME after 3-3-3-4-4-4 cm, dec 1 st in each side by K tog the 2 second outermost sts in each side from RS = 77-85-95-105-119-133 sts. When ridges are done, adjust so that last row is a row with K from WS, put piece aside. YOKE AT THE FRONT: Cast on and work as yoke at the back. BODY: Slip sts from yoke front and back on to same circular needle size 3.5 mm = 154-170-190-210-238-266 sts. Work pattern in the round according to diagram A.1 and dec AT THE SAME TIME 10-14-10-6-10-14 sts evenly on 1st round – READ DECREASE/INCREASE TIP = 144-156-180-204-228-252 sts and 12-13-15-17-19-21 repetitions of 12 sts. When A.1 has been worked, work pattern in the round according to diagram A.2 while AT THE SAME TIME dec 2-6-6-6-6-6 sts evenly on 1st round = 142-150-174-198-222-246 sts and dec 6 sts evenly on 11th round = 136-144-168-192-216-240 sts. After A.2 work pattern in the round according to diagram A.3 (NOTE: Choose diagram for correct size = 17-18-21-24-27-30 repetitions of 8 sts). When A.3 has been worked 1 time vertically, there are 170-180-210-216-243-270 sts on needle. Switch to circular needle size 3 mm and work 2 ridges. LOOSELY cast off. Top measures approx. 47-49-49-52-53-54 cm from shoulder and down (measured flat) - NOTE: The weight of the yarn will make the piece longer when worn. ASSEMBLY: Sew the shoulder seams. Sew side seams on yoke edge to edge in outer loops of edge sts so that the seam is flat. |
||||||||||||||||||||||
Diagram explanations |
||||||||||||||||||||||
|
||||||||||||||||||||||
 |
||||||||||||||||||||||
 |
||||||||||||||||||||||
Have you finished this pattern?Tag your pictures with #dropspattern or submit them to the #dropsfan gallery. Do you need help with this pattern?You'll find 23 tutorial videos, a Comments/Questions area and more by visiting the pattern on garnstudio.com. © 1982-2026 DROPS Design A/S. We reserve all rights. This document, including all its sub-sections, has copyrights. Read more about what you can do with our patterns at the bottom of each pattern on our site. |
||||||||||||||||||||||


With over 40 years in knitting and crochet design, DROPS Design offers one of the most extensive collections of free patterns on the internet - translated to 17 languages. As of today we count 324 catalogues and 12290 patterns translated into English (UK/cm). 12290
We work hard to bring you the best knitting and crochet have to offer, inspiration and advice as well as great quality yarns at incredible prices! Would you like to use our patterns for other than personal use? You can read what you are allowed to do in the Copyright text at the bottom of all our patterns. Happy crafting!
Post a comment to pattern DROPS Extra 0-1288
We would love to hear what you have to say about this pattern!
If you want to leave a question, please make sure you select the correct category in the form below, to speed up the answering process. Required fields are marked *.