
Popular categories
Looking for a yarn?


Comments / Questions (100)
Ingrid wrote:
De aanpassing van 20/6 (n.a.v. de opm. van Olga Vos) snap ik niet wat daarmee bedoeld is en waar dat is. Heb volgens mij het patroon iets daarvoor uitgeprint
05.07.2016 - 17:35Ingrid wrote:
Wat is dit een abacadabra patroon zeg. Maar vind het vest zo mooi en wil het zo graag haken.....zo jammer dat ik er niets van snap..... Wat ik ten eerste al niet snap is waarom je ieder laatste stokje en ieder laatste vaste alle 2 moet eindigen met een halve vaste. Dan kom je toch een steek te kort? want je kan in die halve vaste toch niet meer insteken? Ik heb de vraag op een haak- forum gezet en iedereen vond het vreemd en niemand snapte het. Is het voor de afwerking, langs de kant bijv???
05.07.2016 - 17:32
![]() Olga Vos wrote:
Olga Vos wrote:
Er staat een fout in het Nederlandstalige patroon. In patroon 2 voor de mouwen staat: haak A.3 over alle steken; dit moet zijn haak A.7. Het staat wel correct in de Engelstalige patronen. En deze opmerking is al eerder gemaakt zag ik hieronder. Helaas te laat, ik kan de halve mouw weer uit gaan halen.
19.06.2016 - 23:01DROPS Design answered:
Hoi Olga. Ik heb gekeken bij het originele patroon (het Noorse) en je hebt gelijk. Dat is een foutje bij het vertalen en ik heb het aangepast. Bedankt voor het melden.
20.06.2016 - 14:36
![]() Marij Van Kruysdijk wrote:
Marij Van Kruysdijk wrote:
Model 169-32 vest. Pas: ik heb voor maat M na 7 toeren 161 stokjes. Als ik het totaal aantal steken vlgs het beschreven patroon tel moeten er 247 stokjes zijn. Ik snap niets van de meerderingen.
15.06.2016 - 16:06DROPS Design answered:
Hoi Marij. Je meerdert niet alleen op de toeren zoals beschreven, maar ook tijdens het haken van A.1-A.4: A.2 begint met 7 st en eindigt op 12 per herhaling en A.3 begint met 6 st en eindigt op 12 per herhaling. Je haakt A.3 1 keer en A.2 17 keer = +91 st. Daarbij meerder je ook gelijkmatig over de laatste toer van A.1-4.
16.06.2016 - 15:26
![]() Dorothea Hufnagel wrote:
Dorothea Hufnagel wrote:
Guten Tag! Ich verzweifle an der Internet-Anleitung von Modell DROPS 169-32 (Sweet Mint Cardigan). Die Safran-Baumwolle habe ich bereits bestellt und versuchte die Passe mit Restwolle. Es stimmt einfach nicht, und ich bin eine geübte Strickerin! Gibt es für diese schöne Häkeljacke denn keine vernünftige Anleitung, evtl. in einem Ihrer Hefte? Ich bedanke mich sehr für eine Antwort und Ihre Bemühung! Freundliche Grüße! Dorothea Hufnagel
02.05.2016 - 11:31DROPS Design answered:
Liebe Frau Hufnagel, damit wir Ihnen weiterhelfen können, müssten Sie Ihre Frage etwas genauer formulieren.
03.05.2016 - 21:49
![]() Camilla wrote:
Camilla wrote:
Hej! På mönstren A2 och A3, ska muscherna göras på varv 2? Ska i så fall muscherna och "luftmasköglan" göras på samma varv? Tack för hjälpen :) Camilla
29.04.2016 - 12:27DROPS Design answered:
Hej Camilla, se både rättelse och video som visar hur du gör. Lycka till!
01.02.2017 - 08:33
![]() Iris wrote:
Iris wrote:
Merci infiniment !! ce tuto répond exactement à mes questions, il est très bien réalisé, dessins clairs, explications détaillées, plus de souci pour continuer. Merci à vous pour la rapidité de votre réponse.
22.04.2016 - 15:08
![]() Jolanda Poelstra wrote:
Jolanda Poelstra wrote:
Hallo, vol enthousiasme ben ik begonnen met de Sweet Mint Cardigan 169-32. Ik heb redelijk ervaring maar ik kom niet uit de tekening van patroon A2 en de A3 en dan de 2e en 3e toer. Dat moet een bobbel worden? Zou u mij ook het patroon maar dan geschreven kunnen laten weten? Hoor graag van u. Met vriendelijke groet, Jolanda Poelstra
19.04.2016 - 22:12DROPS Design answered:
Hoi Jolanda. Ik heb niet de mogelijkheid om helaas patroon uit te schrijven voor je, maar je haakt (de bubbel): 3 l, 1 stk om l-ring (van 2e toer), 3 l, 1 hv om dezelfde l-ring. Het is niet een "standaard" bubbel (waar je meerdere stk samen haken), maar je krijgt wel een soort nopje.
21.04.2016 - 15:57
![]() Sabina wrote:
Sabina wrote:
Hej! Jag försöker mig på detta fina mönster. Men jag förstår tyvärr inte hur jag ska gå vidare när jag kommer till första öknings varvet efter det att jag snart virkat klart första mönstret.
03.04.2016 - 15:04DROPS Design answered:
Hej, Jo du ökar 1 st genom att virka 2 st i samma m. Lycka till!
05.04.2016 - 12:05
![]() Antonella wrote:
Antonella wrote:
Buonasera sto per eseguire l' ultima riga del diagramma A1-A4 dove indica 4 maglie alte attorno adi ogni arco di catenella, non mi è chiaro dove è come fare gli aumenti -1 (che andrebbero fatti lavorando due maglie alte nella stessa maglia). Grazie per un chiarimento
29.03.2016 - 17:15DROPS Design answered:
Buonasera Antonella. Quando p.es per la taglia S, trova scritto: lavorare 4 m.a e aumentare 2 m.a in modo uniforme, lavora 2 m.a come da schema, aumenta 1 m.a, due m.a come da schema, aumenta 1 m.a. A seconda del punto esatto in cui si trova, le m.a che aumenta potrebbero essere lavorate in due archi di cat diversi, per avere una distribuzione più uniforme delle m. Buon lavoro!
29.03.2016 - 19:17
|
||||||||||||||||||||||||||||||||||
Sweet Mint Cardigan#sweetmintcardigan |
||||||||||||||||||||||||||||||||||
|
|
||||||||||||||||||||||||||||||||||
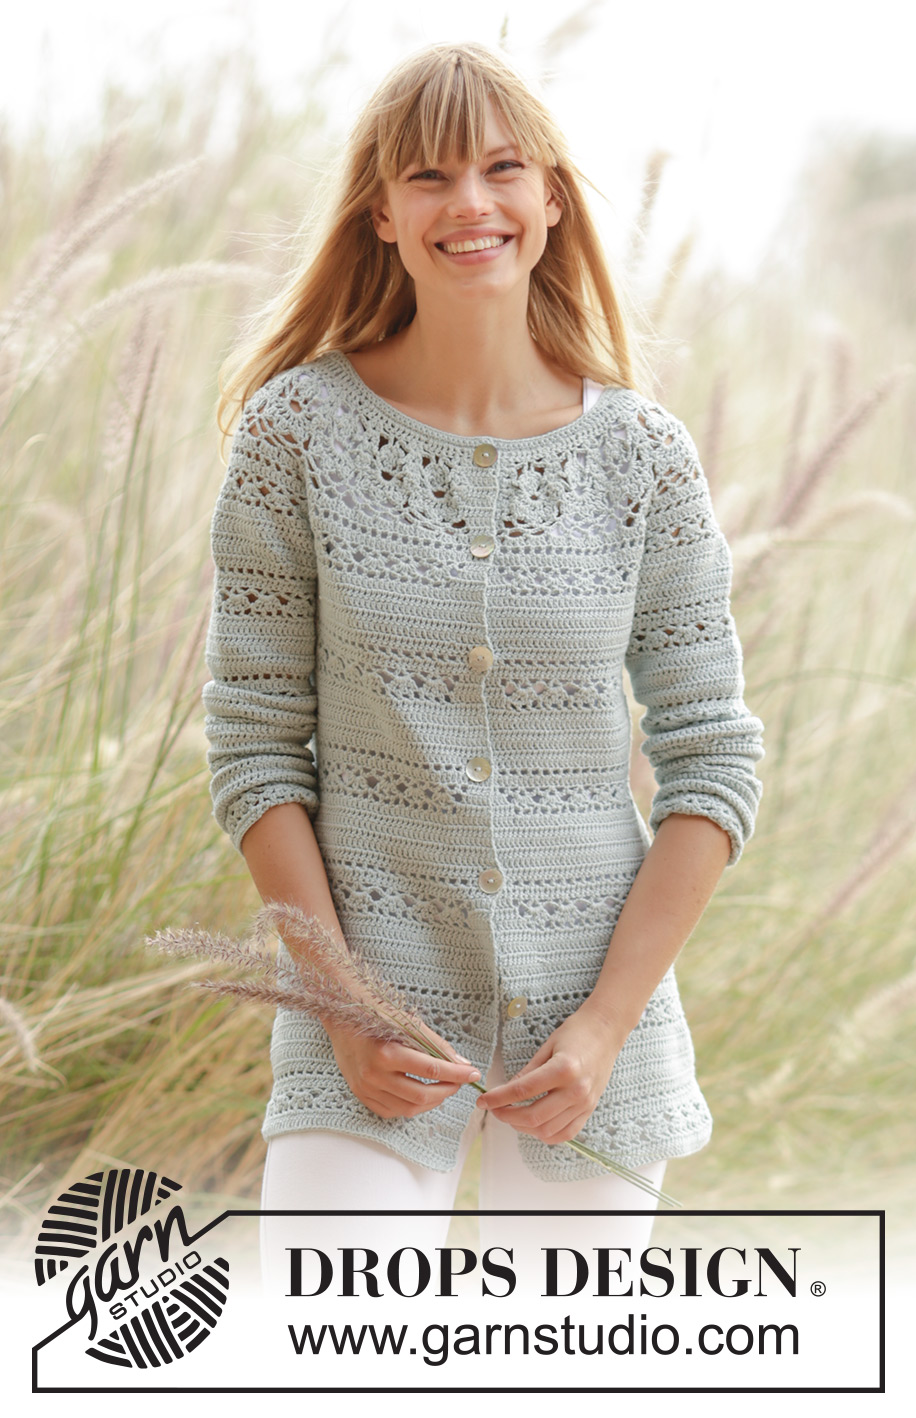
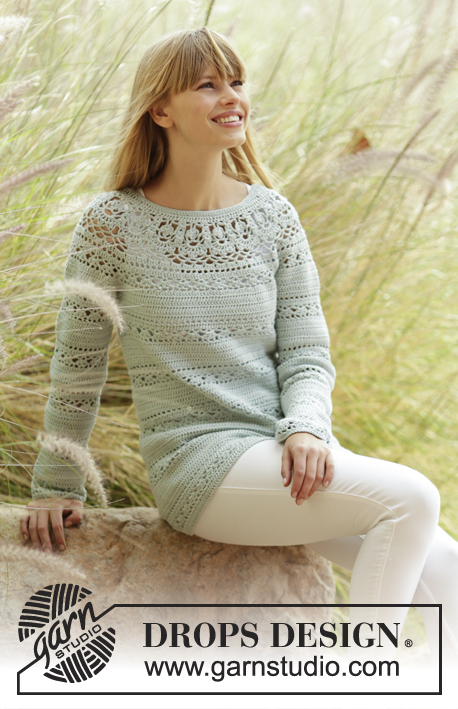
Crochet DROPS jacket with lace pattern and round yoke in ”Safran”. The piece is worked top down. Size: S - XXXL.
DROPS 169-32 |
||||||||||||||||||||||||||||||||||
|
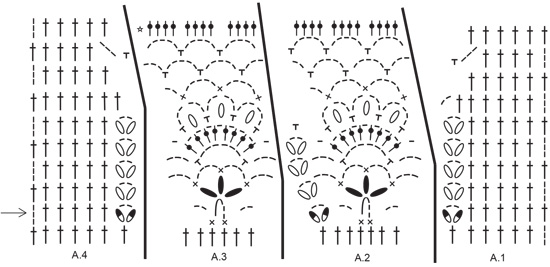
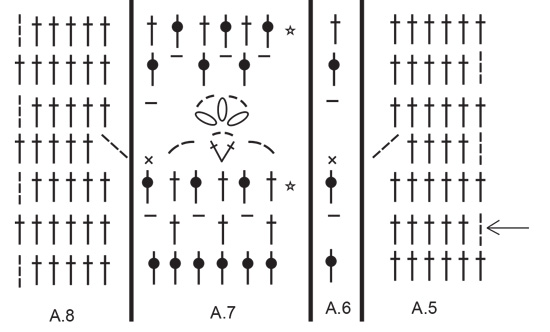
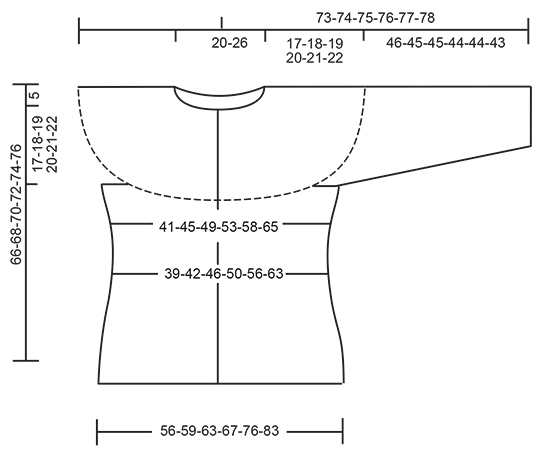
PATTERN: See diagrams A.1 to A.8. CROCHET INFO: On every tr row replace first tr with 3 ch. On every dc row replace first dc with 1 ch. Replace first tr at on every tr round with 3 ch, finish the round with 1 sl st in 3rd ch from beg of round. Replace first dc at on every dc round with 1 ch, finish the round with 1 sl st in first ch from beg of round. INCREASE TIP-1: Inc 1 tr by working 2 tr in same st. INCREASE TIP-2: Work until 2 tr/ch remain before marker, work 2 tr in/around next tr/ch (= 1 tr inc), work 1 tr in/around each of the next 2 tr/ch, markers is in the middle of these tr/ch, work 2 tr in/around next tr/ch (= 1 tr inc). Repeat inc at every marker. PATTERN-1 (applies to body): Work 1 tr in every tr until 6-8-10-10-10-10 rows have been worked, * work from RS: Work A.5 over the first 6 tr, A.6 over next tr, repeat A.7 until 6 tr remain, A.8 over the last 6 tr. When A.5 to A.8 have been worked 1 time vertically, work 6-8-10-10-10-10 rows with 1 tr in every tr *, repeat pattern from *-* until finished measurements. PATTERN-2 (applies to sleeve): * Work A.7 over all tr. When A.7 has been worked 1 time vertically, continue as follows: Work 6-8-10-10-10-10 rounds with 1 tr in every tr *, repeat from *-* until finished measurements. DECREASE TIP: Dec 1 tr by working the next 2 tr tog as follows: Work 1 tr but wait with last pull through (= 2 loops on hook), then work next tr but on last pull through, pull yarn through all 3 loops on hook. BUTTONHOLES: Make buttonholes on right band. 1 buttonhole = replace fourth tr from edge with 1 ch. On next row work band st as before (work 1 tr around ch). Work for buttonholes when piece measures: SIZE S: 2, 11, 20, 29, 38 and 47 cm. SIZE M: 2, 11, 20, 29, 38 and 47 cm. SIZE L: 2, 10, 18, 26, 34, 42 and 50 cm SIZE XL: 2, 10, 18, 26, 34, 42 and 50 cm SIZE XXL: 2, 11, 20, 29, 38, 47 and 55 cm SIZE XXXL: 2, 11, 20, 29, 38, 47 and 55 cm ---------------------------------------------------------- YOKE: Worked back and forth, top down. Work 163-163-172-172-180-180 ch on hook size 3.5 mm with Safran. Work next row as follows: Work 1 tr in 4th ch from hook (= 2 tr) - READ CROCHET INFO, 1 tr in each of the next 5-5-0-0-1-1 ch, * skip 1 ch, 1 tr in each of the next 6 ch *, repeat from *-* the entire row = 139-139-146-146-153-153 tr. Then work next row from WS as follows: Work A.4 over the first 7 tr (= right band), A.3 over the next 6 tr, repeat A.2 until 7 tr remain (= 17-17-18-18-19-19 times in width), finish with A.1 over the last 7 tr (= left band). Continue like this, i.e. work as follows from RS: A.1, A.2 17-17-18-18-19-19 times in total, A.3 and A.4. REMEMBER THE CROCHET TENSION! Remember BUTTONHOLES - see explanation above. On last row in A.1-A.4 (= from WS) insert 8 markers and inc as follows: NOTE: Continue as shown in diagrams A.1-A.4. Work and inc like as follows AT THE SAME TIME inc in addition 0-3-3-9-3-3 tr evenly on the entire row – READ INCREASE TIP-1: Work 36-36-38-38-40-40 tr, insert 1 marker in piece, work 4 tr and inc 2-4-4-4-4-4 tr evenly (= right front piece), insert 1 marker, work 42-42-44-44-46-46 tr, insert 1 marker, work 4 tr and inc 2-4-4-4-4-4 tr evenly, insert 1 marker (= sleeve), work 56-56-60-60-64-64 tr, insert 1 marker, work 4 tr and inc 2-4-4-4-4-4 tr evenly, insert 1 marker (= back piece), work 42-42-44-44-46-46 tr, insert 1 marker, work 4 tr and inc 1-4-4-4-4-4 tr evenly, insert 1 marker (= sleeve), work 36-36-38-38-40-40 tr (= left front piece) = 235-247-259-265-271-271 tr on row. Move the markers upwards when working. Piece measures approx. 9 cm. Work 0-0-0-0-2-2 row with 1 tr in every tr and inc 0-0-0-0-12-15 tr evenly on every row (= 0-0-0-0-24-30 tr in total) = 235-247-259-265-295-301 tr. Work A.5 to A.7 as follows (first row is from RS): Work A.5 over the first 6 tr (= left band), A.6 over next tr, repeat A.7 until 6 tr remain (= 37-39-41-42-47-48 times in width), finish with A.8 over the last 6 tr (= right band). On 2nd row (i.e. tr row) inc at every marker – READ INCREASE TIP-2 and inc 2-8-8-8-8-8 tr evenly on row (= 2 tr in at every marker and 2-8-8-8-8-8 tr inc evenly = 18-24-24-24-24-24 tr inc in total on row) = 253-271-283-289-319-325 tr. Now repeat A.7 40-43-45-46-51-52 times in width. Repeat inc (i.e. 2 tr inc at every marker and 2-8-8-8-8-8 tr inc evenly = 18-24-24-24-24-24 tr inc in total on row). On last row in A.5 to A.8 = 271-295-307-313-343-349 tr. * Work 1 row with 1 tr in every tr. Work 1 row with tr and inc 18-18-16-17-24-26 tr evenly *, repeat from *-* 1-1-2-3-2-3 times in total = 289-313-339-364-391-427 tr. Work 0-1-1-0-1-0 rows with 1 tr in every tr. Piece measures approx. 17-18-19-20-21-22 cm. On next row (= from RS), work as follows: Work 1 tr in each of the first 46-50-54-58-64-70 tr (= left front piece), work 8 ch, skip 60-64-69-73-75-79 tr from previous row (= sleeve), 1 tr in each of the next 77-85-93-102-113-129 tr (= back piece), 8 ch, skip 60-64-69-73-75-79 tr from previous round (= sleeve), 1 tr in each of the last 46-50-54-58-64-70 tr (= right front piece) = 185-201-217-234-257-285 tr/ch on row. Insert 1 marker in piece, NOW MEASURE PIECE FROM HERE. Work 1 row from WS with 1 tr in every tr/ch. Then work PATTERN-1 from RS - see explanation above and dec 4-2-0-5-4-2 tr evenly in first row of tr - READ DECREASE TIP = 181-199-217-229-253-283 tr. When piece measures 12 cm, adjust so that next row is a row with tr, dec 6-12-12-6-6-6 tr evenly = 175-187-205-223-247-277 tr. Continue with pattern as before. When piece measures 19-20-21-22-23-24 cm – adjust so that next row is a row with tr, inc 12 tr evenly. Repeat inc every 3 cm 5-5-5-5-6-6 more times = 247-259-277-295-331-361 tr. Work pattern as before until piece measures 44-45-46-47-48-49 cm from marker. Fasten off. SLEEVE: Sleeve is worked in the round, top down. Beg by working mid under sleeve as follows: Work 1 dc in 5th ch of the 8 ch work in armhole on body, 3 ch (= 1 tr), work 1 tr in each of the next 3 ch, work 1 tr in every tr over sleeve, work 1 tr in each of the remaining 4 ch under sleeve = 68-72-77-81-83-87 tr. Insert 1 marker thread mid under sleeve. Insert 1 marker in piece, NOW MEASURE PIECE FROM HERE. Leave marker in piece, move marker thread when working. SIZE S-M: Work 1 tr in every tr and dec 2-0 tr evenly = 66-72 tr. SIZE L-XL-XXL-XXXL: Work 1 tr in every tr and inc 1-3-1-3 tr evenly = 78-84-84-90 tr. ALL SIZES: READ ALL OF THE FOLLOWING SECTION BEFORE CONTINUING! WORK PATTERN AND DEC AT THE SAME TIME: PATTERN: Work 1 tr in every tr until 5-7-9-9-9-9 round with tr have been worked in total. Work PATTERN-2 - see explanation above. DECREASE: When piece measures 4 cm, adjust so that next round is 1 round with tr, dec 6 tr evenly, repeat dec every 15-10-8-8-8-6 cm 2-3-4-4-4-5 more times = 48-48-48-54-54-54 tr. Fasten off when sleeve measures 46-45-45-44-44-43 cm. Work the other sleeve the same way. NECK EDGE: Worked back and forth from mid front. Beg from RS. Work in ch where the tr were worked (i.e. do not work over the ch skipped = 139-139-146-146-153-153 tr). Work 1 dc in each of the first 22-22-24-24-26-26 tr, * 1 htr in each of the next 3 ch, 1 tr in each of the next 3 ch, 1 dtr in each of the next 19 ch, 1 tr in each of the next 3 ch, 1 htr in each of the next 3 ch *, 1 dc in each of the next 33-33-36-36-39-39 ch, repeat from *-* 1 time, 1 dc in each of the last 22-22-24-24-26-26 ch. Work next row as follows: Work 1 dc in each of the first 26-26-28-28-30-30 sts, ** 1 htr in each of the next 3 sts, 1 tr in each of the next 3 sts, * work the next 2 dtr tog *, repeat from *-* 5 more times, 1 tr in each of the next 3 sts, 1 htr in each of the next 3 sts **, 1 dc in each of the next 39-39-42-42-45-45 sts, repeat from **-** 1 more time, finish with 1 dc in each of the last 26-26-28-28-30-30 sts = 127-127-134-134-141-141 sts. Work 1 row with 1 dc in every st. Fasten off. ASSEMBLY: Sew the buttons on to the left front band. |
||||||||||||||||||||||||||||||||||
Diagram explanations |
||||||||||||||||||||||||||||||||||
|
||||||||||||||||||||||||||||||||||
 |
||||||||||||||||||||||||||||||||||
 |
||||||||||||||||||||||||||||||||||
 |
||||||||||||||||||||||||||||||||||
Have you finished this pattern?Tag your pictures with #dropspattern #sweetmintcardigan or submit them to the #dropsfan gallery. Do you need help with this pattern?You'll find 15 tutorial videos, a Comments/Questions area and more by visiting the pattern on garnstudio.com. © 1982-2026 DROPS Design A/S. We reserve all rights. This document, including all its sub-sections, has copyrights. Read more about what you can do with our patterns at the bottom of each pattern on our site. |
||||||||||||||||||||||||||||||||||


With over 40 years in knitting and crochet design, DROPS Design offers one of the most extensive collections of free patterns on the internet - translated to 17 languages. As of today we count 324 catalogues and 12290 patterns translated into English (UK/cm). 12290
We work hard to bring you the best knitting and crochet have to offer, inspiration and advice as well as great quality yarns at incredible prices! Would you like to use our patterns for other than personal use? You can read what you are allowed to do in the Copyright text at the bottom of all our patterns. Happy crafting!
Post a comment to pattern DROPS 169-32
We would love to hear what you have to say about this pattern!
If you want to leave a question, please make sure you select the correct category in the form below, to speed up the answering process. Required fields are marked *.