
Popular categories
Looking for a yarn?


Comments / Questions (100)
![]() Lisa Lebrija wrote:
Lisa Lebrija wrote:
Jeg er kommet til mønster 1 i str. L. Der står jeg skal have 10 rk. stgm. * hækl fra RET siden A5-A6-A7-A8* Jeg kan kun få det til at blive 9 rk. stgm. hvis jeg skal begynde på ret siden. Er der fejl i opskriften??? Det er synd Jeres opskrifter er så dårlig formuleret.
24.09.2016 - 00:19DROPS Design answered:
Hej Lisa. Ja, det er en fejl. Jeg meningen er at man haekler MØNSTER-1 og samtidig tager 4-2-0-5-4-2 st ind jævnt fordelt i förste raekke. Jeg skal bede om at faa det rettet, vi kan desvaerre ikke skrive saa alle tilfredse og fejl sker jo desvaerre ;-) Men tak for meldingen.
26.09.2016 - 15:27
![]() Lisa Lebrija wrote:
Lisa Lebrija wrote:
Jeg hækler str. L og på 2. række får jeg 19 mønstre og ikke 18 som der står. Er det ikke en fejl i opskriften?
16.09.2016 - 22:19DROPS Design answered:
Hej Lisa. Du har 146 st og haekler: Hækl A.4 over de første 7 st, A.3 over de næste 6 st, gentag A.2 til der er 7 st tilbage (= 18 gange i bredden), afslut med A.1 over de sidste 7 st (= venstre forkant). Dvs 7+6+126 (= 7 m x 18 gentagelser)+7 = 146 st.
28.09.2016 - 14:02
![]() Kirsten Tilger wrote:
Kirsten Tilger wrote:
Passe Gr. M begonnen und die ersten 2 Reihen gehäkelt = 139 STB. 3. Reihe: Im Muster ist angegeben, dass ich A2 insgesamt 17 mal zu häkeln hätte. Ich habe19 Wiederholungen. Ich habe noch einmal nachgezählt, dass ich bei 139 STB insgesamt 1 x 7 und danach 22 x 6 Stäbchen gehäkelt habe. Dies ergibt also automatisch 22 "Löcher", die dann mit den Stäbchenbündeln der 3. Reihe gefüllt werden. Wie also komme ich auf nur 17 Wiederholungen.
30.08.2016 - 15:01DROPS Design answered:
Liebe Frau Tilger, in der 2. Grössen müssen sie die 139 Stb so häkeln: A.4 (= 7 M), A.3 (= 6 M), A.2 (= 7 M x 17 = über die nächste 119 M), A.1 (= 7 M), dh: 7 + 6 + 119 + 7 = 139 Stb.
31.08.2016 - 16:15
![]() Ingrid wrote:
Ingrid wrote:
Ik moet nu patroon 1 doen (vest zelf) ik maak maat s. Er staat: haak 1 stokje in 1 stokje totdat er 6 touren stokjes in totaal zijn. Maar is dit incl. De stokjestour, tour 6 van telpatroon 2 A5 t/m A8 of excl? Want dat is niet een stokjes in stokjes tour maar het wel een volle tour stokjes. Voor op het oog kan je dus 6 of 7 rijen stokjes hebben voordat je weer begint met telpatroon 2. Wat is goed?
24.08.2016 - 21:41DROPS Design answered:
Hoi Ingrid. Nee, je begint met PATROON-1 en haakt dan 6 toeren in totaal met stk(je telt niet eerdere toeren mee). Na A5 t/m A8 haak je weer 6 toeren stk
25.08.2016 - 15:30
![]() Tamara Bertilsdotter wrote:
Tamara Bertilsdotter wrote:
Jag har gjort om oket flera gånger men hur jag än ber mig åt har jag totalt 254 st när jag är klar med 10:e varvet och jag kan inte fortsätta. Saknar 4 st...Hjälp!!
21.08.2016 - 18:16DROPS Design answered:
Hej Det är svårt att veta var du saknar de 4 st. Men du bör kunna virka 4 st ekstra jämnt fördelat på varvet, så du kan gå vidare. Fråga också gärna hos din lokala garnbutik. Lycka till!
31.08.2016 - 08:56
![]() Ulrika Vakili wrote:
Ulrika Vakili wrote:
Jag fastnar redan på andra raden instruktion. Förstår inte hur detta ska göras. = virka 6 lm, 1 sm i 4:e lm från nålen, vänd lm-ringen (dvs det fortsätts att virkas i samma rktning), sedan virkas det muscher igen. Finns det video som förklarar?
25.07.2016 - 03:25DROPS Design answered:
Hej, Ja det finns en video, gå längst ner i mönstret och klicka på video-bilden. Lycka till!
22.12.2016 - 09:47
![]() Marianne Alfstad wrote:
Marianne Alfstad wrote:
Jeg har heklet denne, og er godt fornøyd med den. Jeg er glad i oppskrifter som begynner ovenfra, og som hekles fram og tilbake. Da kan den prøves på underveis, og kan eventuelt justeres slik at den passer. Tusen takk for oppskriften! :)
19.07.2016 - 21:28
![]() Ingrid wrote:
Ingrid wrote:
Sorry van mijn eerdere opmerking. Ik begin het patroon die te krijgen. Vraag over tour 7. Moet je na A1 niet 2 lossen doen om naar a2 te gaan? Aan de andere kant bij tour a3 naar A4 staan ze namelijk wel en daartussen ook. Ik doe ze dan maar wel denk. Lees graag uw antwoord
13.07.2016 - 17:43DROPS Design answered:
Hoi Ingrid. Ja, ik denk van wel. Ik denk eigenlijk dat de 2 l die in toer 8 staan bij 7 horen, dus zo zou ik het ook doen.
14.07.2016 - 15:00Marij Van Kruysdijk wrote:
Kan iemand de laatste toer van A1 -A4 (toer 10) met de meerderingen en markeringen volledig uitschrijven: dus 7 st,.en dan verder.
09.07.2016 - 19:27DROPS Design answered:
Hoi Marij. Ik kan niet zomaar het patroon verder uitschrijven. Welke maat maak je en waarom gaat het fout? Dan kan ik proberen het wat duidelijker uit te leggen :)
12.07.2016 - 16:53
![]() Ali Altink wrote:
Ali Altink wrote:
De bobbel wordtvgemaakt door drie lossen,één stokje ,drie lossen en een halve vaste, maar waar komen de eerst drie lossen. ?
05.07.2016 - 17:42DROPS Design answered:
Hoi Ali. Hoezo? Je haakt 3 l vanaf de l-ring, 1 stk om de l-ring, 3 l die dan weer om de ring met 1 hv worden bevestigd.
06.07.2016 - 14:26
|
||||||||||||||||||||||||||||||||||
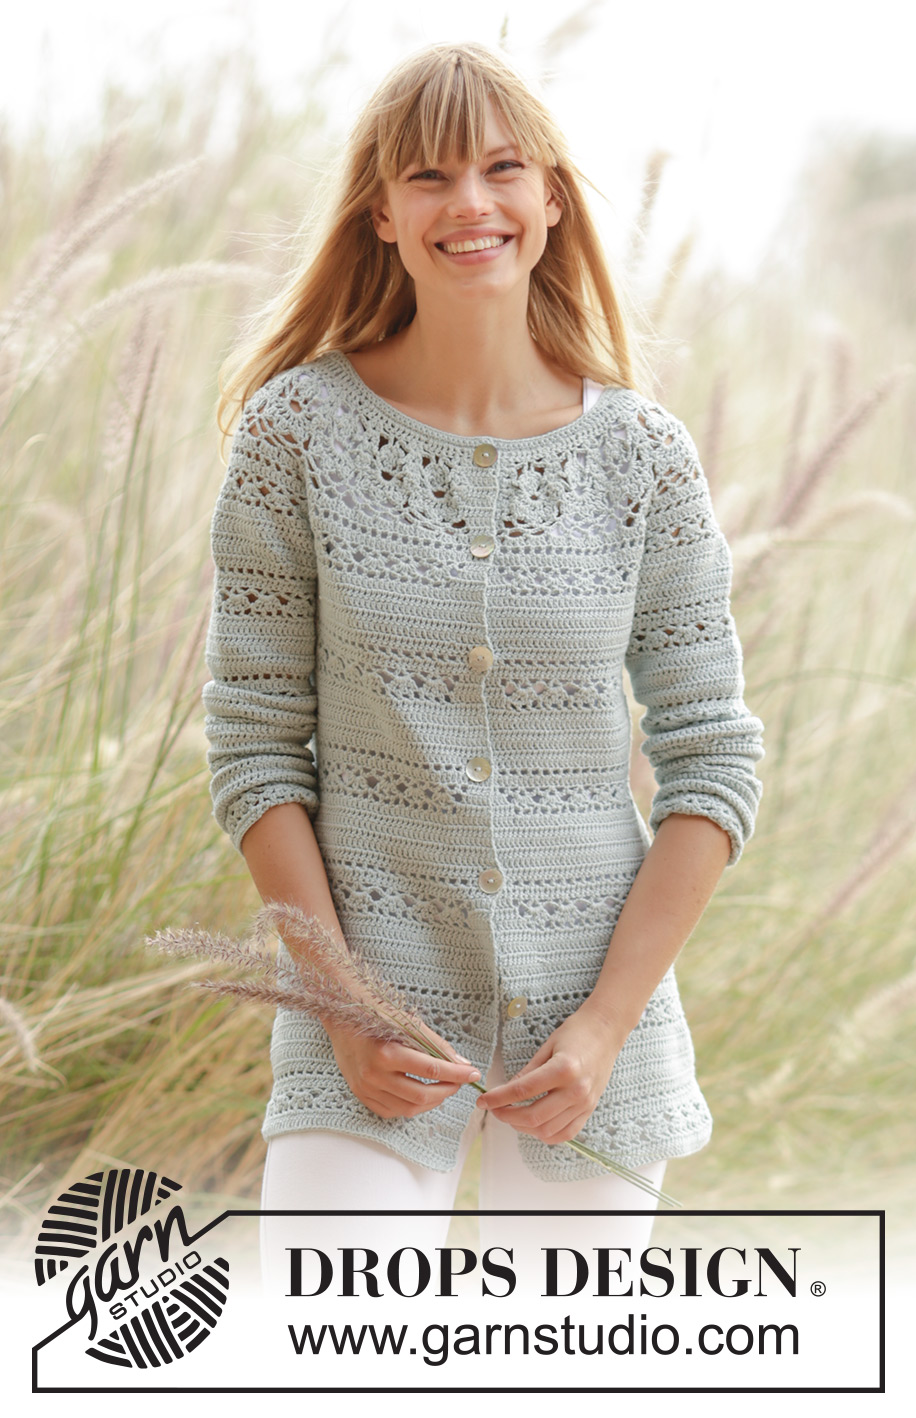
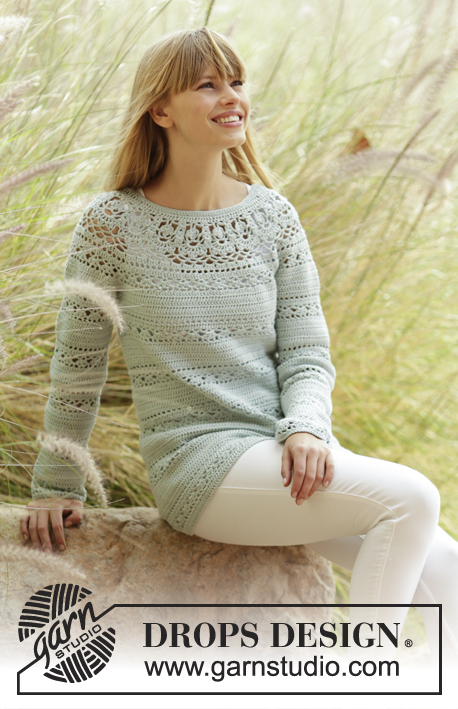
Sweet Mint Cardigan#sweetmintcardigan |
||||||||||||||||||||||||||||||||||
|
|
||||||||||||||||||||||||||||||||||
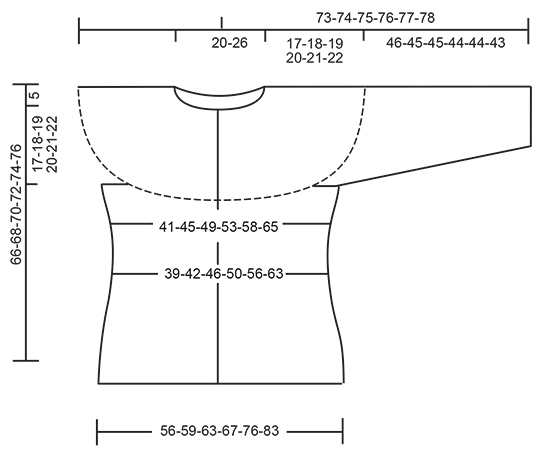
Crochet DROPS jacket with lace pattern and round yoke in ”Safran”. The piece is worked top down. Size: S - XXXL.
DROPS 169-32 |
||||||||||||||||||||||||||||||||||
|
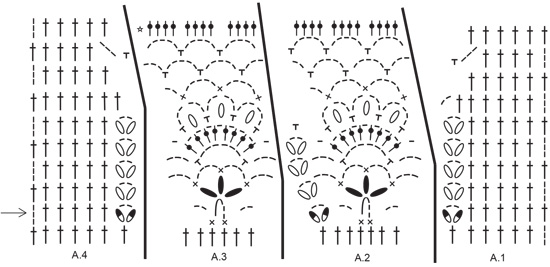
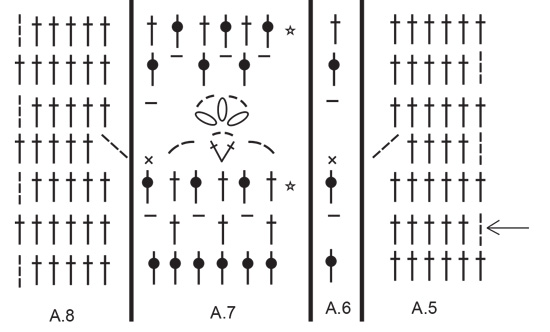
PATTERN: See diagrams A.1 to A.8. CROCHET INFO: On every tr row replace first tr with 3 ch. On every dc row replace first dc with 1 ch. Replace first tr at on every tr round with 3 ch, finish the round with 1 sl st in 3rd ch from beg of round. Replace first dc at on every dc round with 1 ch, finish the round with 1 sl st in first ch from beg of round. INCREASE TIP-1: Inc 1 tr by working 2 tr in same st. INCREASE TIP-2: Work until 2 tr/ch remain before marker, work 2 tr in/around next tr/ch (= 1 tr inc), work 1 tr in/around each of the next 2 tr/ch, markers is in the middle of these tr/ch, work 2 tr in/around next tr/ch (= 1 tr inc). Repeat inc at every marker. PATTERN-1 (applies to body): Work 1 tr in every tr until 6-8-10-10-10-10 rows have been worked, * work from RS: Work A.5 over the first 6 tr, A.6 over next tr, repeat A.7 until 6 tr remain, A.8 over the last 6 tr. When A.5 to A.8 have been worked 1 time vertically, work 6-8-10-10-10-10 rows with 1 tr in every tr *, repeat pattern from *-* until finished measurements. PATTERN-2 (applies to sleeve): * Work A.7 over all tr. When A.7 has been worked 1 time vertically, continue as follows: Work 6-8-10-10-10-10 rounds with 1 tr in every tr *, repeat from *-* until finished measurements. DECREASE TIP: Dec 1 tr by working the next 2 tr tog as follows: Work 1 tr but wait with last pull through (= 2 loops on hook), then work next tr but on last pull through, pull yarn through all 3 loops on hook. BUTTONHOLES: Make buttonholes on right band. 1 buttonhole = replace fourth tr from edge with 1 ch. On next row work band st as before (work 1 tr around ch). Work for buttonholes when piece measures: SIZE S: 2, 11, 20, 29, 38 and 47 cm. SIZE M: 2, 11, 20, 29, 38 and 47 cm. SIZE L: 2, 10, 18, 26, 34, 42 and 50 cm SIZE XL: 2, 10, 18, 26, 34, 42 and 50 cm SIZE XXL: 2, 11, 20, 29, 38, 47 and 55 cm SIZE XXXL: 2, 11, 20, 29, 38, 47 and 55 cm ---------------------------------------------------------- YOKE: Worked back and forth, top down. Work 163-163-172-172-180-180 ch on hook size 3.5 mm with Safran. Work next row as follows: Work 1 tr in 4th ch from hook (= 2 tr) - READ CROCHET INFO, 1 tr in each of the next 5-5-0-0-1-1 ch, * skip 1 ch, 1 tr in each of the next 6 ch *, repeat from *-* the entire row = 139-139-146-146-153-153 tr. Then work next row from WS as follows: Work A.4 over the first 7 tr (= right band), A.3 over the next 6 tr, repeat A.2 until 7 tr remain (= 17-17-18-18-19-19 times in width), finish with A.1 over the last 7 tr (= left band). Continue like this, i.e. work as follows from RS: A.1, A.2 17-17-18-18-19-19 times in total, A.3 and A.4. REMEMBER THE CROCHET TENSION! Remember BUTTONHOLES - see explanation above. On last row in A.1-A.4 (= from WS) insert 8 markers and inc as follows: NOTE: Continue as shown in diagrams A.1-A.4. Work and inc like as follows AT THE SAME TIME inc in addition 0-3-3-9-3-3 tr evenly on the entire row – READ INCREASE TIP-1: Work 36-36-38-38-40-40 tr, insert 1 marker in piece, work 4 tr and inc 2-4-4-4-4-4 tr evenly (= right front piece), insert 1 marker, work 42-42-44-44-46-46 tr, insert 1 marker, work 4 tr and inc 2-4-4-4-4-4 tr evenly, insert 1 marker (= sleeve), work 56-56-60-60-64-64 tr, insert 1 marker, work 4 tr and inc 2-4-4-4-4-4 tr evenly, insert 1 marker (= back piece), work 42-42-44-44-46-46 tr, insert 1 marker, work 4 tr and inc 1-4-4-4-4-4 tr evenly, insert 1 marker (= sleeve), work 36-36-38-38-40-40 tr (= left front piece) = 235-247-259-265-271-271 tr on row. Move the markers upwards when working. Piece measures approx. 9 cm. Work 0-0-0-0-2-2 row with 1 tr in every tr and inc 0-0-0-0-12-15 tr evenly on every row (= 0-0-0-0-24-30 tr in total) = 235-247-259-265-295-301 tr. Work A.5 to A.7 as follows (first row is from RS): Work A.5 over the first 6 tr (= left band), A.6 over next tr, repeat A.7 until 6 tr remain (= 37-39-41-42-47-48 times in width), finish with A.8 over the last 6 tr (= right band). On 2nd row (i.e. tr row) inc at every marker – READ INCREASE TIP-2 and inc 2-8-8-8-8-8 tr evenly on row (= 2 tr in at every marker and 2-8-8-8-8-8 tr inc evenly = 18-24-24-24-24-24 tr inc in total on row) = 253-271-283-289-319-325 tr. Now repeat A.7 40-43-45-46-51-52 times in width. Repeat inc (i.e. 2 tr inc at every marker and 2-8-8-8-8-8 tr inc evenly = 18-24-24-24-24-24 tr inc in total on row). On last row in A.5 to A.8 = 271-295-307-313-343-349 tr. * Work 1 row with 1 tr in every tr. Work 1 row with tr and inc 18-18-16-17-24-26 tr evenly *, repeat from *-* 1-1-2-3-2-3 times in total = 289-313-339-364-391-427 tr. Work 0-1-1-0-1-0 rows with 1 tr in every tr. Piece measures approx. 17-18-19-20-21-22 cm. On next row (= from RS), work as follows: Work 1 tr in each of the first 46-50-54-58-64-70 tr (= left front piece), work 8 ch, skip 60-64-69-73-75-79 tr from previous row (= sleeve), 1 tr in each of the next 77-85-93-102-113-129 tr (= back piece), 8 ch, skip 60-64-69-73-75-79 tr from previous round (= sleeve), 1 tr in each of the last 46-50-54-58-64-70 tr (= right front piece) = 185-201-217-234-257-285 tr/ch on row. Insert 1 marker in piece, NOW MEASURE PIECE FROM HERE. Work 1 row from WS with 1 tr in every tr/ch. Then work PATTERN-1 from RS - see explanation above and dec 4-2-0-5-4-2 tr evenly in first row of tr - READ DECREASE TIP = 181-199-217-229-253-283 tr. When piece measures 12 cm, adjust so that next row is a row with tr, dec 6-12-12-6-6-6 tr evenly = 175-187-205-223-247-277 tr. Continue with pattern as before. When piece measures 19-20-21-22-23-24 cm – adjust so that next row is a row with tr, inc 12 tr evenly. Repeat inc every 3 cm 5-5-5-5-6-6 more times = 247-259-277-295-331-361 tr. Work pattern as before until piece measures 44-45-46-47-48-49 cm from marker. Fasten off. SLEEVE: Sleeve is worked in the round, top down. Beg by working mid under sleeve as follows: Work 1 dc in 5th ch of the 8 ch work in armhole on body, 3 ch (= 1 tr), work 1 tr in each of the next 3 ch, work 1 tr in every tr over sleeve, work 1 tr in each of the remaining 4 ch under sleeve = 68-72-77-81-83-87 tr. Insert 1 marker thread mid under sleeve. Insert 1 marker in piece, NOW MEASURE PIECE FROM HERE. Leave marker in piece, move marker thread when working. SIZE S-M: Work 1 tr in every tr and dec 2-0 tr evenly = 66-72 tr. SIZE L-XL-XXL-XXXL: Work 1 tr in every tr and inc 1-3-1-3 tr evenly = 78-84-84-90 tr. ALL SIZES: READ ALL OF THE FOLLOWING SECTION BEFORE CONTINUING! WORK PATTERN AND DEC AT THE SAME TIME: PATTERN: Work 1 tr in every tr until 5-7-9-9-9-9 round with tr have been worked in total. Work PATTERN-2 - see explanation above. DECREASE: When piece measures 4 cm, adjust so that next round is 1 round with tr, dec 6 tr evenly, repeat dec every 15-10-8-8-8-6 cm 2-3-4-4-4-5 more times = 48-48-48-54-54-54 tr. Fasten off when sleeve measures 46-45-45-44-44-43 cm. Work the other sleeve the same way. NECK EDGE: Worked back and forth from mid front. Beg from RS. Work in ch where the tr were worked (i.e. do not work over the ch skipped = 139-139-146-146-153-153 tr). Work 1 dc in each of the first 22-22-24-24-26-26 tr, * 1 htr in each of the next 3 ch, 1 tr in each of the next 3 ch, 1 dtr in each of the next 19 ch, 1 tr in each of the next 3 ch, 1 htr in each of the next 3 ch *, 1 dc in each of the next 33-33-36-36-39-39 ch, repeat from *-* 1 time, 1 dc in each of the last 22-22-24-24-26-26 ch. Work next row as follows: Work 1 dc in each of the first 26-26-28-28-30-30 sts, ** 1 htr in each of the next 3 sts, 1 tr in each of the next 3 sts, * work the next 2 dtr tog *, repeat from *-* 5 more times, 1 tr in each of the next 3 sts, 1 htr in each of the next 3 sts **, 1 dc in each of the next 39-39-42-42-45-45 sts, repeat from **-** 1 more time, finish with 1 dc in each of the last 26-26-28-28-30-30 sts = 127-127-134-134-141-141 sts. Work 1 row with 1 dc in every st. Fasten off. ASSEMBLY: Sew the buttons on to the left front band. |
||||||||||||||||||||||||||||||||||
Diagram explanations |
||||||||||||||||||||||||||||||||||
|
||||||||||||||||||||||||||||||||||
 |
||||||||||||||||||||||||||||||||||
 |
||||||||||||||||||||||||||||||||||
 |
||||||||||||||||||||||||||||||||||
Have you finished this pattern?Tag your pictures with #dropspattern #sweetmintcardigan or submit them to the #dropsfan gallery. Do you need help with this pattern?You'll find 15 tutorial videos, a Comments/Questions area and more by visiting the pattern on garnstudio.com. © 1982-2026 DROPS Design A/S. We reserve all rights. This document, including all its sub-sections, has copyrights. Read more about what you can do with our patterns at the bottom of each pattern on our site. |
||||||||||||||||||||||||||||||||||


With over 40 years in knitting and crochet design, DROPS Design offers one of the most extensive collections of free patterns on the internet - translated to 17 languages. As of today we count 324 catalogues and 12290 patterns translated into English (UK/cm). 12290
We work hard to bring you the best knitting and crochet have to offer, inspiration and advice as well as great quality yarns at incredible prices! Would you like to use our patterns for other than personal use? You can read what you are allowed to do in the Copyright text at the bottom of all our patterns. Happy crafting!
Post a comment to pattern DROPS 169-32
We would love to hear what you have to say about this pattern!
If you want to leave a question, please make sure you select the correct category in the form below, to speed up the answering process. Required fields are marked *.