DROPS Children 49 · Lots of new kid designs!
Product image DROPS Paris yarn
DROPS Paris
100% Cotton
from 1.25 € /50g
Get the yarn to make this pattern from 10.00€.

The yarn cost is calculated from the pattern’s smallest size and the yarn’s cheapest product type. Looking for an even better price? You might find it on the DROPS Deals!

DROPS AW2425

Charlotte Cardigan

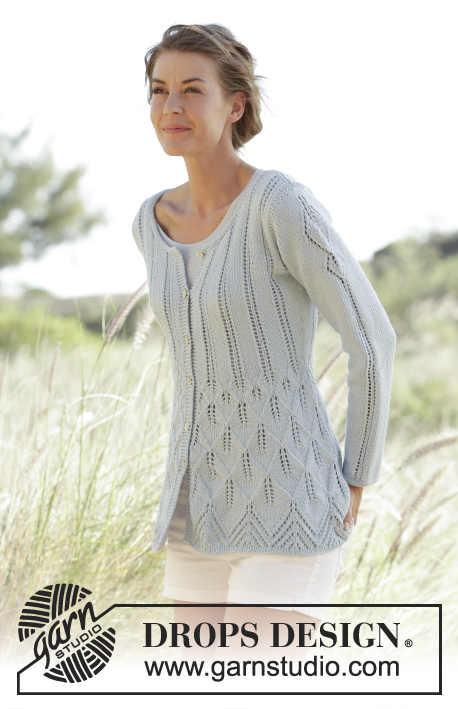
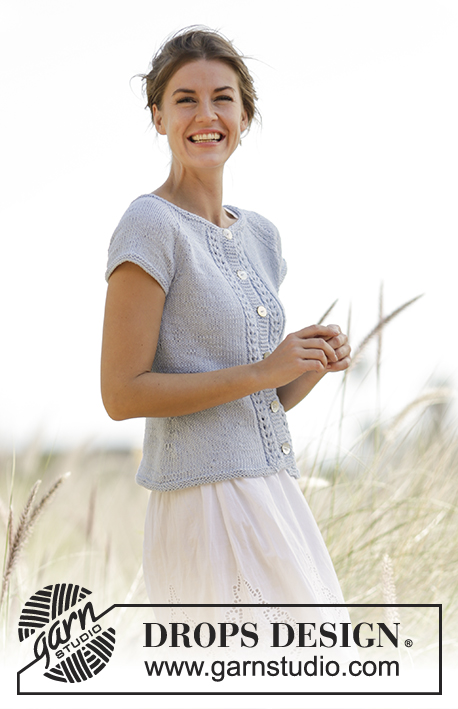
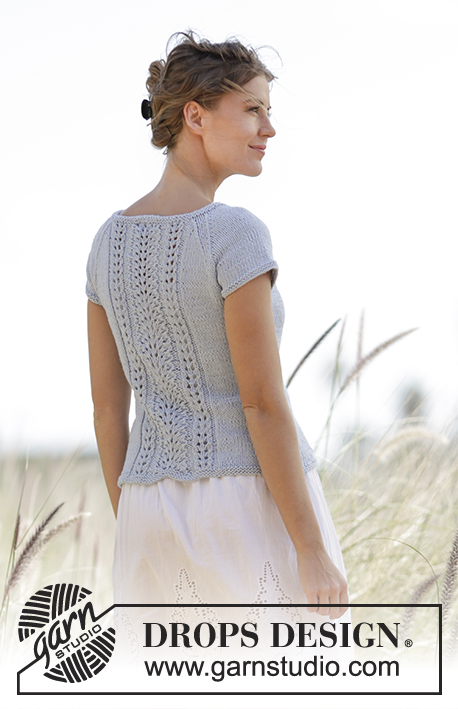
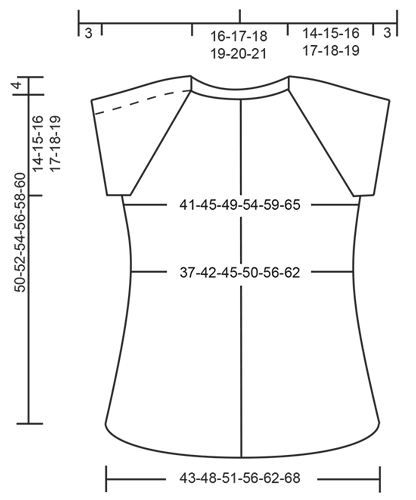
Knitted DROPS jacket with lace pattern, raglan and short sleeves in ”Paris”. Size: S - XXXL.

Highlight Size:
DROPS 168-9

#charlottecardigan

DROPS design: Pattern no w-588
Yarn group C or A + A
----------------------------------------------------------
Size: S - M - L - XL - XXL - XXXL
Materials:
DROPS PARIS from Garnstudio
400-400-450-500-550-600 g colour no 100, light wash

DROPS CIRCULAR NEEDLE (60 or 80 cm) SIZE 5 mm - or size needed to get 17 sts x 22 rows in stocking st = 10 x 10 cm.
DROPS DOUBLE POINTED NEEDLES SIZE 5 mm.
DROPS MOTHER-OF-PEARL BUTTON ARCHED (white), NO 522: 6-6-7-7-7-7 pieces

-------------------------------------------------------

Alternative Yarn – See how to change yarns here
Yarn Groups A to F – Use the same pattern and change the yarn here
Yarn usage using an alternative yarn – Use our yarn converter here

-------------------------------------------------------

You might also like...

Product image DROPS Paris
DROPS Paris
100% Cotton
from 1.25 € /50g
Get the yarn to make this pattern from 10.00€.

The yarn cost is calculated from the pattern’s smallest size and the yarn’s cheapest product type. Looking for an even better price? You might find it on the DROPS Deals!

Pattern instructions

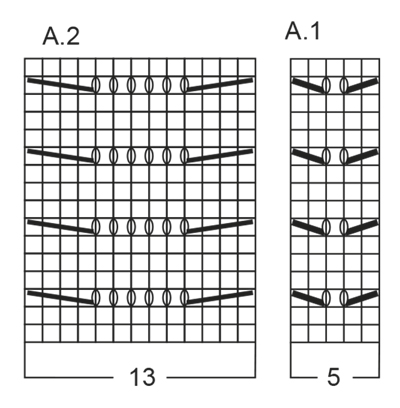
GARTER ST (back and forth on needle):
K all rows. 1 ridge = 2 rows K.

GARTER ST (worked in the round):
1 ridge = 2 rounds. * K 1 round and P 1 round *, repeat from *-*.

PATTERN: See diagrams A.1 and A.2. Diagrams show all rows seen from RS.

DECREASE TIP:
Dec as follows from RS: Beg 3 sts before marker: K 2 tog, K 2 (marker is between these sts), slip 1 st as if to K, K 1, psso.
Dec as follows from WS: Beg 3 sts before marker:
P 2 twisted tog, P 2 (marker is between these sts), P 2 tog.

KNITTING TIP:
If knitting tension is incorrect in height and the knitting is too tight, the raglan dec will be too short and the armholes too small. This can be adjusted by working 1 extra row without dec evenly spaced between dec.

BUTTONHOLES:
Dec for buttonholes on right band. 1 buttonhole = K tog 2nd and 3rd st from mid front, then make 1 YO. Dec for buttonholes when piece measures:
SIZE S: 5, 13, 21, 30, 39 and 48 cm.
SIZE M: 5, 14, 23, 32, 41 and 50 cm.
SIZE L: 4, 12, 20, 28, 36, 44 and 52 cm
SIZE XL: 4, 12, 20, 28, 36, 45 and 54 cm
SIZE XXL: 4, 12, 20, 29, 38, 47 and 56 cm
SIZE XXXL: 4, 13, 22, 31, 40, 49 and 58 cm
--------------------------------------------------------


JACKET:
Worked back and forth on circular needle from mid front. Cast on 155-171-183-199-219-239 sts (incl 5 band sts in each side) on circular needle size 5 mm. Work 2 ridges in GARTER ST - see explanation above. Then work as follows from RS: 5 sts in garter st, P 2, A.1 (= 5 sts), P 2, stocking st over the next 48-56-62-70-73-83 sts, * P 2, A.1 *, repeat from *-* 1-1-1-1-2-2 times in total, P 2, A.2 (= 13 sts), P 2, *A.1, P 2,* repeat from *-* 1-1-1-1-2-2 times in total, stocking st over the next 48-56-62-70-73-83 sts, P 2, A.1, P 2, and 5 sts in garter st. The 5 sts in garter st in each side = bands. Work bands in garter st until finished measurements. Continue pattern like this. Dec for BUTTONHOLES on right band - see explanation above. REMEMBER THE KNITTING TENSION Insert 2 markers in the piece; 41-45-48-52-57-62 sts in from each side (back piece = 73-81-87-95-105-115 sts). When piece measures 5 cm, dec 1 st on each side of markers, repeat dec every 3 cm 4 more times - READ DECREASE TIP = 135-151-163-179-199-219 sts. When piece measures 21 cm, inc 1 st on each side of each marker, repeat inc every 6-6-7-7-8-8 cm 2 more times = 147-163-175-191-211-231 sts. When piece measures 36-37-38-39-40-41 cm (on a row from RS), cast off 6 sts in each side (= 3 sts on each side of marker in each side), work the remaining sts as before = 135-151-163-179-199-219 sts.

SLEEVE EDGE:
Cast on 52-56-60-62-66-70 sts on double pointed needles size 5 mm with Paris. Work 2 ridges in GARTER ST- see explanation above, then work in stocking st until piece measures 3 cm. Now cast off 6 sts mid under sleeve = 46-50-54-56-60-64 sts. Knit another sleeve edge the same way.

YOKE:
Slip sleeves on to same circular needle as body where armholes were cast off (without working them first) = 227-251-271-291-319-347 sts. Insert 1 marker in every transition between sleeves and body = 4 markers. Continue in garter st and with pattern as before while at the same time on next row from RS dec for raglan in each of the 4 transitions between body and sleeves (i.e. 8 dec per dec-row) - READ DECREASE TIP AND KNITTING TIP! Dec every other row 16-16-16-17-18-18 times and then every row 0-2-4-4-5-7 times. After all dec are done, 99-107-111-123-135-147 sts remain on needle. Work 2 ridges while AT THE SAME TIME on 1st row dec 6-11-12-22-31-40 sts evenly = 93-96-99-101-104-107 sts. Cast off.

ASSEMBLY:
Sew the openings under the sleeves. Sew the buttons on to the left band.

Diagram

K from RS, P from WS<br />
<br />
<br />
= K from RS, P from WS


1 YO between 2 sts<br />
= 1 YO between 2 sts
K 2 tog = K 2 tog
slip 1 st as if to K, K 1, psso = slip 1 st as if to K, K 1, psso
K 4 tog = K 4 tog
K 4 twisted tog = K 4 twisted tog
Diagram for DROPS 168-9
Do you have a question? See a list of frequently asked questions (FAQ)

Knitting tension is what determines the final measurements of your work, and is usually measured per 10 x 10 cm. It is provided like so: number of stitches in width x number of rows in height - eg: 19 stitches x 26 rows = 10 x 10 cm.

The knitting tension is very individual; some people knit/crochet loosely while others work tightly. You adjust the knitting tension with the needle size, which is why the suggested needle size is only meant as a guide! You need to adjust this (up or down) to ensure that YOUR knitting tension matches the knitting tension provided in the pattern. If you work with a different knitting tension than provided you will have a different yarn consumption, and your work will have different measurements than what the pattern suggests.

The knitting tension also determines which yarns can replace each other. As long as you achieve the same knitting tension you can replace one yarn with another.

See DROPS lesson: How to measure your tension/gauge

See DROPS video: How to make a gauge tension swatch

The required amount of yarn is provided in grams, eg: 450 g. To calculate how many balls you’ll need you first need to know how many grams are in 1 ball (25g, 50g or 100g). This information is available if you click on the individual yarn quality on our pages. Divide the amount required with the amount of each ball. For example, if each ball is 50g (the most common amount), the calculation will be as follows: 450 / 50 = 9 balls.

The important thing when changing from one yarn to another is that the knitting/crochet tension remains the same. This is so that the measurements of the finished piece will be the same as on the sketch provided. It is easier to achieve the same knitting tension using yarns from the same yarn group. It is also possible to work with multiple strands of a thinner yarn to achieve the knitting tension of a thicker one. Please try our yarn converter. We recommend you to always work a test swatch.

Please NOTE: when changing yarn the garment might have a different look and feel to the garment in the photo, due to individual properties and qualities of each yarn.

See DROPS lesson: Can I use a different yarn than the one mentioned in the pattern?

All our yarns are categorised into yarn groups (from A to F) according to thickness and knitting tension – group A contains the thinnest yarns and group F the thickest. This makes it easier for you to find alternative yarns to our patterns, should you wish to switch yarn. All yarns within the same group have a similar knitting tension and can easily replace each other. However, different yarn qualities have different structures and properties which will give the finished work a unique look and feel.

Click here for an overview of the yarns in each yarn group

At the top of all our patterns you’ll find a link to our yarn calculator, which is a helpful tool should you wish to use a different yarn than suggested. By filling in the yarn quality you wish to replace, the amount (in your size) and number of strands, the calculator will present good alternative yarns with the same knitting tension. Additionally it will tell you how much you’ll require in the new qualities and whether you’ll need to work with multiple strands. Most skeins are 50g (some are 25g or 100g).

If the pattern is worked with multiple colours, every colour will have to be calculated separately. Similarly, if the pattern is worked with several strands of different yarns (for example 1 strand Alpaca and 1 strand Kid-Silk) you will have to find alternatives for each, individually.

Click here to see our yarn calculator

Since different yarns have different qualities and textures we have chosen to keep the original yarn in our patterns. However, you can easily find options among our available qualities by using our yarn calculator, or simply pick a yarn from the same yarn group.

It is possible that some retailers still have discontinued yarns in stock, or that someone has a few skeins at home that they would like to find patterns for.

The yarn calculator will provide both alternative yarn as well as required amount in the new quality.

If you think it's hard to decide what size to make, it can be a good idea to measure a garment you own already and like the size of. Then you can pick the size by comparing those measures with the ones available in the pattern's size chart.

You'll find the size chart at the bottom of the pattern.

See DROPS lesson: How to read size chart

The needle size provided in the pattern serves only as a guide, the important thing is to follow the knitting tension. And since knitting tension is very individual, you will have to adjust the needle size to ensure that YOUR tension is the same as in the pattern – maybe you’ll have to adjust 1, or even 2 needle sizes, up or down to achieve the correct tension. For this, we recommend that you work test swatches.

Should you work with a different knitting tension than the one provided, the measurements of the finished garment might deviate from the measurement sketch.

See DROPS lesson: How to measure your tension/gauge

See DROPS video: How to make a tension/gauge swatch

Working a garment top-down provides more flexibility and room for personal adjustment. For example it is easier to try the garment on while working, as well as making adjustments to length of yoke and shoulder caps.

The instructions are carefully explaining every step, in the correct order. Diagrams are adjusted to the knitting direction and are worked as usual.

The diagram depicts all rows/rounds, and every stitch seen from the right side. It is read from bottom to top, from right to left. 1 square = 1 stitch.

When working back and forth, every other row is worked from the right side and every other row is worked from the wrong side. When working from the wrong side, the diagram will have to be worked reversed: from left to right, knit stitches are purled, purl stitches are knit etc.

When working in the round every round is worked from the right side and the diagram are worked from right to left on all rounds.

See DROPS lesson: How to read knitting diagrams

The diagram depicts all rows/rounds, and every stitch seen from the right side. It is worked from bottom to top, from right to left.

When working back and forth every other row is worked from the right side: from right to left and every other row is worked from the wrong side: from left to right.

When working in the round, every row in the diagram are worked from the right side, from right to left.

When working a circular diagram you start in the middle and work your way outwards, counter clockwise, row by row.

The rows usually start with a given number of chain stitches (equivalent to the height of the following stitch), this will either be depicted in the diagram or explained in the pattern.

See DROPS lesson: How to read crochet diagrams

Instructions for working several diagrams after each other on the same row/round, will often be written like so: “work A.1, A.2, A.3 a total of 0-0-2-3-4 times". This means you work A.1 once, then A.2 is worked once, and A.3 is repeated (in width) the number of times provided for your size – in this case like so: S = 0 times, M = 0 times, L=2 times, XL= 3 times and XXL = 4 times.

The diagrams are worked as usual: begin with the first row in A.1, then work the first row in A.2 etc.

See DROPS lesson: How to read knitting diagrams

See DROPS lesson: How to read crochet diagrams

The total width of the garment (from wrist-to-wrist) will be larger in the larger sizes, despite the actual sleeves being shorter. The larger sizes have longer sleeve caps and wider shoulders, so there will be a good fit in all sizes.

The measurement sketch/schematic drawing provides information regarding the full length of the garment. If it’s a jumper or a jacket the length is measured from the highest point on the shoulder closest to the neckline, and straight down to the bottom of the garment. It is NOT measured from the tip of shoulder. Similarly, the length of yoke is measured from the highest point on the shoulder and down to where yoke is split into body and sleeves.

On a jacket measures are never taken along bands, unless specifically stated. Always measure inside band stitches when measuring the length.

See DROPS lesson: How to read a schematic drawing

Diagrams are often repeated on the round or in height. 1 repeat is the diagram the way it appears in the pattern. If it says to work 5 repeats of A.1 in the round, then you work A.1 a total of 5 times after/next to each other in the round. If it says to work 2 repeats of A.1 vertically/in height you work the entire diagram once, then begin again at the start and work the entire diagram one more time.

Chain stitches are slightly narrower than other stitches and to avoid working the cast-on edge too tight, we simply chain more stitches to begin with. The stitch count will be adjusted on the following row to fit the pattern and measurement sketch.

The rib edge is more elastic and will contract slightly compared to, for example, stocking stitch. By increasing before the rib edge, you avoid a visible difference in width between the rib edge and the rest of the body.

It’s very easy to cast off too tightly, and by making yarn overs while casting off (and simultaneously casting these off) you avoid a too tight cast off edge.

See DROPS video: How to bind off with yarn overs (yo)

To achieve an even increase (or decrease) you can increase on, for example: every 3rd and 4th row alternately, like so: work 2 rows and increase on the 3rd row, work 3 rows and increase on the 4th. Repeat this until the increase is complete.

See DROPS lesson: Increase or decrease 1 st on every 3rd and 4th row alternately

Should you prefer to work in the round instead of back and forth, you may of course adjust the pattern. You’ll need to add steeks mid-front (usually 5 stitches), and follow the instructions. When you would normally turn and work from the wrong side, simply work across the steek and continue in the round. At the end you’ll cut the piece open, pick up stitches to work bands, and cover the cut edges.

See DROPS video: How to knit steeks and cut open

Should you prefer to work back and forth instead of in the round, you may of course adjust the pattern so you work the pieces separately and then assemble them at the end. Divide the stitches for the body in 2, add 1 edge stitch in each side (for sewing) and work the front and back pieces separately.

See DROPS lesson: Can I adapt a pattern for circular needles into straight needles?

Pattern repeats can vary slightly in the different sizes, in order to get the correct proportions. If you’re not working the exact same size as the garment in the photo, yours might deviate slightly. This has been carefully developed and adjusted so that the complete impression of the garment is the same in all sizes.

Make sure to follow instructions and diagrams for your size!

If you have found a pattern you like which is available in women’s size it’s not very difficult to convert it to men’s size. The biggest difference will be the length of sleeves and body. Start working on the women size that you think would fit across the chest. The additional length will be worked right before you cast off for the armhole/sleeve cap. If the pattern is worked top-down you can add the length right after the armhole or before the first decrease on sleeve.

Regarding additional yarn amount, this will depend on how much length you add, but it is better with a skein too many than too few.

All yarns will have excess fibres (from production) that might come off as lint or shedding. Brushed yarns (ie hairier yarns) have more of these loose, excess fibres, causing more shedding.

Shedding also depends on what is worn under or over the garment, and whether this pulls at the yarn fibres. It’s therefore not possible to guarantee that there will be no shedding

Below are some tips on how to get the best result when working with hairier yarns:

1. When the garment is finished (before you wash it) shake it vigorously so the looser hairs come off. NOTE: do NOT use a lint roller, brush or any method that pulls at the yarn.

2. Place the garment in a plastic bag and put it in your freezer - the temperature will cause the fibres to become less attached to each other, and excess fibres will come off easier.

3. Leave in the freezer for a few hours before taking it out and shaking it again.

4. Wash the garment according to the instructions on the yarn label.

Pilling is a natural process that happens to even the most exclusive of fibers. It's a natural sign of wear and tear that is hard to avoid, and that is most visible in high friction areas of your garment like a sweater's arms and cuffs.

You can make your garment look as new by removing the pilling, using a fabric comb or a pill/lint remover.

Still can't find the answer you need? Then scroll down and leave your question so one of our experts can try to help you. This will be done normally within 5 to 10 working days.
In the meantime, you can read the questions and answers that others have left to this pattern or join the DROPS Workshop on Facebook to get help from fellow knitters/crocheters!
Have you finished this pattern?
Tag your pictures with #dropspattern #charlottecardigan or submit them to the #dropsfan gallery.

Post a comment to pattern DROPS 168-9

We would love to hear what you have to say about this pattern!

If you want to leave a question, please make sure you select the correct category in the form below, to speed up the answering process. Required fields are marked *.

Comments / Questions (26)

country flag Mona Røsand wrote:

Om knappe hull : det står strikk 2m, strikk 3m sammen, et kast. Sitter du ikke da igjen med 4m og ikke 5 som du startet med?

07.06.2016 - 18:04

DROPS Design answered:

Hei Mona. Der staar: 1 knapphull = strikk 2.og 3.m fra midt foran rett sammen og lag deretter 1 kast. Dvs, du strikker maske nummer 2 OG 3 sammen = 2 m bliver 1, saa du faar ikke mindre.

08.06.2016 - 16:19

country flag Inge Nielsen wrote:

Hvordan skal jeg forstå diagram A1 og A2? Jeg har set i opskrift DROPS 168-15, hvor det samme mønster er benyttet. Her er et billede af mønsteret tæt på, hvor jeg kan tælle at der er 2 p mellem hulrækkerne, altså hulrække på hver 4. p. Jeg opfatter at en kvardrat i diagrammet dækker over 1 maske ret på retten og vrang på vrangen. Er det forkert opfattet? Venlig hilsen Inge Nielsen

03.03.2016 - 20:08

DROPS Design answered:

Hej Inge, du start altid i nederste højre hjørne, hver rude er én maske. Her kan du se hvordan selve mønsterpinden strikkes.

DROPS Knitting Tutorial: How to work a wave pattern from Garnstudio Drops design on Vimeo.

08.03.2016 - 09:42

country flag Gunda Poll wrote:

Einfach fantastisch, diese Kollektion, wo soll ich nur anfangen, eins schöner als das andere, herrlich, danke, tausendmal danke!!! must have!

10.02.2016 - 09:26

country flag Eva Vilsbøl wrote:

Flot og elegant model, som passer til en hyggelig aften i selskab med gode vennerne dejlig varm sommeraften. En model jeg skal have.

20.01.2016 - 19:49

Evelyn wrote:

Lovely. Looks like a perfect top for a hot summer's day in Paris Cotton.

11.01.2016 - 15:23

country flag Mita wrote:

Leuke twinset met het bloesje van daarnaast

11.12.2015 - 11:38