
Popular categories
Looking for a yarn?


Comments / Questions (74)
![]() Edith wrote:
Edith wrote:
Ik heb dit leuke truitje gebreid op rechte pennen met knop en dat ging heel goed. Waarschijnlijk maakt u veel mensen blij als u deze mogelijkheid bij het patroon vermeldt, want het is hard zoeken als je niet met rondbreinaalden kunt omgaan (zoals ik).
13.04.2026 - 22:23
![]() Jan wrote:
Jan wrote:
Is there an email address I can send some longer comment to about your English version patterns please? I’d like you to look into making them easier to understand.
22.03.2026 - 19:57
![]() Jan wrote:
Jan wrote:
Thanks. One further question, because the pattern makes the bottom uneven, where do you take measurements from for length please?
22.03.2026 - 19:55DROPS Design answered:
Hi Jan, Measurements are taken from the longest part of the wavy pattern. Regards, Drops Team.
23.03.2026 - 06:16
![]() Jan Fitzpatrick wrote:
Jan Fitzpatrick wrote:
Please explain ‘k5 twisted tog’?
21.03.2026 - 22:13DROPS Design answered:
Hello Jan, for this technique, we have a video tutorial available. Happy knitting!
22.03.2026 - 18:04
![]() Jeannette wrote:
Jeannette wrote:
Brei je het linkervoorpand en linkerachterpand apart
08.03.2026 - 09:46DROPS Design answered:
Dag Jeanette,
Je breit eerst het linker voorpand van onder naar boven en aansluitend brei je het linker achterpand. Dit doe je ook met de rechter panden en op het eind wordt het werkstuk midden achter en in de zijkanten in elkaar genaaid.
09.03.2026 - 13:26
![]() Susanne Løve wrote:
Susanne Løve wrote:
Jeg har strikket første pind (retside) til denne jakke og er nu i tvivl om, hvordan vrangsiden skal strikkes. Skal alle maskerne - bortset fra dem i RETSTRIK - strikkes modsat, dvs. vr til ret og ret til vr? Og skal mønstrene A1, 2 og 3 strikkes ens på ret- og vrangside?
10.08.2025 - 12:16DROPS Design answered:
Hej Susanne. Ja du stickar de motsatt på vrangen. Symbolerna i diagrammet är förklarade både från retsiden och vrangsiden, så se där hur de ska stickas på vrangsiden. Mvh DROPS Design
26.08.2025 - 14:50
![]() Brigitte wrote:
Brigitte wrote:
Bonjour J'aimerais tricoter le modèle W 521 en kid silk. Est-ce possible ? Si oui, pourriez-vous m'indiquer combien il me faudrait de laine ? Sinon, est-ce possible en alpaga silk ? Merci pour votre réponse Cordialement, Brigitte
16.04.2025 - 14:33
![]() Brigitte wrote:
Brigitte wrote:
Bonsoir, J'aimerais tricoter le modèle W 521 en kid silk. Est-ce possible ? Si oui, pourriez-vous m'indiquer combien il me faudrait de laine ? Sinon, est-ce possible en alpaga silk ? Merci pour votre réponse Cordialement, Brigitte
12.04.2025 - 20:16DROPS Design answered:
Bonjour Brigitte, vous pouvez tout à fait utiliser 2 fils Kid-Silk ou bien 1 fil Brushed Alpaca Silk pour réaliser ce modèle, notez juste que la texture et le résultat sera différent car ces laines ont une composition différente (pensez juste à bien vérifier votre échantillon et ajustez si besoin la taille des aiguilles) - retrouvez ici comment calculer la quantité nécessaire (ou ici directement pour Brushed Alpaca Silk). Bon tricot!
22.04.2025 - 08:25
![]() Corinne Molteno wrote:
Corinne Molteno wrote:
Bonjour, j'ai commencé l'ouvrage ,j'ai fait les 3 cm mais je comprends pas comment faire les augmentations
20.03.2025 - 15:48DROPS Design answered:
Bonjour Mme Molteno, pour le côté gauche, montez sur le côté droit (vu sur l'endroit), autrement dit en fin de rang sur l'envers: 5 x 1 m et 3 x 2 m - ces nouvelles mailles se tricotent en jersey, puis montez encore 1 x 5 m; ces 5 dernières mailles se tricotent au point mousse. Vous avez tricoté la partie B en bas à droite du schéma. Bon tricot!
21.03.2025 - 07:34
![]() Yvonne wrote:
Yvonne wrote:
Hej, Har bara börjat med första varvet som är räta men hur fortsätter jag med andra varvet som är på avigan, dvs hur stickar man maskorna innan mönstret på 21 maskor på aviga varvet? Mvh Yvonne
22.02.2025 - 18:15DROPS Design answered:
Hei Yvonne. Fra vrangen (avigan) strikker du 2 vrang - 2 rett - 2 vrang (stolpen), slik at rettmasken kommer over rettmasker og vrangmaskene kommer over vrangmaskene. Om du ser på bildet som viser plagget foran, ser du hvordan stolpen vil bli seende ut. mvh DROPS Design
03.03.2025 - 09:00
|
|||||||||||||||||||||||||
Audry#audrycardigan |
|||||||||||||||||||||||||
 |
 |
||||||||||||||||||||||||
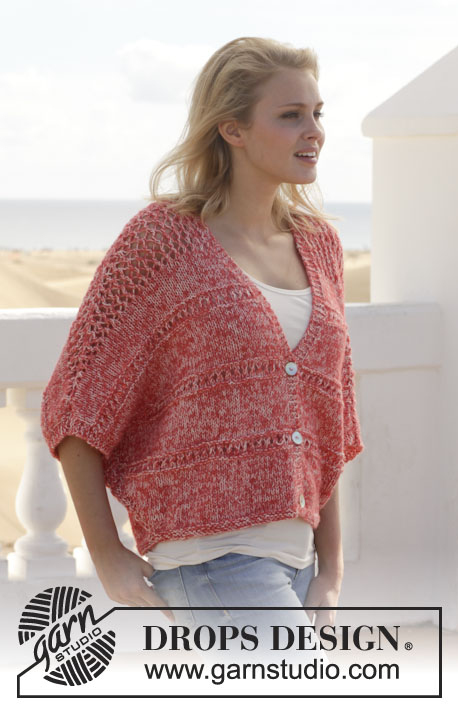
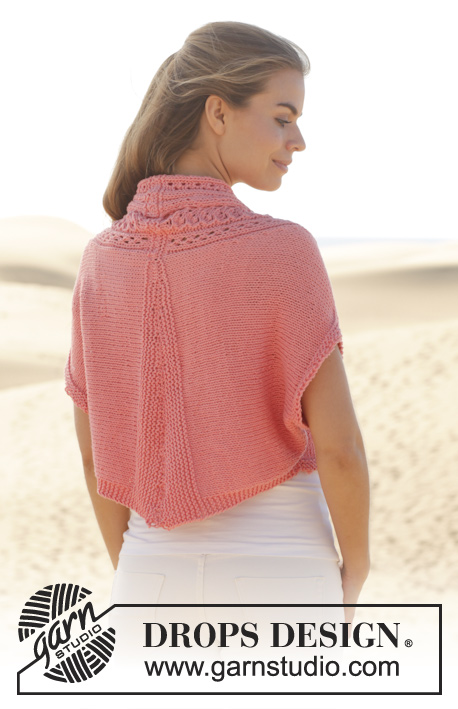
Knitted DROPS jacket with lace pattern and shawl collar in ”Paris”. Size: S - XXXL.
DROPS 154-20 |
|||||||||||||||||||||||||
|
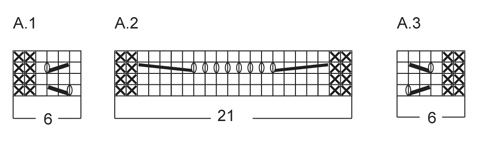
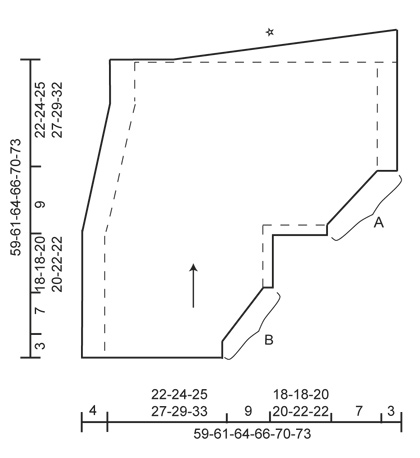
GARTER ST (back and forth on needle): K all rows. 1 ridge = 2 rows K. PATTERN: See diagrams A.1-A.3. The diagrams show all rows in pattern seen from RS. BUTTONHOLES: Dec for buttonholes on right band. 1 buttonhole = K tog 5th and 6th st from mid front. On next row cast on 1 new st over the dec st. Dec for buttonholes when piece measures: SIZE S: 6, 12 and 18 cm SIZE M: 6, 12 and 18 cm SIZE L: 6, 13 and 20 cm SIZE XL: 6, 13 and 20 cm SIZE XXL: 7, 14 and 21 cm SIZE XXXL: 7, 14 and 21 cm ---------------------------------------------------------- JACKET: Work back and forth in two parts from bottom edge on front piece to mid back. Sew the two parts tog when finished. LEFT FRONT PIECE/BACK PIECE: Worked back and forth on circular needle to make room for all the sts. Cast on 44-46-48-52-56-62 sts (incl 6 band sts towards mid front) on circular needle size 5 mm with Paris. Work as follows from RS: Work in GARTER ST – see explanation above - over the first 5-7-9-13-17-23 sts, P 2, 4 sts in stocking st, A.2 (= 21 sts), 4 sts in stocking st, P 2, finish with K 2, P 2, K 2 (= band). NOTE! Work band like this until finished measurements. Work 4 rows like this, then work as follows from RS: Work in garter st over the first 5-7-9-13-17-23 sts, A.3 (= 6 sts), A.2 (= 21 sts), A.1 (= 6 sts), finish with K 2, P 2, K 2 (= band). Continue until piece measures 3 cm. Then work in stocking st over the first 5-7-9-13-17-23 sts, A.3/A.2/A.1 and band sts (= K 2, P 2, K 2) as before AT THE SAME TIME on next row from WS beg inc towards the side and cast on new sts at the end of every row from WS as follows: Cast on 1 st 5 times in total and 2 sts 3 times in total. Work the new sts in stocking st. Then on next row from WS, cast on 5 new sts 1 time in total = 60-62-64-68-72-78 sts. Work the 5 new sts in garter st for sleeve edge. When piece measures 28-28-30-30-32-32 cm, LOOSELY cast on 30-30-34-34-38-38 new sts for sleeve at the end of next row from WS = 90-92-98-102-110-116 sts. Work the 30-30-34-34-38-38 new sts in garter st. Work 3 ridges in garter st over the new sts. Work the rest of sts as before. Then work in stocking st over all sts in garter st (work sts in stocking st until finished measurements). Now dec for neck as follows: Work in stocking st until 2 sts remain before A.3, slip 1 st as if to K, K 1, psso, repeat dec every 4th row 10 times in total. AT THE SAME TIME on next row from WS beg inc towards the side and cast on new sts at end of every row from WS as follows: Cast on 2 sts 5 times in total and 1 st 2 times in total. NOTE! Work the 12 new sts in stocking st. On next row from WS, cast on 5 new sts 1 time in total (work the 5 new sts in garter st until finished measurements). When neck dec is done, there are 97-99-105-109-117-123 sts on needle. Work as before until piece measures 58-60-63-65-69-72 cm. Adjust so that next row is from RS. Work 1 ridge over all sts AT THE SAME TIME on last row (= WS) cast off the first 39 sts. Then work in garter st AT THE SAME TIME cast off as follows: K all sts (= from RS), turn and * cast off the first 5-5-5-6-5-6 sts (= WS) and work remaining sts on row, turn and work back *, repeat from *-* 11-11-12-12-14-14 times in total. Cast off the remaining sts. RIGHT FRONT PIECE/BACK PIECE: Work as left front piece/back piece but reversed. I.e. dec and inc in left side of piece (i.e. at the end of every row from RS). Dec for neck after A.3 (from RS) by K 2 tog. Dec for BUTTONHOLES - see explanation above. ASSEMBLY: Sew the two parts tog mid back in front loop of outermost sts. Sew tog A against B - see chart – sew in outer loops of edge sts. Sew the buttons on to left front piece. |
|||||||||||||||||||||||||
Diagram explanations |
|||||||||||||||||||||||||
|
|||||||||||||||||||||||||
 |
|||||||||||||||||||||||||
 |
|||||||||||||||||||||||||
Have you finished this pattern?Tag your pictures with #dropspattern #audrycardigan or submit them to the #dropsfan gallery. Do you need help with this pattern?You'll find 17 tutorial videos, a Comments/Questions area and more by visiting the pattern on garnstudio.com. © 1982-2026 DROPS Design A/S. We reserve all rights. This document, including all its sub-sections, has copyrights. Read more about what you can do with our patterns at the bottom of each pattern on our site. |
|||||||||||||||||||||||||


With over 40 years in knitting and crochet design, DROPS Design offers one of the most extensive collections of free patterns on the internet - translated to 17 languages. As of today we count 324 catalogues and 12290 patterns translated into English (UK/cm). 12290
We work hard to bring you the best knitting and crochet have to offer, inspiration and advice as well as great quality yarns at incredible prices! Would you like to use our patterns for other than personal use? You can read what you are allowed to do in the Copyright text at the bottom of all our patterns. Happy crafting!
Post a comment to pattern DROPS 154-20
We would love to hear what you have to say about this pattern!
If you want to leave a question, please make sure you select the correct category in the form below, to speed up the answering process. Required fields are marked *.