DROPS Paris
DROPS Paris
100% Cotton
from 1.25 € /50g
Get the yarn to make this pattern from 10.00€.

The yarn cost is calculated from the pattern’s smallest size and the yarn’s cheapest product type. Looking for an even better price? You might find it on the DROPS Deals!

DROPS SS24

Audry

Knitted DROPS jacket with lace pattern and shawl collar in ”Paris”. Size: S - XXXL.

DROPS 154-20
DROPS design: Pattern no w-521
Yarn group C
-----------------------------------------------------------
Size: S - M - L - XL - XXL - XXXL
Materials:
DROPS PARIS from Garnstudio
400-400-450-500-550-600 g colour no 01, apricot

DROPS CIRCULAR NEEDLE (80 cm) SIZE 5 mm - or size needed to get 17 sts x 22 rows in stocking st = 10 x 10 cm.
DROPS MOTHER-OF-PEARL BUTTON NO 521: 3 pieces for all sizes

-------------------------------------------------------

Alternative Yarn – See how to change yarns here
Yarn Groups A to F – Use the same pattern and change the yarn here
Yarn usage using an alternative yarn – Use our yarn converter here

-------------------------------------------------------

DROPS Paris
DROPS Paris
100% Cotton
from 1.25 € /50g
Get the yarn to make this pattern from 10.00€.

The yarn cost is calculated from the pattern’s smallest size and the yarn’s cheapest product type. Looking for an even better price? You might find it on the DROPS Deals!

Pattern instructions

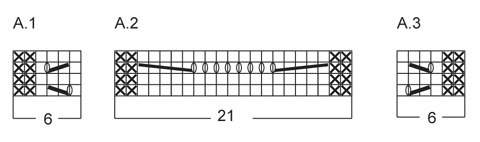
GARTER ST (back and forth on needle):
K all rows. 1 ridge = 2 rows K.

PATTERN:
See diagrams A.1-A.3. The diagrams show all rows in pattern seen from RS.

BUTTONHOLES:
Dec for buttonholes on right band. 1 buttonhole = K tog 5th and 6th st from mid front. On next row cast on 1 new st over the dec st. Dec for buttonholes when piece measures:
SIZE S: 6, 12 and 18 cm
SIZE M: 6, 12 and 18 cm
SIZE L: 6, 13 and 20 cm
SIZE XL: 6, 13 and 20 cm
SIZE XXL: 7, 14 and 21 cm
SIZE XXXL: 7, 14 and 21 cm
----------------------------------------------------------

JACKET:
Work back and forth in two parts from bottom edge on front piece to mid back. Sew the two parts tog when finished.

LEFT FRONT PIECE/BACK PIECE:
Worked back and forth on circular needle to make room for all the sts.
Cast on 44-46-48-52-56-62 sts (incl 6 band sts towards mid front) on circular needle size 5 mm with Paris. Work as follows from RS: Work in GARTER ST – see explanation above - over the first 5-7-9-13-17-23 sts, P 2, 4 sts in stocking st, A.2 (= 21 sts), 4 sts in stocking st, P 2, finish with K 2, P 2, K 2 (= band). NOTE! Work band like this until finished measurements. Work 4 rows like this, then work as follows from RS: Work in garter st over the first 5-7-9-13-17-23 sts, A.3 (= 6 sts), A.2 (= 21 sts), A.1 (= 6 sts), finish with K 2, P 2, K 2 (= band).

Continue until piece measures 3 cm. Then work in stocking st over the first 5-7-9-13-17-23 sts, A.3/A.2/A.1 and band sts (= K 2, P 2, K 2) as before AT THE SAME TIME on next row from WS beg inc towards the side and cast on new sts at the end of every row from WS as follows: Cast on 1 st 5 times in total and 2 sts 3 times in total. Work the new sts in stocking st. Then on next row from WS, cast on 5 new sts 1 time in total = 60-62-64-68-72-78 sts. Work the 5 new sts in garter st for sleeve edge.

When piece measures 28-28-30-30-32-32 cm, LOOSELY cast on 30-30-34-34-38-38 new sts for sleeve at the end of next row from WS = 90-92-98-102-110-116 sts. Work the 30-30-34-34-38-38 new sts in garter st. Work 3 ridges in garter st over the new sts. Work the rest of sts as before. Then work in stocking st over all sts in garter st (work sts in stocking st until finished measurements). Now dec for neck as follows: Work in stocking st until 2 sts remain before A.3, slip 1 st as if to K, K 1, psso, repeat dec every 4th row 10 times in total. AT THE SAME TIME on next row from WS beg inc towards the side and cast on new sts at end of every row from WS as follows: Cast on 2 sts 5 times in total and 1 st 2 times in total. NOTE! Work the 12 new sts in stocking st. On next row from WS, cast on 5 new sts 1 time in total (work the 5 new sts in garter st until finished measurements). When neck dec is done, there are 97-99-105-109-117-123 sts on needle. Work as before until piece measures 58-60-63-65-69-72 cm. Adjust so that next row is from RS. Work 1 ridge over all sts AT THE SAME TIME on last row (= WS) cast off the first 39 sts. Then work in garter st AT THE SAME TIME cast off as follows: K all sts (= from RS), turn and * cast off the first 5-5-5-6-5-6 sts (= WS) and work remaining sts on row, turn and work back *, repeat from *-* 11-11-12-12-14-14 times in total. Cast off the remaining sts.

RIGHT FRONT PIECE/BACK PIECE:
Work as left front piece/back piece but reversed. I.e. dec and inc in left side of piece (i.e. at the end of every row from RS). Dec for neck after A.3 (from RS) by K 2 tog. Dec for BUTTONHOLES - see explanation above.

ASSEMBLY:
Sew the two parts tog mid back in front loop of outermost sts. Sew tog A against B - see chart – sew in outer loops of edge sts. Sew the buttons on to left front piece.

Diagram

symbols = K from RS, P from WS
symbols = P from RS, K from WS
symbols = 1 YO between 2 sts
symbols = slip 1 st as if to K, K 1, psso
symbols = K 2 tog
symbols = K 5 tog
symbols = K 5 twisted tog
symbols = mid back
diagram
diagram
Do you have a question? See a list of frequently asked questions (FAQ)

Knitting tension is what determines the final measurements of your work, and is usually measured per 10 x 10 cm. It is provided like so: number of stitches in width x number of rows in height - eg: 19 stitches x 26 rows = 10 x 10 cm.

The knitting tension is very individual; some people knit/crochet loosely while others work tightly. You adjust the knitting tension with the needle size, which is why the suggested needle size is only meant as a guide! You need to adjust this (up or down) to ensure that YOUR knitting tension matches the knitting tension provided in the pattern. If you work with a different knitting tension than provided you will have a different yarn consumption, and your work will have different measurements than what the pattern suggests.

The knitting tension also determines which yarns can replace each other. As long as you achieve the same knitting tension you can replace one yarn with another.

See DROPS lesson: How to measure your tension/gauge

See DROPS video: How to make a gauge tension swatch

The required amount of yarn is provided in grams, eg: 450 g. To calculate how many balls you’ll need you first need to know how many grams are in 1 ball (25g, 50g or 100g). This information is available if you click on the individual yarn quality on our pages. Divide the amount required with the amount of each ball. For example, if each ball is 50g (the most common amount), the calculation will be as follows: 450 / 50 = 9 balls.

The important thing when changing from one yarn to another is that the knitting/crochet tension remains the same. This is so that the measurements of the finished piece will be the same as on the sketch provided. It is easier to achieve the same knitting tension using yarns from the same yarn group. It is also possible to work with multiple strands of a thinner yarn to achieve the knitting tension of a thicker one. Please try our yarn converter. We recommend you to always work a test swatch.

Please NOTE: when changing yarn the garment might have a different look and feel to the garment in the photo, due to individual properties and qualities of each yarn.

See DROPS lesson: Can I use a different yarn than the one mentioned in the pattern?

All our yarns are categorised into yarn groups (from A to F) according to thickness and knitting tension – group A contains the thinnest yarns and group F the thickest. This makes it easier for you to find alternative yarns to our patterns, should you wish to switch yarn. All yarns within the same group have a similar knitting tension and can easily replace each other. However, different yarn qualities have different structures and properties which will give the finished work a unique look and feel.

Click here for an overview of the yarns in each yarn group

At the top of all our patterns you’ll find a link to our yarn calculator, which is a helpful tool should you wish to use a different yarn than suggested. By filling in the yarn quality you wish to replace, the amount (in your size) and number of strands, the calculator will present good alternative yarns with the same knitting tension. Additionally it will tell you how much you’ll require in the new qualities and whether you’ll need to work with multiple strands. Most skeins are 50g (some are 25g or 100g).

If the pattern is worked with multiple colours, every colour will have to be calculated separately. Similarly, if the pattern is worked with several strands of different yarns (for example 1 strand Alpaca and 1 strand Kid-Silk) you will have to find alternatives for each, individually.

Click here to see our yarn calculator

Since different yarns have different qualities and textures we have chosen to keep the original yarn in our patterns. However, you can easily find options among our available qualities by using our yarn calculator, or simply pick a yarn from the same yarn group.

It is possible that some retailers still have discontinued yarns in stock, or that someone has a few skeins at home that they would like to find patterns for.

The yarn calculator will provide both alternative yarn as well as required amount in the new quality.

If you think it's hard to decide what size to make, it can be a good idea to measure a garment you own already and like the size of. Then you can pick the size by comparing those measures with the ones available in the pattern's size chart.

You'll find the size chart at the bottom of the pattern.

See DROPS lesson: How to read size chart

The needle size provided in the pattern serves only as a guide, the important thing is to follow the knitting tension. And since knitting tension is very individual, you will have to adjust the needle size to ensure that YOUR tension is the same as in the pattern – maybe you’ll have to adjust 1, or even 2 needle sizes, up or down to achieve the correct tension. For this, we recommend that you work test swatches.

Should you work with a different knitting tension than the one provided, the measurements of the finished garment might deviate from the measurement sketch.

See DROPS lesson: How to measure your tension/gauge

See DROPS video: How to make a tension/gauge swatch

Working a garment top-down provides more flexibility and room for personal adjustment. For example it is easier to try the garment on while working, as well as making adjustments to length of yoke and shoulder caps.

The instructions are carefully explaining every step, in the correct order. Diagrams are adjusted to the knitting direction and are worked as usual.

The diagram depicts all rows/rounds, and every stitch seen from the right side. It is read from bottom to top, from right to left. 1 square = 1 stitch.

When working back and forth, every other row is worked from the right side and every other row is worked from the wrong side. When working from the wrong side, the diagram will have to be worked reversed: from left to right, knit stitches are purled, purl stitches are knit etc.

When working in the round every round is worked from the right side and the diagram are worked from right to left on all rounds.

See DROPS lesson: How to read knitting diagrams

The diagram depicts all rows/rounds, and every stitch seen from the right side. It is worked from bottom to top, from right to left.

When working back and forth every other row is worked from the right side: from right to left and every other row is worked from the wrong side: from left to right.

When working in the round, every row in the diagram are worked from the right side, from right to left.

When working a circular diagram you start in the middle and work your way outwards, counter clockwise, row by row.

The rows usually start with a given number of chain stitches (equivalent to the height of the following stitch), this will either be depicted in the diagram or explained in the pattern.

See DROPS lesson: How to read crochet diagrams

Instructions for working several diagrams after each other on the same row/round, will often be written like so: “work A.1, A.2, A.3 a total of 0-0-2-3-4 times". This means you work A.1 once, then A.2 is worked once, and A.3 is repeated (in width) the number of times provided for your size – in this case like so: S = 0 times, M = 0 times, L=2 times, XL= 3 times and XXL = 4 times.

The diagrams are worked as usual: begin with the first row in A.1, then work the first row in A.2 etc.

See DROPS lesson: How to read knitting diagrams

See DROPS lesson: How to read crochet diagrams

The total width of the garment (from wrist-to-wrist) will be larger in the larger sizes, despite the actual sleeves being shorter. The larger sizes have longer sleeve caps and wider shoulders, so there will be a good fit in all sizes.

The measurement sketch/schematic drawing provides information regarding the full length of the garment. If it’s a jumper or a jacket the length is measured from the highest point on the shoulder closest to the neckline, and straight down to the bottom of the garment. It is NOT measured from the tip of shoulder. Similarly, the length of yoke is measured from the highest point on the shoulder and down to where yoke is split into body and sleeves.

On a jacket measures are never taken along bands, unless specifically stated. Always measure inside band stitches when measuring the length.

See DROPS lesson: How to read a schematic drawing

Diagrams are often repeated on the round or in height. 1 repeat is the diagram the way it appears in the pattern. If it says to work 5 repeats of A.1 in the round, then you work A.1 a total of 5 times after/next to each other in the round. If it says to work 2 repeats of A.1 vertically/in height you work the entire diagram once, then begin again at the start and work the entire diagram one more time.

Chain stitches are slightly narrower than other stitches and to avoid working the cast-on edge too tight, we simply chain more stitches to begin with. The stitch count will be adjusted on the following row to fit the pattern and measurement sketch.

The rib edge is more elastic and will contract slightly compared to, for example, stocking stitch. By increasing before the rib edge, you avoid a visible difference in width between the rib edge and the rest of the body.

It’s very easy to cast off too tightly, and by making yarn overs while casting off (and simultaneously casting these off) you avoid a too tight cast off edge.

See DROPS video: How to bind off with yarn overs (yo)

To achieve an even increase (or decrease) you can increase on, for example: every 3rd and 4th row alternately, like so: work 2 rows and increase on the 3rd row, work 3 rows and increase on the 4th. Repeat this until the increase is complete.

See DROPS lesson: Increase or decrease 1 st on every 3rd and 4th row alternately

Should you prefer to work in the round instead of back and forth, you may of course adjust the pattern. You’ll need to add steeks mid-front (usually 5 stitches), and follow the instructions. When you would normally turn and work from the wrong side, simply work across the steek and continue in the round. At the end you’ll cut the piece open, pick up stitches to work bands, and cover the cut edges.

See DROPS video: How to knit steeks and cut open

Should you prefer to work back and forth instead of in the round, you may of course adjust the pattern so you work the pieces separately and then assemble them at the end. Divide the stitches for the body in 2, add 1 edge stitch in each side (for sewing) and work the front and back pieces separately.

See DROPS lesson: Can I adapt a pattern for circular needles into straight needles?

Pattern repeats can vary slightly in the different sizes, in order to get the correct proportions. If you’re not working the exact same size as the garment in the photo, yours might deviate slightly. This has been carefully developed and adjusted so that the complete impression of the garment is the same in all sizes.

Make sure to follow instructions and diagrams for your size!

If you have found a pattern you like which is available in women’s size it’s not very difficult to convert it to men’s size. The biggest difference will be the length of sleeves and body. Start working on the women size that you think would fit across the chest. The additional length will be worked right before you cast off for the armhole/sleeve cap. If the pattern is worked top-down you can add the length right after the armhole or before the first decrease on sleeve.

Regarding additional yarn amount, this will depend on how much length you add, but it is better with a skein too many than too few.

All yarns will have excess fibres (from production) that might come off as lint or shedding. Brushed yarns (ie hairier yarns) have more of these loose, excess fibres, causing more shedding.

Shedding also depends on what is worn under or over the garment, and whether this pulls at the yarn fibres. It’s therefore not possible to guarantee that there will be no shedding

Below are some tips on how to get the best result when working with hairier yarns:

1. When the garment is finished (before you wash it) shake it vigorously so the looser hairs come off. NOTE: do NOT use a lint roller, brush or any method that pulls at the yarn.

2. Place the garment in a plastic bag and put it in your freezer - the temperature will cause the fibres to become less attached to each other, and excess fibres will come off easier.

3. Leave in the freezer for a few hours before taking it out and shaking it again.

4. Wash the garment according to the instructions on the yarn label.

Pilling is a natural process that happens to even the most exclusive of fibers. It's a natural sign of wear and tear that is hard to avoid, and that is most visible in high friction areas of your garment like a sweater's arms and cuffs.

You can make your garment look as new by removing the pilling, using a fabric comb or a pill/lint remover.

Still can't find the answer you need? Then scroll down and leave your question so one of our experts can try to help you. This will be done normally within 5 to 10 working days.
In the meantime, you can read the questions and answers that others have left to this pattern or join the DROPS Workshop on Facebook to get help from fellow knitters/crocheters!

You might also like...

Post a comment to pattern DROPS 154-20

We would love to hear what you have to say about this pattern!

If you want to leave a question, please make sure you select the correct category in the form below, to speed up the answering process. Required fields are marked *.

Comments / Questions (61)

country flag Dorte Harup-Hansen wrote:

Jeg strikker i str XL, slået 52 m op, og jeg har lavet udtagningerne i slutningen af vrangpinden efter de 3 cm kant og har 68 m på pinden. Jeg har strikket til mål 30 cm og slået de 34 m op i slutningen af vrangpinden og strikket de 6 pinde, hvor de nye masker strikkes retstrik. Hvornår skal jeg så starte med lukning til hals og den nye udtagning mod siden. Det har jeg svært ved at forstå. Jeg vil pille det hele op og starte forfra, når jeg har forstået det korrekt

25.08.2021 - 12:57

country flag Dorte Harup-Hansen wrote:

Skal alle de masker, der skal tages ud på vrangsiden, slåes op allesammen for enden af pinden. Jeg synes, det kommer til at se mærkeligt ud

19.08.2021 - 21:16

DROPS Design answered:

Hej Dorte, hvilken størrelse strikker du, hvor er du i opskriften, hvor mange masker har du og hvor mange skal du tage ud i din størrelse?

25.08.2021 - 10:43

country flag Lorraine Forcier wrote:

Pensez-vous qu'il serait possible de réaliser ce modèle plus en longueur? Merci

02.06.2020 - 23:06

DROPS Design answered:

Bonjour Mme Forcier, possiblement, mais nous ne sommes malheureusement pas en mesure de pouvoir adapter chacun de nos modèles à chaque demande, merci de bien vouloir contacter votre magasin pour toute assistance individuelle, ou bien rechercher un autre modèle de veste, en filtrant les résultats si besoin. Bon tricot!

03.06.2020 - 07:09

country flag Susanne wrote:

Hej! Jättefin modell men jag har problem med "Sedan minskas det till hals så här: Sticka slätst tills det återstår 2 m före A.3, lyft 1 m, 1 rm, drag den lyfta m över, upprepa minskn på vart 4:e v totalt 10 ggr". Om man tittar på bilden ser det ut som om man har kvar de 21 maskorna som är A2. Vilka maskor är det som kommer maskas av? Är det från A2? Jag får inte ihop det. Tacksam för hjälp

20.02.2020 - 14:02

DROPS Design answered:

Hej Susanne, Du minskar i de slätstickade maskor innan du stickar A.3-A.2-A.1. Lycka till :)

21.02.2020 - 08:28

country flag Libellule wrote:

Je ne comprends pas ce passage :\r\n« Tricoter 3 côtes mousse sur les nouvelles mailles et les mailles restantes comme avant » Que veut dire « 3 côtes mousse ». Comment faire des « côtes mousse » (pour moi côte = un certain nombre de point endroits et envers alternés), surtout que juste avant il y a « Tricoter les 30-30-34-34-38-38 nouvelles m au point mousse. » Si tout est au point mousse, comment faire des côtes ? Merci.

09.08.2019 - 11:31

DROPS Design answered:

Bonjour Libellule, 1 côte mousse = 2 rangs end (cf POINT MOUSSE), donc on va tricoter ici 6 rangs au total avec 3 côtes mousse sur les mailles indiquées, et les autres mailles seront tricotées comme avant pendant ces 6 rangs. Bon tricot!

09.08.2019 - 12:06

country flag Pauline wrote:

Die Jacke finde ich toll und möchte sie in Größe M nachstricken. Dabei möchte ich die Länge der Jacke um ca. 10 cm verlängern, weil sie für mich im Original-Schnitt etwas zu kurz ist. Wo und wie muss ich den Original-Schnitt verändern, damit die Länge der Jacke um ca. 10 cm vergrößert wird?

13.11.2018 - 15:36

DROPS Design answered:

Liebe Pauline, leider können wir nicht jede Anleitung nach jeder individuellen Anfrage anpassen - gerne können Sie Kontakt mit Ihrem DROPS Laden aufnehmen - auch telefonisch oder per E-mail. Viel Spaß beim stricken!

13.11.2018 - 16:18

country flag Bonnie LIvely wrote:

I'm having trouble knitting 5 together. Do you have any suggestions? Tips?

14.05.2018 - 03:02

DROPS Design answered:

Dear Bonnie, there is a tutorial video, that will probably help you. You can find it here Happy Knitting!

14.05.2018 - 07:50

country flag Dianne wrote:

Love the look of this lacy little jacket, but I'd like to make it a bit longer. But if I'm understanding the diagram correctly, the front is "up and down", and the back portion goes "sideways". So I will have to add extra stitches in width to make the back longer, in addition to adding extra rows for length for the front? Correct?

04.05.2018 - 00:43

DROPS Design answered:

Dear Dianne, front piece is worked from bottom up, then you cast on new sts on the side for back piece (A & B = seam on the side in chart and opening for arm = between A & B). Happy knitting!

04.05.2018 - 09:00

country flag Hege S Borgersen wrote:

Skjønner ikke hva som skal gjøres i starten etter pinne 1. Da skal jo pinnen snus. Det står i oppskriften, strikk 4 pinner til. Menes da identisk med det som står altså at r på retten, blir r på vrangen (med unntak av A2 som forteller hva en skal gjøre) eller skal det strikkes speilvendt? Slik at forkanten 2 vr, 2 r, 2 vr, 2 r på retten blir 2 r 2 vr 2 r 2 vr på vrangen?? Og at rillene kommer over hverandre og ikke i hver sin ende når en snur?

01.04.2018 - 22:41

DROPS Design answered:

Hei Hege. Du skal lese oppskriften som "strikkes som sett fre retten". Alstå når du strikker fra vrangen blir rette masker vrange og omvendt. Med andre ord, fra vrangen strikkes det speilvendt av slik det strikkes fra retten. God fornøyelse

05.04.2018 - 08:20

country flag Mina wrote:

Hola # 154-20, no he podido descifrar las instrucciones; lo escrito, no me concuerda con el diagrama; mi talla es S; empiezo con 5 puntos en musgo, luego cómo sigo hasta llegar a 21 puntos del diagrama A2; repito todo hasta llegar al borde?\Por favor indicarme con más claridad como seguir. Otra pregunta, los 44 puntos que monto al principio, son sólo para la mitad de la chaqueta? Para la otra mitad debo montar otros 44?Gracias por la atención prestada a éste asunto.

25.02.2018 - 23:30