
Popular categories
Looking for a yarn?


Comments / Questions (162)
![]() Yvonne Duckstein wrote:
Yvonne Duckstein wrote:
Hallo, das Häkeln des Reglan bedeutet nur das oberste Teil über der Brust? Man häkelt das Musterbild nur 1x ?! Und dann kommen in den letzten beiden Reihen die Zunahmen? Habe ich das so richtig verstanden? Danke und Beste Grüße Yvonne Duckstein
30.03.2026 - 14:32DROPS Design answered:
Liebe Frau Duckstein, das Diagram A.z wird insgesamt 2 Mal in der Höhe gehäkelt. Die Zunahmen werden bei den 2 letzten Reihen vom 1. Rapport in der Höhe gehäkelt, dann bei den 2 letzten Reihen vom 2. Rapport in der Höhe (4 Reihen mit Zunahmen). Viel Spaß beim Häkeln!
07.04.2026 - 14:06
![]() Rebours wrote:
Rebours wrote:
Encolure beaucoup trop importante comment la diminuer Merci si vous avez une obtion0
19.12.2025 - 17:50
![]() Barre wrote:
Barre wrote:
Je me retrouve avec 12 A2
15.12.2025 - 17:50DROPS Design answered:
Bonjour Mme Barre, vérifiez bien votre nombre de mailles et le décompte donné hier (on commence par A.1, on répète 10 fois A.2 et on termine par A.3, on aura ainsi 12 groupes de double-brides au total pour la manche. Bon crochet!
16.12.2025 - 08:57
![]() Barre wrote:
Barre wrote:
Sur les ms ont continu toujours en ms si non on a plus de 10 A1 MERCI
15.12.2025 - 17:27DROPS Design answered:
Bonjour Mme Barre, en taille S/M vous avez sauté 40 m de l'empiècement pour la manche, vous allez crocheter ces 40 m dans le point fantaisie A.1-A.2-A.3 exactement comme avant + dans les 9 mailles crochetées sous la manche; si vous avez davantage de mailles, vous pouvez probablement ajuster en fonction de votre nombre; attention à ce que vous ayez suffisamment de mailles pour crocheter le point fantaisie. Bon crochet!
16.12.2025 - 08:56
![]() Barre wrote:
Barre wrote:
Je suis arrivée à la manche mais j'ai un problème j'ai mais 49 ms mais pourquoi après vous dites de continuer sur les 40 mailles sur les 9 mailles on fait quoi Merci
14.12.2025 - 19:40DROPS Design answered:
Bonjour Mme Barre, on crochète le tout 1er rang des manches en mailles serrées: 1 ms dans la 1ère des 8 ml et 1 ms dans les 40 ms de l'empiècement = 49 ms. Crochetez ensuite: A.1 (= 6 m), répétez 10 fois A.2 (= 8 m x 10 = 40) et terminez par A.3 (= 3 m) = 6+40+3=49 m. Commencez les tours par 4 ml pour remplacer 1 double-bride / 1 ml pour remplacer 1 ms et terminez les tours par 1 mc dans la 4ème/la 1ère ml du début du tour. Bon crochet!
15.12.2025 - 15:17
![]() Barre wrote:
Barre wrote:
À la fin du 1er rang du dos quand on a crocheter les 60 mailles que fait on Merci
02.12.2025 - 18:59DROPS Design answered:
Bonjour Mme Barre, lorsque vous divisez l'ouvrage, vous sautez les mailles des manches que vous remplacez par 8 mailles en l'air, et, au 2ème rang, vous crochetez les diagrammes comme avant en sautant les 8 mailles en l'air des emmanchures. Crochetez ainsi toutes les mailles comme avant: on va avoir ainsi, A.4, A.1 puis A.2 pour la fin du devant, tout le long du dos, au début de l'autre devant et on termine par A.4 et A.4 (vu sur l'endroit). Bon crochet!
03.12.2025 - 08:15
![]() Rebours wrote:
Rebours wrote:
Lorsque l'on a terminé le 1er A2il faut bien piquer dans 1maille il y a quelque chose qui m'échappe à ce moment la
12.11.2025 - 15:21DROPS Design answered:
Bonjour Mem Rebours, à la fin du dernier A.2 (sur les 24 mailles), vous terminez A.2 par 3 ml, vous crochetez les 8 ml et vous sautez les mailles de la manche, puis vous reprenez A.2 dans le motif suivant (1 ml, vous sautez 1 ms, les double-brides, etc...). Quand vous crochèterez le rang suivant, crochetez les 5 double-brides dans l'arceau d'1 ml comme avant et tout le rang (donc rien dans les 8 mailles en l'air de chaque côté sous les manches. Bon crochet!
12.11.2025 - 16:52
![]() Rebours wrote:
Rebours wrote:
Lorsqu'on arrive à la 24 ème maille du devant l'on fait une maille serrée ou une double bride Merci
10.11.2025 - 11:59DROPS Design answered:
Bonjour Mme Rebours, terminez le dernier A.2 en largeur par 3 mailles en l'air, sautez les 2 ms suivantes, puis crochetez 8 mailles en l'air, sautez les mailles indiquées pour la manche et commencez le A.2 du dos dans la maille suivante; au tour suivant, rappelez-vous que les 8 mailles en l'air ne seront pas crochetées. Bon crochet!
11.11.2025 - 15:59
![]() Barre wrote:
Barre wrote:
Excusez moi mais je ne comprend pas comment faire avec les 8 mailles en l'air
04.11.2025 - 08:31DROPS Design answered:
Bonjour Mme Barre, lorsque vous crochetez le rang de division manches/dos et devants, vous les crochetez à la place des manches, et au rang suivant, vous sautez ces 8 mailles en l'air, vous ne les crochetez pas pour le bas du gilet, vous les crochèterez seulement quand vous ferez les manches. Bon crochet!
04.11.2025 - 17:12
![]() Barre wrote:
Barre wrote:
Les 8 mailles en l'air ne font pas 40 mailles
01.11.2025 - 19:35DROPS Design answered:
Bonjour Mme Barre, les 8 mailles en l'air sont faites quand on saute les 40 mailles des manches, elles seront crochetées ensuite lorsque l'on termine les manches. Bon crochet!
03.11.2025 - 07:38
|
|||||||||||||||||||
Nevertheless#neverthelesscardigan |
|||||||||||||||||||
|
|
|||||||||||||||||||
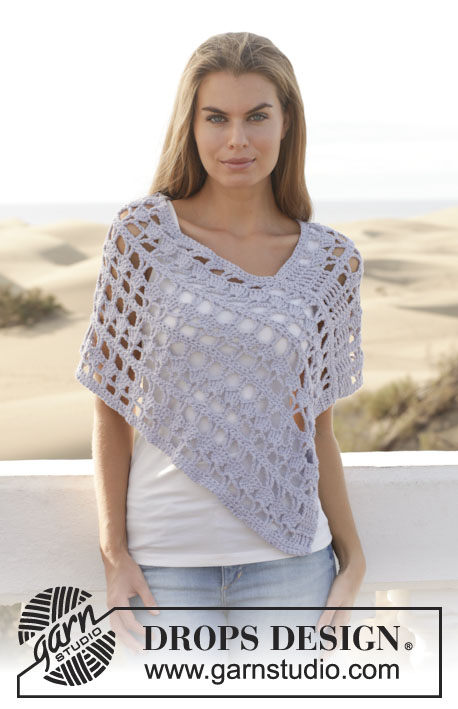
Crochet DROPS jacket in "Paris". Size: S - XXXL.
DROPS 153-10 |
|||||||||||||||||||
|
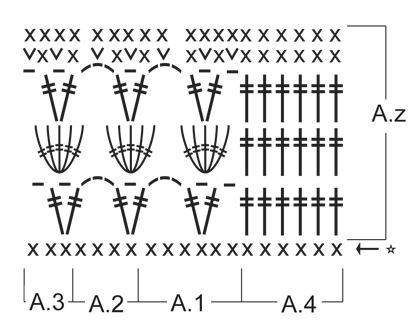
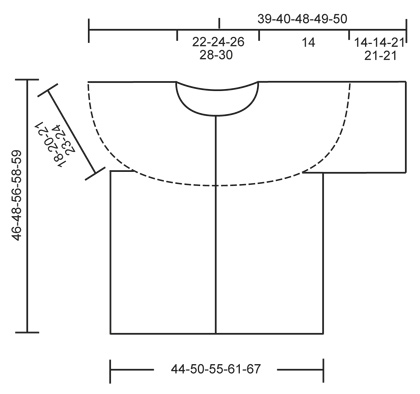
PATTERN: See diagrams A.1 to A.4. CROCHET INFO: Replace first dc on every dc row with 1 ch. Replace first dtr on every dtr row with 4 ch. INCREASE TIP: Inc by working 2 dc in 1 dc. ---------------------------------------------------------- JACKET: Worked top down, back and forth from mid front. YOKE: Work 156-166-177-188-198 loose ch (incl 1 ch to turn with) on hook size 5 mm with Paris. Work 1st row as follows: Work 1 dc in 2nd ch from hook, * 1 dc in each of the next 3 ch, skip 1 ch *, repeat from *-*, and finish with 1 dc in each of the last 2-4-3-2-4 ch = 117-125-133-141-149 dc (= the first row in diagram) - READ CROCHET INFO. Continue to work as follows: A.4 (= band), A.1, A.2 over the next 96-104-112-120-128 dc (= 24-26-28-30-32 times in width), finish with A.3 and A.4 (= band). Work diagram A.z 1 time vertically AT THE SAME TIME on the last 2 rows inc 24-28-32-36-40 sts evenly on each of the rows (= 48-56-64-72-80 sts inc in total) – READ INCREASE TIP above. NOTE: Do not inc over A.4 = 165-181-197-213-229 sts. Then work diagram A.z 1 time vertically (A.2 is now worked 36-40-44-48-52 times in width) AT THE SAME TIME on the last 2 rows inc 22-26-30-34-38 sts evenly on each of the rows (= 44-52-60-68-76 sts inc in total). NOTE: Do not inc over A.4 = 209-233-257-281-305 sts. BODY: NOW MEASURE PIECE FROM HERE. Continue to work as follows: A.4, A.1, A.2 over the next 24-28-32-36-40 dc (= 6-7-8-9-10 times in width) (front piece), 8 ch (under sleeve), skip 40-44-48-52-56 dc from previous row (armhole, sts used for sleeve later), A.2 over the next 60-68-76-84-92 dc (back piece), 8 ch (under sleeve), skip 40-44-48-52-56 dc from previous row (armhole, sts used for sleeve later), A.2 over the next 24-28-32-36-40 dc (front piece) and finish with A.3 and A.4. Continue to work as follows: Work A.4, A.1, A.2 over the next 24-28-32-36-40 dc (= 6-7-8-9-10 times in width) (front piece), skip 8 ch (under sleeve), A.2 over the next 60-68-76-84-92 dc (back piece), skip 8 ch (under sleeve), A.2 over the next 24-28-32-36-40 dc (front piece) and finish with A.3 and A.4. Repeat A.z until piece measures approx. 28-28-35-35-35 cm, finish after one whole repetition of A.z. Fasten off. Piece measures approx. 46-48-56-58-59 cm from shoulder. SLEEVE: Worked in the round. NOW MEASURE PIECE FROM HERE. Worked top down. Beg by working mid under sleeve as follows: Work 2 dc in the first ch (of the 8 ch), 1 dc in each of the next 7 ch and 1 dc in each of the 40-44-48-52-56 dc from yoke = 49-53-57-61-65 dc. Continue to work as follows: 4 ch, A.1, A.2 over the next 40-44-48-52-56 sts (= 10-11-12-13-14 times in width), finish with A.3 and 1 sl st in fourth ch. Continue like this until piece measures approx. 14-14-21-21-21 cm, finish after one whole repetition of A.z. Fasten off. ASSEMBLY: Work a dc edge around the neck to get a nice finish as follows: Work * 1 dc in each of the next 3 ch, skip 1 ch *, repeat from *-*, and finish with 1 dc in each of the last 4-6-5-4-6 ch = 118-126-134-142-150 dc. Sew the buttons on to the left band, approx. 7 cm apart. |
|||||||||||||||||||
Diagram explanations |
|||||||||||||||||||
|
|||||||||||||||||||
 |
|||||||||||||||||||
 |
|||||||||||||||||||
Have you finished this pattern?Tag your pictures with #dropspattern #neverthelesscardigan or submit them to the #dropsfan gallery. Do you need help with this pattern?You'll find 6 tutorial videos, a Comments/Questions area and more by visiting the pattern on garnstudio.com. © 1982-2026 DROPS Design A/S. We reserve all rights. This document, including all its sub-sections, has copyrights. Read more about what you can do with our patterns at the bottom of each pattern on our site. |
|||||||||||||||||||


With over 40 years in knitting and crochet design, DROPS Design offers one of the most extensive collections of free patterns on the internet - translated to 17 languages. As of today we count 324 catalogues and 12290 patterns translated into English (UK/cm). 12290
We work hard to bring you the best knitting and crochet have to offer, inspiration and advice as well as great quality yarns at incredible prices! Would you like to use our patterns for other than personal use? You can read what you are allowed to do in the Copyright text at the bottom of all our patterns. Happy crafting!
Post a comment to pattern DROPS 153-10
We would love to hear what you have to say about this pattern!
If you want to leave a question, please make sure you select the correct category in the form below, to speed up the answering process. Required fields are marked *.