
Popular categories
Looking for a yarn?


Comments / Questions (38)
![]() Päivi wrote:
Päivi wrote:
Hei, millä ompelutekniikalla lehtikuvioreunus kannattaa ommella mekon helmaan, että saumasta tulee siisti? Kiitos jo etukäteen
04.03.2026 - 09:52DROPS Design answered:
Klikkaa verkkosivujemme Vinkkejä & Apua -painiketta ja katso esim. seuraava DROPS Video: Viimeistely: Ompele yhteen: Sauman ompeleminen huomaamattomin pistoin.
06.03.2026 - 18:56
![]() Isa wrote:
Isa wrote:
Hallo, ik heb deze jurk bijna volledig af, maar ik moet nu aan de mouwen beginnen. Deze worden op een rechte naald zonder knop gebreid... kan dit ook met een rondbreinaald (40cm) gedaan worden? Mvg
02.01.2021 - 23:49DROPS Design answered:
Dag Isa,
Volgens het patroon worden de mouwen in de rondte gebreid van boven naar beneden. Je mindert midden onder de mouw en op het einde naai je het gat onder de mouw (oksel) dicht.
10.01.2021 - 11:54
![]() Victoria Waters wrote:
Victoria Waters wrote:
How can I change the size from S/M to M/L, because I think the S/M size will be too small and the next size given will be too big?
26.01.2020 - 12:54DROPS Design answered:
Dear Mrs Waters, we are unfortunately not able to adjust every pattern to every single request - for any individual assistance you are welcome to contact the store where you bought the yarn and/or any knitting forum. Happy knitting!
27.01.2020 - 09:10
![]() Julia Denkwitz wrote:
Julia Denkwitz wrote:
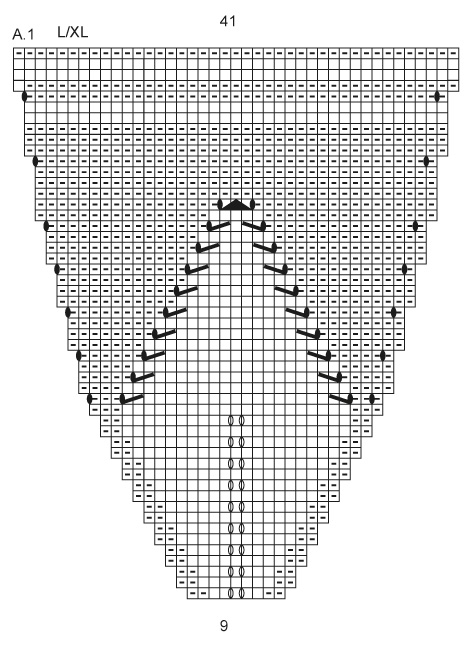
In Reihe 16 von Muster A1 L/XL taucht auf einmal, ohne eine Zunahme an dieser Stelle, eine zusätzliche linke Masche auf, genauso in Reihe 18. Wo kommen die her?
27.11.2019 - 09:51DROPS Design answered:
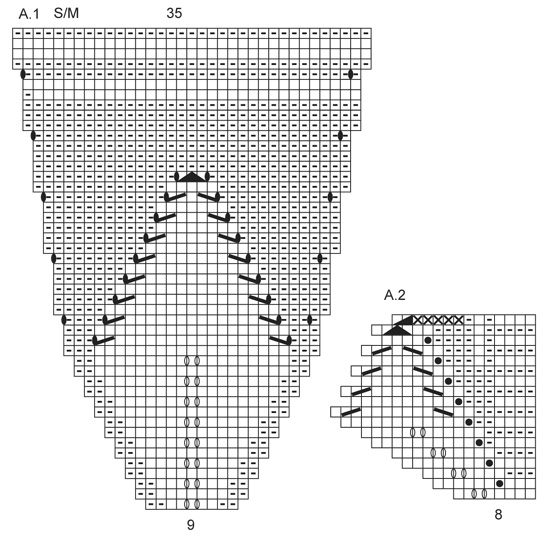
Liebe Frau Denkwitz, Diagram A.1, size L/XL wird korrigiert, bei der 16. Reihe müssen Sie nur 2 linken Maschen stricken (= nicht 3) und am Ende Reihe 18 und 20 soll die letzte Masche links gestrickt werden+ 1 Umschlag fehlt am Ende Reihe 19 + 23. Viel Spaß beim stricken!
27.11.2019 - 12:51
![]() Zuzanna wrote:
Zuzanna wrote:
Dzien dobry Czy na schemacie karczku sukienki orchid boom są pokazane parzyste i nieparzyste rzędy?
16.08.2018 - 19:43DROPS Design answered:
Witaj Zuzanno! Schemat pokazuje wszystkie rzędy, widok na prawej stronie robótki. Pozdrawiamy
17.08.2018 - 16:41
![]() Marty wrote:
Marty wrote:
Non riesco a capire come sia possibile avere 9 maglie di partenza per arrivare poi a 35 maglia. Forse sto interpretando male il disegno, AL primo giro ho già 11 maglie corretto perchè ho i due gettati; al secondo giro ne ho 13 perchè ho i due aumenti laterali; al terzo giro avrò altre 2 maglie in più per via dei gettati quindi ne avrò 15 e via dicendo e al giro 16 ne avrò almeno 43 giusto?
23.07.2016 - 17:02DROPS Design answered:
Buongiorno Marty. Inizia con gli aumenti ai giri 1, 3, 5, 7, 9, 11, 13, 15. Quindi al giro 16 il numero delle m è 25 (ha aumentato 2 m 8 volte, quindi in tutto 16 m in più; 9 + 16 = 25 m). Ai giri 17, 21, 23, 27, 29 e 33 le m gettate vengono compensate dalle m diminuite (quindi in questi giri non ci sono aumenti). Aumenta di nuovo 2 m ai giri 19, 25, 31, 37, 43. Quindi vengono aumentate in tutto altre 10 m (2 m aumentate 5 volte). Al giro 44 la ripetizione del motivo è formata da 25 m + 10 m = 35 m. Buon lavoro!
23.07.2016 - 17:32
![]() Irene Moss wrote:
Irene Moss wrote:
Has anyone else found this neckline to be very high and somewhat tight? I'm making the size s/m which is definitely my size, but am concerned about the small # of stitches at cast-on.
16.06.2015 - 20:19
![]() Monika wrote:
Monika wrote:
Bei der Zeichenerklärung (Diagramm) stehen bei zwei Zeichen 1M re in Hin-R, 1M li in Rück-R. Beim Rund sticken gibt es doch aber nur eine Runde, was gilt dann dort? Beim Saum ist es mir klar, da hin und her geschrickt wird.
27.10.2014 - 21:12DROPS Design answered:
Beim Rundstricken haben Sie ja immer die Vorderseite vorne, daher gilt hier immer das, was für Hin-R beschrieben ist.
28.10.2014 - 06:01
![]() Mannoury wrote:
Mannoury wrote:
Je ne comprends pas les explications pour l'empiecement apres les 63 mailles les explications : tricoter une re-hausse je n'ai pas compris comment faire
08.02.2014 - 12:52DROPS Design answered:
Bonjour Mannoury, la ré-hausse pour l'encolure dos permet à l'encolure dos d'être plus haute que l'encolure devant. Commencez au milieu dos (début du tour), et tricotez des rangs raccourcis au point mousse en tricotant : 8 m au 1er rang (sur l'end), 16 m au 2ème rang (sur l'env), 24 m au 3ème rang (sur l'end) et ainsi de suite jusqu'à ce que vous ayez tricoté 48 m, tricotez encore 1 tour end jusq'au milieu dos et continuez en point fantaisie. Bon tricot!
10.02.2014 - 09:22
![]() Sissel wrote:
Sissel wrote:
Ferdig! Og den ble nydelig. Takk for en fantastisk oppskrift.
02.02.2014 - 22:53
|
|||||||||||||||||||||||||||||||
Orchid Bloom#orchidbloomdress |
|||||||||||||||||||||||||||||||
|
|
|||||||||||||||||||||||||||||||
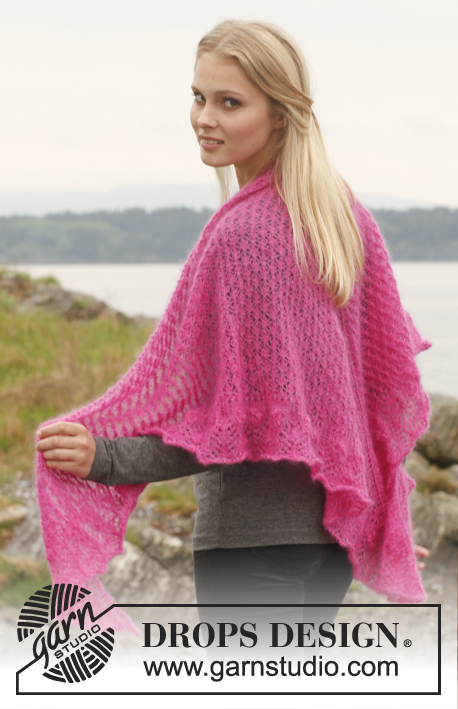
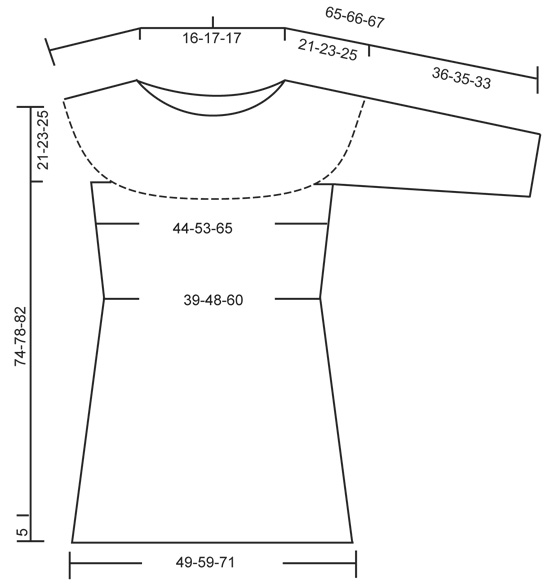
Knitted DROPS dress with round yoke and lace pattern in ”Big Merino”. Size: S - XXXL.
DROPS 151-6 |
|||||||||||||||||||||||||||||||
|
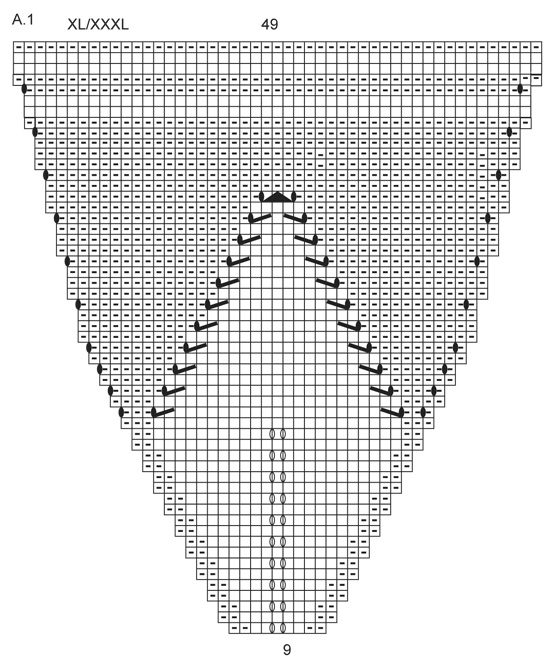
GARTER ST (in the round on circular needle): * K 1 round and P 1 round *, repeat from *-*. 1 ridge = 2 rounds. PATTERN: See diagrams A.1 and A.2. See diagram A.1 for size! ---------------------------------------------------------- DRESS: Worked in the round on circular needle, top down. YOKE: Cast on 54-58-58 sts on a short circular needle size 5 mm with Big Merino. Work 2 RIDGES in garter st - see explanation above, on last round inc 9-5-5 sts evenly = 63 sts in all sizes. Insert 1 marker at beg of round = mid back. Then work an elevation at the back in garter st as follows: K 8 sts past marker, turn, tighten yarn and K 16 sts back, turn, tighten yarn and K 24 sts, turn, continue by working 8 sts more on every turn until a total of 48 sts have been worked, turn and K 1 round until marker mid back again. Then work according to A.1 (work 7 repetitions of A.1 in width). Switch to a longer circular needle when needed. When A.1 has been worked, there are 245-287-343 sts on round. K 1 round while AT THE SAME TIME adjusting the no of sts to 240-288-340. Work next round as follows from mid back: Work 33-41-51 sts, slip the next 54-62-68 sts on 1 stitch holder for sleeve (without working them first), cast on 8 new sts, work 66-82-102 sts (= front piece), slip the next 54-62-68 sts on 1 stitch holder for sleeve (without working them first), cast on 8 new sts, work 33-41-51 sts. BODY: = 148-180-220 sts. NOW MEASURE PIECE FROM HERE! Insert 1 marker in each side, in the middle of the 8 new sts that were cast on. Work in stocking st. When piece measures 3 cm, dec 1 st on each side of markers, repeat dec every 4-4½-5 cm 3 more times (4 dec in total ) = 132-164-204 sts. When piece measures 21-23-25 cm, inc 1 st on each side of each marker, repeat inc every 3 cm 8 more times (9 inc in total) = 168-200-240 sts. Continue until piece measures 53-55-57 cm, cast off. SLEEVE: Slip sts from one stitch holder on double pointed needles size 5 mm, cast in addition on 8 sts mid under sleeve (insert 1 marker in the middle of these sts) = 62-70-76 sts. NOW MEASURE PIECE FROM HERE! Work in stocking st in the round. When sleeve measures 3 cm, dec 1 st on each side of marker. Repeat dec every 2½-2-1½ cm 10-13-14 more times (11-14-15 times in total) = 40-42-46 sts. When sleeve measures 35-34-32 cm (shorter measurements in the larger sizes because of wider shoulders), work 2 ridges in garter st. Cast off. Work the same way over the sts on the other stitch holder. ASSEMBLY: Sew the openings under the sleeves. EDGE WITH LEAF PATTERN: Work edge back and forth on circular needle and fasten at the bottom of dress when finished. Cast on 8 sts on circular needle size 5 mm with Big Merino. Work according to A.2 (1st row = from RS). Work A.2 until piece measures 98-118-142 cm vertically, cast off. Sew cast-on edge and cast-off edge tog, fasten the edge at the bottom of dress, make sure that the seam on edge is mid back on dress. |
|||||||||||||||||||||||||||||||
Diagram explanations |
|||||||||||||||||||||||||||||||
|
|||||||||||||||||||||||||||||||
 |
|||||||||||||||||||||||||||||||
 |
|||||||||||||||||||||||||||||||
 |
|||||||||||||||||||||||||||||||
 |
|||||||||||||||||||||||||||||||
Have you finished this pattern?Tag your pictures with #dropspattern #orchidbloomdress or submit them to the #dropsfan gallery. Do you need help with this pattern?You'll find 21 tutorial videos, a Comments/Questions area and more by visiting the pattern on garnstudio.com. © 1982-2026 DROPS Design A/S. We reserve all rights. This document, including all its sub-sections, has copyrights. Read more about what you can do with our patterns at the bottom of each pattern on our site. |
|||||||||||||||||||||||||||||||


With over 40 years in knitting and crochet design, DROPS Design offers one of the most extensive collections of free patterns on the internet - translated to 17 languages. As of today we count 324 catalogues and 12290 patterns translated into English (UK/cm). 12290
We work hard to bring you the best knitting and crochet have to offer, inspiration and advice as well as great quality yarns at incredible prices! Would you like to use our patterns for other than personal use? You can read what you are allowed to do in the Copyright text at the bottom of all our patterns. Happy crafting!
Post a comment to pattern DROPS 151-6
We would love to hear what you have to say about this pattern!
If you want to leave a question, please make sure you select the correct category in the form below, to speed up the answering process. Required fields are marked *.