
Popular categories
Looking for a yarn?


Comments / Questions (28)
![]() Danielle Turcotte wrote:
Danielle Turcotte wrote:
Puis je faire ce modèle en point jersey
31.12.2025 - 12:48DROPS Design answered:
Bonjour Danielle, bien sur. N'oubliez pas de faire un echantillon. Bon tricot!
31.12.2025 - 13:59
![]() Sari wrote:
Sari wrote:
Oikea etukappale kohta ohjeessa on järkyttävän huonosti ohjeistettu. Samalla sitä ja samalla tätä, kavennetaan ja lisätään. Kohta olisi pitänyt ohjeistaa rivi riviltä (kuten esim. pitsineulesukissa) eikä noin summittaisesti.
25.09.2023 - 15:43
![]() Astrid De Laat wrote:
Astrid De Laat wrote:
Beste, bij de sjaalkraag geeft u aan dat 12 steken gebreid worden wat doe ik met de 4 overige steken?
15.07.2023 - 10:36DROPS Design answered:
Dag Astrid,
Je breit 2 naalden alleen over de buitenste 12 steken. Dus je begint met breien tot je 12 steken hebt gebreid. Dan keer je het werk (terwijl er dus nog steken op je linker naald zitten die niet gebreid zijn) en brei je terug over de 12 steken. Je hebt nu een extra ribbel over alleen die 12 steken gemaakt.
18.07.2023 - 21:06
![]() Gertruud Dijkstra wrote:
Gertruud Dijkstra wrote:
Voorpand: als ik thv de kraag eerste 44 steken op een hulpdraad zet, dan brei ik toch verder met een pen averecht over de overgebleven steken van het linker voorpand? lins gezien vanaf als ik de trui aan zou hebben? in het patroon staat verder breien met het rechter halsdeel?
03.04.2022 - 18:40DROPS Design answered:
Dag Gertruurd,
Nadat je 1 naald recht aan de goede kant hebt gebreid, zet je de steken van het linker voorpand (gezien als het kledingstuk gedragen wordt) op een een hulpdraad. Je breit dan het rechter pand verder en de eerste naald is dus op de verkeerde kant, inderdaad in averecht. Maar de 10 steken midden voor brei je in ribbelsteek. Dat zijn dus de laatste 10 steken aan de verkeerde kant en de eerste 10 steken als je aan de goede kant bent.
04.04.2022 - 11:37
![]() Carina wrote:
Carina wrote:
Hej undrar om halsen, är det mot bakstycket eller mot halsen som man ska sticka de 12 maskorna, tacksam för svar mvh Carina
19.07.2020 - 00:11DROPS Design answered:
Hej Carina, er det de yderste 12 masker i sjalskraven du mener. Hvis ja så er det de yderste mod midt foran :)
29.07.2020 - 15:39
![]() Katie wrote:
Katie wrote:
Which is the "right" or outer side? The knit side or the purl? I can't tell from the picture and the pattern doesn't specify. Thanks.
29.01.2018 - 16:33DROPS Design answered:
Dear Katie, the right side will be the knit side. Happy knitting!
29.01.2018 - 17:08
![]() Helle Arrøe wrote:
Helle Arrøe wrote:
Jeg er i tvivl om om ud og indtagningerne på forstykkerne. Udtagningerne til sjalskraven er det efter at have strikket 1 maske og er indtagningerne efter at have strikket de 10 retmasker?
08.07.2016 - 22:49DROPS Design answered:
Hej Helle. Ja, det er korrekt.
22.11.2016 - 15:54
![]() Katherine wrote:
Katherine wrote:
J'adopte et je vais essayer de la faire rapidement pour cet été
03.06.2012 - 16:20
![]() Gunvor B wrote:
Gunvor B wrote:
Mycket fin och praktisk vårtröja.
27.02.2012 - 10:16
![]() Abuela wrote:
Abuela wrote:
Tyylikäs ja sopivan väljä ja helppo malli. Kiva kaula-aukko.
26.02.2012 - 06:05
|
|
Fields of Gold#fieldsofgoldsweater |
|
 |
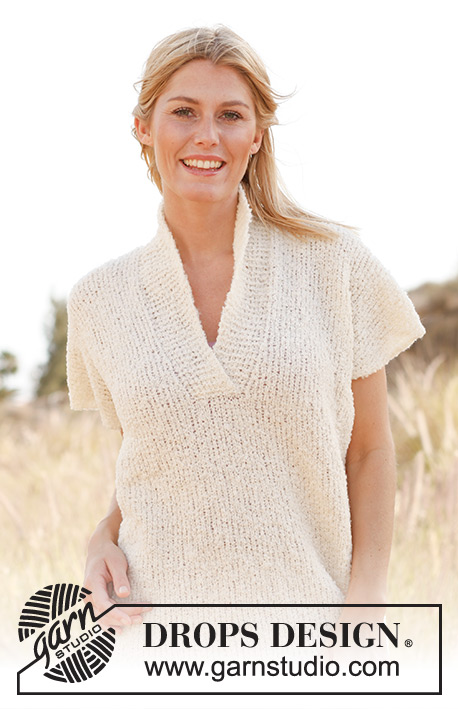 |
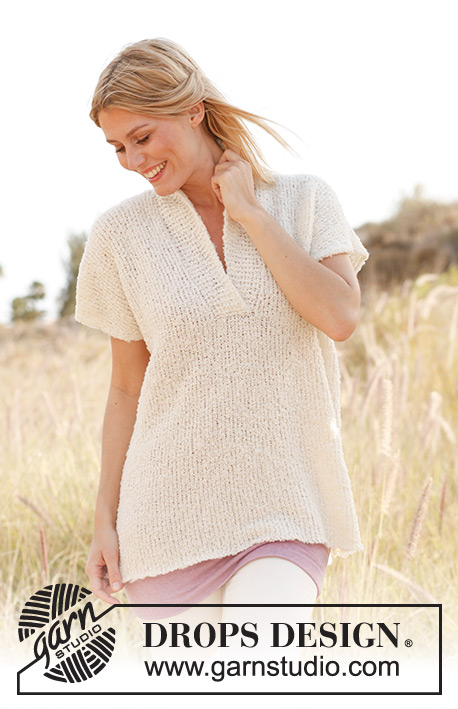
Knitted DROPS jumper with short sleeves and shawl collar in ”Alpaca Bouclé”. Size S-XXXL.
DROPS 138-10 |
|
|
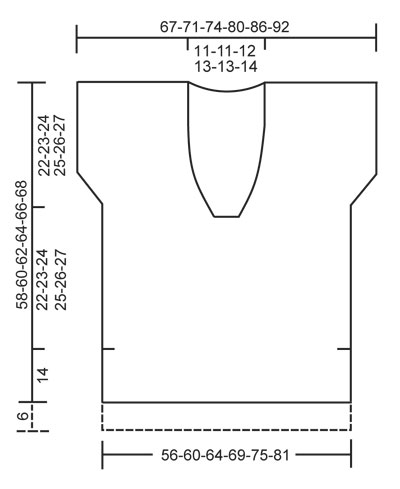
GARTER ST (back and forth on needle): K all rows. INCREASE TIP 1 (applies to sleeve): All inc are done from RS. Inc 1 st inside 3 edge sts in garter st by making 1 YO. On next row P YO twisted to avoid holes. INCREASE TIP 2 (applies to shawl collar): Inc inside outermost st in garter st towards mid front by making 1 YO. On next row K YO twisted to avoid holes. DECREASE TIP (applies to neckline at the front): Dec inside 10 sts in garter st + sts inc for collar. All dec are done from RS. Dec as follows after st in garter st: Slip 1 st as if to K, K 1, psso. Dec as follows before st in garter st: K 2 tog. -------------------------------------------------------- BACK PIECE: The piece is worked back and forth on circular needle because of no of sts. The jumper is 6 cm longer in the back than in the front. Loosely cast on 96-102-108-118-128-138 sts on circular needle size 5 mm with Alpaca Bouclé. Work 2 rows in GARTER ST - see explanation above. Then work in stocking st with 3 edge st in garter st in each side (for vent). When piece measures 20 cm, finish vents and cast on 1 new st in each side for seam = 98-104-110-120-130-140 sts. Then work in stocking st with 1 edge st in garter st in each side. When piece measures 42-43-44-45-46-47 cm, cast off 1 edge st in each side = 96-102-108-118-128-138 sts. Now work in garter st over the outermost 3 sts in each side (continue the other sts in stocking st). AT THE SAME TIME inc for sleeve in each side as follows – READ INCREASE TIP 1: Inc 1 st on every row from RS a total of 9 times = 114-120-126-136-146-156 sts. Continue in stocking st with 3 sts in garter st in each side. When piece measures 62-64-66-68-70-72 cm, cast off the middle 16-16-18-20-20-22 sts for neck and finish each shoulder separately. Then cast off 1 st on next row from neck = 48-51-53-57-62-66 sts remain on the shoulder. Continue as before and loosely cast off when piece measures 64-66-68-70-72-74 cm. FRONT PIECE: Cast on and work as back piece but when piece measures 14 cm, finish vents at the front and cast on 1 new st in each side for seam = 98-104-110-120-130-140 sts. Then work in stocking st with 1 edge st in garter st in each side. When piece measures 33-35-36-37-38-39 cm, work 2 rows in garter st over the middle 10 sts on row, beg from RS (work the other sts in stocking st with edge st in garter st). Then K 1 row over all sts (from RS). Now slip the first 44-47-50-55-60-65 sts that were worked, on a stitch holder for left front piece = 54-57-60-65-70-75 sts remain on needle for right front piece. RIGHT FRONT PIECE: READ ALL OF THE FOLLOWING SECTION BEFORE CONTINUING: Continue in stocking st with edge st in garter st but now work the outermost 10 sts towards mid front in garter st. AT THE SAME TIME inc for shawl collar as follows – READ INCREASE TIP 2: Inc 1 st on every other row a total of 4 times and then on every 4th row a total of 4 times (= 18 sts in garter st for collar). AT THE SAME TIME on next row from RS (after the piece has been divided), dec for V-neck as follows – READ DECREASE TIP: Dec 1 st on every 4th row a total of 4-4-5-6-6-7 times. AT THE SAME TIME when piece measures 36-37-38-39-40-41 cm, dec edge st in the side as on back piece. Now work in garter st over the outermost 3 sts towards the side (work the other sts as before). AT THE SAME TIME inc for sleeve in the side as on back piece. After all inc and dec, 66-69-71-75-80-84 sts remain on needle. Continue in stocking st with 3 sts towards the armhole and the shawl collar in garter st. When piece measures 58-60-62-64-66-68 cm, loosely cast off the outermost 48-51-53-57-62-66 sts at beg of row from the side (= from WS) for shoulder, work the rest of row and slip the remaining 18 sts on a stitch holder for shawl collar. LEFT FRONT PIECE: Slip the 44-47-50-55-60-65 sts from stitch holder on left front piece back on needle. Knit in addition up 10 sts towards mid front - knit up from WS 1 st in each of the 10 sts in garter st mid front = 54-57-60-65-70-75 sts. Then work as right front piece but reversed. ASSEMBLY: Sew the shoulder seams. Sew the side seams inside 1 edge st, leaving vents each side at the bottom open. SHAWL COLLAR: Slip the 18 sts in garter st from stitch holder on one front piece back on needle size 5 mm and work in garter st as follows (1st row = RS): * K 2 rows over all sts, K 2 rows over the outermost 12 sts towards the neck (the other sts on row are not worked) *, repeat from *-* until collar measures approx. 7-7-8-8-8-9 cm from the shoulder (measured on the most narrow part), slip sts on a stitch holder. Repeat in the other side and sew the neck edge tog mid back with grafting/kitchener sts. Sew neck edge to neck line in the back of neck (seam should be in towards WS). |
|
 |
|
Have you finished this pattern?Tag your pictures with #dropspattern #fieldsofgoldsweater or submit them to the #dropsfan gallery. Do you need help with this pattern?You'll find 13 tutorial videos, a Comments/Questions area and more by visiting the pattern on garnstudio.com. © 1982-2026 DROPS Design A/S. We reserve all rights. This document, including all its sub-sections, has copyrights. Read more about what you can do with our patterns at the bottom of each pattern on our site. |
|


With over 40 years in knitting and crochet design, DROPS Design offers one of the most extensive collections of free patterns on the internet - translated to 17 languages. As of today we count 324 catalogues and 12290 patterns translated into English (UK/cm). 12290
We work hard to bring you the best knitting and crochet have to offer, inspiration and advice as well as great quality yarns at incredible prices! Would you like to use our patterns for other than personal use? You can read what you are allowed to do in the Copyright text at the bottom of all our patterns. Happy crafting!
Post a comment to pattern DROPS 138-10
We would love to hear what you have to say about this pattern!
If you want to leave a question, please make sure you select the correct category in the form below, to speed up the answering process. Required fields are marked *.