
Popular categories
Looking for a yarn?


Comments / Questions (109)
![]() Angèle wrote:
Angèle wrote:
Merci pour votre réponse, je suis désolée mais je ne comprends pas tout. Vous dites de joindre et de continuer en rond. Ok, mais dans ce cas mon tour démarre sur le 1ère maille. Comment faire pour démarrer mon tour 8 m avant la fin du dos. Ça voudrait dire que je ne tiens pas compte du tour où je raccorde les 2 parties. Merci pour votre réponse. Avec mes excuses, cordialement
19.08.2024 - 08:36DROPS Design answered:
Bonjour Angèle, vous pouvez tricoter toutes les mailles jusqu'aux 8 dernières mailles du devant (presque un tour complet) et commencer ainsi A.1 (8 dernières mailles du devant + 8 premières mailles du dos). Bon tricot!
20.08.2024 - 07:59
![]() Angèle wrote:
Angèle wrote:
Bonjour, Désolée mais j'ai encore une question. Comment assembler les 2 parties une fois qu'elles sont sur les aiguilles circulaires ? Où dois je fixer mon début de rang ? Merci pour votre réponse. Cordialement.
17.08.2024 - 21:49DROPS Design answered:
Bonjour Angèle, veillez à ce que le dernier rang du devant et du dos soit bien un rang sur l'envers, puis, sur l'endroit, reprenez les mailles du dos et tricotez à suivre les mailles du devant, joignez et continuez en rond. Pour que M.1 soit bien placé au milieu des côtés, commencez vos tours 8 mailles avant la fin du dos et tricotez M.1 ainsi (les 8 dernières mailles du dos + les 8 premières mailles du devant en début de tour). Bon tricot!
19.08.2024 - 08:08
![]() Angèle wrote:
Angèle wrote:
Bonjour, Je commence ce modèle, mais je bloque au niveau des augmentations autour des mailles avec marqueurs. Après les 1ères augmentations je me retrouve avec 53 m et 31 m sur chaque côté. Pour les augmentations suivantes je garde ma maille marquée au centre des augmentations. Merci pour votre réponse. Cordialement. Angèle
16.08.2024 - 13:07DROPS Design answered:
Bonjour Angèle, vous allez augmenter 1 maille de chaque côté des 2 marqueurs, ainsi le nombre de mailles avant le 1er marqueur et celui après le 2ème marqueur augmente d'1 seule maille et le nombre de mailles entre les 2 marqueurs augmente de 2 mailles = 4 mailles en plus à chaque rang sur l'endroit. En taille S et M, après 8 rangs = 4 fois les augmentations, vous devrez avoir 31 (27+4) - marqueur - 54 (4+46+4) - marqueur - 31 (27+4). Bon tricot!
16.08.2024 - 16:11
![]() Ceci wrote:
Ceci wrote:
For the diagram M.1, you are starting from the bottom of the diagram not the top right? As from the photos it seems like you should be starting from the bottom of the pattern M1?
02.04.2024 - 19:52DROPS Design answered:
Dear Ceci, the piece is knitted from the TOP and DOWNWARDS, so the pattern will sit right if you start the diagram from the bottom. Happy Knitting!
02.04.2024 - 23:47
![]() Ceci wrote:
Ceci wrote:
For the Body section, after you've slipped the front and back pieces to the needle, do you continue knitting back and forth on the circular needle or do you knit in the round? Or do you only start knitting in the round on the last 2cm?
02.04.2024 - 19:51DROPS Design answered:
Dear Ceci, after slipping together the pieces for the body, you should knit all the stitches on the round. Happy Knitting!
02.04.2024 - 23:49
![]() Ceci wrote:
Ceci wrote:
Amazing thanks a lot for the explanation!
19.03.2024 - 18:21
![]() Ceci wrote:
Ceci wrote:
Thanks for your answers, but with circular needles, you knit one row then Purl the next right for garter stitch right?
19.03.2024 - 08:13DROPS Design answered:
Dear Ceci, you first work back and forth on circular needle, not in the round, this means you will knit all stitches, all rows. Happy knitting!
19.03.2024 - 11:22
![]() Ceci wrote:
Ceci wrote:
Sorry for so many questions, I think my main confusion is: Front piece K1 row from WS, Continue with K on all rows (=garter st) Does it mean after knitting 1 row from the wrong side, you get on with purling on the next or do you continue knitting 1 row first then change to purl? Kind regards
18.03.2024 - 18:32DROPS Design answered:
Hi Ceci, You knit all rows, from both the right and wrong side, increasing as instructed in the text, then working the armholes. The yoke is continued in garter stitch (knitting all rows), then the body is worked in stocking stitch and pattern, after the front and back pieces have been joined. Happy knitting!
19.03.2024 - 06:48
![]() Ceci wrote:
Ceci wrote:
May I ask for the front piece, once you've knittied the first row on the WS, then the rests are all RS please? And you increase the stitches when you are purling? (With circular needles) Thanks a lot!
18.03.2024 - 18:26DROPS Design answered:
Dear Ceci, you first knit 1 row which is the wrong side of piece, then knit all rows (back and forth on circular needle) to get garter stitch, and at the same time, on 2nd row (right side) start increasing. As you work garter stitch back and forth you will knit all stitches all rows. Happy knitting!
19.03.2024 - 11:01
![]() Ceci wrote:
Ceci wrote:
Thanks for your answers to my last question, I still don't quite get it, for the front piece. After K1 from WS, could you confirm how to find the WS from the start? And then turn and work back and forth, what does it mean? I through garter stitch on circular needle just meaning you keep knitting one row then purl on the next.
18.03.2024 - 18:15DROPS Design answered:
Hi Ceci, When working back and forth (flat), you turn at the end of each row and work back. Garter stitch is knitted on all rows when working back and forth. Happy knitting!
19.03.2024 - 06:50
|
||||||||||||||||
Simply Summer#simplysummertop |
||||||||||||||||
 |
 |
|||||||||||||||
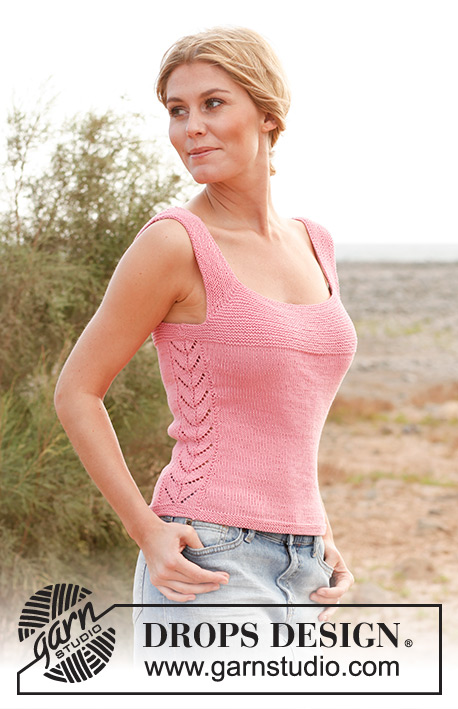
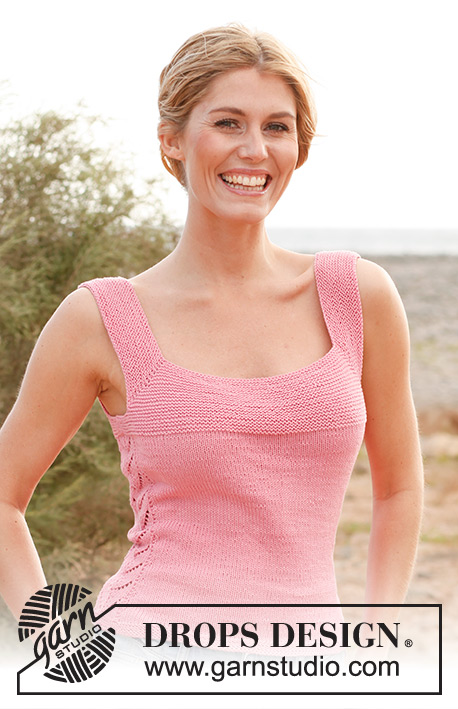
Knitted DROPS top in garter st and with lace pattern, worked top down in ”Safran”. Size: S - XXXL
DROPS 137-2 |
||||||||||||||||
|
GARTER ST (back and forth on needle): K all rows. 1 ridge = K 2 rows. GARTER ST (in the round on circular needle): * K 1 round and P 1 round *, repeat from *-*. PATTERN: See diagram M.1 – the diagram shows 1 repetition of the pattern. DECREASE TIP (applies to side dec): Dec as follows when 2 sts remain BEFORE diagram M.1: K 2 tog. Dec as follows AFTER diagram M.1: Slip 1 st as if to K, K 1, psso. INCREASE TIP (applies to side inc): Work until 1 st in stocking st remains before diagram M.1, make 1 YO, 1 st in stocking st, work diagram M.1 and 1 st in stocking st, make 1 YO. On next round K YOs twisted (i.e. work in back loop of st instead of front) to avoid holes. -------------------------------------------------------- TOP: Worked top down. Front and back piece are worked separately, then put tog and worked in the round. FRONT PIECE: Worked back and forth on circular needle. Cast on 100-100-108-108-115-121 sts on circular needle size 3 mm with Safran. Switch to circular needle size 2.5 mm. Insert a marker in the 27th-27th-30th-30th-32nd-35th st in from each side (= 46-46-48-48-51-51 sts between sts with markers). K 1 row from WS. Continue with K on all rows (= garter st). AT THE SAME TIME on next row, inc 1 st on each side of the 2 sts with markers – inc by making 1 YO, on next row K YOs twisted (i.e. work in back loop of st instead of front) to avoid holes. Repeat inc every other row a total of 14-17-17-19-19-22 times = 156-168-176-184-191-209 sts. K 1 row from WS after last inc. REMEMBER THE KNITTING TENSION! Now piece measures approx. 6-7-7-8-8-9 cm. Work next row as follows (from RS): Loosely cast off the first 40-43-46-48-50-56 sts (= strap), K the next 76-82-84-88-91-97 sts (the first of these sts is already on right needle), and loosely cast off the last 40-43-46-48-50-56 sts (= strap), cut the thread. Work next row from WS as follows: Cast on 7-9-13-16-20-24 new sts at beg of row, work the 76-82-84-88-91-97 sts from needle and cast on 7-9-13-16-20-24 new sts at the end of row = 90-100-110-120-131-145 sts. Work in garter st back and forth for 3-3-3-4-4-4 cm – AT THE SAME TIME after 2-2-2-3-3-3 cm, dec 1 st in each side by K tog the 2 second outermost sts from RS = 88-98-108-118-129-143 sts. Put piece aside. BACK PIECE: Cast on and work as front piece. BODY: Slip front and back piece on to same circular needle size 3 mm = 176-196-216-236-258-286 sts. NOW MEASURE PIECE FROM HERE! Then work diagram M.1 over 16 sts in each side (i.e. 8 sts from back piece and 8 sts from front piece = mid under sleeve). Work the other sts in stocking st. AT THE SAME TIME when piece measures 2 cm, dec 1 st on each side of diagram M.1 in each side - SEE DECREASE TIP! Repeat dec every 2½ cm a total of 6-6-6-6-5-5 times = 152-172-192-212-238-266 sts. When piece measures 18 cm, inc 1 st on each side of diagram M.1 - SEE INCREASE TIP! Repeat inc every 2 cm a total of 6 times = 176-196-216-236-262-290 sts. When piece measures approx. 30-31-32-32-33-33 cm (50-52-54-56-58-60 cm in total) - adjust after 1 whole repetition of diagram M.1, switch to circular needle size 2.5 mm. Work in GARTER ST in the round over all sts for 2 cm - see explanation above! Then loosely cast off with K – use circular needle size 3 mm when casting off (it is very important that the cast off edge is not too tight). The top measures approx. 52-54-56-58-60-62 cm vertically. ASSEMBLY: Sew shoulder seams and side seams edge to edge in front loop of outermost st to avoid chunky and visible seams. |
||||||||||||||||
Diagram explanations |
||||||||||||||||
|
||||||||||||||||
 |
||||||||||||||||
 |
||||||||||||||||
Have you finished this pattern?Tag your pictures with #dropspattern #simplysummertop or submit them to the #dropsfan gallery. Do you need help with this pattern?You'll find 7 tutorial videos, a Comments/Questions area and more by visiting the pattern on garnstudio.com. © 1982-2026 DROPS Design A/S. We reserve all rights. This document, including all its sub-sections, has copyrights. Read more about what you can do with our patterns at the bottom of each pattern on our site. |
||||||||||||||||


With over 40 years in knitting and crochet design, DROPS Design offers one of the most extensive collections of free patterns on the internet - translated to 17 languages. As of today we count 324 catalogues and 12290 patterns translated into English (UK/cm). 12290
We work hard to bring you the best knitting and crochet have to offer, inspiration and advice as well as great quality yarns at incredible prices! Would you like to use our patterns for other than personal use? You can read what you are allowed to do in the Copyright text at the bottom of all our patterns. Happy crafting!
Post a comment to pattern DROPS 137-2
We would love to hear what you have to say about this pattern!
If you want to leave a question, please make sure you select the correct category in the form below, to speed up the answering process. Required fields are marked *.