
Popular categories
Looking for a yarn?


Comments / Questions (15)
![]() Gabriella wrote:
Gabriella wrote:
Buonasera, voglio realizzare lo scialle Himalaya con lana Snow (previsti g. 200 di lana) ma per sbaglio ne ho acquistata g. 250; sapreste dirmi di quanto posso allungare lo scialle se uso g. 250 di Snow ? (il vostro modello prevede larghezza in alto circa 150 cm) Grazie. Cordiali saluti Gabriella
02.12.2022 - 18:51DROPS Design answered:
Buonasera Gabriella, per un'assistenza così personalizzata può rivolgersi al suo rivenditore DROPS di fiducia. Buon lavoro!
03.12.2022 - 16:17
![]() Sonca wrote:
Sonca wrote:
I don't understand the instructions for this hat. It states that the earlaps are worked with 2 thread of white then finish with 1 thread. Does this mean you are knitting both earlaps are the same time? Can you use circular needles to make the earlaps?
19.10.2022 - 03:11DROPS Design answered:
Hi Sonca, The ear flaps are worked with 2 strands to make them warmer, as is the first ridge on the hat itself. Each ear flap is worked back and forth separately to begin with, then they are placed on the same circular needle, stitches are cast on for the rest of the hat, which is continued first back and forth from mid-back then finished in the round. Happy knitting!
19.10.2022 - 06:55
![]() Nicoletta wrote:
Nicoletta wrote:
Buonasera, non riesco a capire come fare i paraorecchie. Il gettato per l'aumento va fatto prima di iniziare il giro dopo il primo ferro una volta avviate le maglie? Non riesco proprio a fare il 2. a specchio. Quando inizio gli aumenti? Sempre prima del 2. ferro? In questo modo però non mi trovo col dritto del lavoro. Infine i 6 punti da avviare fra i paraorecchie vanno avviati attaccati a uno dei paraorecchie o separati? Vi ringrazio per la pazienza
02.09.2021 - 23:16DROPS Design answered:
Buonasera, gli aumenti iniziano dopo il promo giro e deve lavorare 1 gettato a entrambi i lati: inoltre, sul 1° paraorecchie deve avviare le maglie alla fine di un ferro dal diritto del lavoro, verso il dietro; per il secondo paraorecchie deve avviare le maglie alla fine di un ferro dal rovescio del lavoro e aumentare verso il centro davanti all'inizio di un ferro dal diritto del lavoro invece di un ferro dal rovescio del lavoro. Buon lavoro!
04.09.2021 - 21:15
![]() Estela wrote:
Estela wrote:
Solamente puedo tejer la orejera de la que explica el patron. Como podria tejer la otra orejera de lado contrario. Me podrian explicar porfavor. O hacer un tutorial porfavor. Gracias
30.11.2019 - 02:36DROPS Design answered:
Hola Estela. Los dos orejeras se trabajan antes de empezar el gorro. Cuando se termina la primera orejera, dejar la labor en espera y empezar la otra orejera, pero trabajando los aumentos a la inversa. Lee atentamente el patrón.
30.11.2019 - 19:13
![]() Lindsay wrote:
Lindsay wrote:
Hello, how do I connect the ear pieces? Do the ear pieces gonnext to each other with the 16 new cast ons next, where the forehead will be? I was confused why the pattern kept referring to start mid back. Thank you!
23.11.2017 - 03:00DROPS Design answered:
Dear Lindsay, mid back will be the side of ear flaps where you cast on 5 sts on each ear flap - when joining both ear pieces together, start on mid back on 1st ear flap (sts on needle = the 5 sts cast on are at the beg of this row), then cast on 16 sts between both pieces for front piece and work 2nd ear flap (sts put aside, the 5 sts are at the end of piece). Happy knitting!
23.11.2017 - 08:38
![]() Valerie wrote:
Valerie wrote:
After further review of the shawl pattern, it appears that on the edge, I should slip the first stitch (as if to knit, I'm assuming...it doesn't specify) and then YO. Is that a correct interpretation of that first tip and instruction? Thank you, again!
19.01.2016 - 14:31DROPS Design answered:
Dear Valerie, that's correct - happy knitting!
19.01.2016 - 16:36
![]() Valerie wrote:
Valerie wrote:
Your shawl pattern states: "inc 1 st at beg of every row from RS - inc by working 1 YO inside 1 edge st" - does this mean "create a yo at the first edge stitch on the RS"? Meaning, to me, on the RS, knit the first stitch, then YO. Correct? Then, on the next row (WS) P YO the YO that was created on the previous row. Thank you!
19.01.2016 - 11:50DROPS Design answered:
Dear Valerie, that's right: you inc at the beg of every row from RS= 1 edge st, 1 YO, etc and on next row from WS work the YO into back of loop to avoid hole. Happy knitting!
19.01.2016 - 16:33
![]() Katy wrote:
Katy wrote:
Hello, thank you for your help. I still don't understand. I know it has to be cast on towards the back but how do I do that if my working yarn is on the other side. I would have to add a row and after that the ear flap is going to be longer than the first one. I was hoping that you could give me row by row instructions.
12.01.2016 - 17:18DROPS Design answered:
Dear Katy, work reversed will mean you will make on the opposite side what you made on one side for the firt piece. For 1st earfla, you cast on sts at the end of row from RS -towards back) for 2nd piece, you will cast on sts at the end of row from WS. So that both pieces will be reversed. Happy knitting!
13.01.2016 - 10:30
![]() Katy wrote:
Katy wrote:
Hello, Could you please give me a full instruction for making a second (reversed) ear flap? Thank you!
12.01.2016 - 01:35DROPS Design answered:
Dear Katy, to work the 2nd earflap reversed, cast on the sts towards back piece at the end of a row from WS (instead of at the end of a row from RS for 1st earflap), and inc towards mid front at the beg of a row from RS instead of at the beg of a row from WS. Happy knitting!
12.01.2016 - 10:02
![]() Alessandro wrote:
Alessandro wrote:
Buongiorno, ho bisogno di un chiarimento per gli aumenti a lavoro iniziato nel cappello. Date indicazione di un video per gli aumenti a lavoro iniziato, in cui illustrate due tecniche..La prima mi sembra non adatta perché fa un bordo molto morbido, la seconda tecnica non riesco ad applicarla perché ho il filo dalla parte opposta del lavoro...come consigliate di fare? grazie
27.02.2015 - 18:24DROPS Design answered:
Buongiorno Alessandro. La seconda tecnica presentata può essere usata per aumentare le m sia sul rovescio che sul diritto del lavoro. Le m vanno aumentate all'inizio del ferro. Ci riscriva se non abbiamo capito correttamente la sua domanda. Buon lavoro!
28.02.2015 - 23:07
|
|||||||
Himalaya#himalayaset |
|||||||
 |
 |
||||||
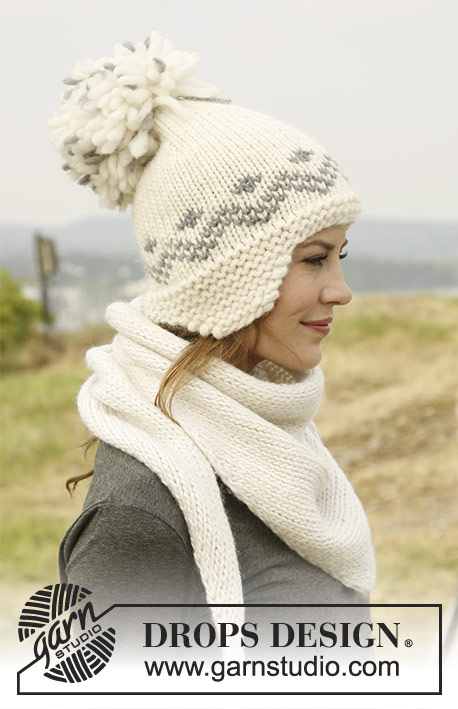
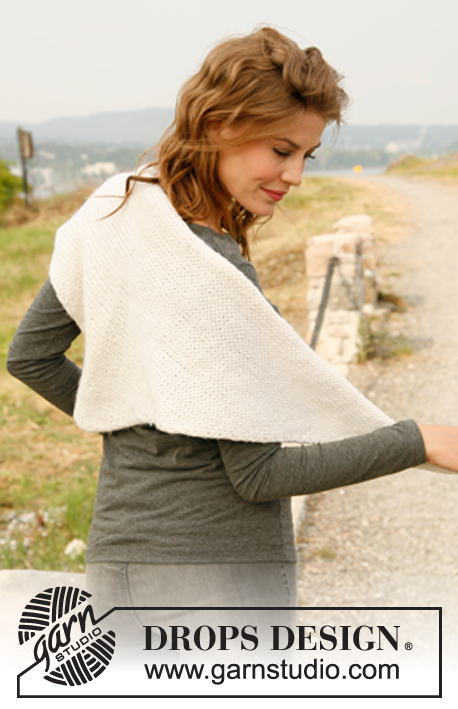
Knitted DROPS hat with ear flaps and shawl in ”Snow”.
DROPS 131-21 |
|||||||
|
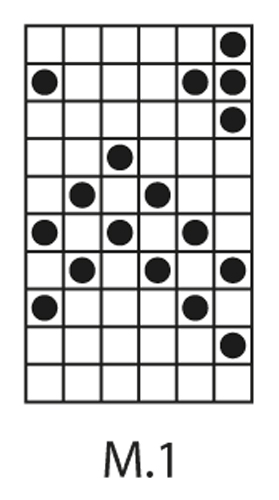
GARTER ST: 1 ridge = 2 rows: 1st row: K all sts, 2nd row: K all sts. INCREASE TIP for hat: Inc by working 1 YO, on next row K YO twisted (i.e. work in back loop of st instead of front) to avoid holes. KNITTING TIP for shawl: To make the edge look nice work as follows: Slip 1st st on every row. -------------------------------------------------------- -------------------------------------------------------- HAT: Ear flaps and the first ridges on the hat itself are worked with 2 threads off white, then finish with 1 thread. Cast on 7 sts on needle size 8 mm with 2 threads Snow. Work in garter st - at the same time after 1 row, inc 1 st in each side on every other row a total of 3 times - see Increase tip = 13 sts. On next row cast on 5 sts towards mid back = 18 sts. K 1 row over all sts until 1 st remains (towards mid front) now inc 1 st with 1 YO before last st = 19 sts, K 1 row. Put piece aside. Work another ear flap but reversed i.e.: be aware of what is front and what is back when inc. Work the ear flaps on to same needle - beg mid back and cast on 16 new sts between ear flaps to forehead = 54 sts on needle. Then work back and forth from mid back. Work 4 rows in garter st over all sts. Switch to double pointed needles size 8 mm and finish the hat in the round from mid back with 1 thread. Work diagram M.1 and then finish in off white and stocking st. REMEMBER THE KNITTING TENSION! When piece measures 16 cm - measured mid front - work next round in the round as follows: * K 2 tog, K 7 *, repeat from *-*. K 1 round. Work next round as follows: * K 2 tog, K 6 *, repeat from *-*. Continue dec on every other round with 1 st less between every dec until 9 sts remain on needle. Hat measures approx. 26 cm from mid front. Cut the thread and pull it through the remaining sts, tighten tog and fasten. Sew tog ridges mid back in front loop of outermost st to make the seam invisible. Make a large pompom in off white and some medium grey and fasten at the top. SHAWL: Cast on 3 sts on needle size 8 mm with 1 thread Snow. Read KNITTING TIP. Work in stocking st while at the same time inc 1 st at beg of every row from RS - inc by working 1 YO inside 1 edge st, P YO twisted (i.e. work in back loop of st instead of front) on next row to avoid holes. REMEMBER THE KNITTING TENSION! When piece measures 75 cm, the shawl is half finished. Work 2 rows without inc. Now dec in the same side as inc by working the first 3 sts as follows: 1 edge st, slip 1 st as if to K, K 1, psso. Continue and dec like this every row from RS until 3 sts remain - piece measures approx. 150 cm. Cast off. |
|||||||
Diagram explanations |
|||||||
|
|||||||
 |
|||||||
Have you finished this pattern?Tag your pictures with #dropspattern #himalayaset or submit them to the #dropsfan gallery. Do you need help with this pattern?You'll find 14 tutorial videos, a Comments/Questions area and more by visiting the pattern on garnstudio.com. © 1982-2026 DROPS Design A/S. We reserve all rights. This document, including all its sub-sections, has copyrights. Read more about what you can do with our patterns at the bottom of each pattern on our site. |
|||||||


With over 40 years in knitting and crochet design, DROPS Design offers one of the most extensive collections of free patterns on the internet - translated to 17 languages. As of today we count 324 catalogues and 12290 patterns translated into English (UK/cm). 12290
We work hard to bring you the best knitting and crochet have to offer, inspiration and advice as well as great quality yarns at incredible prices! Would you like to use our patterns for other than personal use? You can read what you are allowed to do in the Copyright text at the bottom of all our patterns. Happy crafting!
Post a comment to pattern DROPS 131-21
We would love to hear what you have to say about this pattern!
If you want to leave a question, please make sure you select the correct category in the form below, to speed up the answering process. Required fields are marked *.