
Popular categories
Looking for a yarn?


Comments / Questions (63)
![]() Sanne wrote:
Sanne wrote:
Ik heb dit leuke vestje gebreid in maat 6/9 maanden. Met hetzelfde garen als in het patroon. Ik heb echter maar twee bolletjes, dus 100 gram hoeven gebruiken!
21.11.2025 - 10:45
![]() Annika wrote:
Annika wrote:
På venstre forstykke skal man sette stolpemaskene på en streng FØR man øker - på høyre forstykke skal man sette stolpemaskene på en streng ETTER at man øker, stemmer det? Og når man strikker sjalkragen så skal man likevel strikke like langt på høyre og venstre side? - eller like langt fra skuldermerket?
14.10.2025 - 09:04DROPS Design answered:
Hei Annika. Ja, det stemmer. Strikk de ca like lange, men avpass slik at de avsluttes likt. mvh DROPS Design
20.10.2025 - 10:07
![]() Marion wrote:
Marion wrote:
Heb ik 2 rondbreinaalden nodig? Waar laat ik anders het 1e voorpand?
13.09.2025 - 09:48DROPS Design answered:
Dag Marion,
Je kunt de steken ook tijdelijk op een restant garen zetten.
17.09.2025 - 22:01
![]() Annie wrote:
Annie wrote:
Me gustaría ver como hacer los patrones económicos dos agujas rectas o bien como convertir el patrón de aguja circular a dos agujas rectas
08.05.2025 - 05:26
![]() Shirley wrote:
Shirley wrote:
Bonjour, je n'arrive pas à comprendre cette partie: * Tricoter 2 rangs sur les 24-24-26 (28-28) m de la bordure devant, 2 rangs sur les 12-12-13 (14-14) premières mailles seulement.* Aussi, j'ai monté 47 m, qu'est-ce que je fait des des 11 m qui reste? Vous serait-il possible de me l'expliquer étape par étape? Merci beaucoup pour votre aide.
20.09.2024 - 16:57DROPS Design answered:
Bonjour Shirley, pour la même hauteur, il faut davantage de rangs au point mousse que de rangs jersey, ainsi, pour avoir la même hauteur tout du long, on va tricoter des rangs raccourcis - cf vidéo; autrement dit, vous tricotez 2 rangs sur les 24 premières mailles sur l'envers pour le devant gauche/sur l'endroit pour le devant droit, laissez les mailles restantes sans les tricoter, tournez et tricotez le rang retour, 2 rangs sur les 12 premières mailles de la même façon et continuez comme avant. Bon tricot!
23.09.2024 - 07:35
![]() Anuschka Rode wrote:
Anuschka Rode wrote:
Hallo, ich verstehe die verkürzten Reihe nicht...?? Ich stricke die zuerst die Blendmaschen je nach Größe und dann....?? Ich versteh das mit den äussersten...?? nicht. Danke für Ihre Rückmeldung
28.04.2024 - 15:05DROPS Design answered:
Liebe Frau Rode, stricken Sie die ersten 24, 26 oder 28 Maschen am Anfang einer Rück-Reihe (beim linken Vorderteil)/ einer Hin-Reihe (beim rechten Vorderteil), wenden Sie und stricken diese Maschen zurück, dann stricken Sie die ersten 12, 13 oder 14 Maschen, wenden Sie und stricken Sie diese Maschen zurück. Viel Spaß beim Stricken!
29.04.2024 - 09:35
![]() Flo wrote:
Flo wrote:
Bonjour Je propose Télio pour le nom du modèle
13.03.2024 - 11:58
![]() Flo wrote:
Flo wrote:
Bonjour Je propose Télio pour le nom du modèle
13.03.2024 - 11:57
![]() Linda wrote:
Linda wrote:
Hi I’m currently knitting baby patter pattern FA-031-by (the striped double breasted shawl collar cardigan 0-3 size) I’ve got to the part shortened rows it says, repeat every 4cm until price measures 19cm (for me) then every 2cm to finished measurement? What is that, still 19cm? Next line says when piece measures 16cm cast on new stitches. I’m totally confused, I’m not sure what measurements I’m working to, hope you can help! Linda
25.11.2023 - 13:56DROPS Design answered:
Dear Linda, you will work shortened rows up to the end of the front piece. So, until the piece measures 27 cm. So you will repeat every 2cm until the piece measures 27cm. At the same time as you are working the shortened rows, you need to start casting on stitches. Specifically, when the piece measures 16cm. So you will be casting on stitches and working shortened rows simultaneously. Happy knitting!
26.11.2023 - 22:19
![]() Jenni wrote:
Jenni wrote:
Hallo! In der oberen Anleitung steht für die Krausrippe eine andere Nadelstärke als bei der glatt rechten Fläche. Inwieweit lässt sich dieses umsetzen? Bleibt nicht alles auf einer rundnadel?
26.10.2022 - 15:48DROPS Design answered:
Liebe Jenni, die untere Kante wird mit den kleineren Nadeln gestrickt, aber die Blende wird mit der Nadel Nr 3 (wie beim glatt rechts) gestrickt. Viel Spaß beim stricken!
26.10.2022 - 17:03
|
|
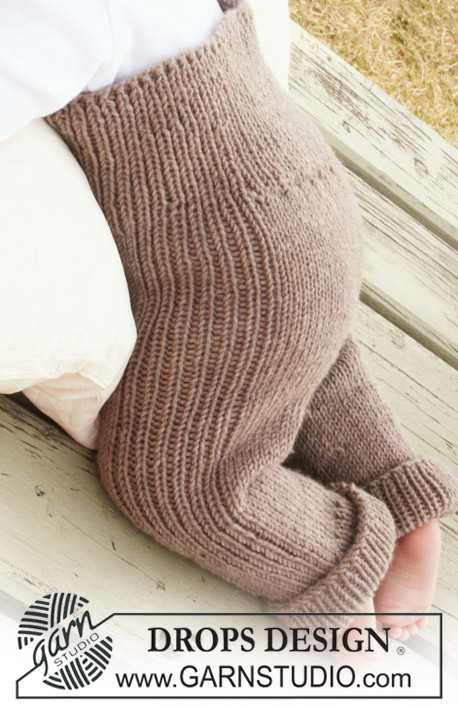
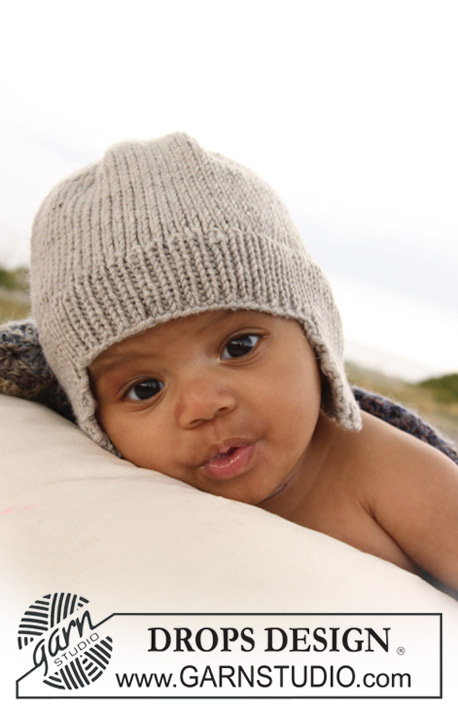
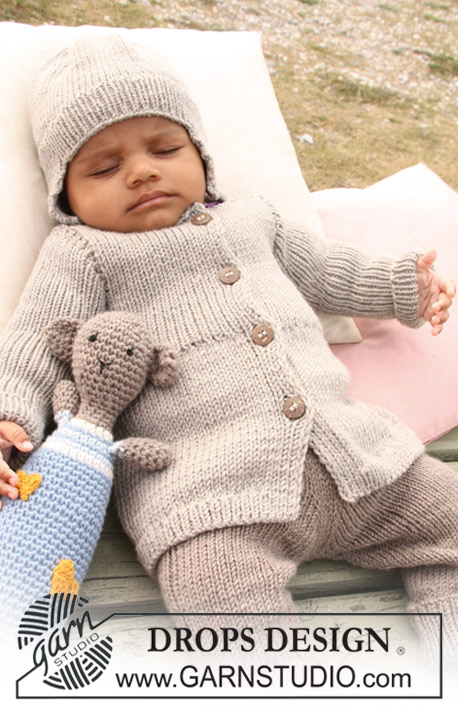
DROPS Baby 20-11 |
|
 |
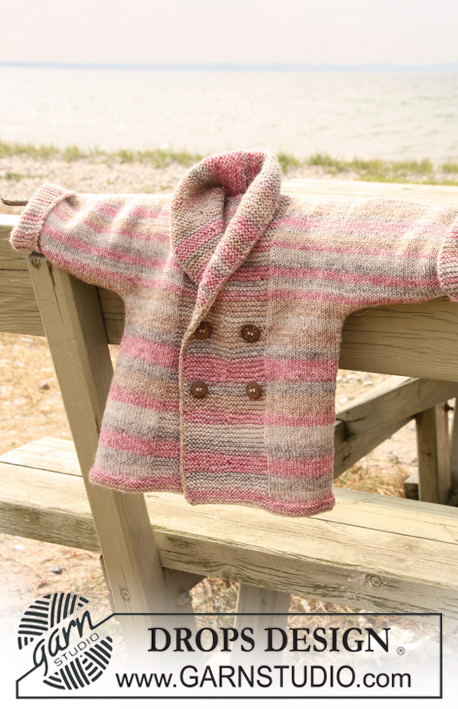 |
Knitted double breasted jacket with shawl collar for baby and children in DROPS Fabel
DROPS Baby 20-11 |
|
|
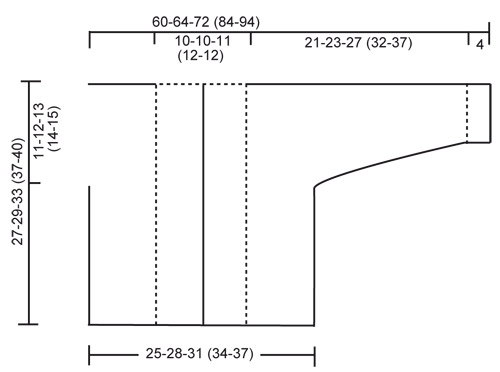
GARTER ST (back and forth on needle): K all rows. SHORTENED ROWS: * Work 2 rows back and forth over 24-24-26 (28-28) front band sts, work 2 rows over the first 12-12-13 (14-14) sts only*. NOTE: When turning in the middle of the work, - slip the first st , tighten the thread and knit back. This is done to avoid a hole in the transition. BUTTONHOLES: The Jacket is double breasted with 4 buttonholes on right front band. 1 BUTTONHOLE = K tog fourth and fifth sts from the edge and make 1 YO. On same row also K tog fourth and fifth LAST sts on front band and make 1 YO. Make 2 buttonholes when piece measures: SIZE 1/3 months: 10 and 14 cm. SIZE 6/9 months: 11 and 15 cm. SIZE 12/18 months: 14 and 18 cm. SIZE 2 years: 17 and 21 cm. SIZE 3/4 years: 19 and 23 cm. -------------------------------------------------------- JACKET: Worked back and forth on circular needle. Start with front piece, inc sts for sleeve and knit up to shoulder. Work the second front piece, put the 2 front pieces tog and knit down the back piece. LEFT FRONT PIECE: READ ALL OF THIS SECTION BEFORE CONTINUING! Cast on 43-47-51 (56-59) sts (includes 1 edge st at the side and 24-24-26 (28-28) front band sts towards front edge) on needle size 2.5 mm with Fabel. Work 6 rows garter st - see explanation above. Change to circular needle size 3 mm and work stocking st, but garter st 24-24-26 (28-28) front band sts towards front edge. When the piece measures 4 cm work SHORTENED ROWS - see above (Row 1 = from WS). Repeat from *-* 1 time every 4 cm until the piece measures 19-21-24 (27-30) cm, then repeat from *-* 1 time every 2 cm to finished measurement. AT THE SAME TIME when piece measures 16-17-20 (23-25) cm cast on new sts at the end of every rows from WS (towards the side for sleeve): 6 sts 2-2-3 (3-3) times, 8 sts 1-1-1 (2-3) times and 21-22-22 (25-26) sts 1 time = 84-89-99 (115-127) sts for shoulder/sleeve. Inc sts are worked in stocking st. When all sts are cast on continue with stocking st and garter sts as before AT THE SAME TIME as the last 10 sts on sleeve also are worked in garter sts. When the piece measures 27-29-33 (37-40) cm insert 1 marker = middle of shoulder. Now slip the 24-24-26 (28-28) front band sts onto a stitch holder. Next cast on 2 new sts at the end of the row from RS (towards neck), repeat the inc on next row towards neck = 64-69-77 (91-103) sts on needle. Work 1 row from WS. Put work aside. RIGHT FRONT PIECE: Cast on and work as left front piece but mirrored. In addition dec for BUTTONHOLES on front band - see above. NOTE! Slip sts onto a thread after the last inc row (i.e. last row = from WS). BACK PIECE: Work left front piece onto the circular needle, cast on 16-16-18 (20-20) new sts (= back of neck) and work right front piece onto circular needle = 144-154-172 (202-226) sts. NOW MEASURE PIECE FROM MARKERS ON SHOULDERS! Continue with stocking st and garter st at end of each sleeve back and forth on needle. When piece measures 8½-9½-10 (10-11) cm beg cast off sleeve sts. Cast off at beg of every row at each side as follows: 21-22-22 (25-26) sts 1 time, 8 sts 1-1-1 (2-3) times and 6 sts 2-2-3 (3-3) times = 62-70-76 (84-90) sts on needle. Work stocking st with 1 edge st each side. When piece measures approx 26-28-32 (36-39) cm – fold piece double at markers on shoulders and see if back piece is the same length as front piece down to garter sts. Change to needle size 2.5 mm and work 6 rows garter sts. Cast off. SHAWL COLLAR: Slip 24-24-26 (28-28) sts from thread on left front piece back on needle. Work garter sts and continue with shortened rows every 2 cm until collar measures 7-7-8 (9-9) cm (measured where shortest). Cast off. Repeat with sts on thread on right front piece. ASSEMBLY: Sew sleeve and side seams inside 1 edge st. Sew on buttons of left front piece. Sew collar tog at back and sew collar to neckline. CROCHET BORDER: Crochet an edge along front band, along the edge of collar and down along front band on other side. Start at bottom of right front piece and crochet with crochet hook size 2 mm as follows: crochet 1 dc, * 1 ch, skip over approx ½ cm, 1 dc in next sts *, repeat from *-*. |
|
 |
|
Have you finished this pattern?Tag your pictures with #dropspattern or submit them to the #dropsfan gallery. Do you need help with this pattern?You'll find 11 tutorial videos, a Comments/Questions area and more by visiting the pattern on garnstudio.com. © 1982-2026 DROPS Design A/S. We reserve all rights. This document, including all its sub-sections, has copyrights. Read more about what you can do with our patterns at the bottom of each pattern on our site. |
|


With over 40 years in knitting and crochet design, DROPS Design offers one of the most extensive collections of free patterns on the internet - translated to 17 languages. As of today we count 324 catalogues and 12290 patterns translated into English (UK/cm). 12290
We work hard to bring you the best knitting and crochet have to offer, inspiration and advice as well as great quality yarns at incredible prices! Would you like to use our patterns for other than personal use? You can read what you are allowed to do in the Copyright text at the bottom of all our patterns. Happy crafting!
Post a comment to pattern DROPS Baby 20-11
We would love to hear what you have to say about this pattern!
If you want to leave a question, please make sure you select the correct category in the form below, to speed up the answering process. Required fields are marked *.