
Popular categories
Looking for a yarn?


Comments / Questions (49)
![]() Syeda Zarmeen Tahir wrote:
Syeda Zarmeen Tahir wrote:
After completing M3 one time, if we don't get the desired length according to the size which is 40 cm in my case, does it mean that we have to continue repeating M3 over M3 until that particular length is obtained?
07.07.2024 - 11:20DROPS Design answered:
Dear Syeda, M.3 is repeated until you reach the desired final measurements. If you are working the 4th size, this means repeating M.3 until you reach the 64cm mark (you can see that in the last row you decrease over the M.3 stitches, so you continue working M.3 up til then). Happy knitting!
07.07.2024 - 23:00
![]() Ida Jambrich wrote:
Ida Jambrich wrote:
Itt szerepel a nagy K betű.1 szélszem lustakötéssel - lásd a fenti magyarázatot- 14-17-20-23-26-29,S. *2 F, a köv 2 szem mindegyikébe 2 szemet kötünk (= 4 S), 1 S, A köv 2 szem mindegyikébe 2 szemet kötünk (= 4 S). * 36-38-40-42-44-46 S. Ism a *-* közötti részt, K 14-17-20-23-26-29 S, és 1 lustakötéses szélszem = 84-92-100-108-116-124 szem. Váltsunk az 5 mm-es körkötőtűre, és a következő módon folytassuk a FO felől:
31.03.2024 - 09:22DROPS Design answered:
Kedves Ida, köszönöm a pontosítást, a K szerkesztési hiba, (sima szemet jelent, de ez magyarul is szerepel), a leírást javítottam. Sikeres kézimunkázást!
31.03.2024 - 10:14
![]() Ida Jambrich wrote:
Ida Jambrich wrote:
Azt szeretném tudni, hogy mit jelent a K betű? A választ előre köszönöm!
29.03.2024 - 21:41DROPS Design answered:
Kedves Ida, kérem segítsen annyival, hogy kicsit közelebbről megjelöli, hogy a minta melyik részében, hol szerepel az a K betű, aminek a jelentésére kíváncsi. Köszönöm.
30.03.2024 - 00:38
![]() Lillan I Bradley wrote:
Lillan I Bradley wrote:
Hello, I'm unable to start knitting on the right side. The pattern state to do it "mirrored" from the left side. Would you please write down how to knit the FIRST ROW (with needle change) after the three knit rows for the right side. Thank you very much for your assistance. Lillan
03.03.2024 - 07:49DROPS Design answered:
Dear Lillan, mirrored means that the shaping should be done inversed to the other front piece. For example, if, looking from the right side, the decreases for the neck were on the left side and the armholes on the right side, then on the right front piece the neck decreases should be on the right side and the armholes on the left side of the piece. In the row you indicated, the band stitches should be on the opposite side to the left front piece so you work as follows: 5 band stitches in garter stitch, K 18-19-20-21-22-23 sts, K2 in each of the next 2 sts, K1, K2 in each of the next 2 sts, K 14-17-20-23-26-29 sts, 1 edge st in garter st. Happy knitting!
04.03.2024 - 00:04
![]() FRANÇOISE DELANGLE wrote:
FRANÇOISE DELANGLE wrote:
Bonjour, Vous dites "tricotez deux fois M1" mais M1 commence et se termine par des rangs identiques, donc on termine M1 par un rang envers et on le recommence par un rang endroit cela entraîne des torsades à faire à l'envers au 2ème rang? Merci
06.11.2022 - 16:44DROPS Design answered:
Bonjour Mme Delangle, effectivement, cette information va être transférée à nos stylistes - répétez M.1 à partir du 2ème rang pour que les torsades soient toujours sur l'endroit. Bon tricot!
07.11.2022 - 09:23
![]() Annika wrote:
Annika wrote:
Welche Art von Nadeln eignet sich am Besten zum Stricken dieser Weste?
15.09.2022 - 19:33DROPS Design answered:
Liebe Annika, wir haben Paarnadeln benutzt, aber Sie können auch hin- und zurück mit Rundnadeln stricken, solange daß Ihre Maschenprobe stimmt. Viel Spaß beim stricken!
16.09.2022 - 09:26
![]() Lisbeth wrote:
Lisbeth wrote:
Hvorfor kommer diagrammet ikke med når jeg vil udskrive opskriften??
05.12.2021 - 11:28DROPS Design answered:
Heri Lisbeth. Husk å trykk på ikonet: Skriv ut (ikke ctrl+P). Om ikke det hjelper, må du sjekke utskriftsinnstillingene på din PC/Mobil/nettbrett. Vi har ingen problem med å få ut diagrammet. mvh DROPS Design
07.12.2021 - 14:13
![]() Emma wrote:
Emma wrote:
I am confused regarding the last 2 symbols in the key. The last 2 symbols do not mirror each other and that has confused me. (Slip one stitch on cable behind, K2, K2 in stitch on cable needle Slip 2 stitches on cable infront, K2 in next stitch and K2 from cable) With the symbol covering 3 boxes, the pattern should reflect 3 stitches, but the last symbol in the key reads as though there are 4 stitches. Does this mean I need to add a stitch somewhere when doing this part of M2 ?
21.11.2021 - 20:22DROPS Design answered:
Dear Emma, on these 2 symbols you will increase 1 stitch, ie on next to last: K2 in st on cable needle = you work 2 sts in the stitch slipped on the cable needle; on the last: K2 in next st you will work 2 sts in the stitch after the 2 slipped on the cable needle, so that these both cables are worked over 3 sts increased to 4. Happy knitting!
22.11.2021 - 08:34
![]() Monika Fuchs wrote:
Monika Fuchs wrote:
Hallo, beim Rücken habe ich 2x M1 gestrickt und soll anschließend 'M2 über M1 stricken'. Soll ich M1 dann ein drittes Mal stricken oder einfach M2 über mein 2x M1 gestricktes Stück? Vielen Dank für die Unterstützung!
01.08.2021 - 22:50DROPS Design answered:
Liebe Frau Fuchs, jetzt stricken Sie M.2 über die M.1, die Sie schon 2 Mal in der Höhe gestrickt haben. Viel Spaß beim stricken!
02.08.2021 - 07:42
![]() Carine wrote:
Carine wrote:
Bonjour, superbe modèle. J'en suis aux emmanchures du dos, et je n'ai pas bien compris: " 4rangs point mousse sur les 9 premières mailles de chaque côté puis rabattre.. " Il faut bien tricoter toute la largeur du tricot en poursuivant le motif ? Et ensuite les dimensions se font tous les 1/2 (que sur l'endroit)/4 rangs ? Merci d'avance pour votre réponse. Cordialement
25.01.2021 - 21:39DROPS Design answered:
Bonjour Carine, vous tricotez les 4 rangs suivants comme avant sauf les 4 mailles de chaque côté qui vont être tricotées au point mousse pour former ainsi 2 côtes mousse et une petite bordure d'emmanchure. Vous rabattrez ensuite 6 de ces 9 mailles, et vous continuerez avec 3 m point mousse de chaque côté en diminuant pour les emmanchures après ces 3 premières mailles et avant ces 3 premières mailles tous les rangs sur l'endroit. Bon tricot!
26.01.2021 - 08:50
|
|||||||||||||||||||||||||
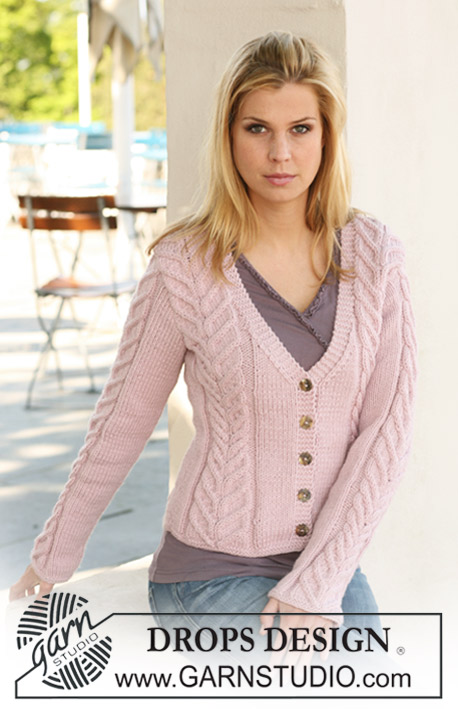
Lady Love Vest |
|||||||||||||||||||||||||
|
|
|||||||||||||||||||||||||
Knitted DROPS waistcoat in ”Nepal” with cables. Size S to XXXL.
DROPS 123-10 |
|||||||||||||||||||||||||
|
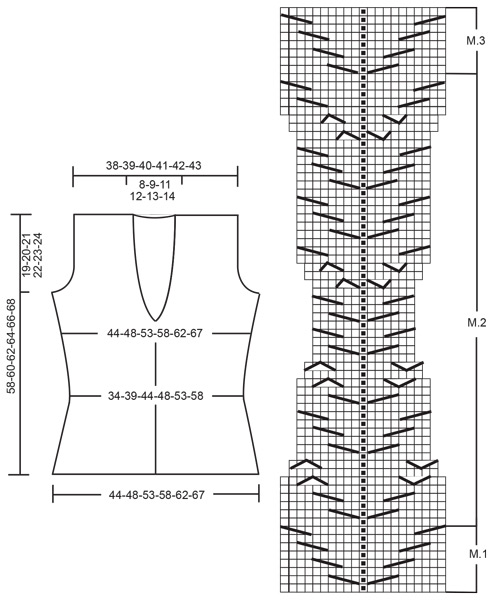
GARTER ST (back and forth on needle): K all rows. PATTERN: See diagrams M.1, M.2 and M.3 - pattern in diagram is shown from RS (Row 1 = WS). DECREASING TIP (applies to armhole and neck): Dec from RS inside 3 garter sts towards armhole and 5 sts garter st towards neck. Dec as follows AFTER 3/5 sts: slip 1 st as if to K, K1, psso. Dec as follows BEFORE 3/5 sts: K2 tog. BUTTONHOLES: Make buttonholes on right front band. 1 buttonhole = K tog 3rd and 4th st from mid front and make 1 YO. Make buttonholes when piece measures: SIZE S: 3, 10, 16, 22 and 28 cm. SIZE M: 3, 10, 16, 23 and 29 cm. SIZE L: 3, 10, 17, 23 and 30 cm. SIZE XL: 4, 11, 18, 24 and 31 cm. SIZE XXL: 4, 11, 18, 25 and 32 cm. SIZE XXXL: 4, 11, 19, 26 and 33 cm. -------------------------------------------------------- BACK PIECE: Worked back and forth on needle. Cast on 76-84-92-100-108-116 sts (includes 1 edge st each side) on needle size 4 mm with Nepal. K 3 rows. Work next row as follows (from RS): 1 edge st in garter st, K 14-17-20-23-26-29 sts, * K2 in each of the next 2 sts, K1, K2 in each of the next 2 sts *, K 36-38-40-42-44-46 sts, repeat from *-*, K 14-17-20-23-26-29 sts and 1 edge st in garter st = 84-92-100-108-116-124 sts. Change to needle size 5 mm, and work next row as follows from WS: 1 edge st in garter st, P 5-8-11-14-17-20 sts, K3, M.1 (= 21 sts), K3, P 18-20-22-24-26-28 sts, K3, M.1 (= 21 sts), K3, P 5-8-11-14-17-20 sts and 1 edge st in garter st. Work 2 vertical repeats of M.1, remaining sts with K over K and P over P. After M.1 work M.2 with dec and inc as shown in diagram (work remaining sts as before). REMEMBER THE KNITTING TENSION! After M.2 there are 84-92-100-108-116-124 sts on needle. Continue in M.3 over M.2 until finished measurements (work remaining sts as before). When piece measures 37-38-39-40-41-42 cm work 4 rows garter st on 7-8-9-10-11-12 sts each side (includes edge st), then cast off the first 4-5-6-7-8-9 sts each side for armhole. Cast off to shape the armhole – SEE DECREASING TIP – 1 st 2-4-6-8-10-12 times = 72-74-76-78-80-82 sts on needle. Continue in pattern as before with 3 garter sts each side towards armhole. When piece measures 55-57-59-61-63-65 cm work 4 rows garter st on the middle 24-26-28-30-32-34 sts, then cast off the middle 14-16-18-20-22-24 sts for neck and complete each shoulder (= 29 sts) separately. Continue with 5 garter sts towards neck. When piece measures approx 58-60-62-64-66-68 cm dec 4 sts evenly over M.3 = 25 sts left on needle. On next row cast off with K over K and P over P. LEFT FRONT PIECE: Cast on 43-47-51-55-59-63 sts (includes 1 edge st at the side and 5 front band sts towards front edge) on needle size 4 mm with Nepal. K 3 rows. Work next row as follows (from RS with start from the side): 1 edge st in garter st, K 14-17-20-23-26-29 sts, K2 in each of the next 2 sts, K1, K2 in each of the next 2 sts, K 18-19-20-21-22-23 sts and 5 front band sts in garter st = 47-51-55-59-63-67 sts. Change to needle size 5 mm, work next row as follows from WS: 5 front band sts in garter st, P 9-10-11-12-13-14 sts, K3, M.1 (= 21 sts), K3, P 5-8-11-14-17-20 sts and 1 edge st in garter st. Work 2 vertical repeats of M.1, remaining sts with K over K and P over P. Then work M.2 over M.1 (with remaining sts as before). After M.2 there are 47-51-55-59-63-67 sts on needle, Continue with M.3 over M.2 until finished measurements (with remaining sts as before). AT THE SAME TIME when piece measures 30-31-32-33-34-35 cm work 2 rows back and forth on the 5 front band sts only. Continue on all sts as before – AT THE SAME TIME on next row from RS dec 1 st towards neck – SEE DECREASING TIP, and repeat the dec on every other row a total of 7-8-9-10-11-12 times and then on every 4th row 5 times for all sizes. AT THE SAME TIME when piece measures 37-38-39-40-41-42 cm work 4 rows garter st on the 7-8-9-10-11-12 sts towards the side, work remaining sts as before. On next row cast off 4-5-6-7-8-9 sts at the side for armhole and cast off to shape the armhole as described or back piece. When all dec for armhole and neck are complete there are 29 sts on needle. Continue in pattern with 3 garter sts towards armhole and 5 garter sts towards neck When piece measures approx 58-60-62-64-66-68 cm dec 4 sts evenly over M.3 = 25 sts left on needle. On next row cast off with K over K and P over P. RIGHT FRONT PIECE: Like left front piece but mirrored. Remember BUTTONHOLES on front band – see above. ASSEMBLY: Sew side seams inside 1 edge st and sew shoulder seams. Sew on buttons. |
|||||||||||||||||||||||||
Diagram explanations |
|||||||||||||||||||||||||
|
|||||||||||||||||||||||||
 |
|||||||||||||||||||||||||
Have you finished this pattern?Tag your pictures with #dropspattern or submit them to the #dropsfan gallery. Do you need help with this pattern?You'll find 16 tutorial videos, a Comments/Questions area and more by visiting the pattern on garnstudio.com. © 1982-2026 DROPS Design A/S. We reserve all rights. This document, including all its sub-sections, has copyrights. Read more about what you can do with our patterns at the bottom of each pattern on our site. |
|||||||||||||||||||||||||


With over 40 years in knitting and crochet design, DROPS Design offers one of the most extensive collections of free patterns on the internet - translated to 17 languages. As of today we count 324 catalogues and 12290 patterns translated into English (UK/cm). 12290
We work hard to bring you the best knitting and crochet have to offer, inspiration and advice as well as great quality yarns at incredible prices! Would you like to use our patterns for other than personal use? You can read what you are allowed to do in the Copyright text at the bottom of all our patterns. Happy crafting!
Post a comment to pattern DROPS 123-10
We would love to hear what you have to say about this pattern!
If you want to leave a question, please make sure you select the correct category in the form below, to speed up the answering process. Required fields are marked *.