
Popular categories
Looking for a yarn?


Comments / Questions (46)
![]() Eugenie Enes-Schaub wrote:
Eugenie Enes-Schaub wrote:
Vielen Dank für die Antwort. Ich werde es testen.
07.04.2025 - 13:30
![]() Eugenie Enes-Schaub wrote:
Eugenie Enes-Schaub wrote:
Wie stricke ich 2 Reihen über die 5 Blendenmaschen?
04.04.2025 - 19:02DROPS Design answered:
Liebe Frau Ines-Schaub, beim linken Vorderteil stricken Sie die ersten 5 Maschen bei einer Rückreihe, wenden Sie, ohne die restlichen Maschen zu stricken (verkürzte Reihe), und diese 5 Maschen stricken Sie (Hinreihe). Wenden Sie und jetzt stricken Sie alle Maschen wie zuvor. Beim rechten Vorderteil beginnen Sie mit einer Hinreihe. Viel Spaß beim Stricken!
07.04.2025 - 07:35
![]() Lorraine Partridge wrote:
Lorraine Partridge wrote:
I had the pleasure of replicating this pattern for a colleague. It turned out absolutely beautiful. Thank you for sharing this beautiful pattern! I can share a picture if you like.
14.03.2025 - 05:44
![]() Jadwiga wrote:
Jadwiga wrote:
Proszę o objaśnienie opisu tyłu robótki Co to znaczy? ., *przer. 2 razy na prawo każde z 2 nast. o., 1 o.p., przer. 2 razy na prawo każde z 2 nast. o.*, 36-38-40-42-44-46 o.p., powt. od *-*, 14-17-20-23-26-29 o.p. i 1 o. brzeg. ściegiem francuskim = 84-92-100-108-116-124 o. Dziękuję
15.01.2025 - 19:30DROPS Design answered:
Witaj Jadwigo, który rozmiar wykonujesz?
16.01.2025 - 13:23
![]() Jadwiga wrote:
Jadwiga wrote:
Proszę o objaśnienie opisu tyłu robótki Dziękuję
15.01.2025 - 17:46DROPS Design answered:
Witaj Jadwigo, proszę, abyś bardziej precyzyjnie wyjaśniła jaki jest problem z tyłem swetra. Pozdrawiam!
16.01.2025 - 13:19
![]() Jadwiga Witek wrote:
Jadwiga Witek wrote:
Ile włóczki dla rozmiaru XL?
13.01.2025 - 20:05DROPS Design answered:
Witaj Jadwigo, rozmiary: S - M - L - XL - XXL - XXXL, materiał: DROPS NEPAL od Garnstudio, 350-400-450-500-550-600 g kolor nr 3112, pudrowy róż. XL to rozmiar 4-ty, więc wybierasz 4-tą cyfrę jeżeli chodzi o ilość włóczki, tj. 500 g. Nepal ma motki 50 g, więc potrzebujesz 10 motków tej włóczki. Pozdrawiamy!
14.01.2025 - 08:38
![]() DOMINGUES wrote:
DOMINGUES wrote:
Combien de pelotes faut-il prévoir pour ce modèle ?
31.12.2024 - 08:46DROPS Design answered:
Bonjour Mme Domingues, vous trouverez la quantité requise pour chaque taille en haut de page, sous l'onglet "Explications", avec les tailles, la taille des aiguilles et l'échantillon. Autrement dit, il faut en taille S par exemple 350 g DROPS Nepal/50 g la pelote = 7 pelotes Nepal en taille S. Bon tricot!
02.01.2025 - 15:18
![]() Syeda Zarmeen Tahir wrote:
Syeda Zarmeen Tahir wrote:
After completing M3 one time, if we don't get the desired length according to the size which is 40 cm in my case, does it mean that we have to continue repeating M3 over M3 until that particular length is obtained?
07.07.2024 - 11:20DROPS Design answered:
Dear Syeda, M.3 is repeated until you reach the desired final measurements. If you are working the 4th size, this means repeating M.3 until you reach the 64cm mark (you can see that in the last row you decrease over the M.3 stitches, so you continue working M.3 up til then). Happy knitting!
07.07.2024 - 23:00
![]() Ida Jambrich wrote:
Ida Jambrich wrote:
Itt szerepel a nagy K betű.1 szélszem lustakötéssel - lásd a fenti magyarázatot- 14-17-20-23-26-29,S. *2 F, a köv 2 szem mindegyikébe 2 szemet kötünk (= 4 S), 1 S, A köv 2 szem mindegyikébe 2 szemet kötünk (= 4 S). * 36-38-40-42-44-46 S. Ism a *-* közötti részt, K 14-17-20-23-26-29 S, és 1 lustakötéses szélszem = 84-92-100-108-116-124 szem. Váltsunk az 5 mm-es körkötőtűre, és a következő módon folytassuk a FO felől:
31.03.2024 - 09:22DROPS Design answered:
Kedves Ida, köszönöm a pontosítást, a K szerkesztési hiba, (sima szemet jelent, de ez magyarul is szerepel), a leírást javítottam. Sikeres kézimunkázást!
31.03.2024 - 10:14
![]() Ida Jambrich wrote:
Ida Jambrich wrote:
Azt szeretném tudni, hogy mit jelent a K betű? A választ előre köszönöm!
29.03.2024 - 21:41DROPS Design answered:
Kedves Ida, kérem segítsen annyival, hogy kicsit közelebbről megjelöli, hogy a minta melyik részében, hol szerepel az a K betű, aminek a jelentésére kíváncsi. Köszönöm.
30.03.2024 - 00:38
|
|||||||||||||||||||||||||
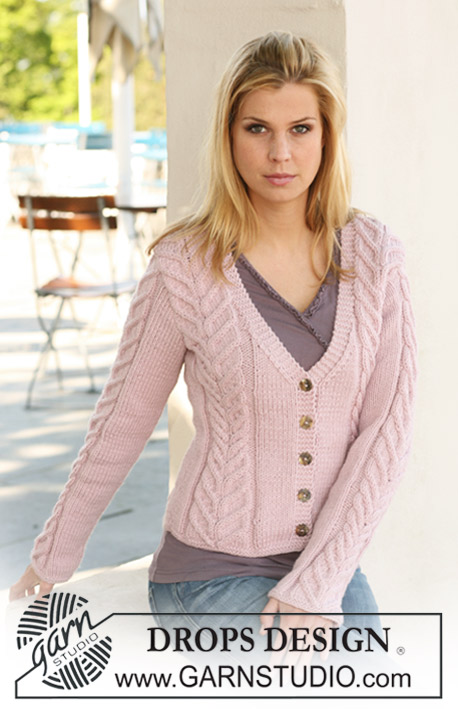
Lady Love Vest |
|||||||||||||||||||||||||
|
|
|||||||||||||||||||||||||
Knitted DROPS waistcoat in ”Nepal” with cables. Size S to XXXL.
DROPS 123-10 |
|||||||||||||||||||||||||
|
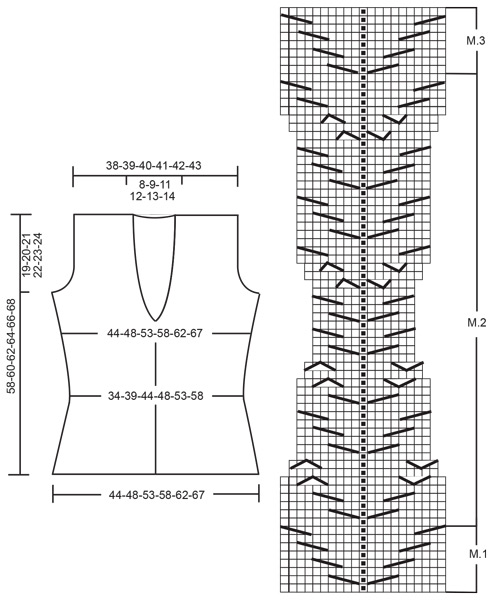
GARTER ST (back and forth on needle): K all rows. PATTERN: See diagrams M.1, M.2 and M.3 - pattern in diagram is shown from RS (Row 1 = WS). DECREASING TIP (applies to armhole and neck): Dec from RS inside 3 garter sts towards armhole and 5 sts garter st towards neck. Dec as follows AFTER 3/5 sts: slip 1 st as if to K, K1, psso. Dec as follows BEFORE 3/5 sts: K2 tog. BUTTONHOLES: Make buttonholes on right front band. 1 buttonhole = K tog 3rd and 4th st from mid front and make 1 YO. Make buttonholes when piece measures: SIZE S: 3, 10, 16, 22 and 28 cm. SIZE M: 3, 10, 16, 23 and 29 cm. SIZE L: 3, 10, 17, 23 and 30 cm. SIZE XL: 4, 11, 18, 24 and 31 cm. SIZE XXL: 4, 11, 18, 25 and 32 cm. SIZE XXXL: 4, 11, 19, 26 and 33 cm. -------------------------------------------------------- BACK PIECE: Worked back and forth on needle. Cast on 76-84-92-100-108-116 sts (includes 1 edge st each side) on needle size 4 mm with Nepal. K 3 rows. Work next row as follows (from RS): 1 edge st in garter st, K 14-17-20-23-26-29 sts, * K2 in each of the next 2 sts, K1, K2 in each of the next 2 sts *, K 36-38-40-42-44-46 sts, repeat from *-*, K 14-17-20-23-26-29 sts and 1 edge st in garter st = 84-92-100-108-116-124 sts. Change to needle size 5 mm, and work next row as follows from WS: 1 edge st in garter st, P 5-8-11-14-17-20 sts, K3, M.1 (= 21 sts), K3, P 18-20-22-24-26-28 sts, K3, M.1 (= 21 sts), K3, P 5-8-11-14-17-20 sts and 1 edge st in garter st. Work 2 vertical repeats of M.1, remaining sts with K over K and P over P. After M.1 work M.2 with dec and inc as shown in diagram (work remaining sts as before). REMEMBER THE KNITTING TENSION! After M.2 there are 84-92-100-108-116-124 sts on needle. Continue in M.3 over M.2 until finished measurements (work remaining sts as before). When piece measures 37-38-39-40-41-42 cm work 4 rows garter st on 7-8-9-10-11-12 sts each side (includes edge st), then cast off the first 4-5-6-7-8-9 sts each side for armhole. Cast off to shape the armhole – SEE DECREASING TIP – 1 st 2-4-6-8-10-12 times = 72-74-76-78-80-82 sts on needle. Continue in pattern as before with 3 garter sts each side towards armhole. When piece measures 55-57-59-61-63-65 cm work 4 rows garter st on the middle 24-26-28-30-32-34 sts, then cast off the middle 14-16-18-20-22-24 sts for neck and complete each shoulder (= 29 sts) separately. Continue with 5 garter sts towards neck. When piece measures approx 58-60-62-64-66-68 cm dec 4 sts evenly over M.3 = 25 sts left on needle. On next row cast off with K over K and P over P. LEFT FRONT PIECE: Cast on 43-47-51-55-59-63 sts (includes 1 edge st at the side and 5 front band sts towards front edge) on needle size 4 mm with Nepal. K 3 rows. Work next row as follows (from RS with start from the side): 1 edge st in garter st, K 14-17-20-23-26-29 sts, K2 in each of the next 2 sts, K1, K2 in each of the next 2 sts, K 18-19-20-21-22-23 sts and 5 front band sts in garter st = 47-51-55-59-63-67 sts. Change to needle size 5 mm, work next row as follows from WS: 5 front band sts in garter st, P 9-10-11-12-13-14 sts, K3, M.1 (= 21 sts), K3, P 5-8-11-14-17-20 sts and 1 edge st in garter st. Work 2 vertical repeats of M.1, remaining sts with K over K and P over P. Then work M.2 over M.1 (with remaining sts as before). After M.2 there are 47-51-55-59-63-67 sts on needle, Continue with M.3 over M.2 until finished measurements (with remaining sts as before). AT THE SAME TIME when piece measures 30-31-32-33-34-35 cm work 2 rows back and forth on the 5 front band sts only. Continue on all sts as before – AT THE SAME TIME on next row from RS dec 1 st towards neck – SEE DECREASING TIP, and repeat the dec on every other row a total of 7-8-9-10-11-12 times and then on every 4th row 5 times for all sizes. AT THE SAME TIME when piece measures 37-38-39-40-41-42 cm work 4 rows garter st on the 7-8-9-10-11-12 sts towards the side, work remaining sts as before. On next row cast off 4-5-6-7-8-9 sts at the side for armhole and cast off to shape the armhole as described or back piece. When all dec for armhole and neck are complete there are 29 sts on needle. Continue in pattern with 3 garter sts towards armhole and 5 garter sts towards neck When piece measures approx 58-60-62-64-66-68 cm dec 4 sts evenly over M.3 = 25 sts left on needle. On next row cast off with K over K and P over P. RIGHT FRONT PIECE: Like left front piece but mirrored. Remember BUTTONHOLES on front band – see above. ASSEMBLY: Sew side seams inside 1 edge st and sew shoulder seams. Sew on buttons. |
|||||||||||||||||||||||||
Diagram explanations |
|||||||||||||||||||||||||
|
|||||||||||||||||||||||||
|
|||||||||||||||||||||||||
Have you finished this pattern?Tag your pictures with #dropspattern or submit them to the #dropsfan gallery. Do you need help with this pattern?You'll find 16 tutorial videos, a Comments/Questions area and more by visiting the pattern on garnstudio.com. © 1982-2025 DROPS Design A/S. We reserve all rights. This document, including all its sub-sections, has copyrights. Read more about what you can do with our patterns at the bottom of each pattern on our site. |
|||||||||||||||||||||||||


With over 40 years in knitting and crochet design, DROPS Design offers one of the most extensive collections of free patterns on the internet - translated to 17 languages. As of today we count 314 catalogues and 11822 patterns translated into English (UK/cm).
We work hard to bring you the best knitting and crochet have to offer, inspiration and advice as well as great quality yarns at incredible prices! Would you like to use our patterns for other than personal use? You can read what you are allowed to do in the Copyright text at the bottom of all our patterns. Happy crafting!
Post a comment to pattern DROPS 123-10
We would love to hear what you have to say about this pattern!
If you want to leave a question, please make sure you select the correct category in the form below, to speed up the answering process. Required fields are marked *.