
Popular categories
Looking for a yarn?


Comments / Questions (74)
![]() Jacqueline wrote:
Jacqueline wrote:
Hallo, ben ik weer. Ik snap niets van het gedeelte over het maken van de armsgaten bij het minderen van de zijkanten. Kun je het simpeler uitleggen? Bij voorbaat dank, groetjes
10.11.2012 - 19:06DROPS Design answered:
Je hebt steken aan de zijkant. Bijvoorbeeld maat L: 13 st Je slaat nu direct de buitenste 5 st over en mindert dan 8 keer tot in totaal alle 13 steken geminderd zijn. Zo krijg je een schuin armsgat. Vergelijk met breien: kant in een keer 5 st af en dan nog een paar keer 1 st.
14.11.2012 - 20:09
![]() Jacqueline wrote:
Jacqueline wrote:
Hallo. Allereerst wat een prachtige patronen! Wat zijn de maattabellen voor de maten? Groetjes jacqueline
09.11.2012 - 13:36DROPS Design answered:
De maten zijn standaardmaten, maar kijk onderaan het patroon. Hier vind je een maattekening met alle afmetingen per maat in cm.
09.11.2012 - 16:40Maria wrote:
Hallo, I started to make this wonderfull vest following the instruction. I did all the work as far as paragraph labeled RIGHT SIDE PIECE. And now I realy do not know, what to do, how to continue... I read that paragraph and the other 2 many times, I used google translator and other dictionary, but it does not make me sense. Could you please send me some diagram how to continue? Or "rewrite" it by other words? Thank you very much :) Best wishes, Maria
26.10.2012 - 18:09DROPS Design answered:
Dear Maria, back piece is worked together with side-pieces for under armholes. So when you will be on "right side piece", the 5-5-8-14-21-25 sts each side are for armhole each side. Size S, you will have nothing to do. Other size will have to dec 1 st towards armhole (starting from outside = toward front piece). Then you will have to shape the armhole on the other side same way, but reversed. You will then continue crocheting back piece in the middle of this piece. Happy Crocheting !
14.11.2012 - 10:02
![]() Elke Caers wrote:
Elke Caers wrote:
Dag, Ben hieraan begonnen en zit vast met de halve vierkanten te haken. Kan er geen video van terugvinden. Kunnen jullie er misschien eentje maken??? Dikke merci
01.08.2012 - 16:21DROPS Design answered:
Hoi Elke. Ik heb gevraagd of we een video kunnen maken van deze, maar we kunnen helaas niet op korte termijn een video publiceren. Ik hoop dat je inmiddels verder bent gekomen of vraag bij je verkooppunt voor ondersteuning.
20.08.2012 - 15:29
![]() Nina Horni wrote:
Nina Horni wrote:
Har heklet den i brun,beige,rosa og grått og den er kjempefin.Enkel oppskrift som det var lett å forstå!
14.12.2010 - 21:03
![]() Vivianna wrote:
Vivianna wrote:
Deze vestje heb ik ook gehaakt,super super!!!!met het rokje er bij!Hartelijk dank!
12.11.2010 - 16:27
![]() Drops Design wrote:
Drops Design wrote:
Tror ikke at det kan forklares tydligere.... se også billedet bagpå. Her ser du at det højre stk (2.del det med knaphullerne) ligger ovenpå venstre stk (1.del). Men det er kun de 6 yderste masker mod midt bagpå som ligger ovenpå hinanden.
26.01.2010 - 09:43
![]() Pia Husted Olesen wrote:
Pia Husted Olesen wrote:
RYGSTK + SIDESTK: Sæt de 2 dele sammen, læg højre del over venstre så der bliver et overlap midt bagpå med 6 m – (dvs at der på 1.række hækles gennem 2 lag over disse 6 m) = 54-66-80-100-118-138 m. Fortsæt Mønsteret. Dette her forstår jeg simpelthen ikke, kan i hjælpe og evt tegne, hvad det er jeg skal gøre? Vh Pia
25.01.2010 - 19:55
![]() Irmgard wrote:
Irmgard wrote:
Ich hab diese Weste bereits 3x (für 3 Generationen) gehäkelt - kommt super an!
04.11.2009 - 21:50
![]() Drops Design wrote:
Drops Design wrote:
Er det indtagningen til ærmegabet du mener, så finder du forklaringen øverst på opskriften: INDTAGNINGSTIPS (gælder ærmegab): Tag ind således i slutningen af rækken: Hækl frem til der er 1 m tilbage, vend og hækl tilbage. Tag ind således i beg af rækken: Hækl 1 km i første m, hækl videre som før. Se også vore hæklevideoer her får du en mere udførlig instruktion.
19.10.2009 - 11:18
|
|
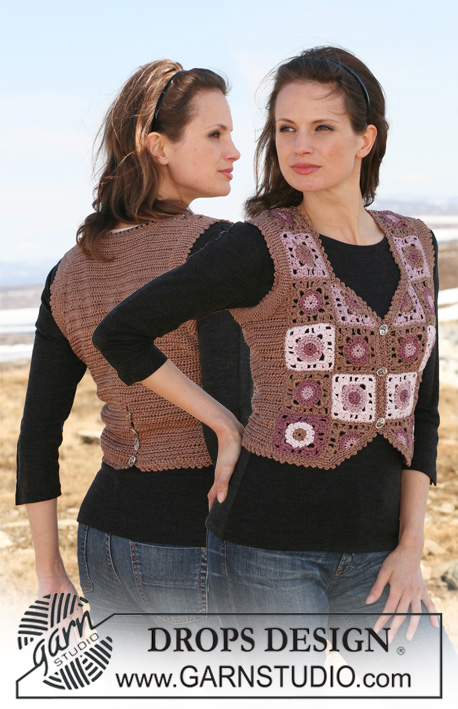
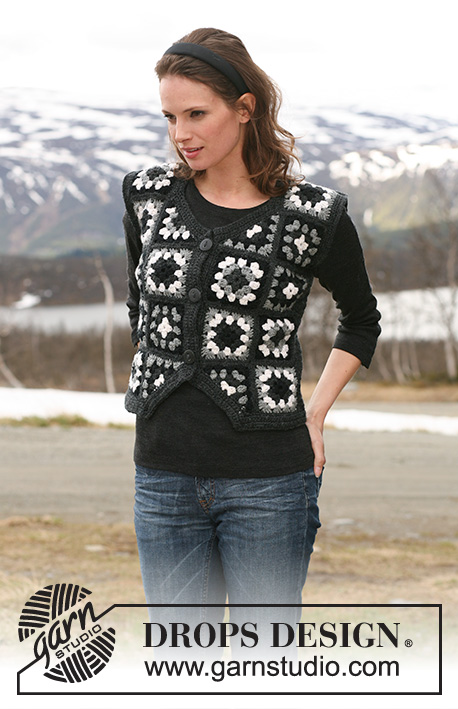
Licorice Squares Vest |
|
 |
 |
Crochet DROPS waistcoat in ”Karisma” with squares. Size S to XXXL.
DROPS 115-37 |
|
|
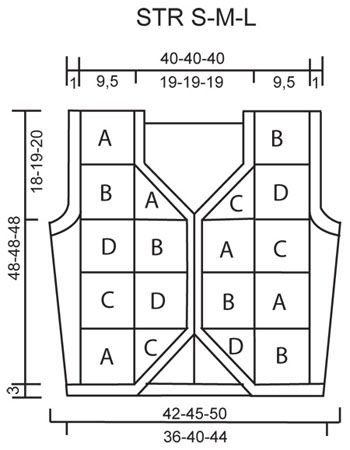
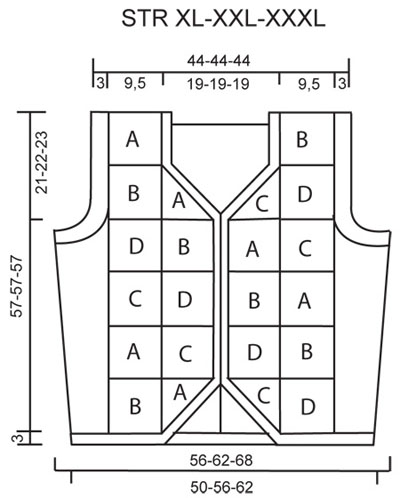
PATTERN: ROW 1: 1 tr in each dc, finish row with 1 ch to turn with. ROW 2: 1 dc in each tr, finish row with 3 ch to turn with. DECREASING TIP (armholes): Dec as follows at the end of row: work row until 1 st remain, turn piece and work return row. Dec as follows at beg of row: work 1 sl st in first st, continue as before. ---------------------------------------------------------- WAISTCOAT: Front piece crochet in squares. Back piece + side piece crochet in pattern rows. COLOURS OF SQUARES: SQUARE A: Beg + round 1 = charcoal grey, round 2 = grey, round 3 = white, round 4 = black, round 5 = charcoal grey. SQUARE B: Beg + round 1 = black, round 2 = charcoal grey, round 3 = white, round 4 = grey, round 5 = charcoal grey. SQUARE C: Beg + round 1 = white, round 2 = charcoal grey, round 3 = black, round 4 = grey, round 5 = charcoal grey. SQUARE D: Beg + round 1 = white, round 2 = charcoal grey, round 3 = grey, round 4 = black, round 5 = charcoal grey. WHOLE SQUARE: Crochet 6 ch with crochet hook size 4 mm and form a ring with 1 sl st in first ch. ROUND 1: 3 ch, 2 tr in ring, * 3 ch, 3 tr *, repeat from *-* a total of 3 times and finish with 3 ch and 1 sl st in 3rd ch from beg of round. Turn piece. ROUND 2: 3 ch, 2 tr in first ch-loop, 3 ch, 3 tr in the same ch-loop, * 1 ch, 3 tr in next ch-loop, 3 ch, 3 tr in the same ch-loop *, repeat from *-* a total of 3 times, finish with 1 ch and 1 sl st in 3rd ch from beg of round. Turn piece. ROUND 3: 3 ch, 2 tr in first ch-loop, 1 ch, * 3 tr in next ch-loop, 3 ch, 3 tr in the same ch-loop, 1 ch, 3 tr in next ch-loop, 1 ch *, repeat from *-* a total of 3 times, 3 tr in next ch-loop, 3 ch, 3 tr in the same ch-loop, 1 ch, finish with 1 sl st in 3rd ch from beg of round. Turn piece. ROUND 4: 3 ch, 2 tr in first ch-loop, 1 ch, * 3 tr in next ch-loop, 3 ch, 3 tr in the same ch-loop, 1 ch, 3 tr in next ch-loop, 1 ch, 3 tr in next ch-loop, 1 ch *, repeat from *-* a total of 3 times, 3 tr in next ch-loop, 3 ch, 3 tr in the same ch-loop, 1 ch, 3 tr in next ch-loop, 1 ch, finish with 1 sl st in 3rd ch from beg of round. Turn piece. ROUND 5: Crochet 1 dc in each tr and 1 dc in each ch, finish with 1 sl st in first dc. Square measures approx 9.5 x 9.5 cm. HALF SQUARE: Crochet 6 ch with crochet hook size 4 mm and form a ring with 1 sl st in first ch. ROW 1: 4 ch, 3 tr in ring, 3 ch, 3 tr in ring, 1 ch, 1 tr in ring. Turn piece. ROW 2: 4 ch, 3 tr in first ch from previous row, 1 ch, 3 tr in next ch-loop, 3 ch, 3 tr in the same ch-loop (= corner), 1 ch, 3 tr in last ch, 1 ch, 1 tr in the same ch. Turn piece. ROW 3: 4 ch, 3 tr in first ch from previous row, 1 ch, 3 tr in next ch, 1 ch, 3 tr in next ch-loop, 3 ch, 3 tr in the same ch-loop (= corner), 1 ch, 3 tr in next ch, 1 ch, 3 tr in last ch, 1 ch, 1 tr in the same ch. Turn piece. ROW 4: 4 ch, 3 tr in first ch from previous row, * 1 ch, 3 tr in next ch-loop *, repeat from *-* a total of 3 times, 3 ch, 3 tr in the same ch-loop, repeat from *-* a total of 3 times, 1 ch, 1 tr in the last ch. Turn piece. ROW 5: Crochet 1 dc in each tr and 1 dc in each ch. NUMBER OF SQUARES: SIZE S-M-L: Crochet 4 whole + 1 half square of A, 5 whole squares of B, 2 whole + 2 half squares of C and 3 whole + 1 half square of D = a total of 14 whole and 4 half squares. SIZE XL-XXL-XXXL: Crochet 4 whole + 2 half squares of A, 6 whole squares of B, 3 whole + 2 half squares of C and 5 whole squares of D = a total of 18 whole and 4 half squares. BACK PIECE + SIDE PIECE: Crochet the first 12 cm in 2 parts (for split mid back). PART-1 (= left side includes buttonhole band): Crochet 38-45-54-66-78-90 loose ch on crochet hook size 4.5 mm with charcoal grey. Crochet first row as follows: 1 dc in 2nd ch from hook, 1 dc in each of the next 1-3-2-4-1-3 ch, * skip 1 ch, 1 dc in each of the next 4 ch *, repeat from *-* = 30-36-43-53-62-72 dc. Continue in PATTERN – see above. REMEMBER THE CROCHET TENSION! When piece measures 12 cm put it aside. PART-2 (= right side includes buttonhole band): Crochet like part-1, but when piece measures approx 5 cm – adjust so that next row is a row with tr - make 1 buttonhole towards mid back by replacing the last but 2 tr towards mid back with 1 ch, on next row crochet 1 dc in ch. Repeat when piece measures 10 cm. Put piece aside when it measures 12 cm (adjust to no of rows on part-1. BACK PIECE + SIDE PIECE: Place part-1 and part-2 over each other (right side over left side) with 6 sts overlapping mid back – (i.e. 1 row crochet through 2 layers on these 6 sts) = 54-66-80-100-118-138 sts. Continue in pattern, AT THE SAME TIME on next row with tr inc 1 st each side by working 2 tr in the last but 1 tr each side. Repeat the inc on every other row a total of 9 times = 72-84-98-118-136-156 sts. When piece measures 30-29-28-36-35-34 cm cast off for armhole as follows: RIGHT SIDE PIECE: Continue in pattern as before on the 0-3-5-7-8-11 outermost sts at the side (the next 5-5-8-14-21-25 sts = armhole - in size S all sts on side piece = armhole). Now dec 1 st on every row towards armhole until all sts have been dec – SEE DECREASING TIP! LEFT SIDE PIECE: Like right side piece. BACK PIECE: Crochet back and forth on the middle 62-68-72-76-78-84 sts only, AT THE SAME TIME dec 1 st towards armhole each side on every row until 62 sts remain (for all sizes). When piece measures 46-46-46-55-55-55 cm crochet 2 rows on 16 sts each side only (the middle 30 sts = neckline). Cut the thread. ASSEMBLY: Sew squares tog to 2 front pieces as shown in chart – sew edge to edge with charcoal grey in outer loops of sts. Sew front pieces to back piece and sew shoulder seams in the same way. BORDER ARMHOLE: Crochet 2-2-2-5-5-5 rounds with dc round armholes with charcoal grey and crochet hook size 4.5 mm - approx 16 dc per 10 cm – make sure border is even, i.e. not too many dc. BORDER WAISTCOAT: Crochet a border round the whole waistcoat with charcoal grey on crochet hook size 4.5 mm. Beg at bottom of split on back piece, continue along bottom edge, up along right front piece, round neck, down along left front piece and along bottom edge to split mid back (i.e. do not crochet each side of split mid back) Crochet 5 rows back and forth with dc - approx 16 dc per 10 cm - NOTE: in all outward facing corners crochet 3 dc and in all inward facing corners skip 1 st. AT THE SAME TIME on row 2 (= WS) make 3-3-3-4-4-4 buttonholes on right front band. 1 BUTTONHOLE = 2 ch and skip 2 dc, on next row crochet 2 dc in each ch-loop. Make 1 buttonhole in each transition between the squares. Sew 2 buttons to split mid back and 3-3-3-4-4-4 buttons to left front band. |
|
 |
|
 |
|
Have you finished this pattern?Tag your pictures with #dropspattern or submit them to the #dropsfan gallery. Do you need help with this pattern?You'll find 11 tutorial videos, a Comments/Questions area and more by visiting the pattern on garnstudio.com. © 1982-2026 DROPS Design A/S. We reserve all rights. This document, including all its sub-sections, has copyrights. Read more about what you can do with our patterns at the bottom of each pattern on our site. |
|


With over 40 years in knitting and crochet design, DROPS Design offers one of the most extensive collections of free patterns on the internet - translated to 17 languages. As of today we count 324 catalogues and 12290 patterns translated into English (UK/cm). 12290
We work hard to bring you the best knitting and crochet have to offer, inspiration and advice as well as great quality yarns at incredible prices! Would you like to use our patterns for other than personal use? You can read what you are allowed to do in the Copyright text at the bottom of all our patterns. Happy crafting!
Post a comment to pattern DROPS 115-37
We would love to hear what you have to say about this pattern!
If you want to leave a question, please make sure you select the correct category in the form below, to speed up the answering process. Required fields are marked *.